Table of Contents
Integrations
Botbuz has integrated with various third-party applications that you are familiar with, including:
Wonder how to utilize these applications in your flow? Check detailed guides for each integration.
Stripe
With Stripe, you can accept payment from users via
- Card
- Alipay
- WeChat Pay
Setup Stripe
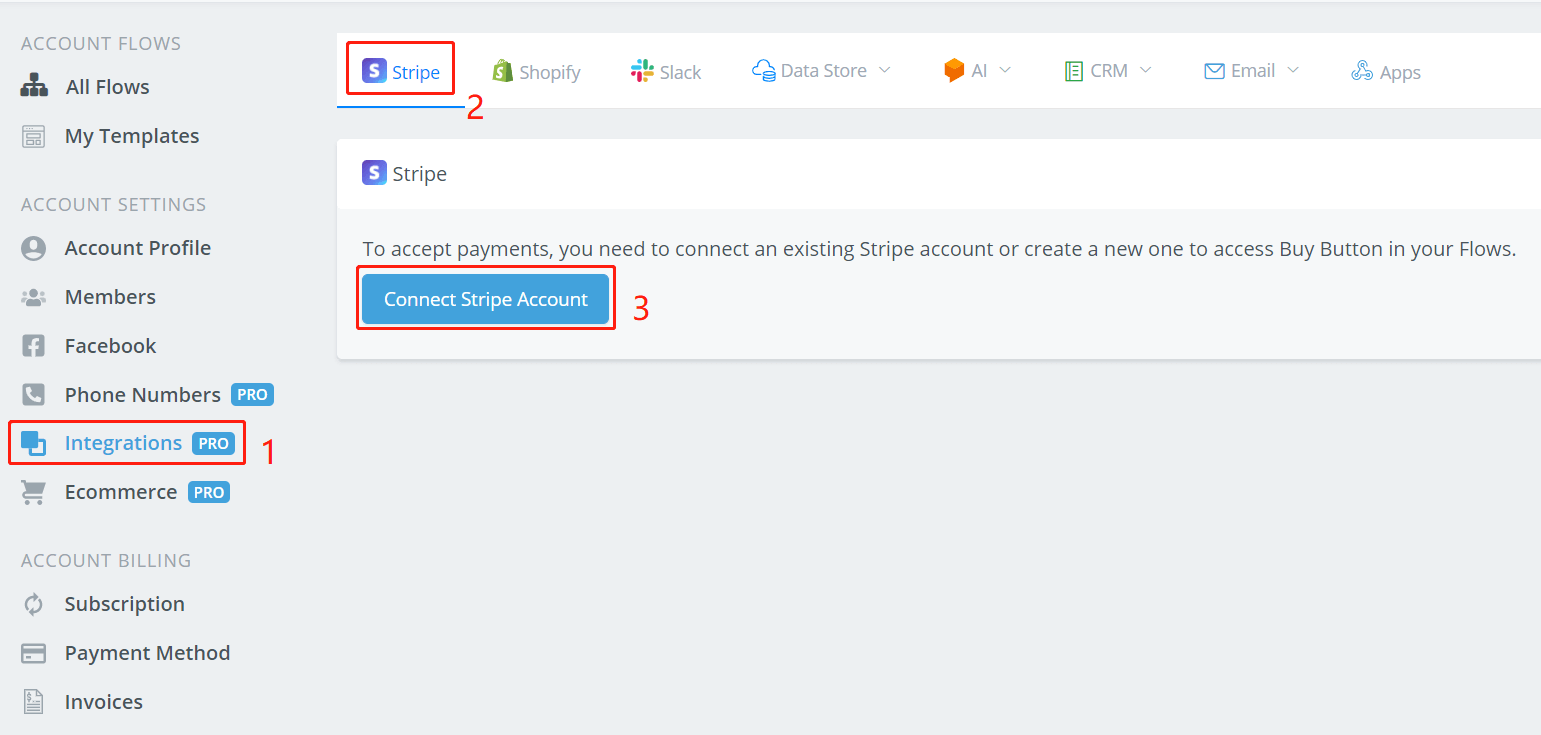
Click 1, 2 and 3 in order on your Botbuz dashboard.
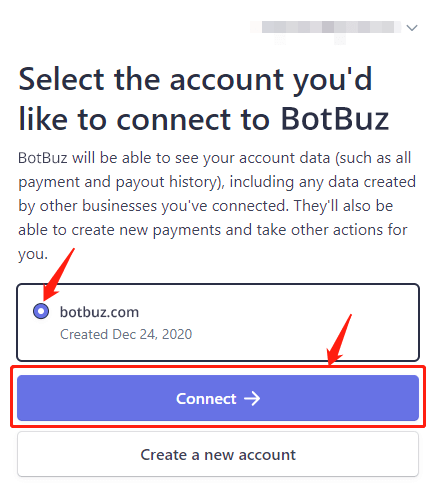
On Stripe's website, log in yourself, select the account you'd like to connect to (create an account if you don't have one yet). Then you will see this:

Click on the green button to change it from “Live Mode” to “Test Mode”.

When you are under the “Test Mode”, you can test the checkout process without paying a real bill. The checkout page will look like this:
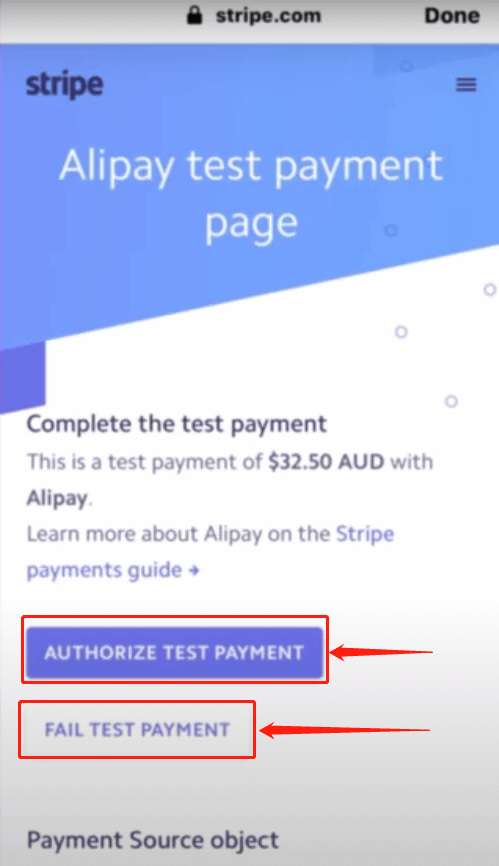
Press the “AUTHORIZE TEST PAYMENT” button to see what will happen when the payment is successful. Instead, pressing the “FAIL TEST PAYMENT” button is simulating the situation that the payment fails. When everything is tested perfectly, click the “Test Mode” again to flip back to the “Live Mode”, then you can receive real payment from users!
PayPal
You can now integrate your PayPal account into your workspace. To find your PayPal integration go from your main dashboard and select Integrations from the left-hand menu. Then select PayPal from the list
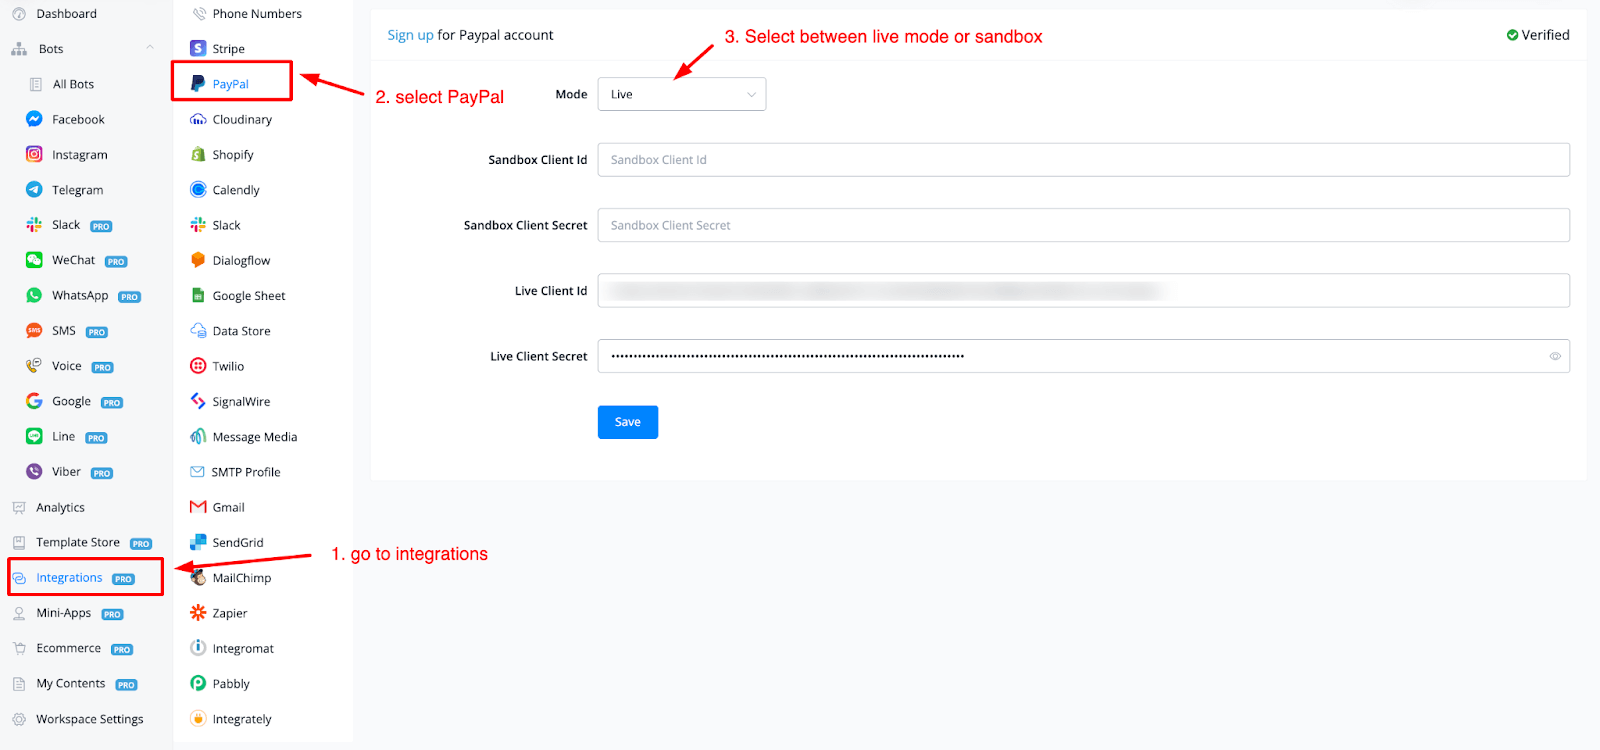
In step 3 you can select which mode you would like to be active. We have live mode and sandbox available for you.
Login to your PayPal developer account
To fetch your credentials login to your PayPal account and then head to your developer dashboard(opens new window)
You will get a similar overview like this;
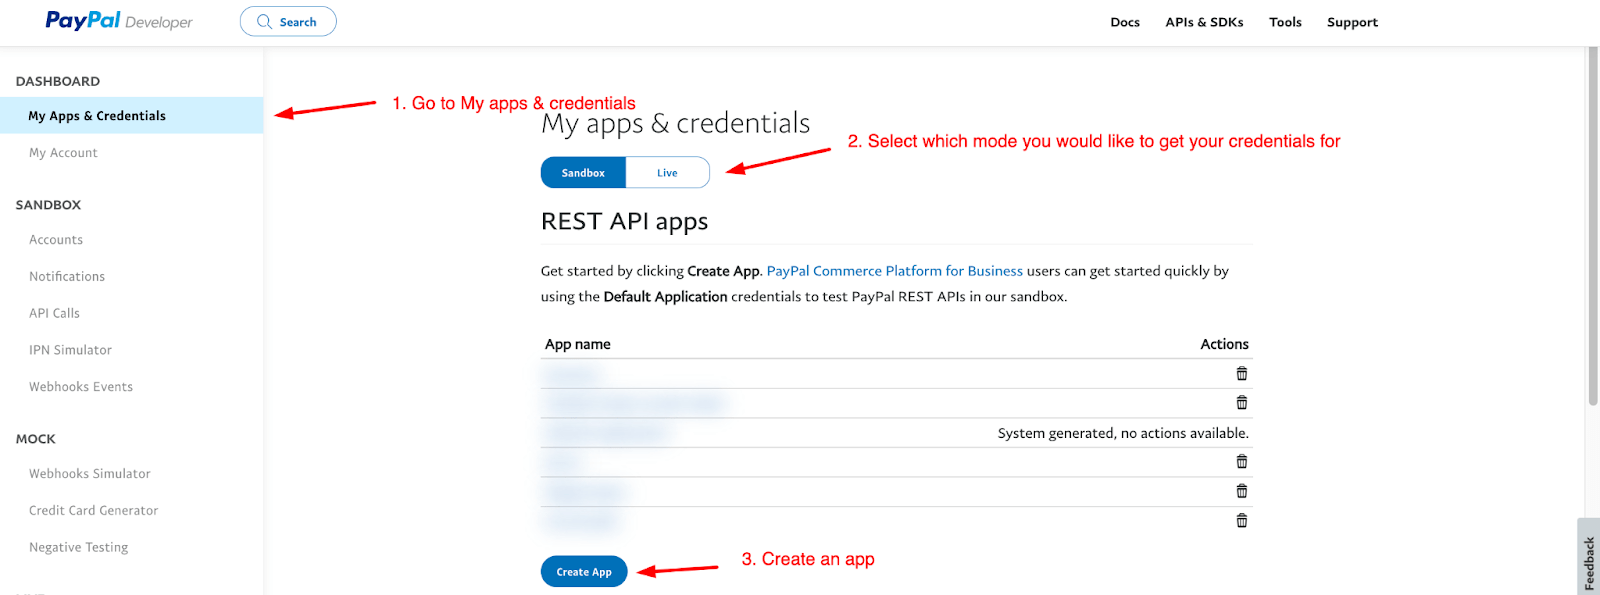
Be sure to select a mode first before creating an app to receive your credentials. Once pressed you will be taken to the page where you can create your app.
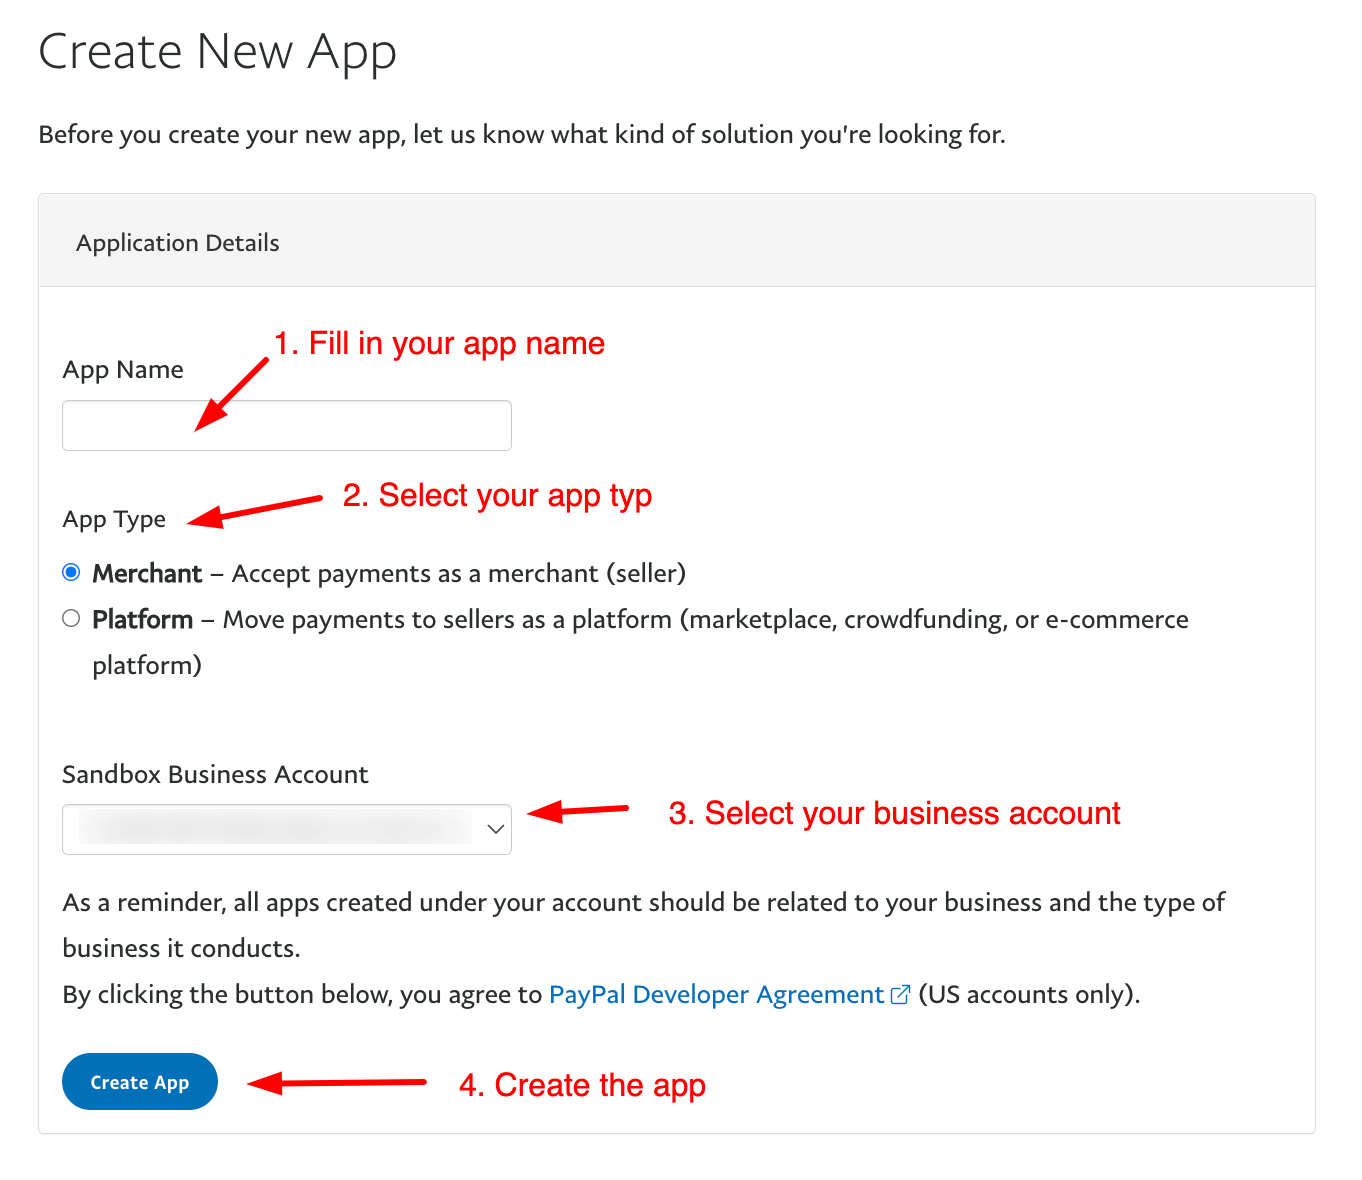
After you created the app you will be taken to the page where you can fetch the client id, the client secret key and paste those into your workspace integration settings for PayPal.
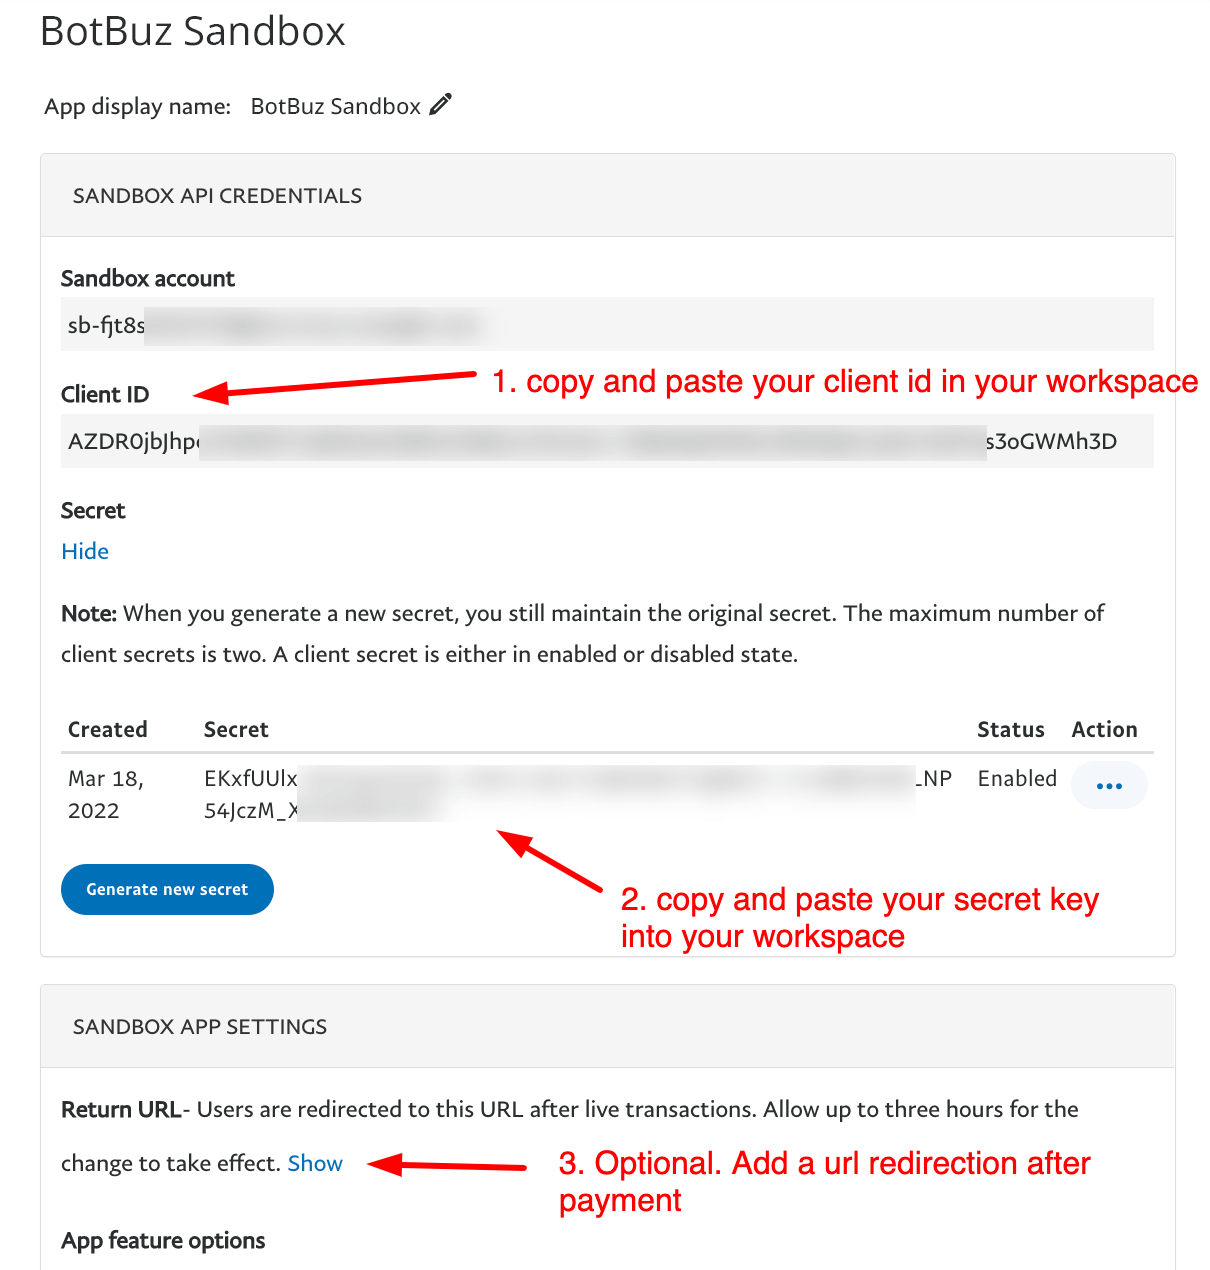
Optional could be to also add a redirection after payment. This allows you to point to a success flow inside your chatbot for example, or maybe a thank you page instead.
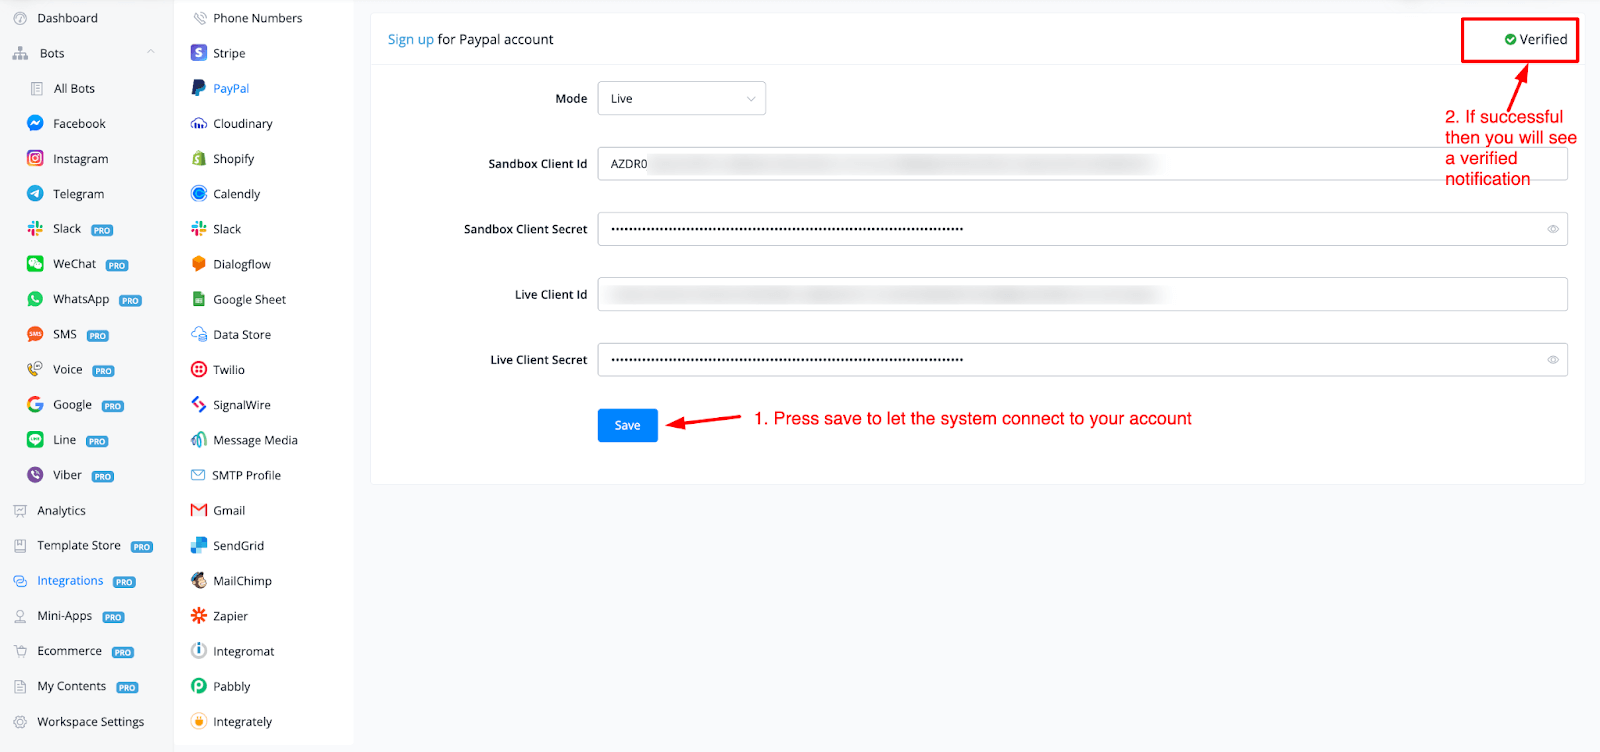
Insert your PayPal details
Once you copied and pasted all the details in your workspace integration section press save and you should see a verified notification popping up in the top right corner.
How to use PayPal in your bot
Soon as your account has been connected you will have two ways of using this in your chatbots. First thing you need to make sure you have set PayPal as a payment method inside your e-commerce store settings.
Setting your payment method
From your main Dashboard go to Ecommerce on the left-hand menu.
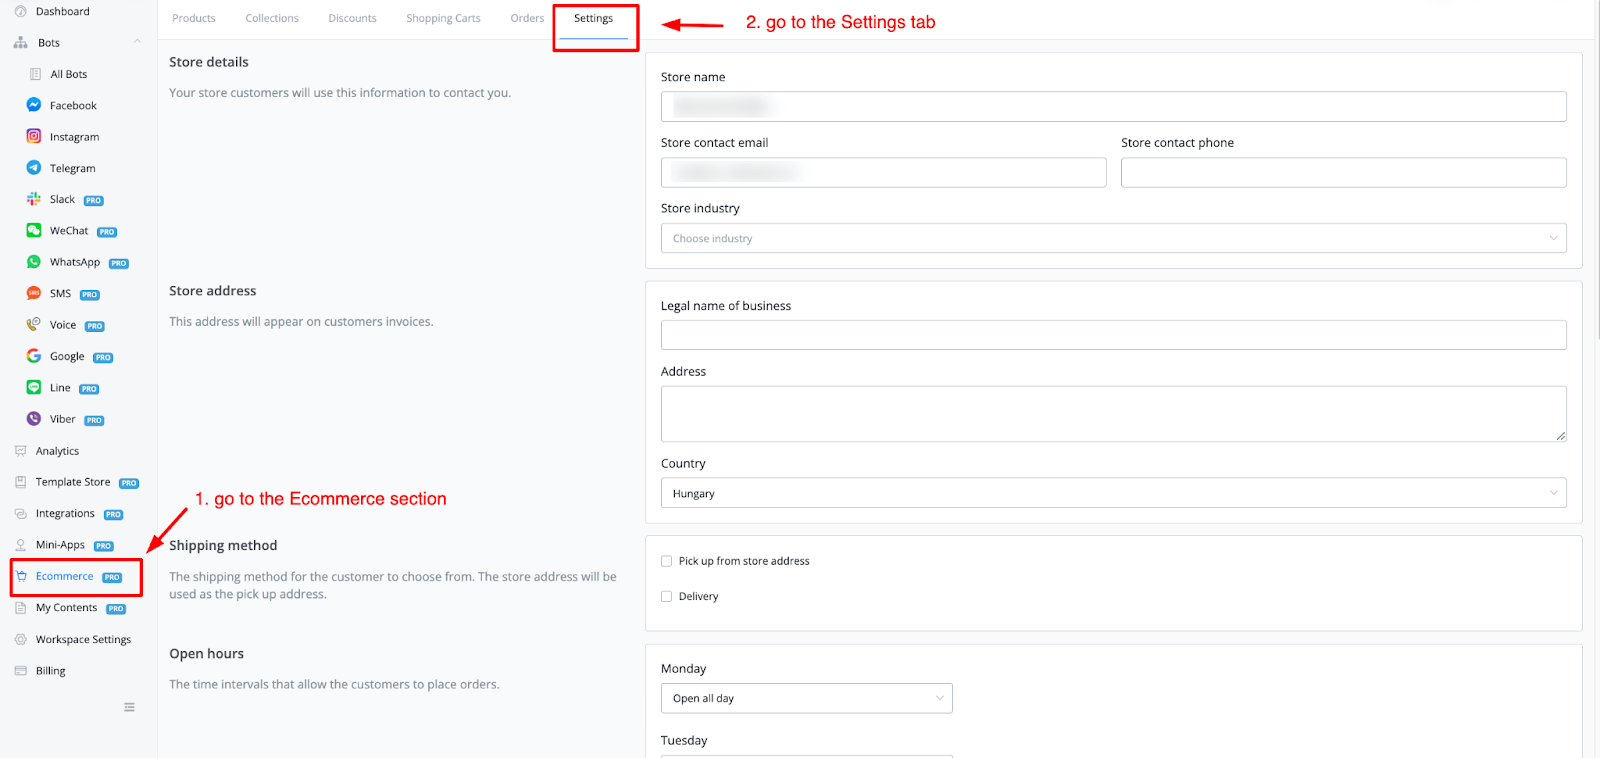
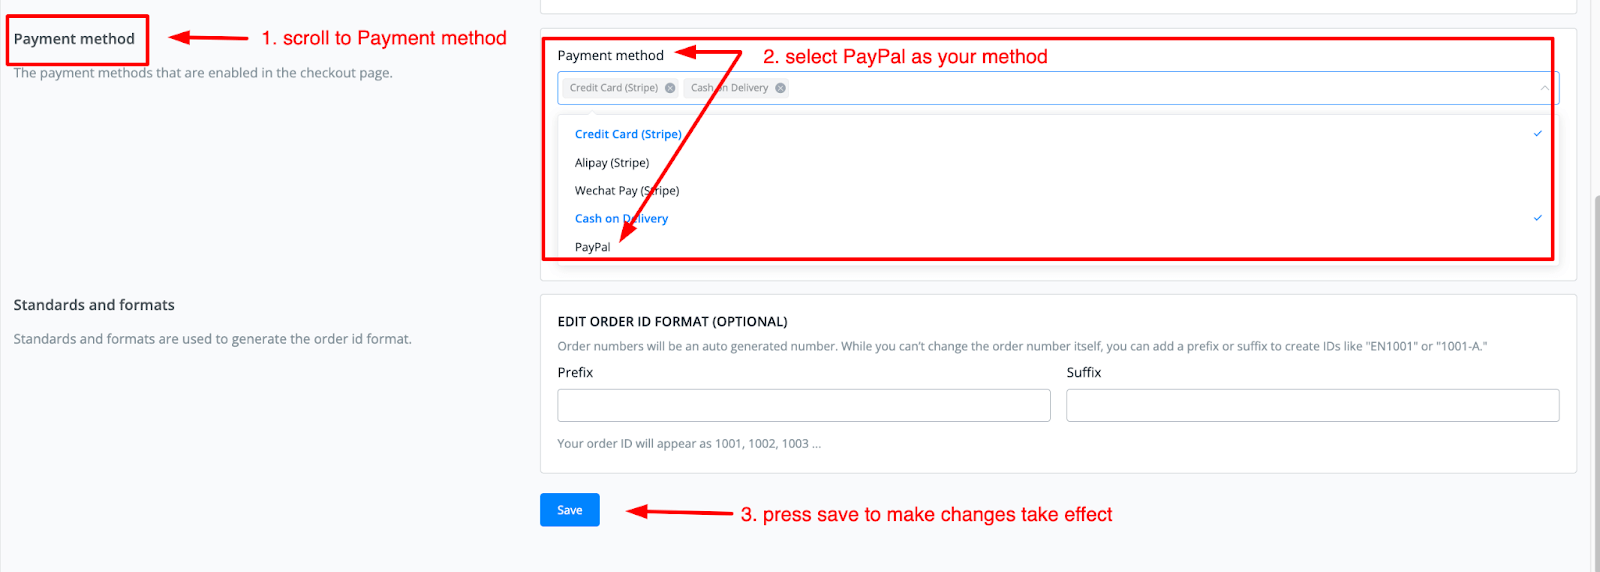
Scroll all the way down until you see the section called Payment Method. From here select PayPal as one of the methods for your ecommerce store. Don’t forget to press save to let the changes take effect.
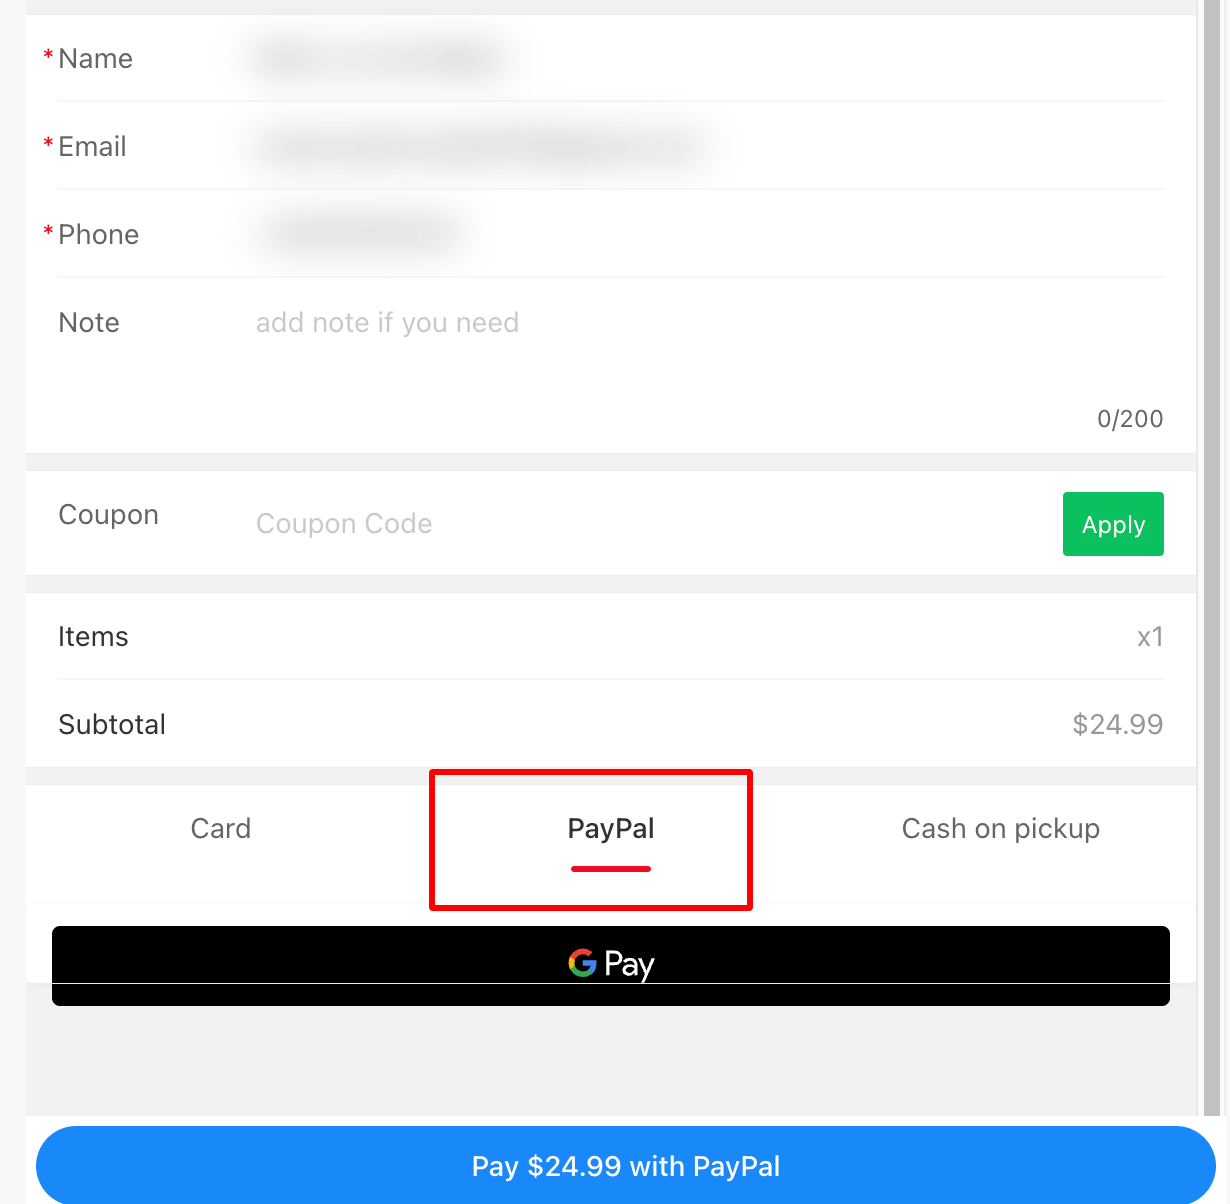
Use checkout to let customers pay with PayPal
Using the built-in ecommerce store is a fantastic way of selling your products. Once the user presses the checkout button in the conversation they will be taken to the online checkout section where they now can select PayPal to pay with.
Use the one-click PayPal buy button
Another way of using the PayPal integration is by using the direct button for this. Very useful if you just want to sell a single product or service. Add a button and from the option given choose the PayPal Buy button.

Once selected you will be able to quickly fill in all the product details like so
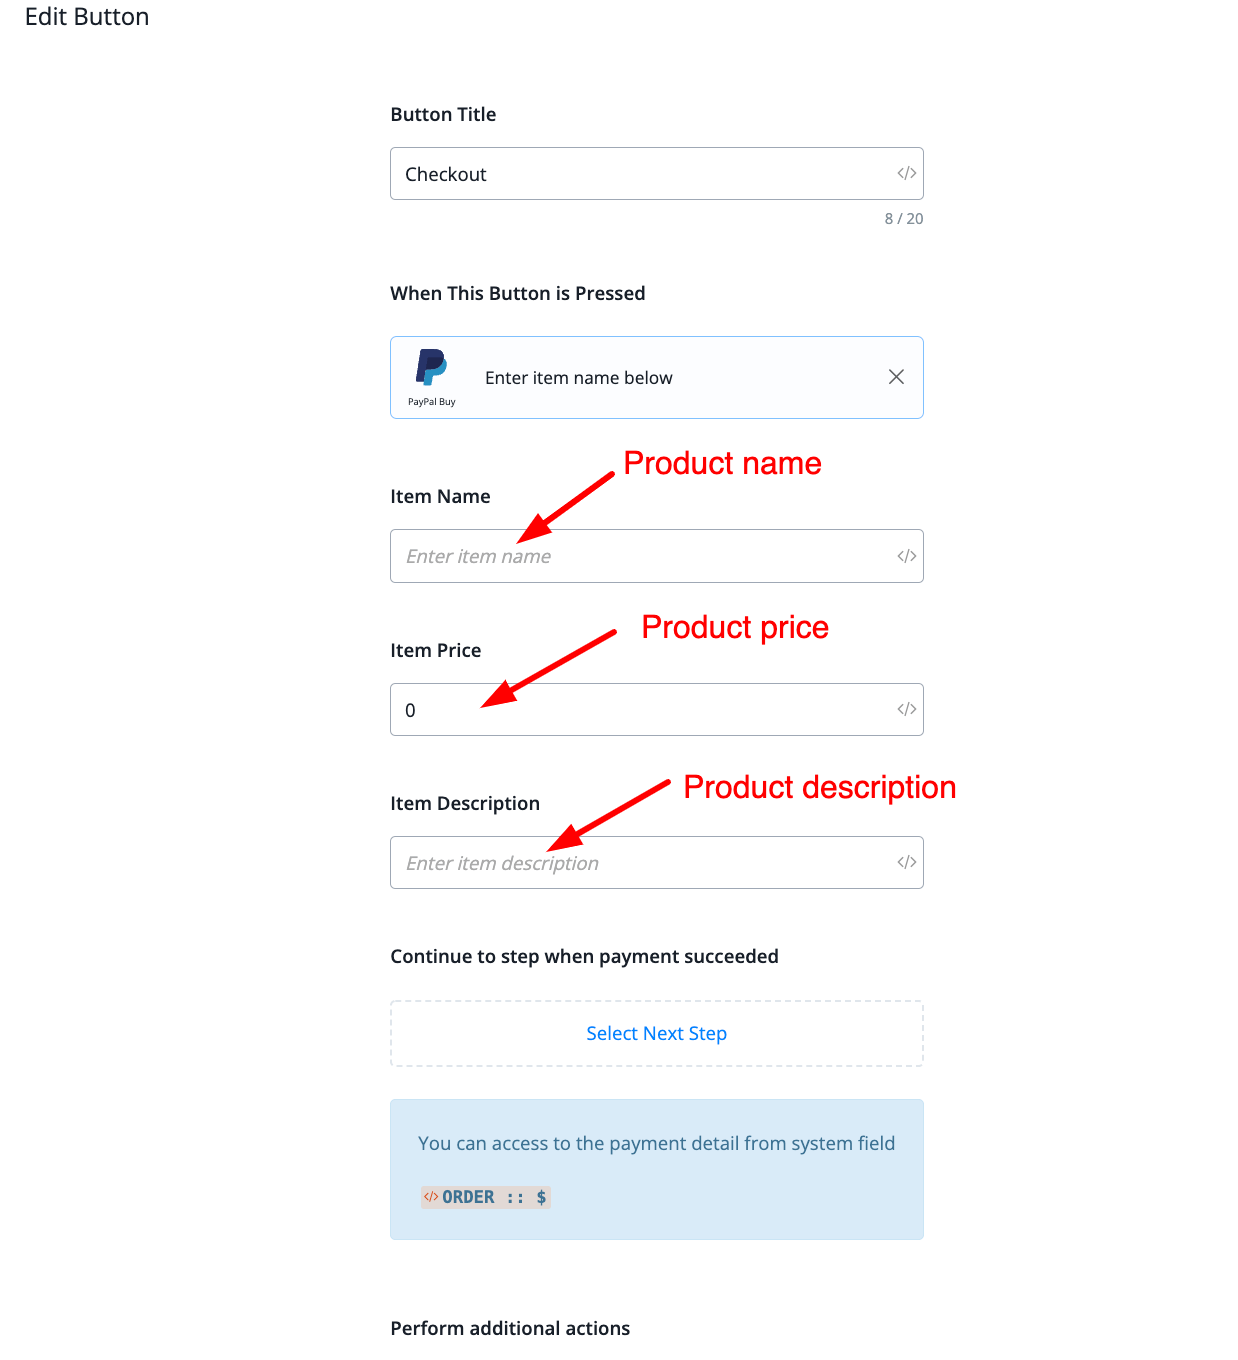
Once everything is filled in, scroll down and press save. You will now be able to sell single products.
Cloudinary
Botbuz integrated with Cloudinary to allow to store data easily with just a few steps.
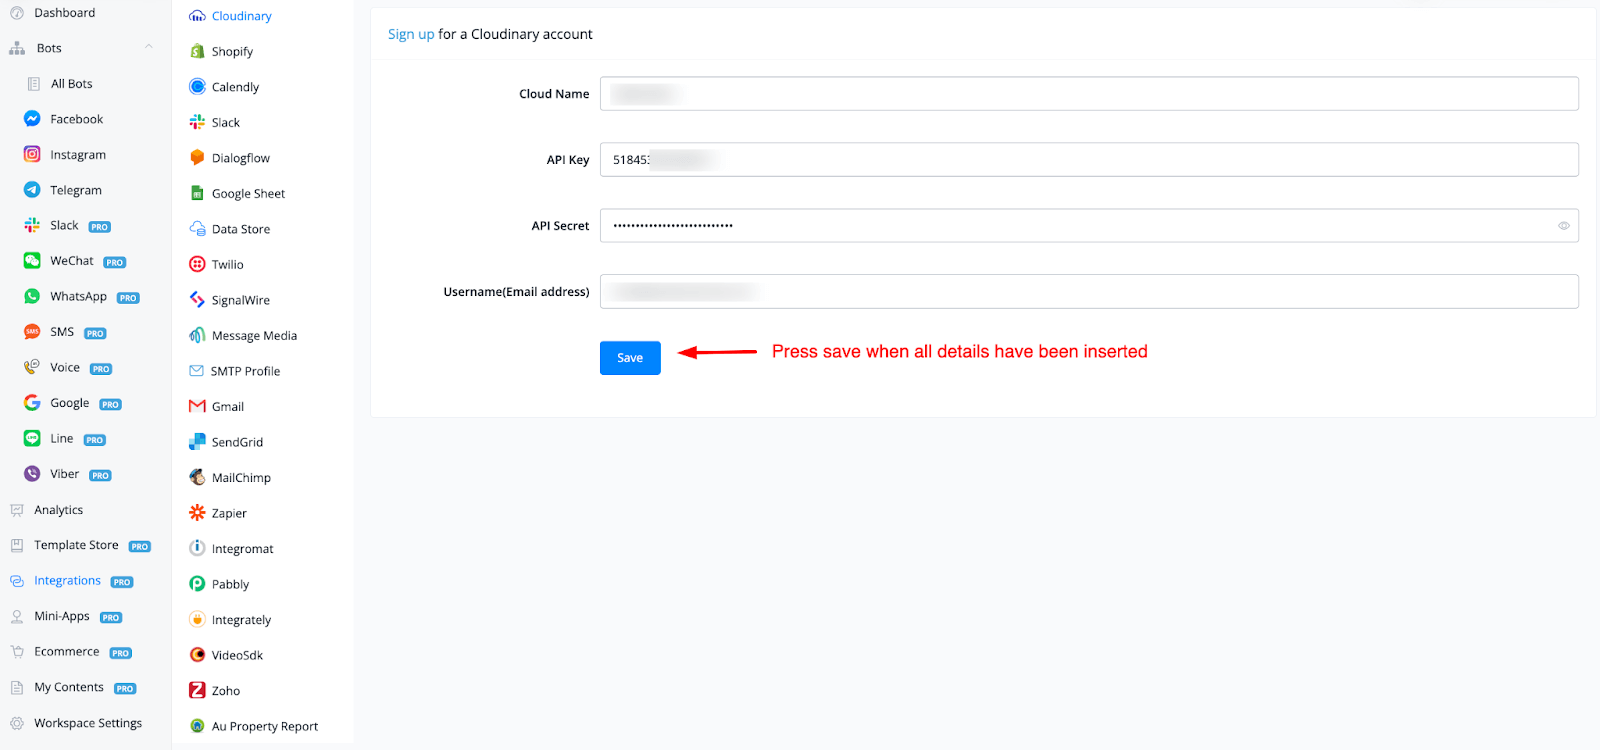
To connect to your Cloudinary account you will need a few things as shown in the below image.
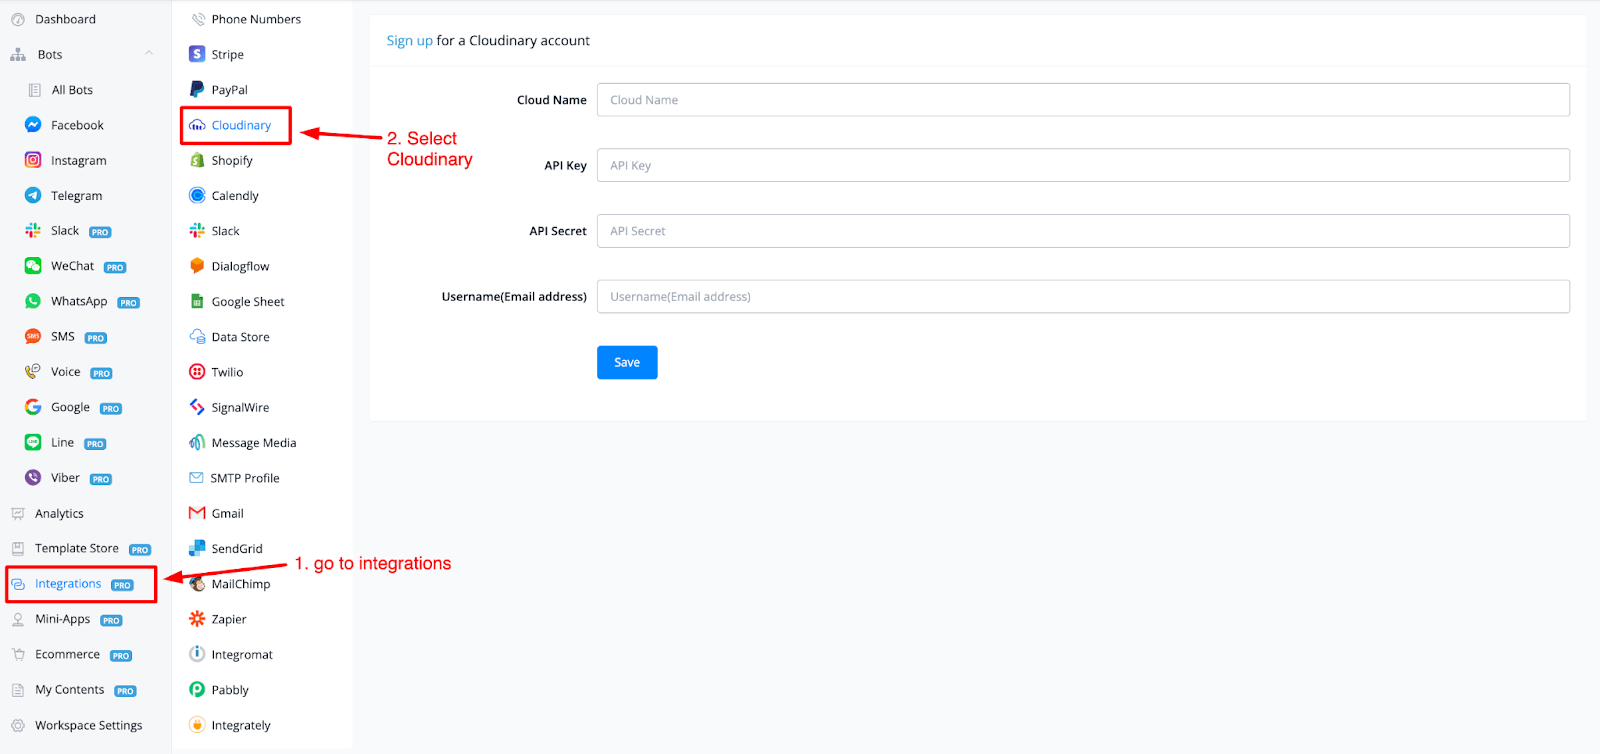
From your main dashboard go to the Integrations section on the left-hand menu. Then select Cloudinary from the overview. From here you will only need 4 things you can fetch from your account over at Cloudinary
Login to Cloudinary
Just login and from the dashboard you will be able to access all the info if you already created it beforehand.
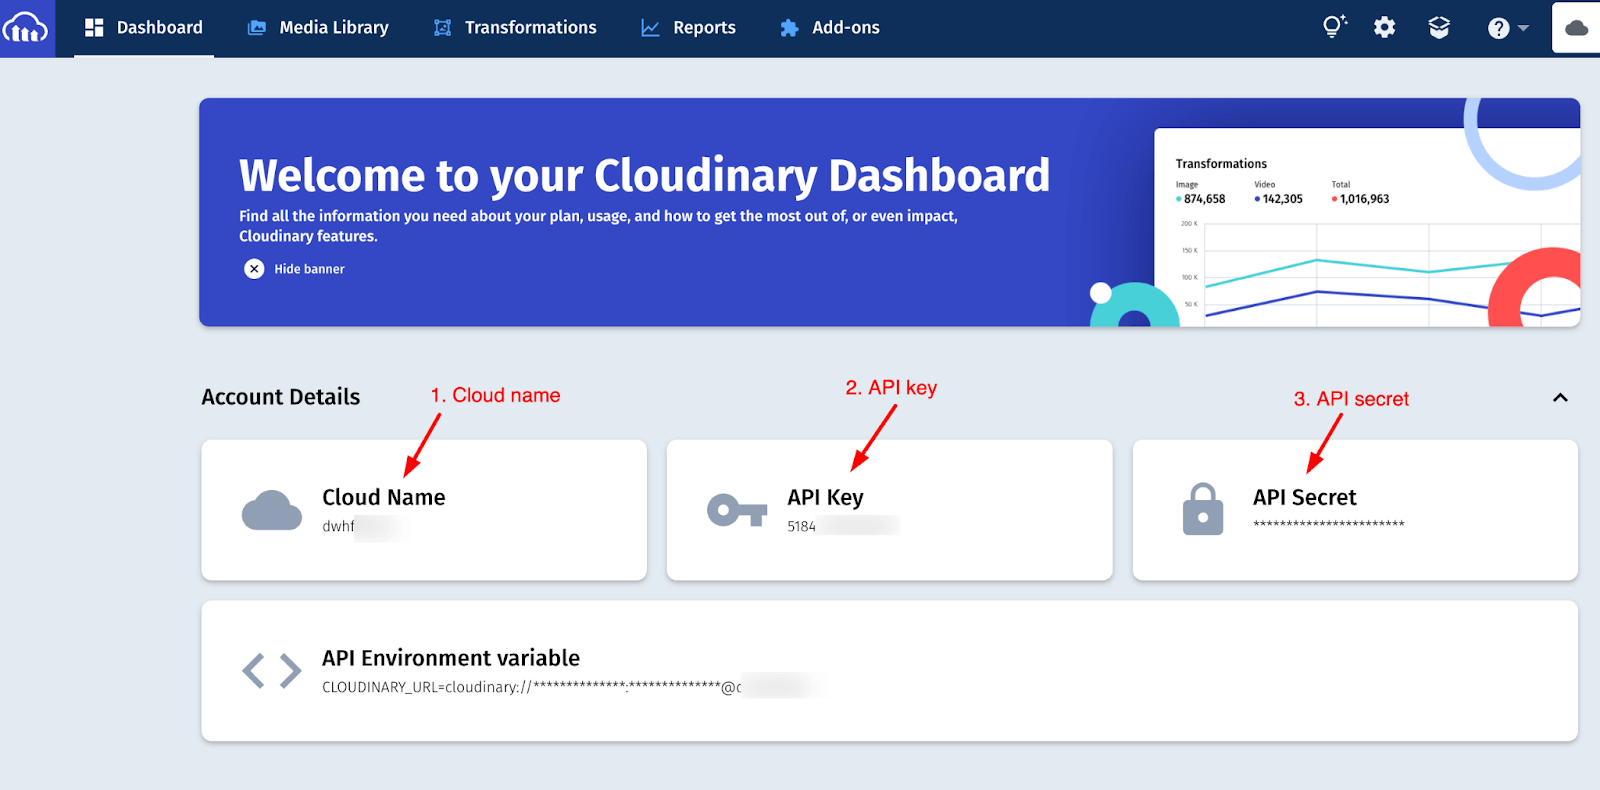
If you have the above already present then you are all set to go. Just copy and paste it into your workspace integration overview. If you do not have an API key and secret yet or want to create a new one just for your chatbot, then you will need to create one.
Creating your API key
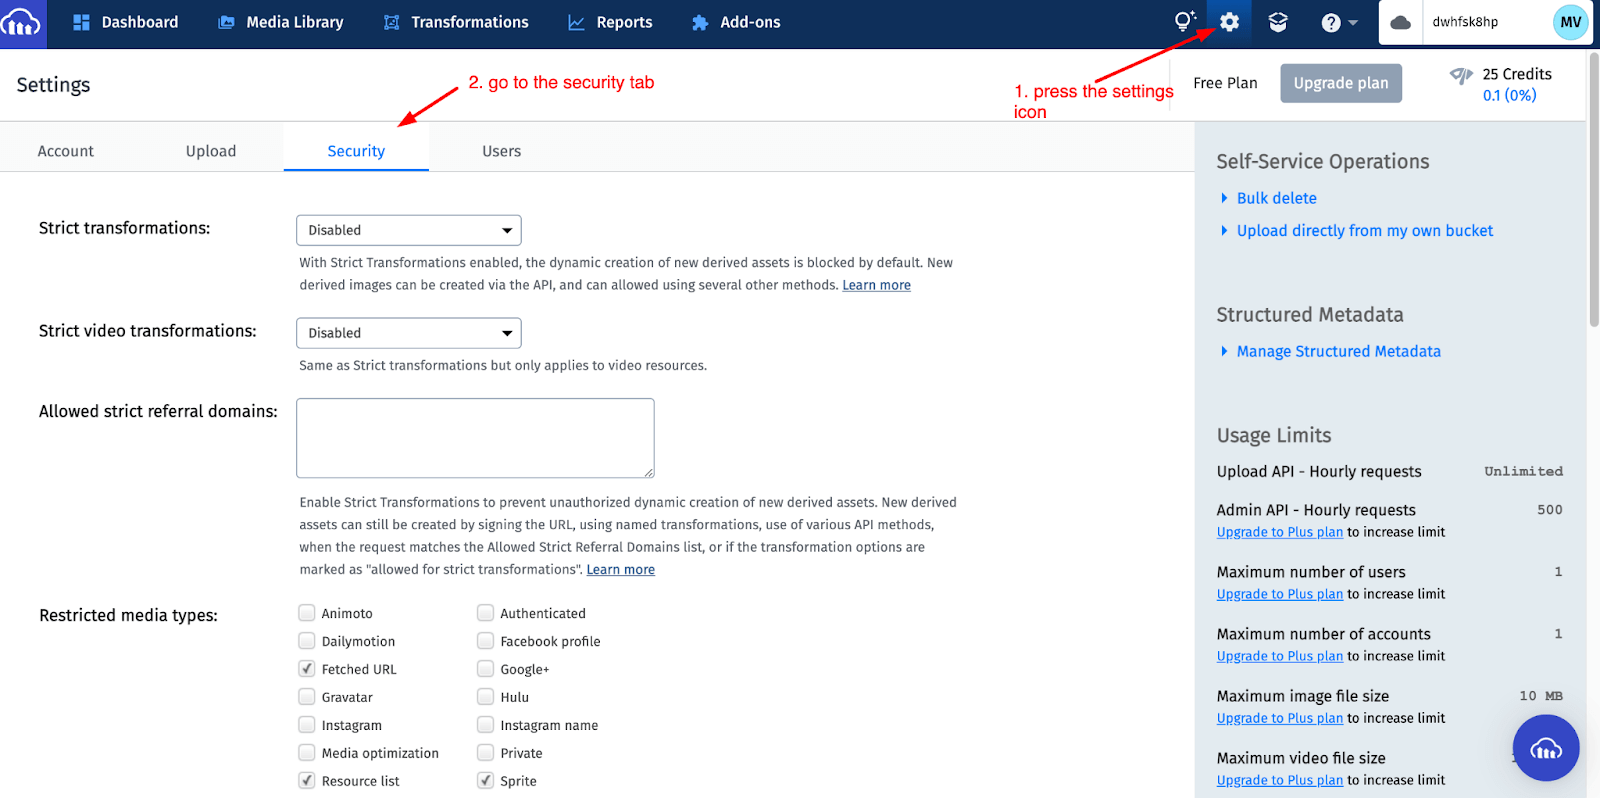
You can create an API key by going to the settings, then selecting the security tab
From here scroll all the way down until you see a section called Access Keys. From here press the text called “generate new pair”
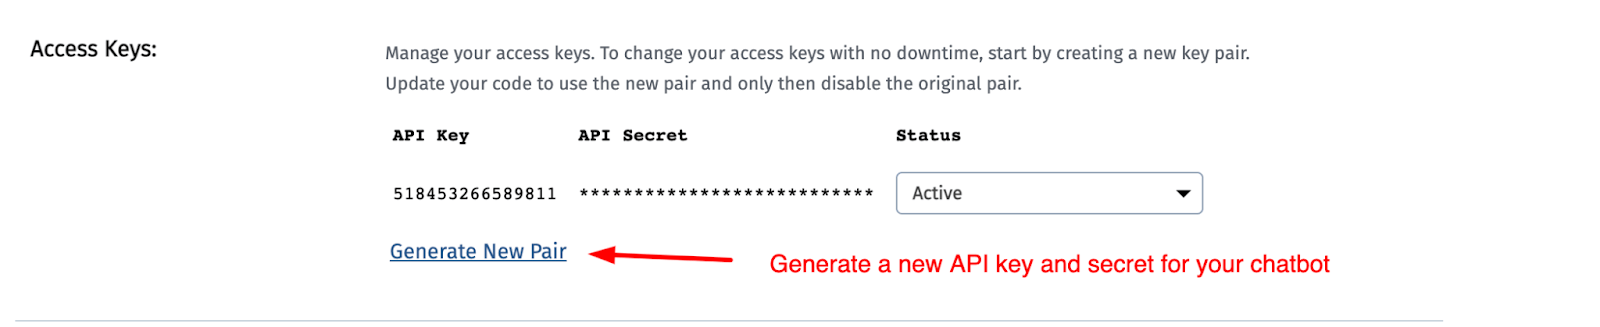
Once generated copy both the API key and secret and paste it into your workspace along with your other details
Using Cloudinary in your flows
Once connected you can use Cloudinary directly inside your chatbot flows. Just insert an action block -› integrations -› Cloudinary. From here you will be able to upload a file directly to your account and store it securely

Shopify
With Shopify, your bot can show and gather information during conversations, including customers, products, discounts and shop details.
Setup Shopify
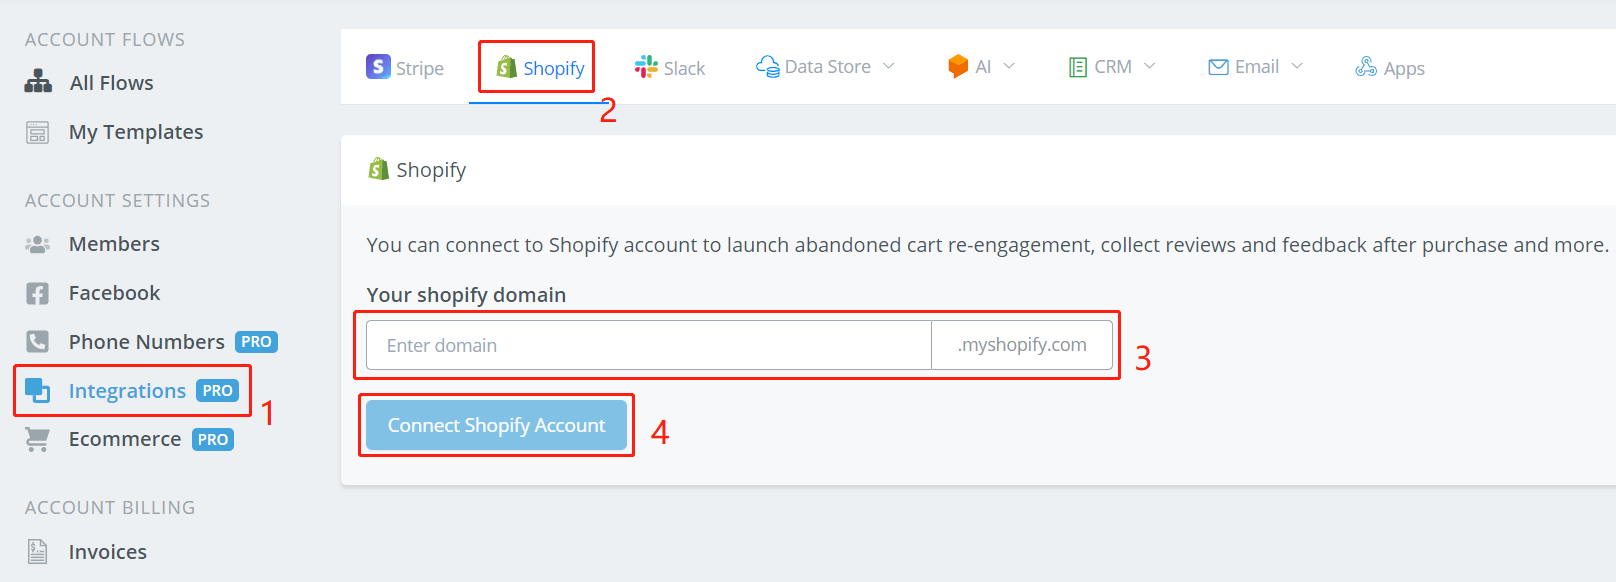
By following the above 4 steps, jumping to Shopify's website and logging in yourself, you can easily connect your Shopify account to Botbuz. After connection, you will then be able to use Shopify in your Action step. As follow are the functions you can utilize. Descriptions for each field will be put on corresponding photos.
TIP
The functions work via API calls. This means that, by giving some inputs, you get your outputs from the servers. The outputs are saved in custom fields for future uses.
Use Shopify in Action Step
- Search for Customers
- Get Customer Info
- Get Customer Orders
- Get Customer Abandoned Checkout
- Search for products
- Get Product Info
- Get Product Images
- Get Product Variants
- Search for Custom Collections
- Search for Smart Collections
- Get Collection Info
- Get Collection Products
- Get Shop Info
- Lookup Discount Code
- Create Discount Code
Facebook Business Management
Facebook business management integration will allow you to easily sync facebook catalog products into Botbuz built-in ecommerce. The benefit of syncing this back to our ecommerce is that you can easily match the products from Facebook with our built-in ecommerce. This is the most needed feature if you are using the WhatsApp product catalog to build out your native WhatsApp ecommerce.
Connect to your Facebook business account
If you click the “Connect Facebook Business” button, it will request you to authorize access to Botbuz.

And click the “Continue” button, it will take you back to Botbuz, and now you are already connected with your Facebook business account.
Disconnect your Facebook business account
You can disconnect your Facebook business account anytime by clicking the disconnect button.

Sync the product catalog from Facebook to your ecommerce
In order to sync the product back, you need to click the “list business catalogs” button, and then it will pull out all the product catalogs from your Facebook business account.
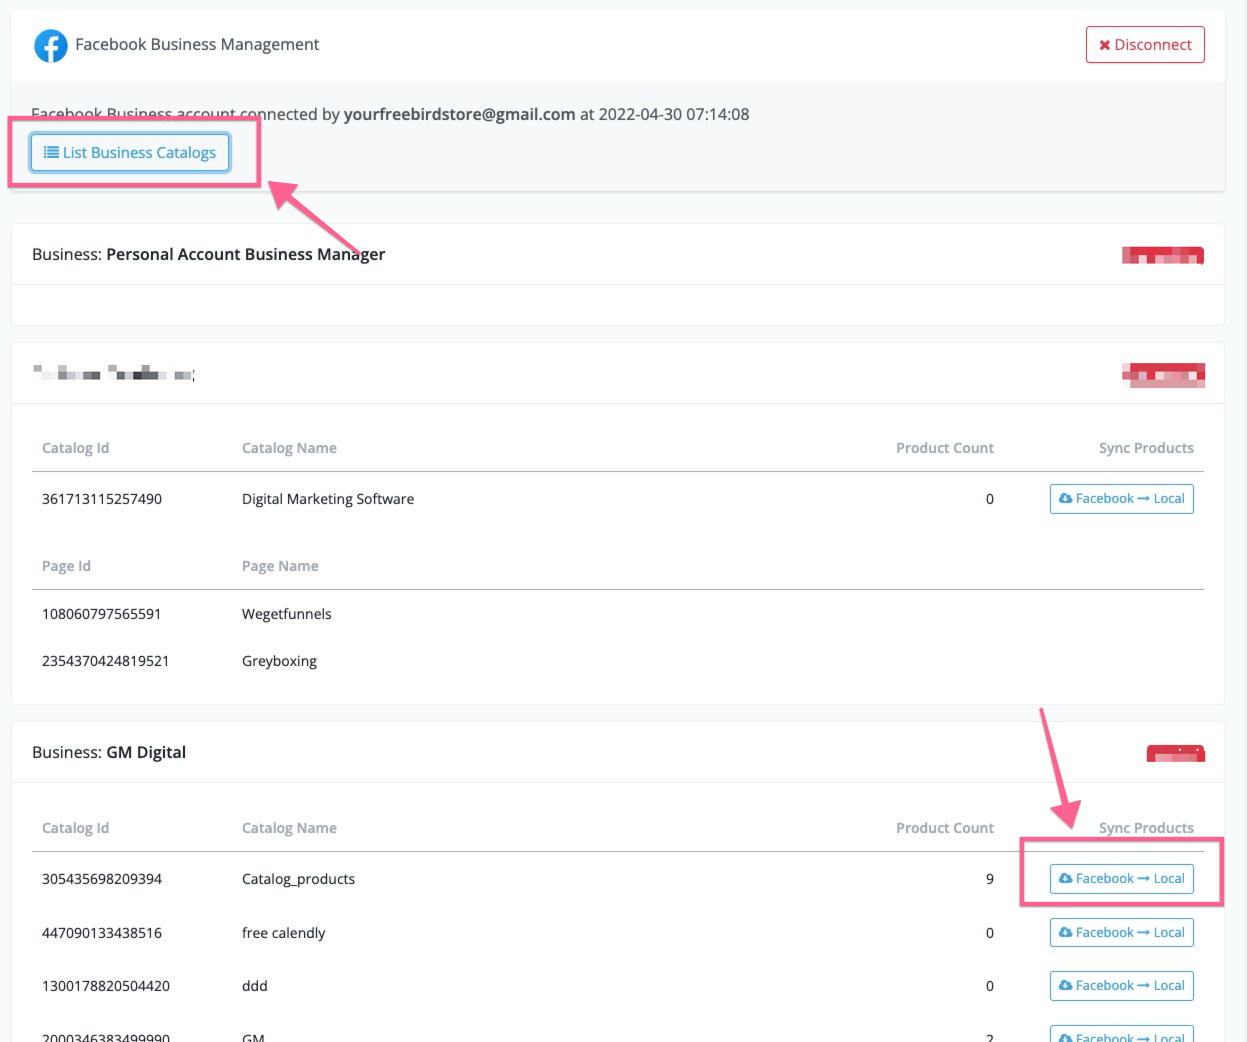
And then click the “Facebook → Local”, you should be able to sync the products into our built-in ecommerce system.
The below value will be synced back to Botbuz.
- Product name
- Product description
- Product image
- Pricing
- SKU
- Product type
- Product vendor
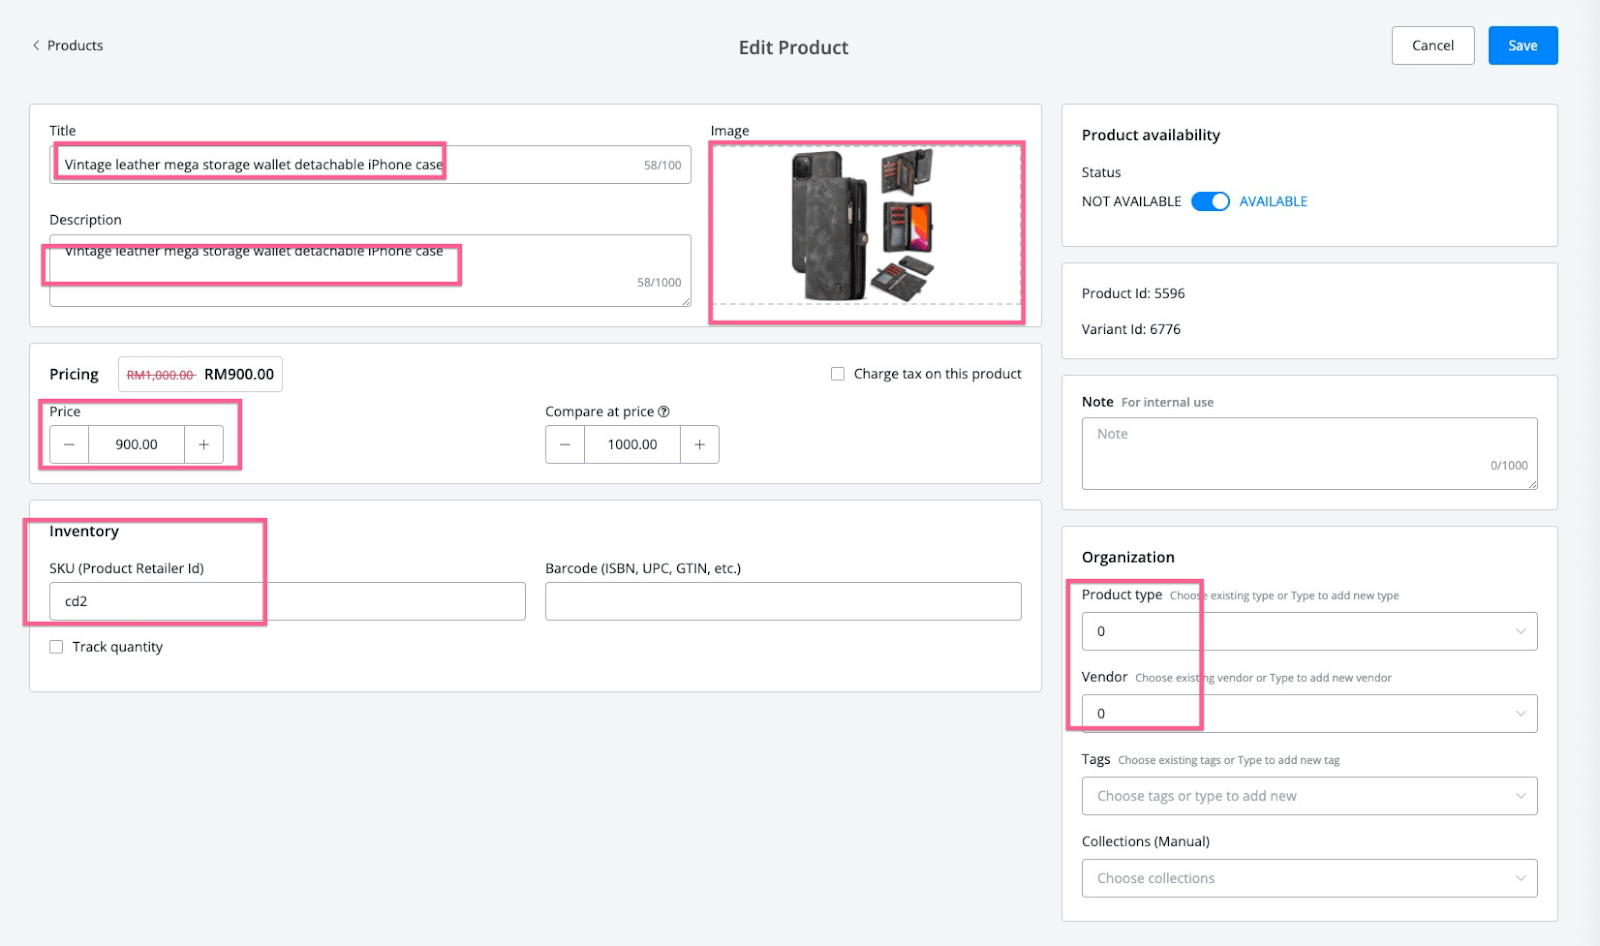
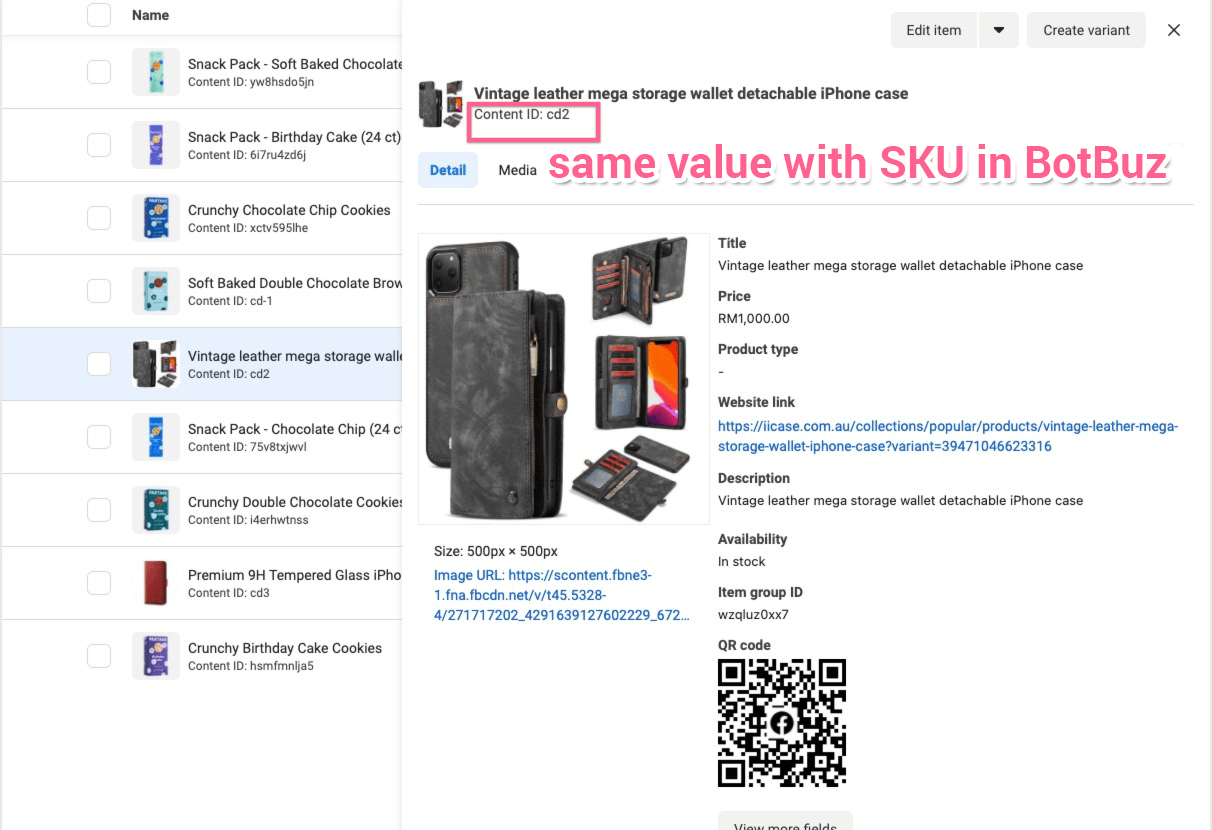
Please note that the SKU is the same value as the content ID in your Facebook cataglog. That’s how Botbuz used to match the product with our ecommerce. Don’t change the SKU value. If you want to use the WhatsApp product catalog/native ecommerce, you need to always keep the SKU at the same value as the content ID in your Facebook catalog.
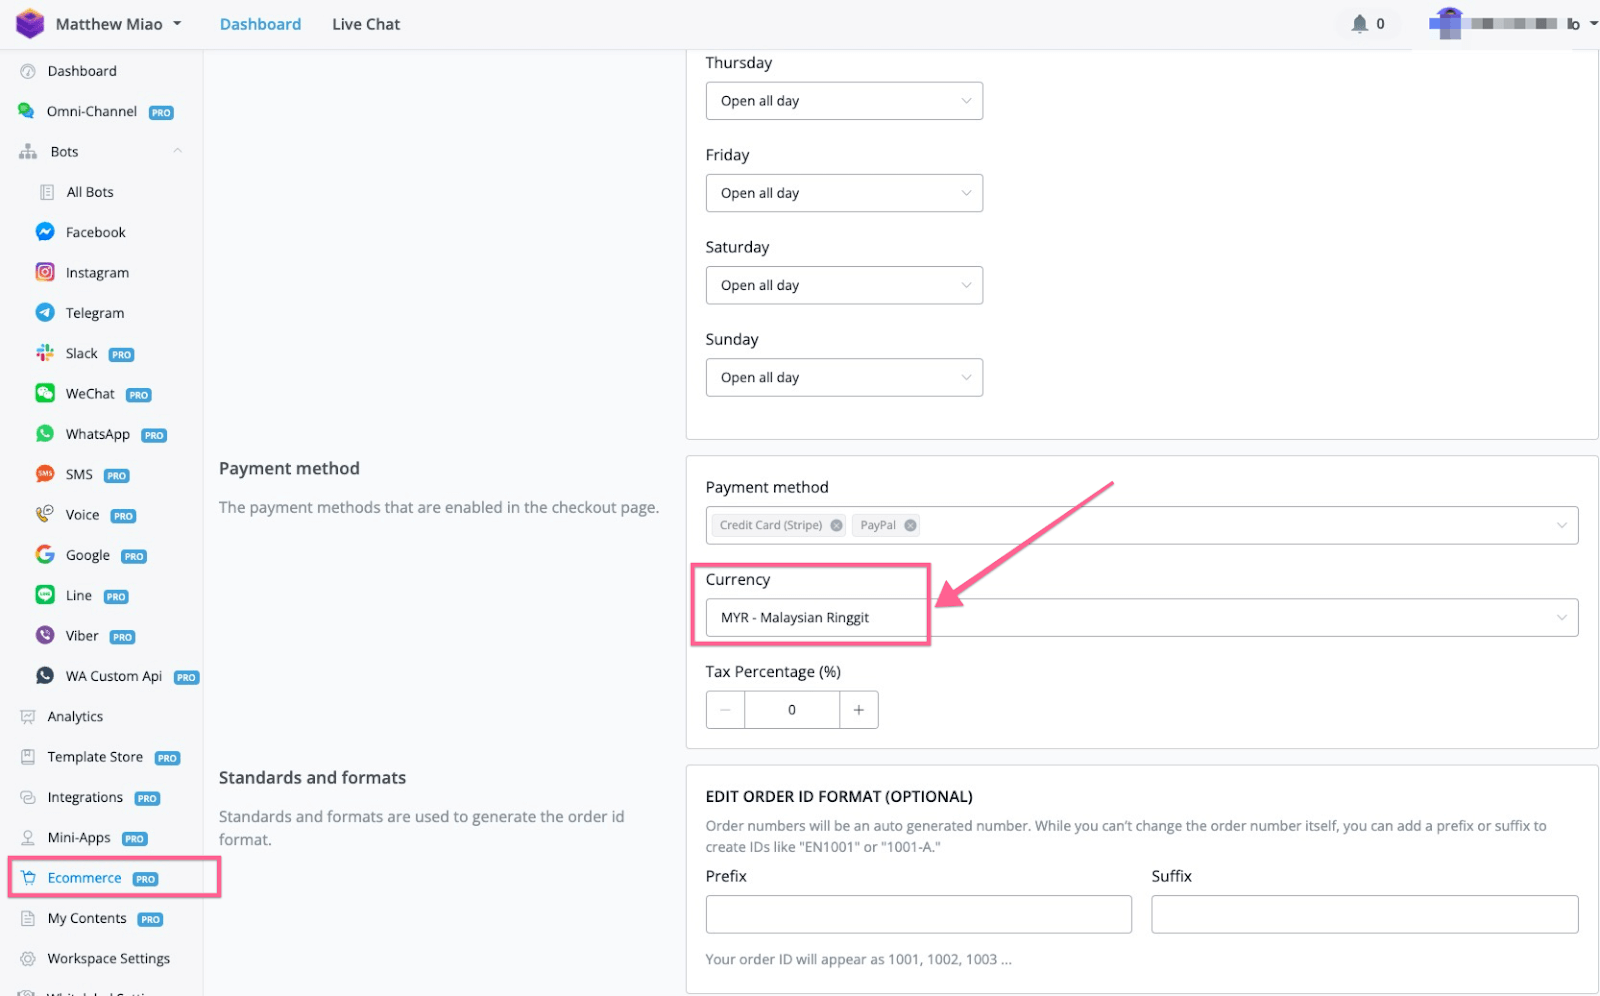
Change the currency
If you are using a different currency in your Facebook product catalog, you need to make sure you change the same currency in your ecommerce settings in Botbuz. Always make sure the currency settings are the same between Botbuz & Facebook product catalog.
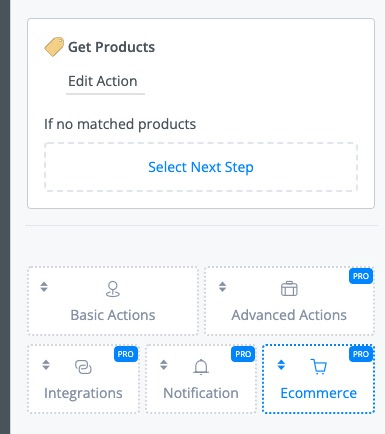
Benefits of syncing Facebook catalog with Botbuz
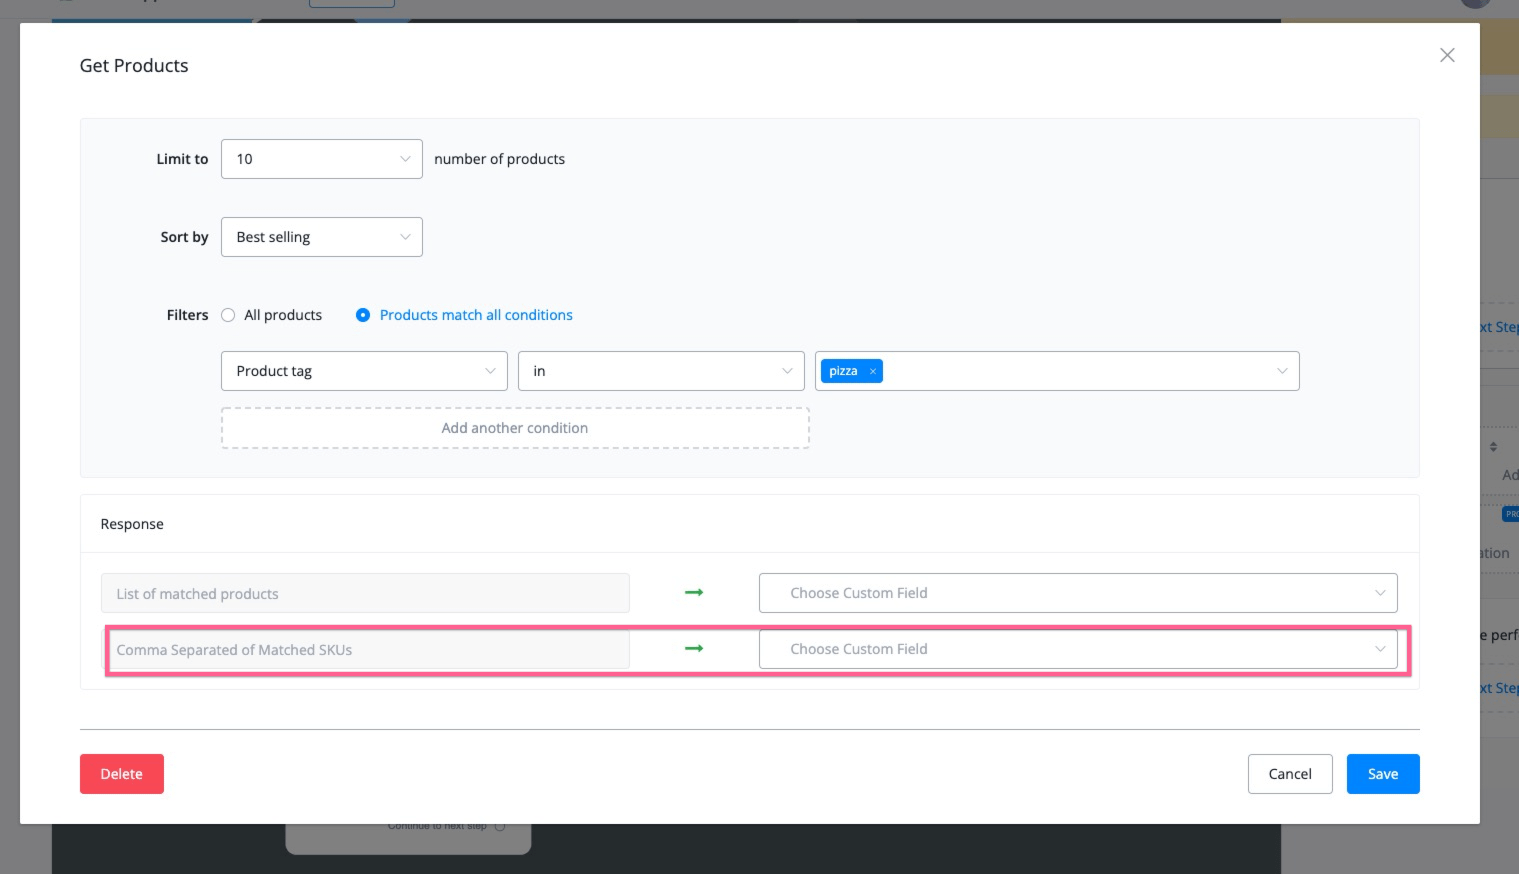
1- For example, when you are using Get products in the ecommerce action, you can select the filter your want as the screenshot below:
And when you have set up your filter to dynamically populate your products, you will be able to save the products dynamically into a JSON variable.
And then you can use the send message, and then select “Catalog product”, please note this is only available in the WhatsApp channel with 360Dialog as your WABA provider.
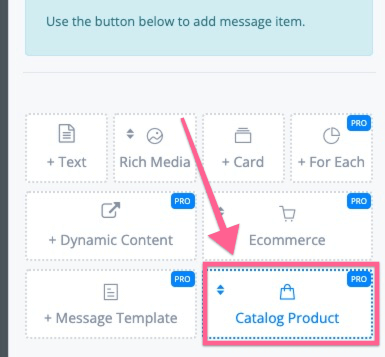
And you can use the retailsID directly in the “WhatsApp Multiple products” message as per the screenshot below:
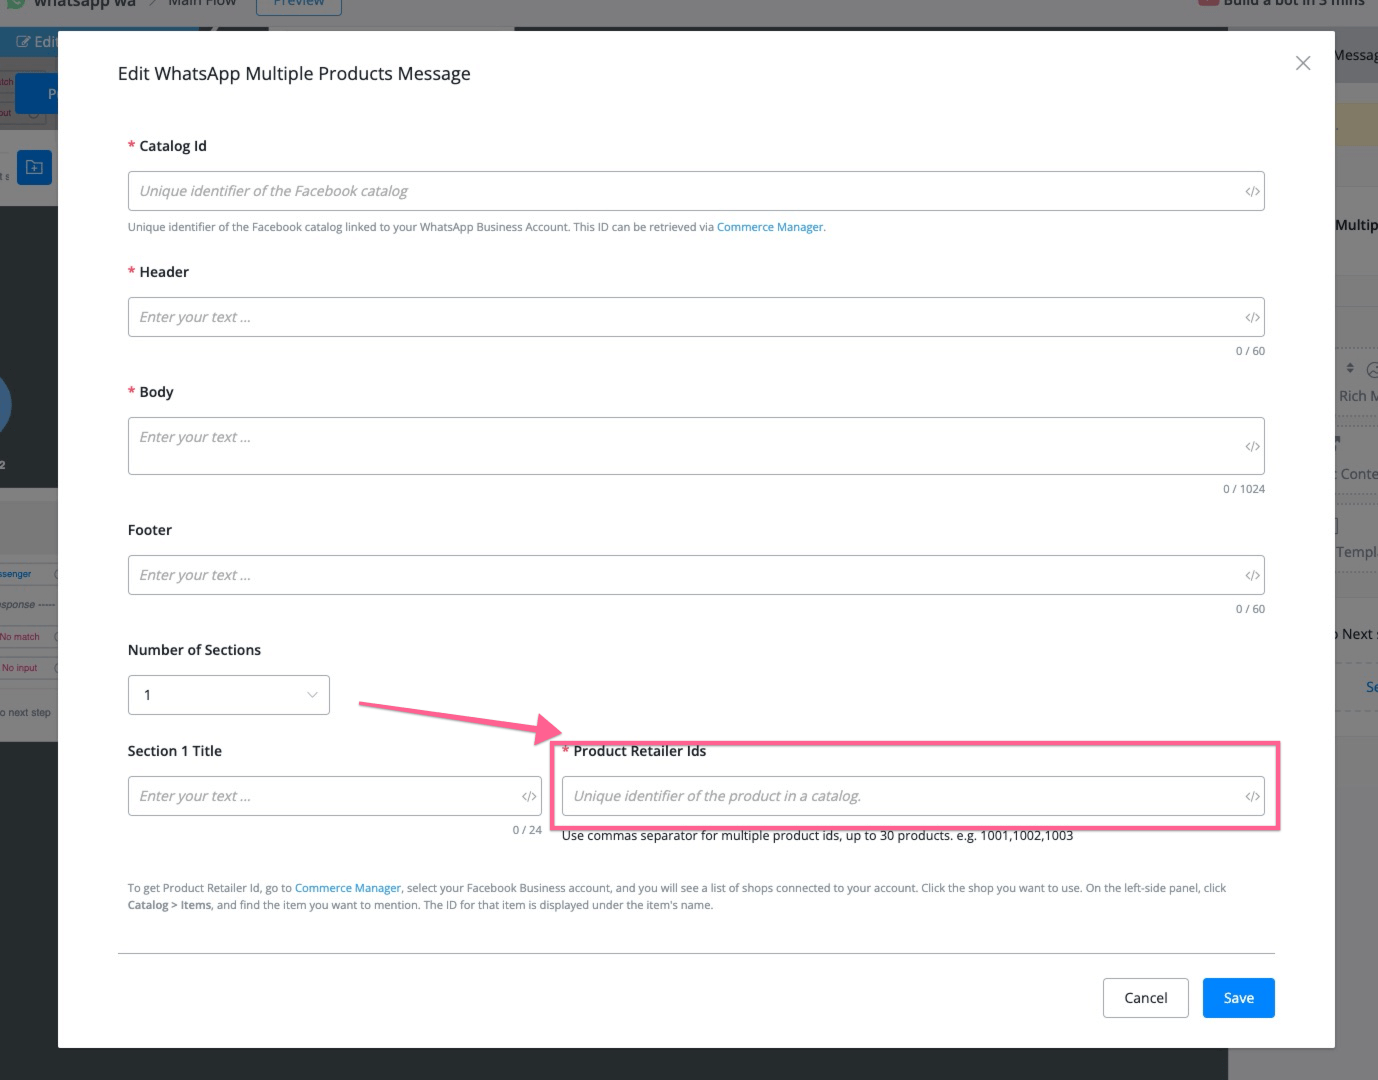
In this case, you will be able to use our built-in ecommerce and dynamically populate the products in the WhatsApp channel.
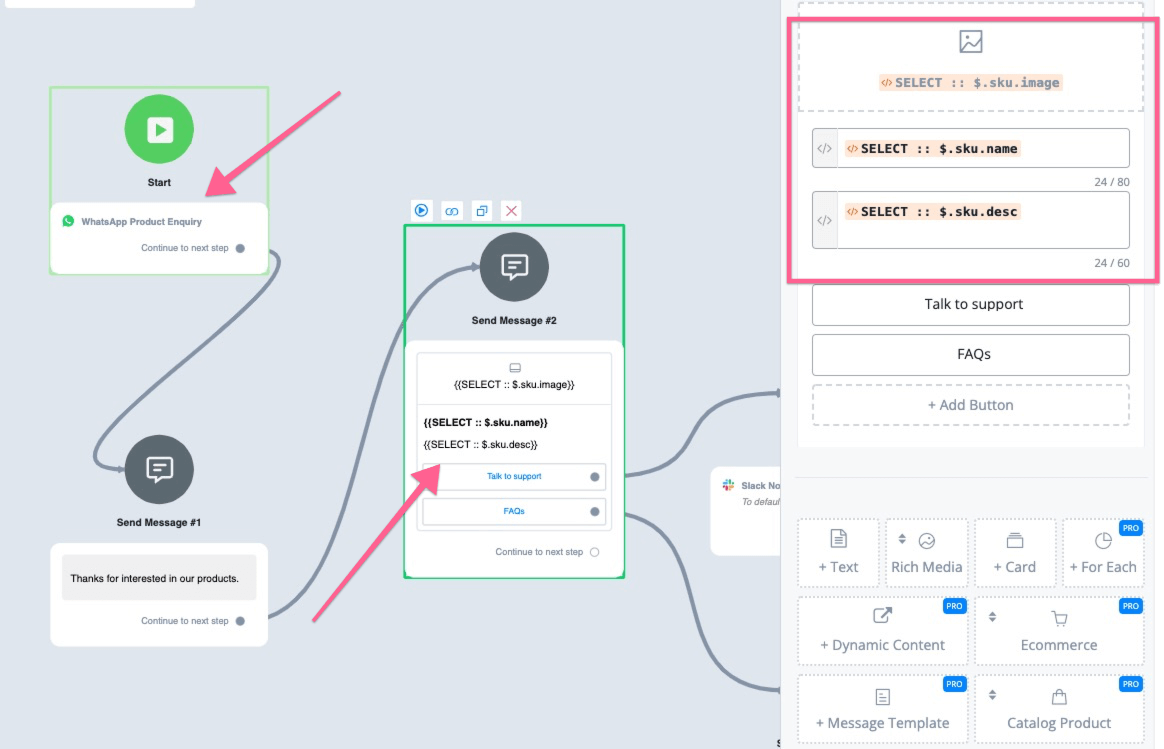
2- WhatsApp product inquiry trigger:
- If you sync your Facebook product catalog with our built-in ecommerce system, and when you set up the “WhatsApp product inquiry” trigger, which you can find in the Automation, then New Triggers.
- Since the product retailer id will have the same value in SKU in our ecommerce system, so that we can display directly which product the user is asking about.
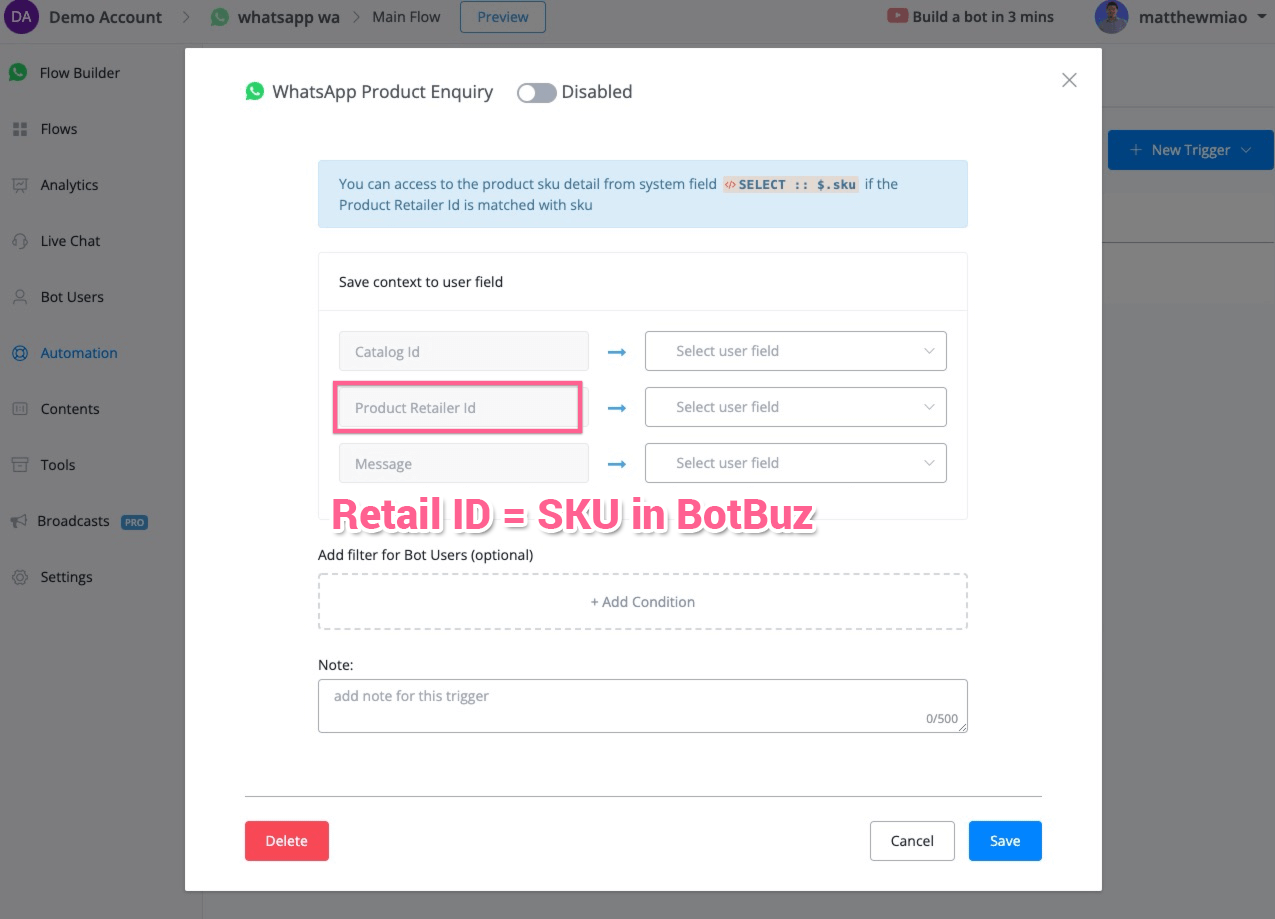
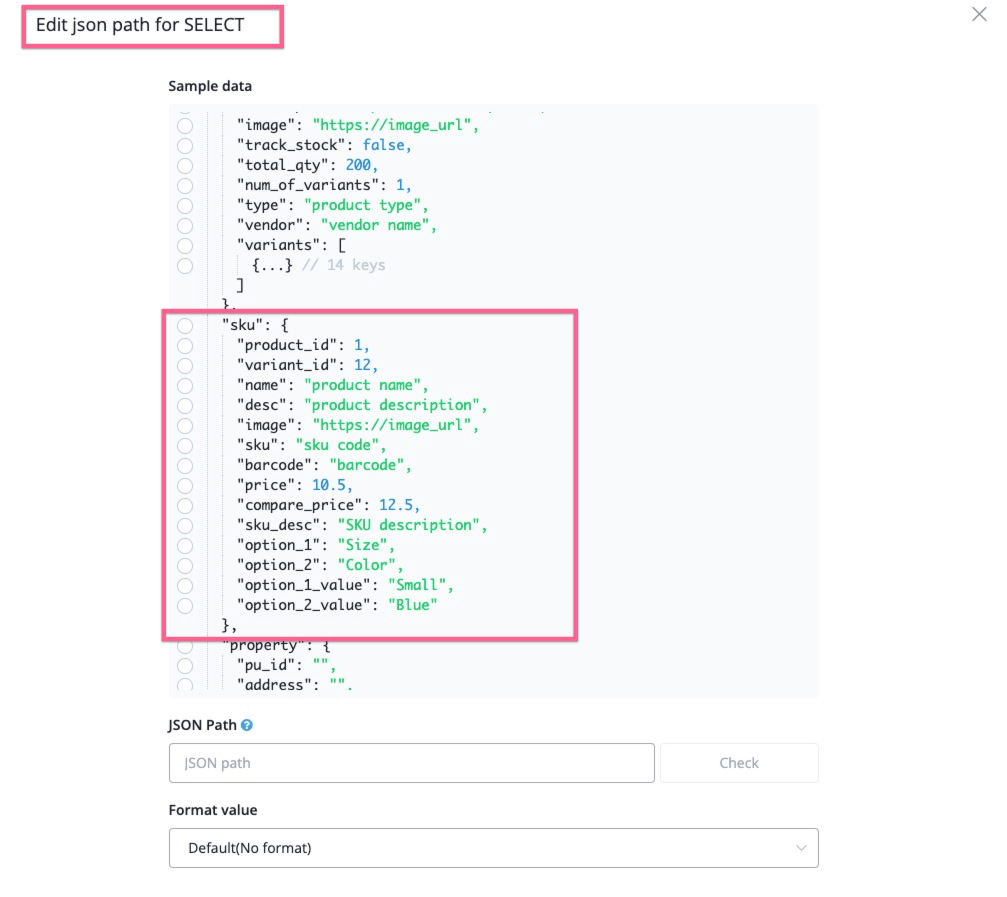
And then, you can use our Select system variable to show the product directly in the card format. If the retail ID is matching with any SKU value in the Botbuz system, then you can find the matching product information in our SELECT system field as per below:
The details set up for the “WhatsApp Product Inquiry” trigger is as the screenshot below:
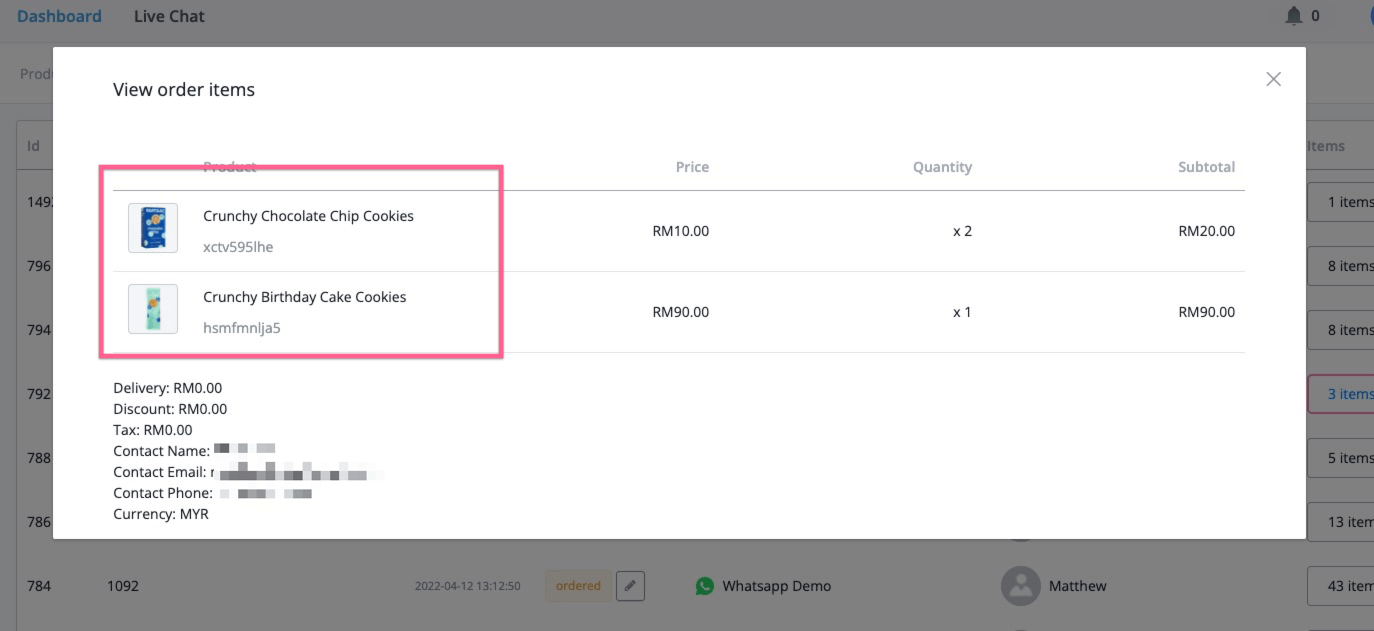
3- Show product details in “Orders” in the Botbuz ecommerce system.
- Since WhatsApp product catalog messages mainly rely on the Facebook Catalog feature, and if you sync them with Botbuz's built-in ecommerce system, you will be able to see the product name and pictures in our order section in ecommerce.
Calendly
Calendly is a fantastic way of being able to create bookings for your business or that of your clients. Botbuz has a native integration that allows you to set this up very easily
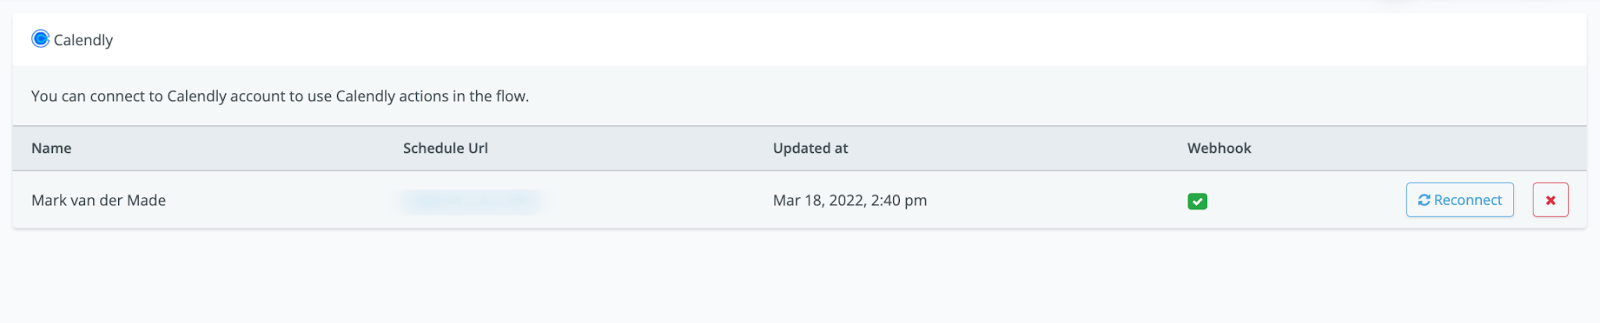
Connect to Calendly
From the main dashboard go to Integrations from the left-hand menu. Then select Calendly from the list.
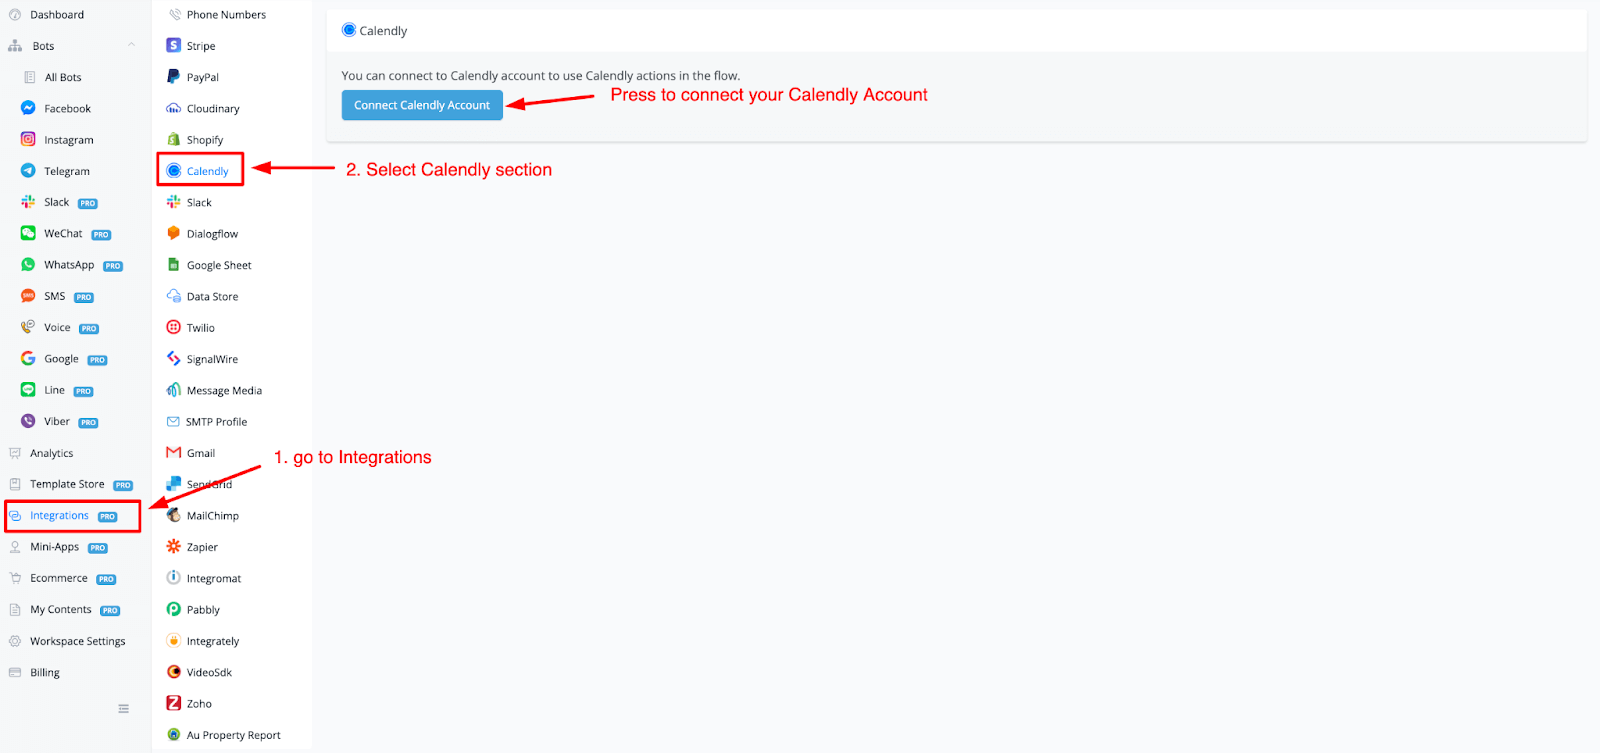
Press the button Connect Calendly Account to go to Calendly and authorize Botbuz to manage bookings for you.
When redirected to the Authorization page be sure to press the button.
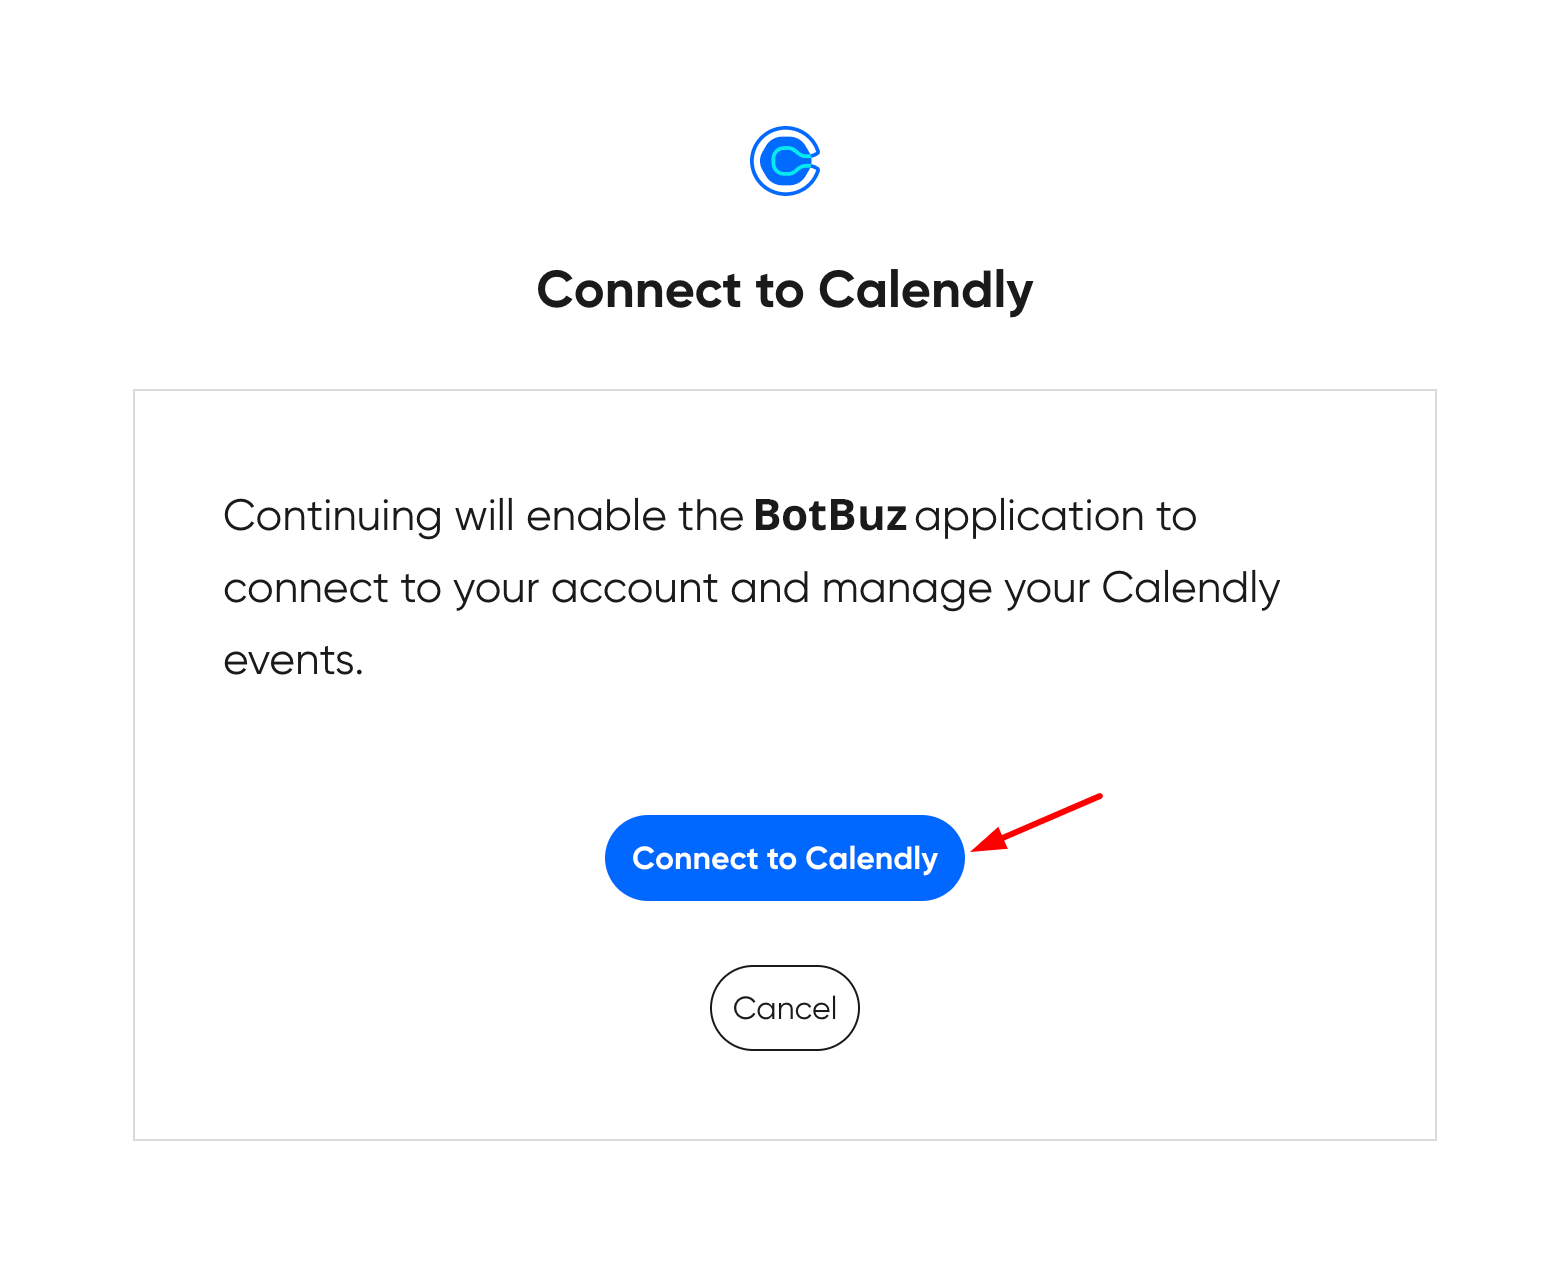
You will be redirected back and your account should show verified. If you have a pro account you will also see a checkmark with the webhook section
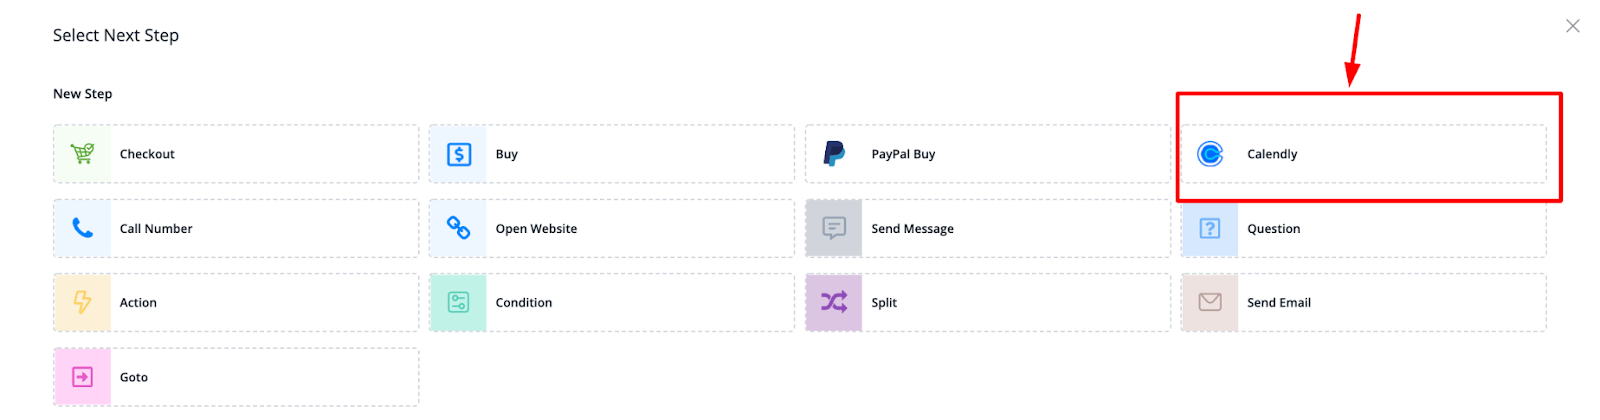
How to use Calendly
Soon as Calendly has been connected you will be able to use it in any of your chatbots.
Go to a flow, select a text message and apply a button. For the type of button, you can select the Calendly button.
Once done you will be able to select an event type. These events are being fetched from your Calendly account.
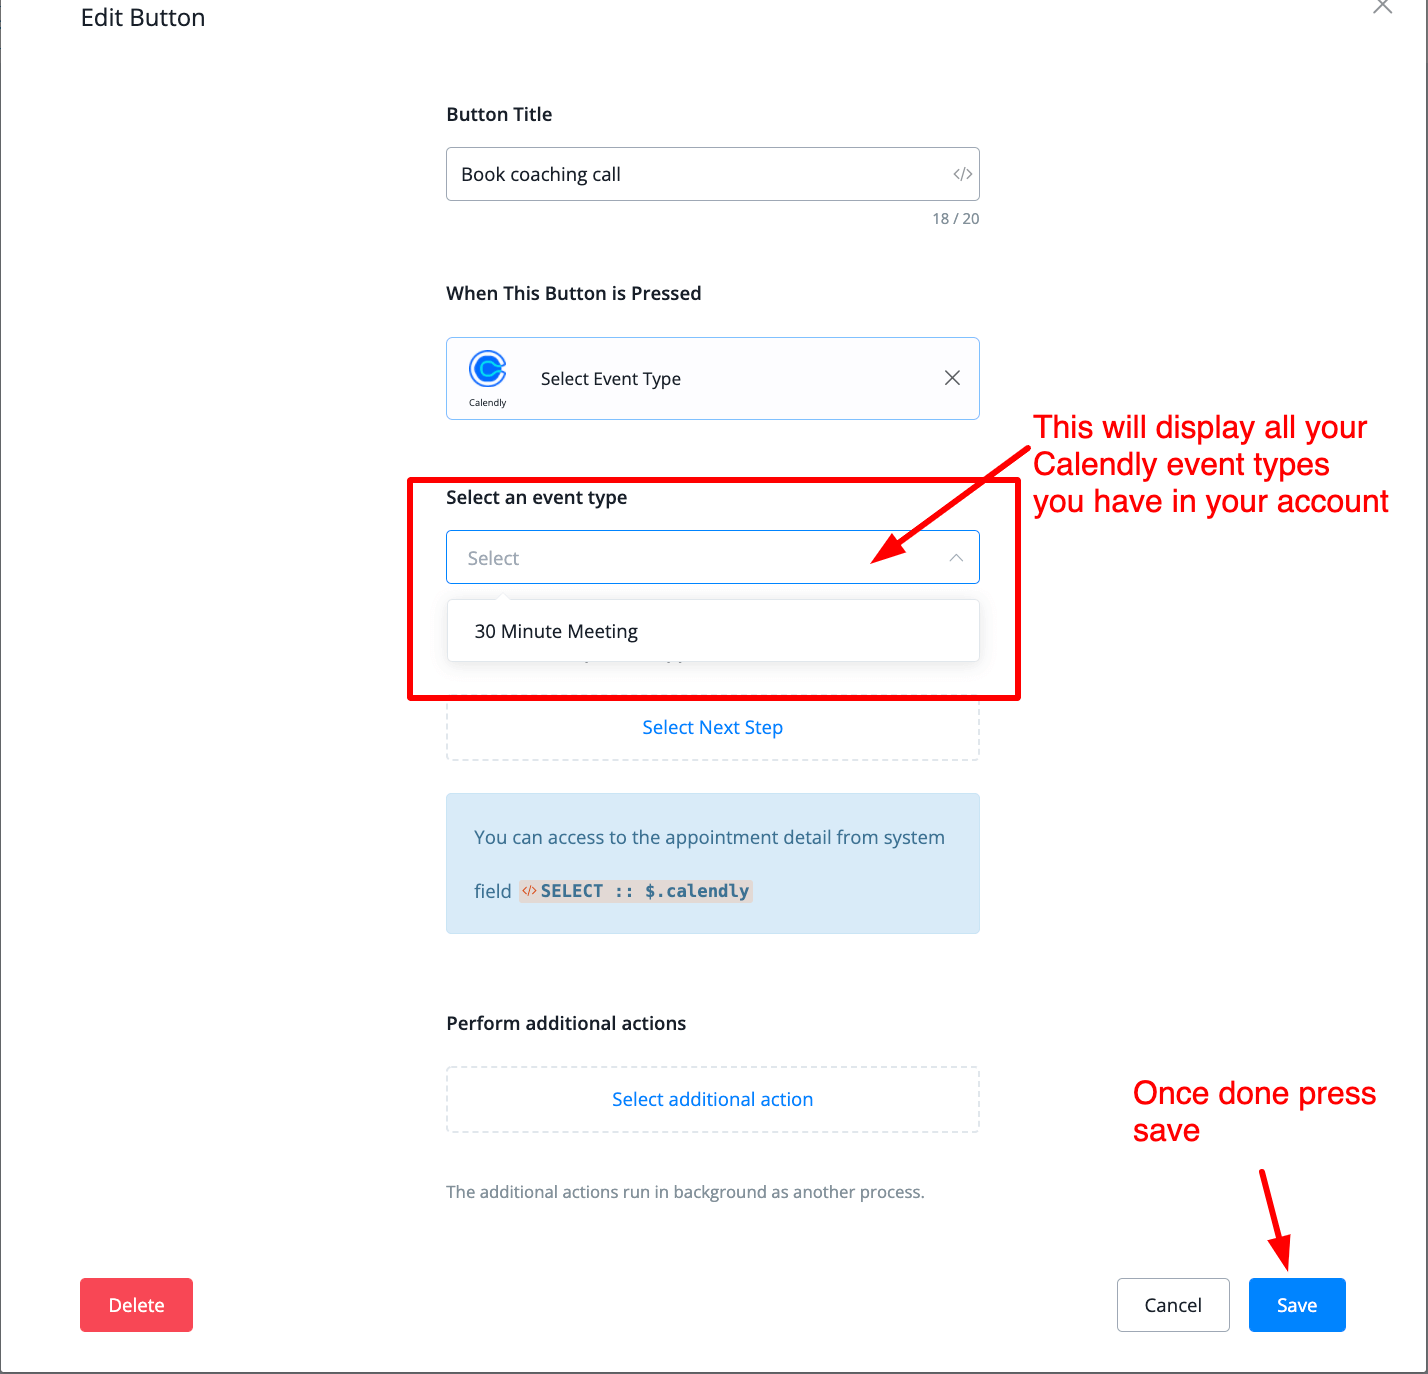
Once you send this message with the button to the subscriber he or she will be able to book an appointment using the event you set up.
After this is done you will be able to fetch the booking details from the Select system field.
Open up the system variable list, Search for the system field called Select
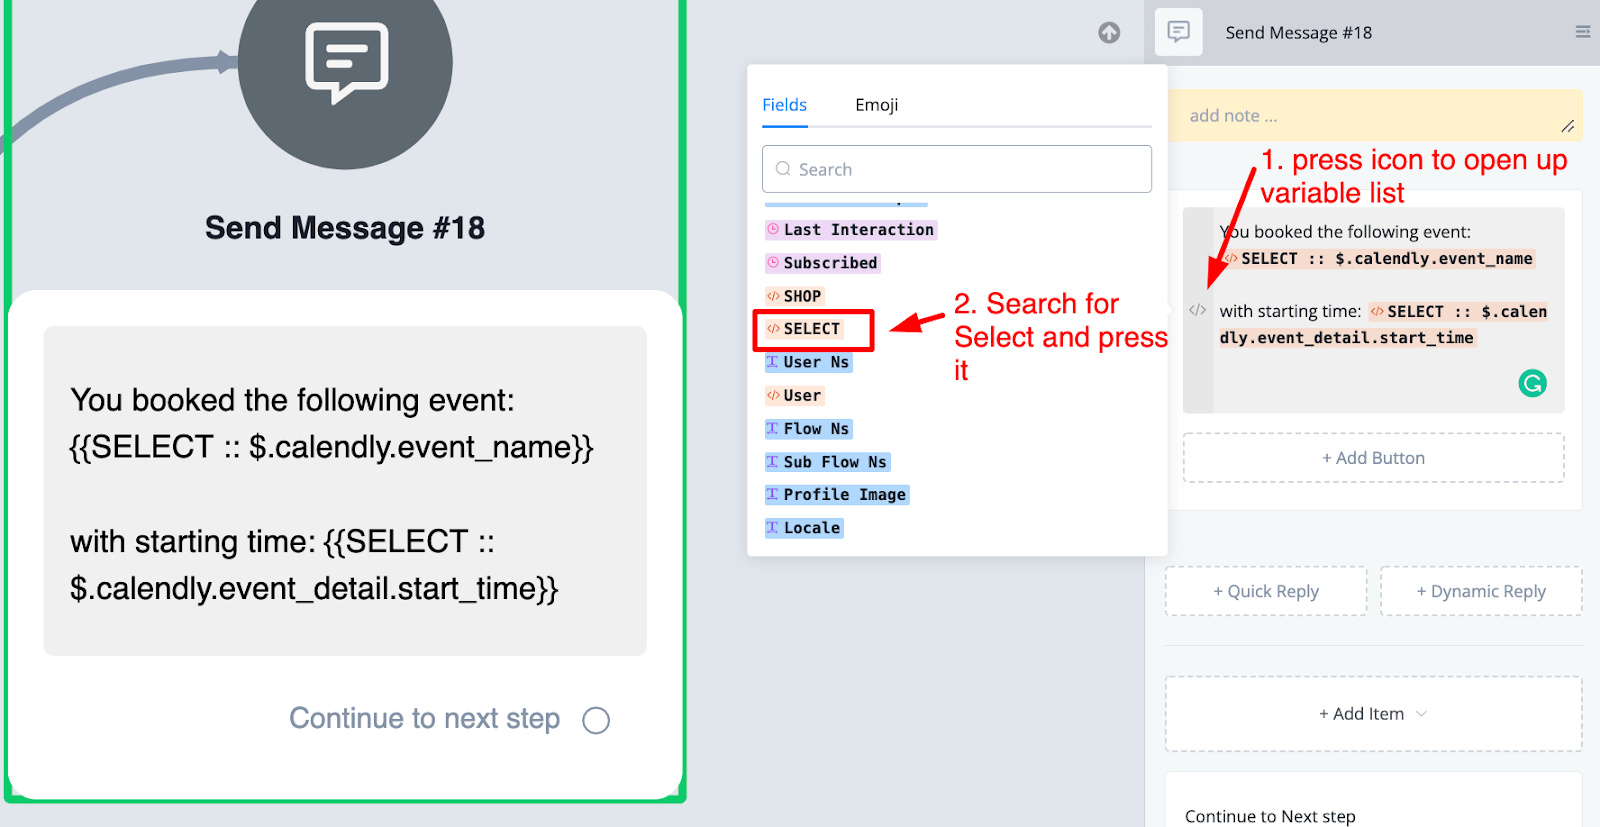
Once pressed you will get a pop-up that will display all possible information you can get back from Calendly.

This way you can confirm the booking with your subscriber as seen in the previous screenshot above
Slack
With Slack, your bots can send various types of messages to your Slack group or contacts mainly for notification purpose for now. However, we are working on building Slack flow. So there will be more functions with Slack shortly.
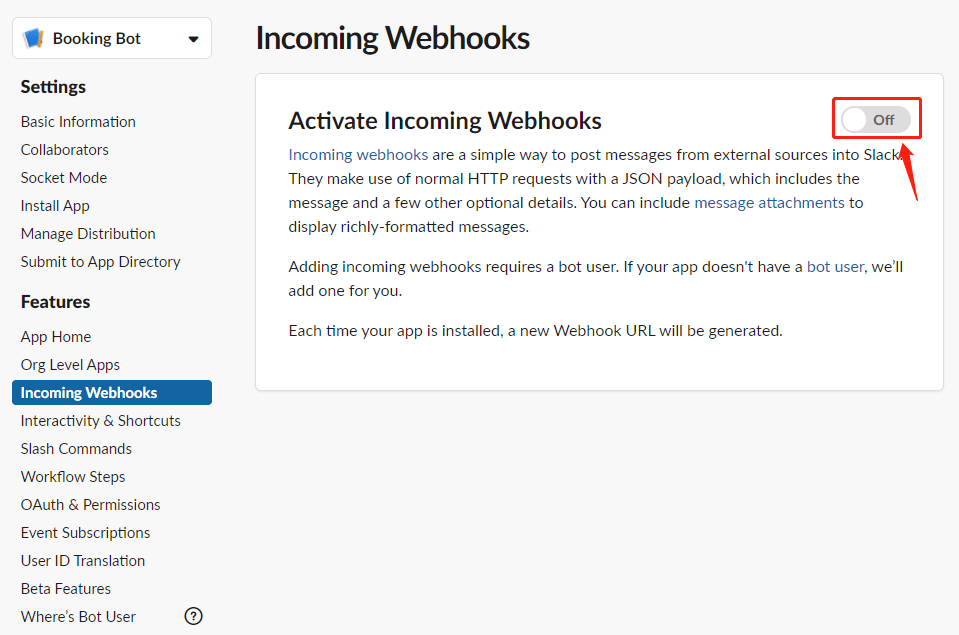
Setup Slack
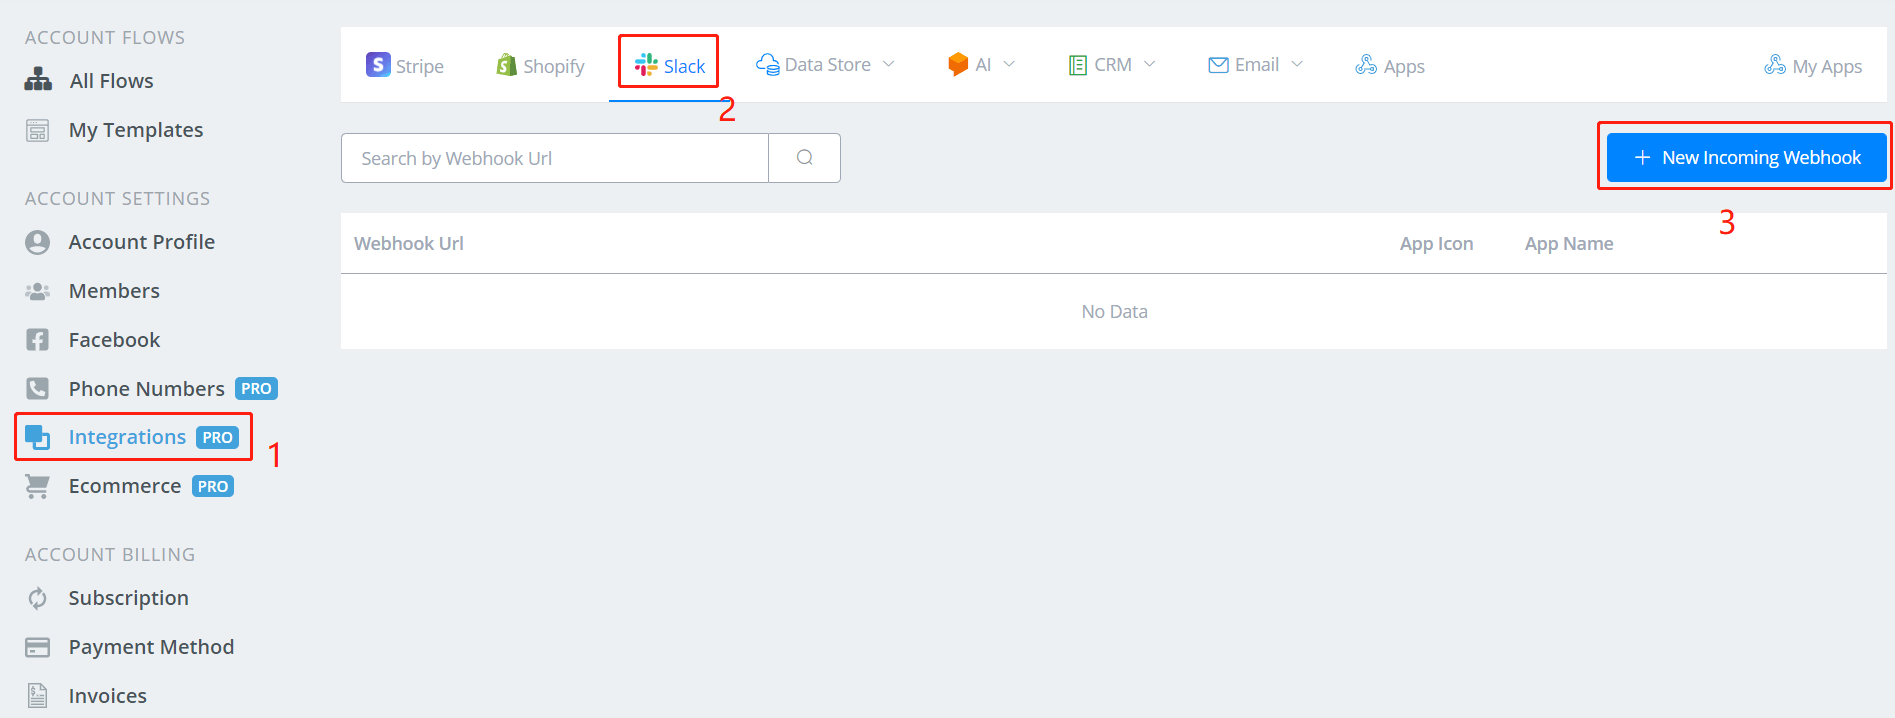
To send out notifications to your Slack group or personal channel, you will need incoming webhooks first. Follow step 1, 2, 3 above and a window will pop up:

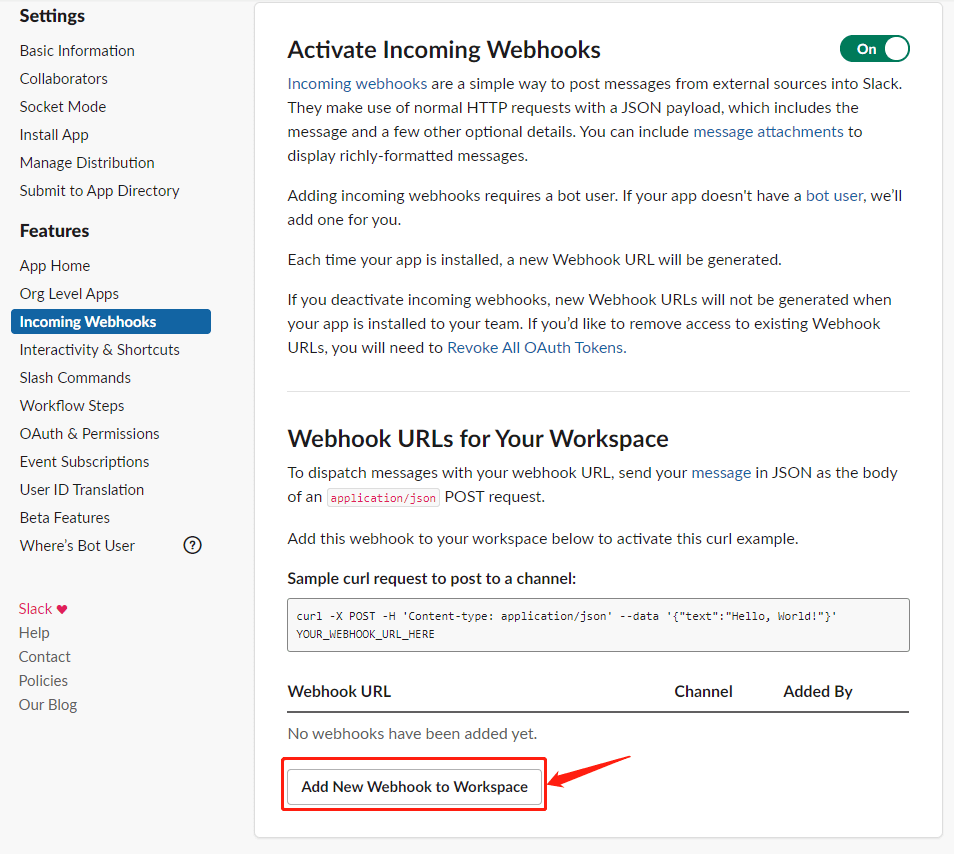
There are 2 ways to get an incoming webhook URL:
- from Slack Incoming Webhooks App
- from your own Slack App
Get an Incoming Webhook URL from Slack Incoming Webhooks App
Visit Incoming WebHooks (opens new window), login yourself, then:
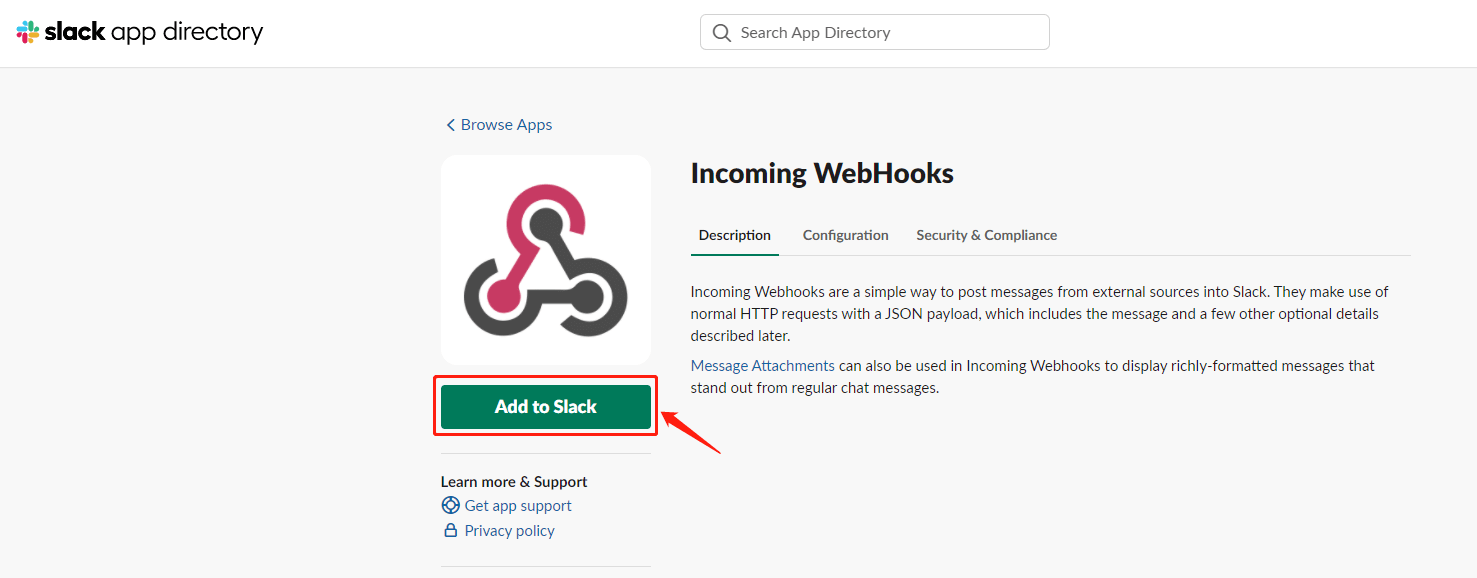
click “Add to Slack”.
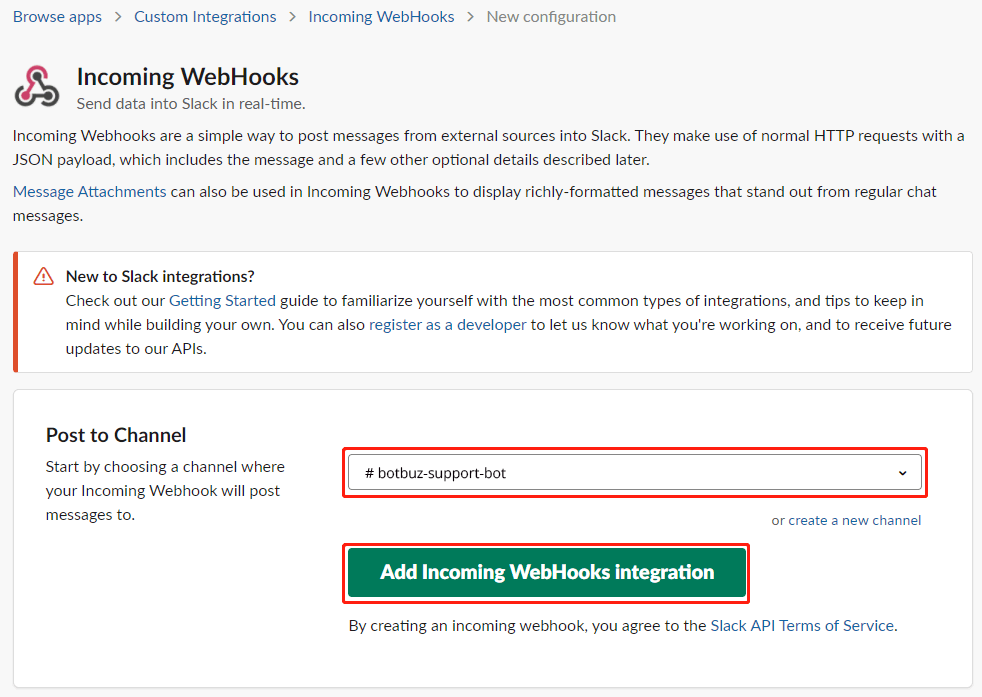
Pick a channel you would like your bot to send notifications to, then click “Add”.
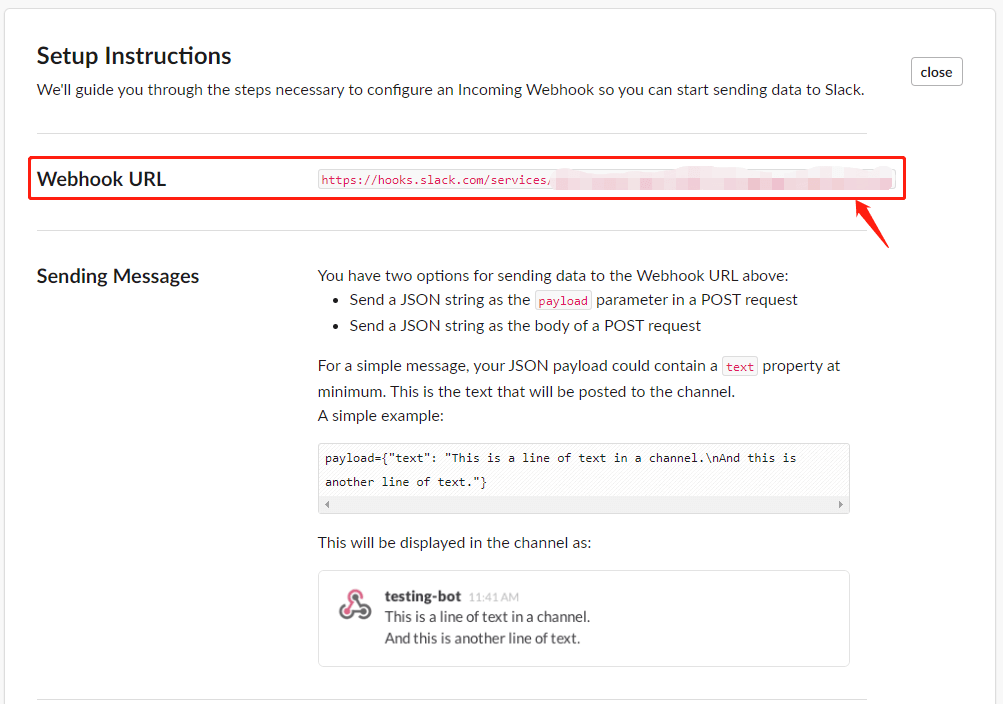
Ta-da! Here you are the URL.
Get an Incoming Webhook URL from Your Own Slack App
A wave of buttons is coming, click on them one by one:
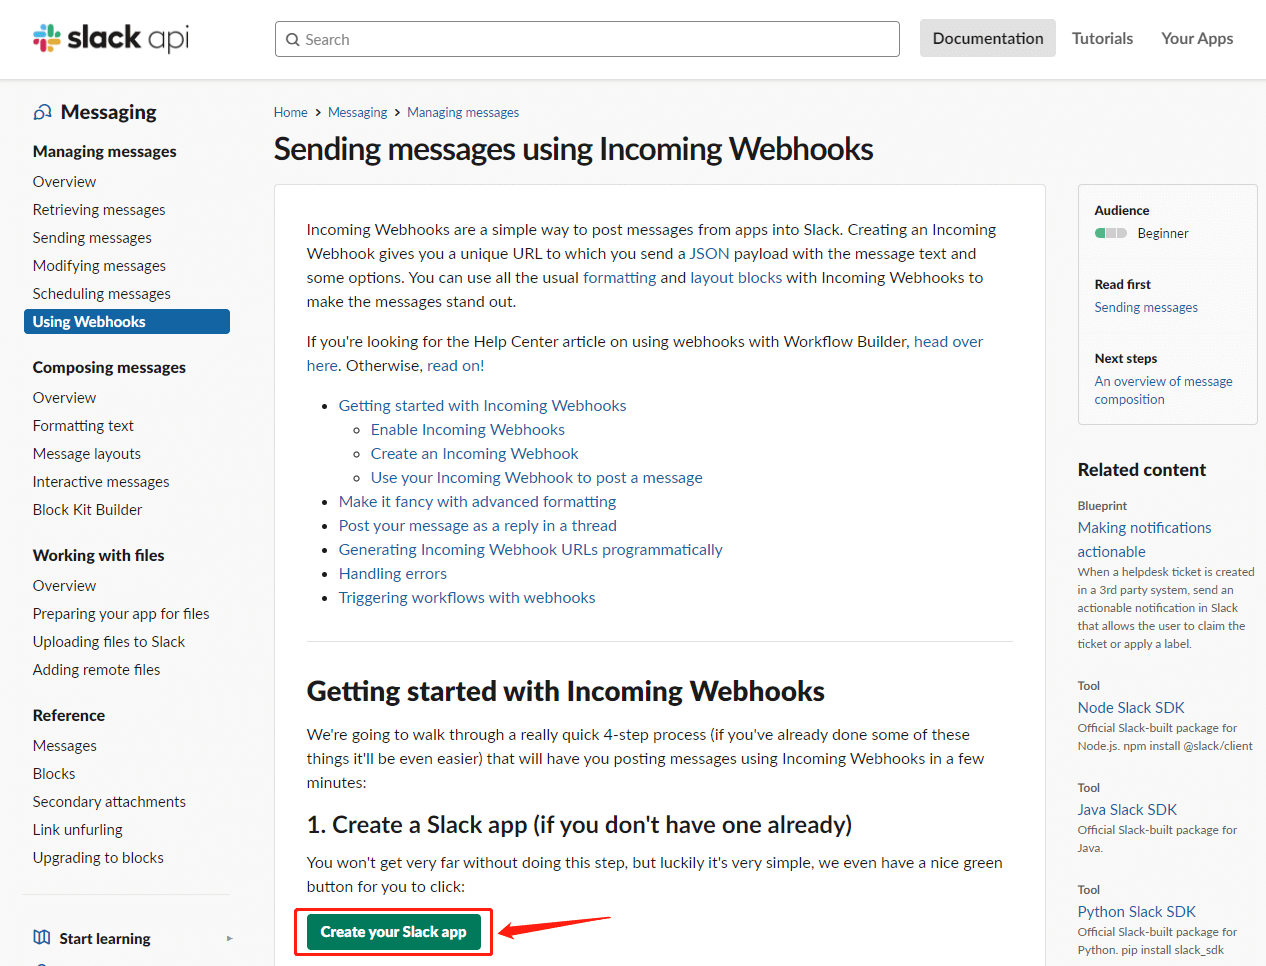
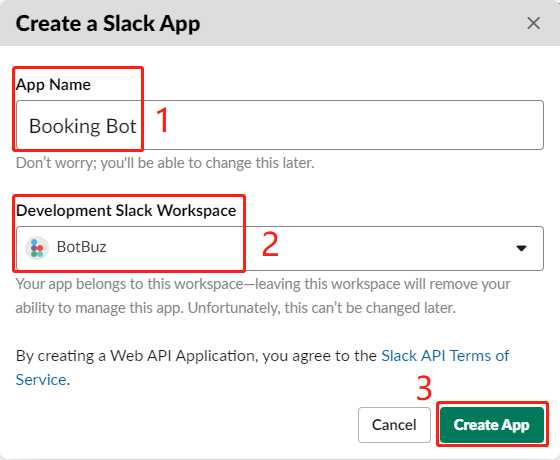
- Give an App name.
- Select your workspace.
- “Create App”
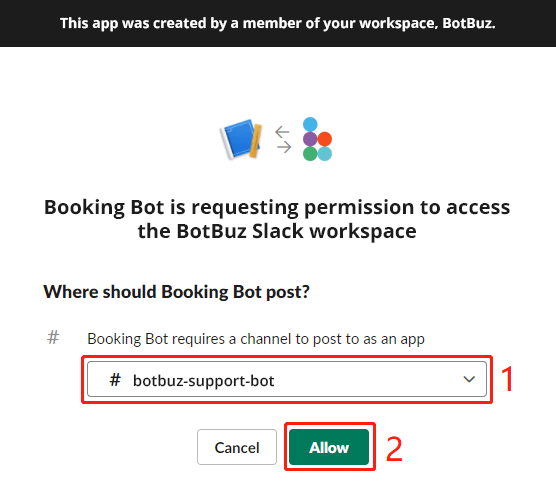
- select a channel
- “Allow”
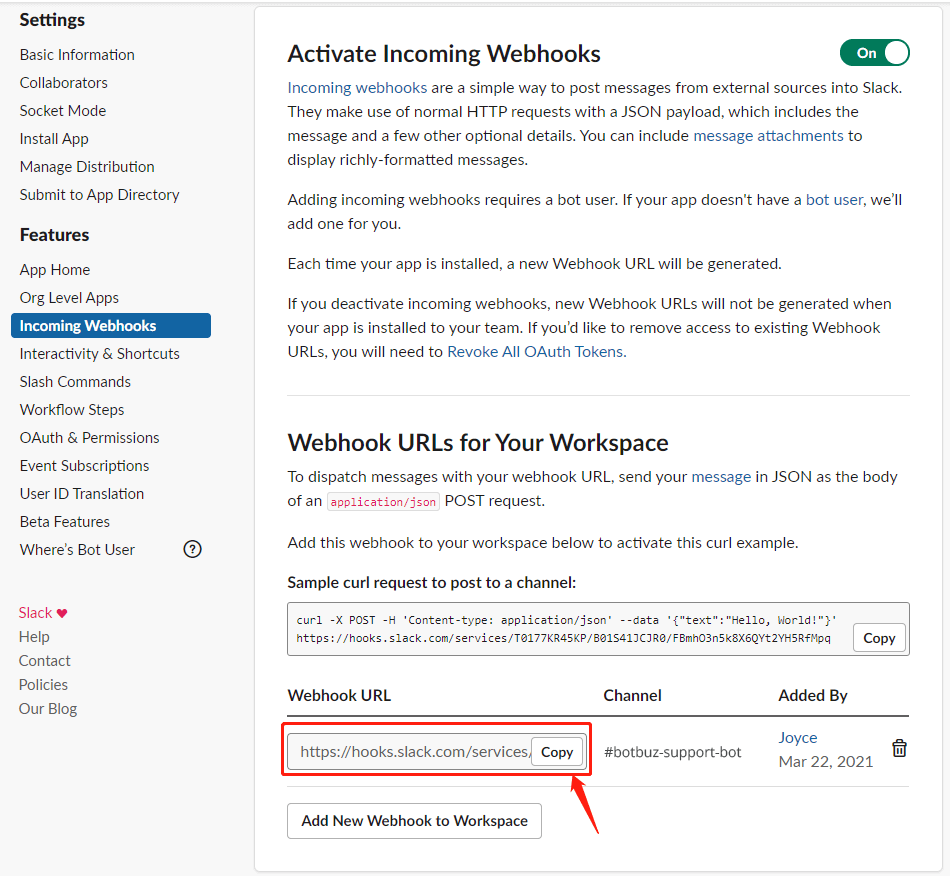
Finally, you see your URL!
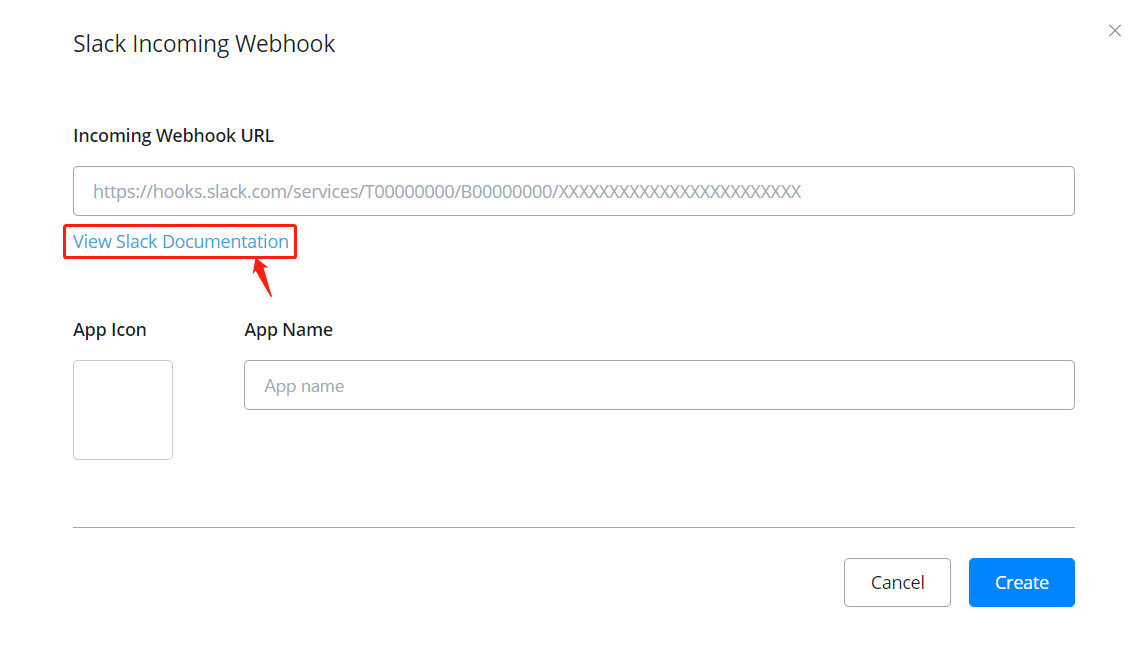
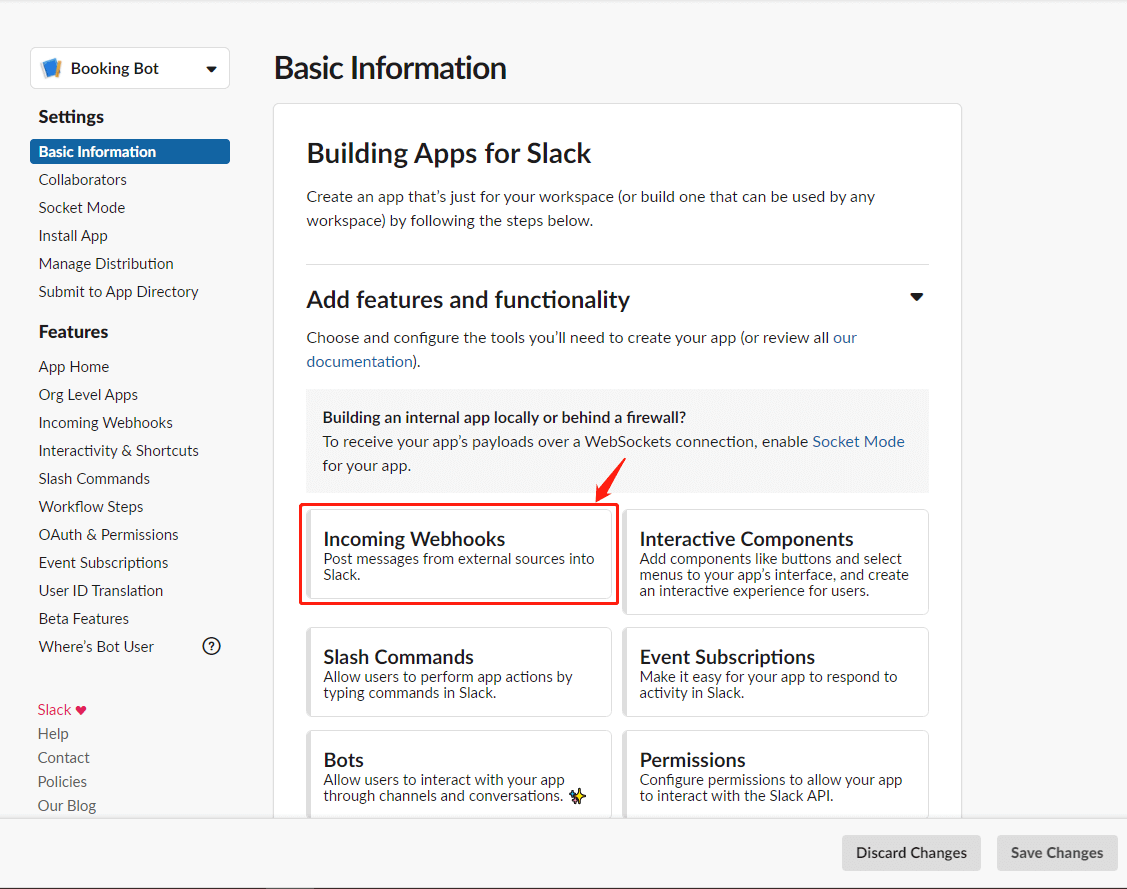
Add Incoming Webhook
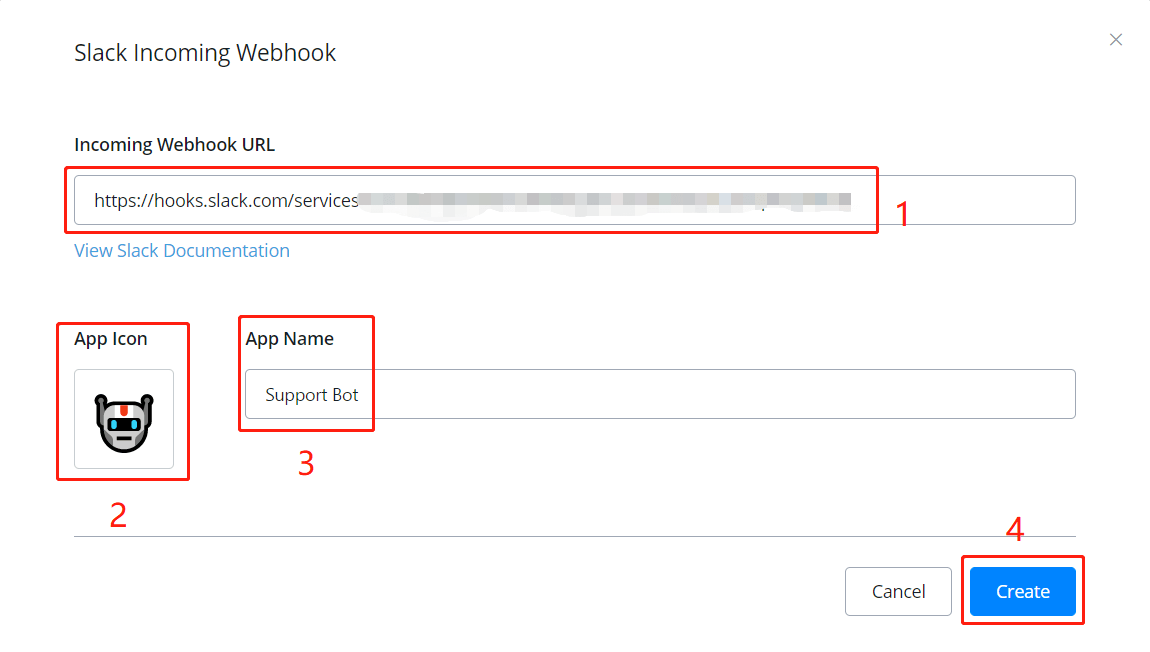
- paste the URL you got in either the first way or the second above.
- pick a lovely icon.
- name it.
- and click “Create”.
All done! This is how it looks like

More information click → Slack API(opens new window)
Slack Agent
Botbuz agent bot will allow you to handle the live chat support across all the 12+ channels Botbuz supports.
- You can receive the push notification in the Slack app
- You can reply & send audio, text, picture, and files to the user directly on Slack
- You can include your team member in the group chat.
- You can easily resume automation or check contact details.
After the automation is paused, you can easily chat with the customers across all the 12+ social channels, you can send images, files, and subflow directly in Slack, and also you can resume automation and check the lead's details and contact information.
Connect Slack to your workspace
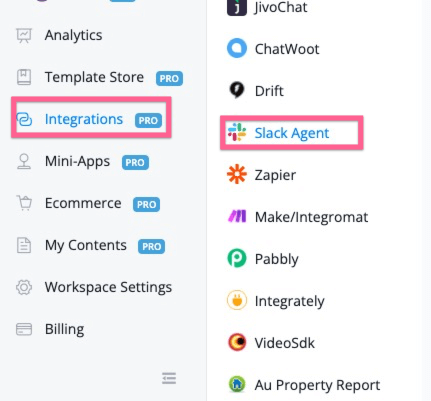
You need to log in to your Botbuz dashboard and then go to integration, then find the Slack agent, and click “Connect Slack account”
After you clicked the “Connect Slack account”, you will be redirected to the authorization window like below:
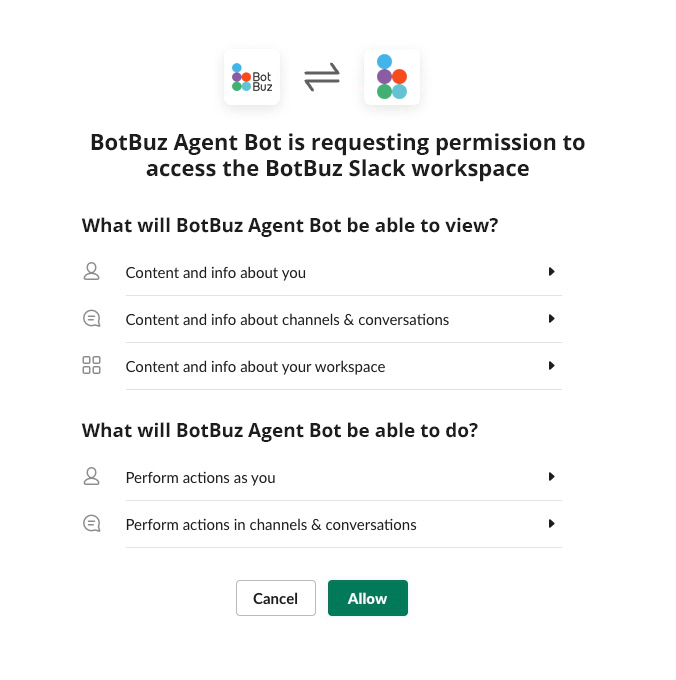
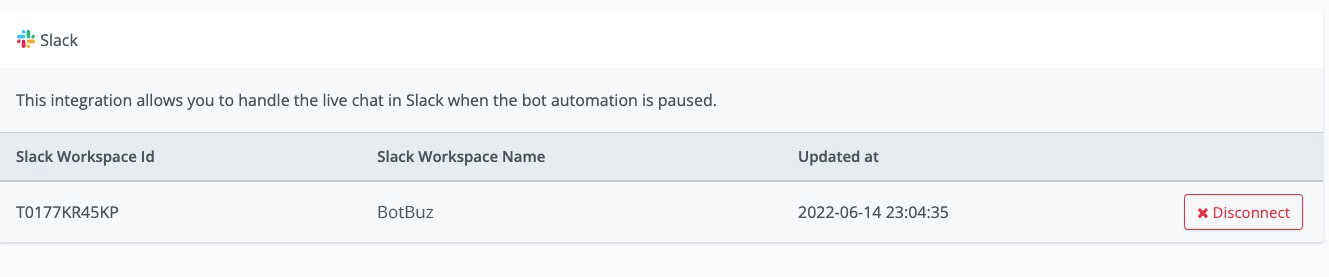
And you need to click “allow”, and then you should be redirected back to Botbuz, with your Slack workspace connected.
How to use Activate Slack as a live chat
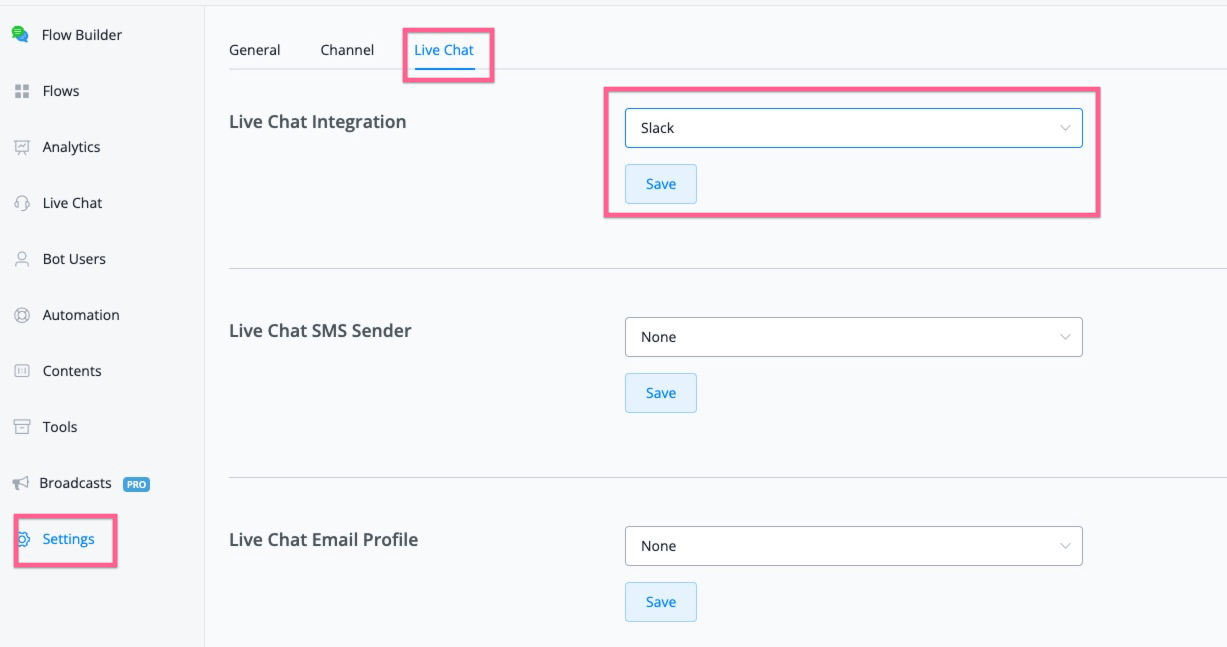
In order to use Slack to handle the live chat, you need to go to the channels then go to the settings, and then go to “Live Chat”,
You need to select “Slack” as the live chat integration as per the screenshot below:
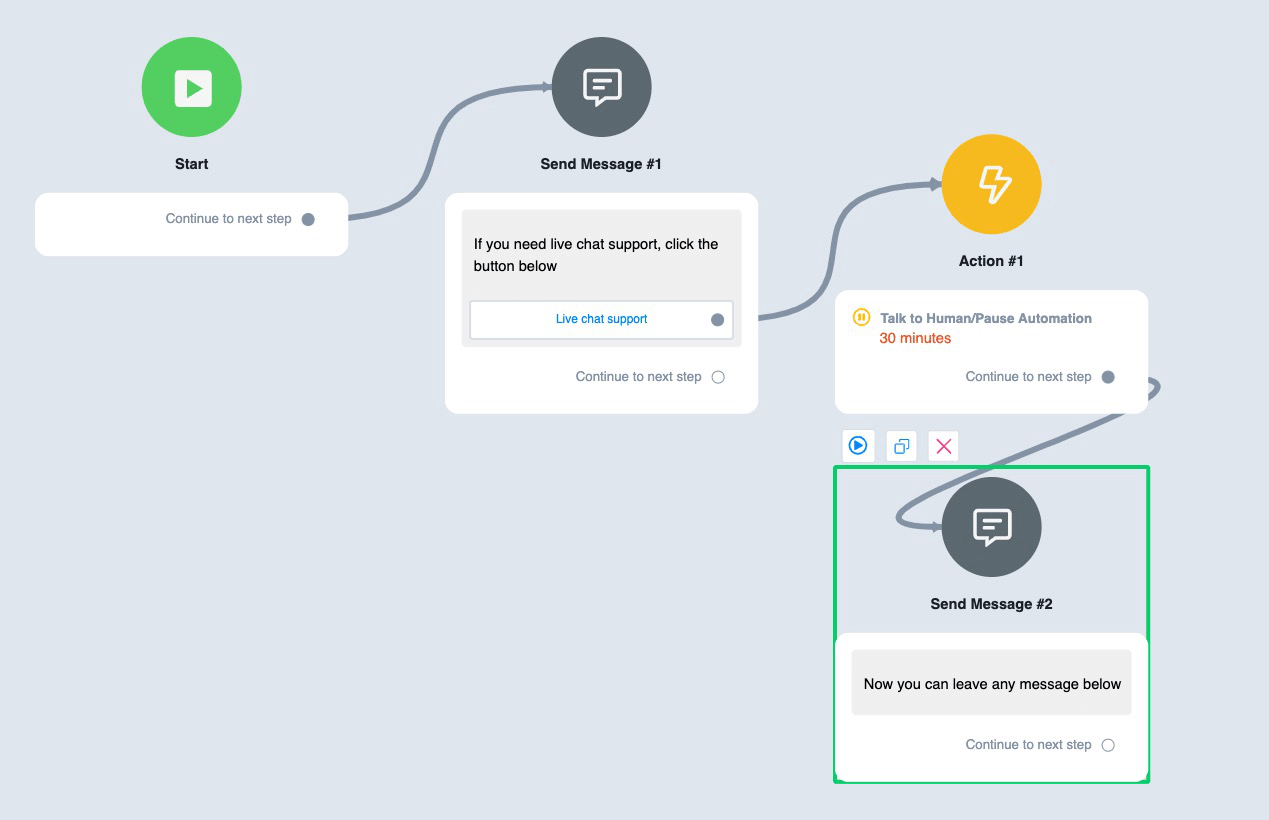
How to use Slack as a live chat
In any of the channels, if you use the “Pause automation/Talk to human”, any message after that will forward to Slack.
Check the sample flow you can build and test with.
You will receive the live chat in the new channel created as per the screenshot below:
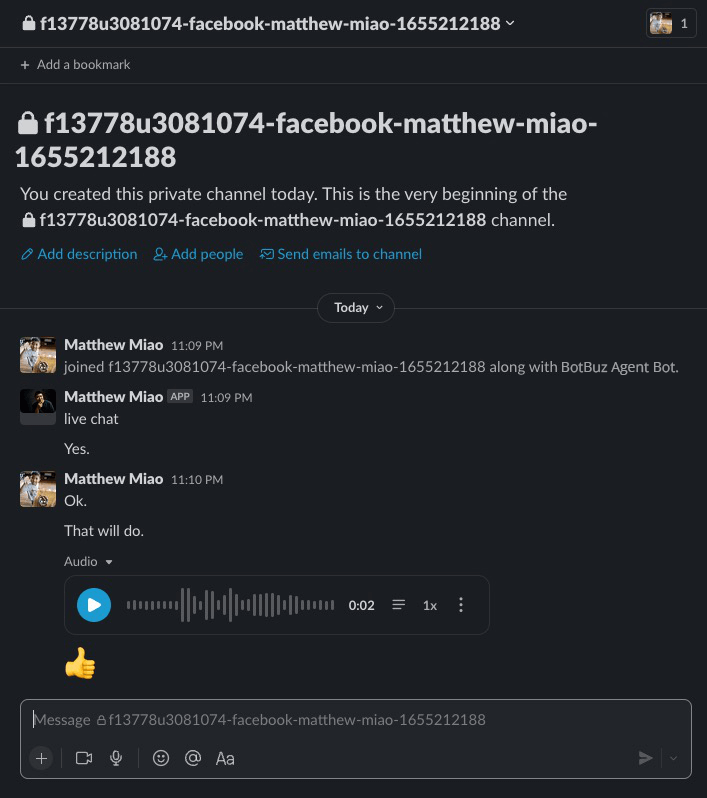
So you can reply with audio, image, files, and emoji to the customers.
You can also invite your team members into the channel.
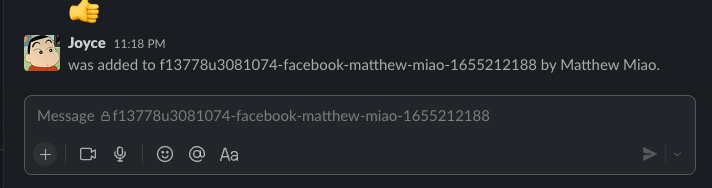
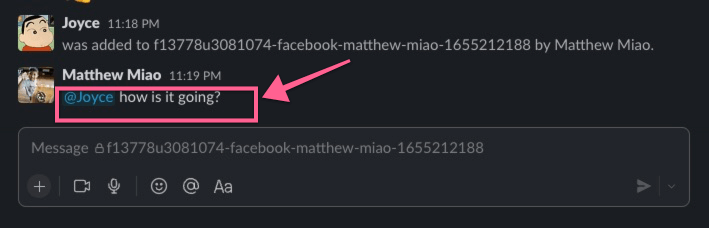
And in the group chat, you can discuss with your team member, and you can use @teammember to discuss, and the discussion between the team members won’t be sent back to the user.
Like the message below, it won't be sent to the customers.
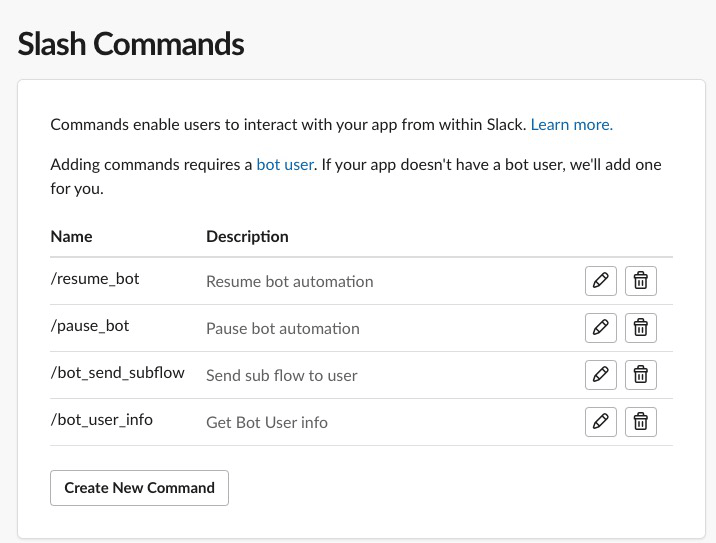
Using Slash Commands
If you type /bot in the chat, it will trigger the slash commands to help you with more actions. Currently, we support the below 4 actions:
- Resume_bot: if you use this action, the user will back to the automation
- Pause_bot: if you use this action, the user will pause the automation
- Bot_send_subflow: You can send a subflow to the user, and after the user received the flow, the user will back to automation
- Bot_user_info: this will get the bot user information for your reference.
Dialogflow
With Dialogflow, you can pre-set some frequently asked questions, and your bot can deal with the simple queries on behalf of you and transfer the difficult. Besides, you can train your bot to understand more human language including greeting, gratitude, basic interaction, etc.
Setup Dialogflow
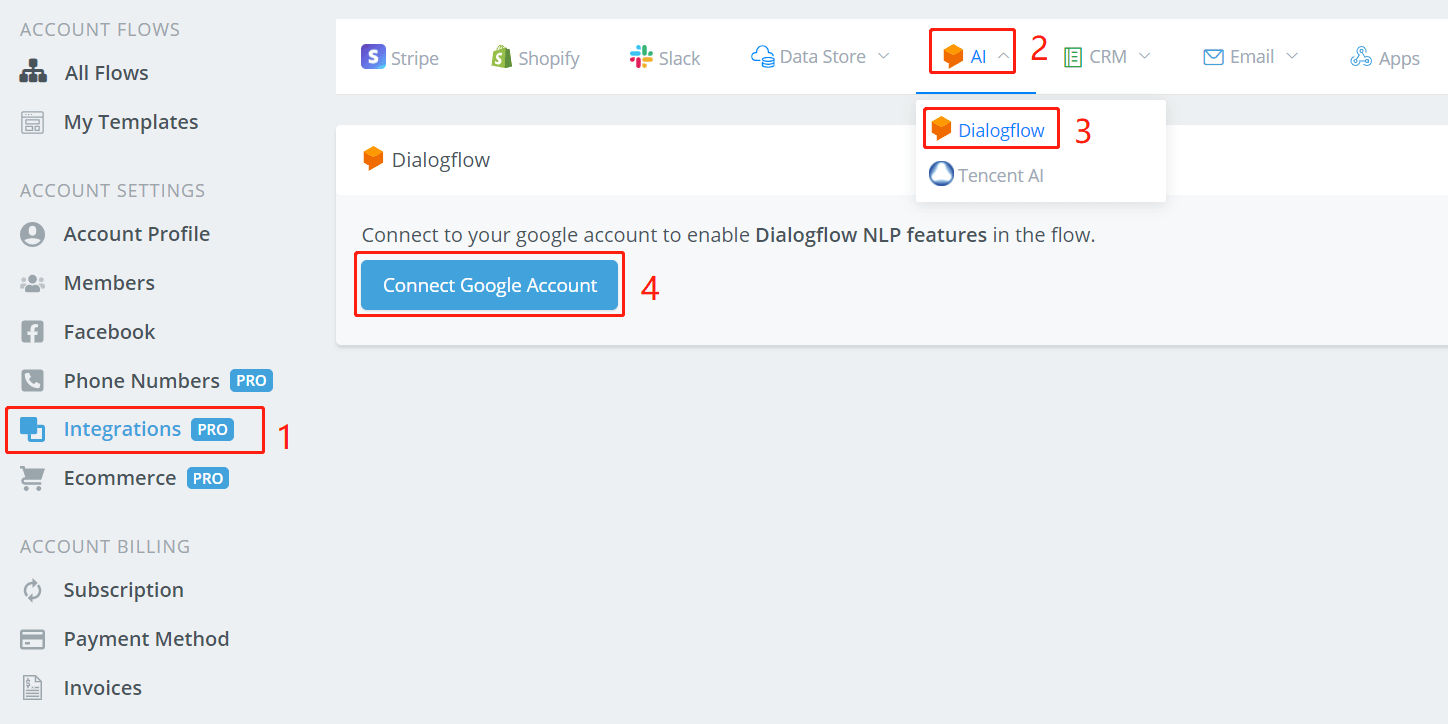
Follow steps 1 to 4 to connect to your Google account.
TIP
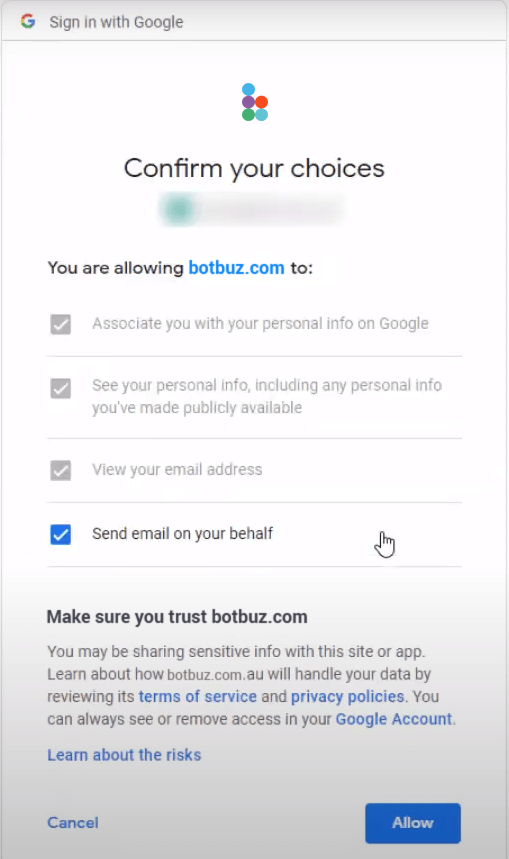
If there is a prompt saying that “Google hasn't verified this app”, try click “Advanced” and then click “Go to Botbuz.com.au”. Don't worry, it's safe to do so.
Click the blue “Allow” button to allow Botbuz to get access to your Dialogflow account.
Visit Dialogflow Website, login to your Google account, then you will see your Dialogflow dashboard like this:
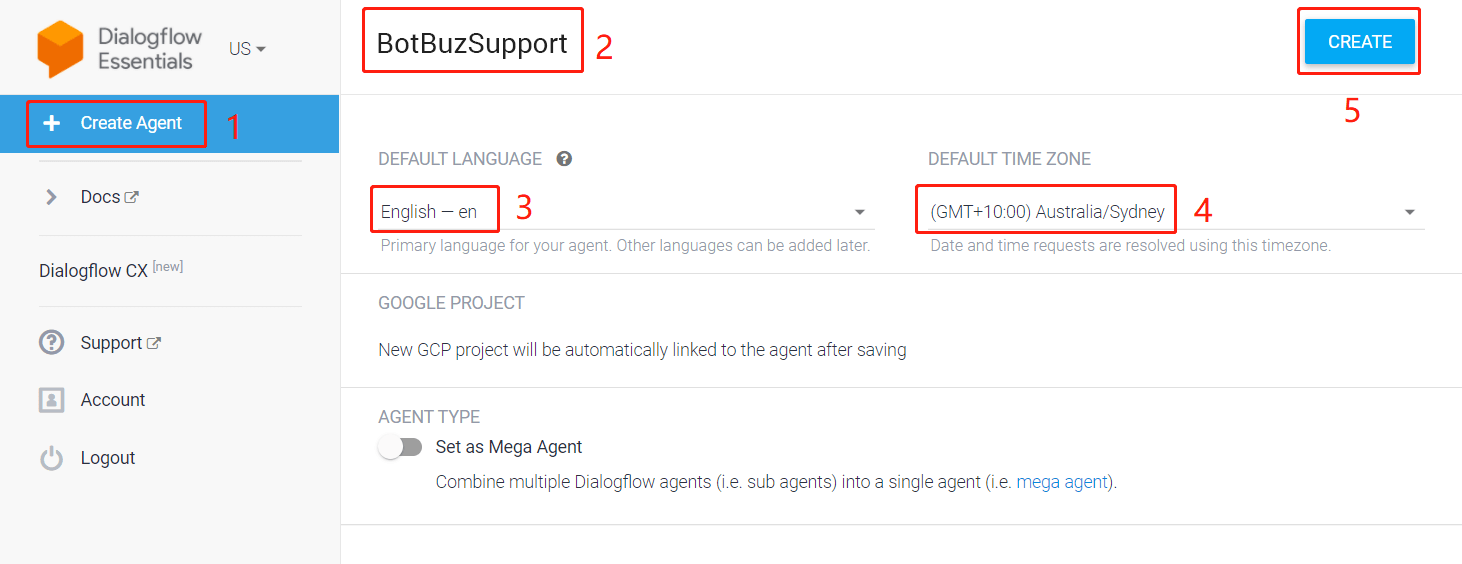
- Click “Create Agent” on the left sidebar
- name this agent
- pick a default language for the bot
- choose a default time zone
- once finish, click “CREATE”
“Google Cloud Platform service has been disabled”
If you fail to create an agent with an error saying “Google Cloud Platform service has been disabled. Please contact your administrator to restore service”, it is possible that because the google account is from your organisation like [email protected]. You can solve this problem by either contacting the administrator in your company for Google cloud platform authorization or using your own Google account instead.
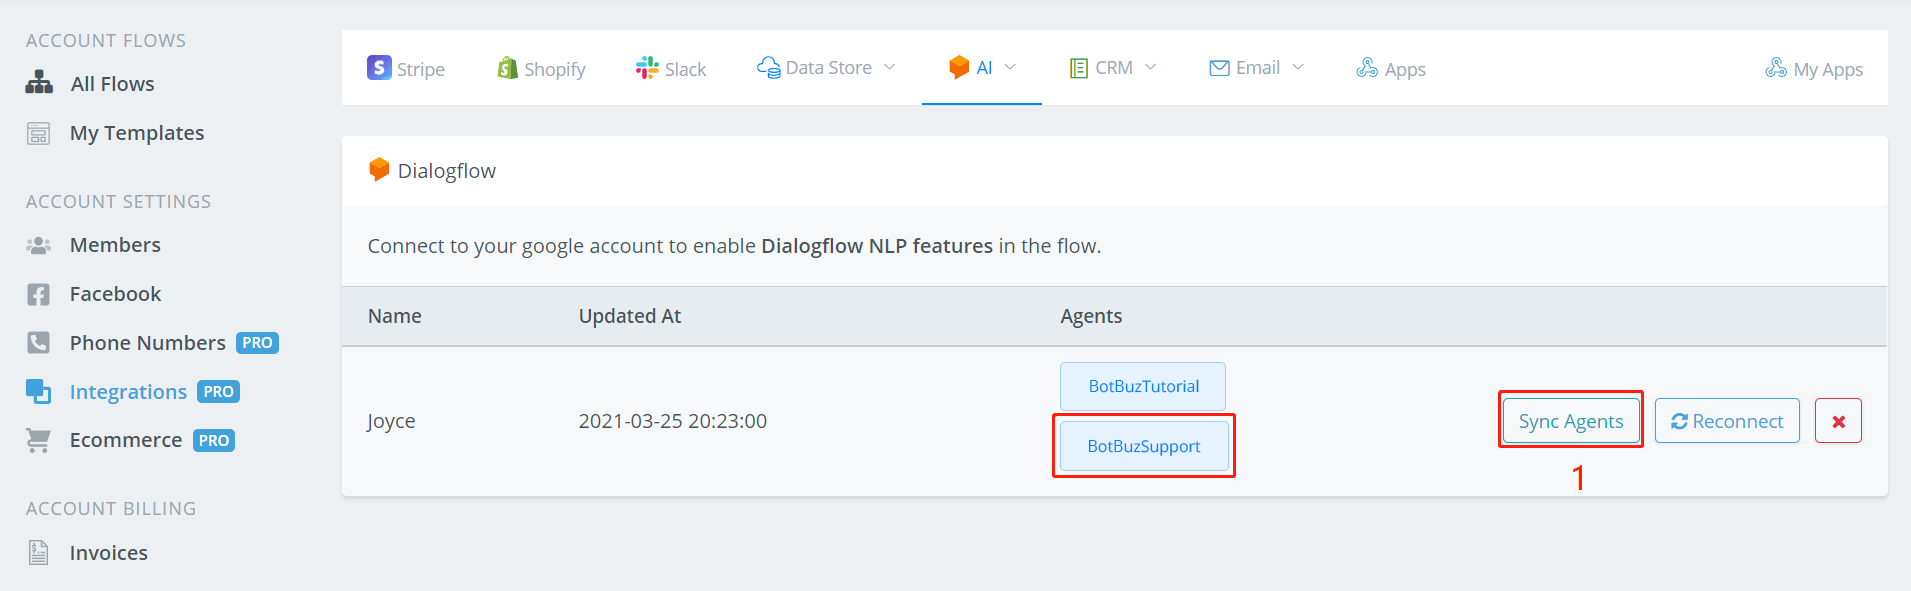
After creating a new agent, come back to Botbuz, click “Sync Agents” as below. All your agents will be listed here.
Use Dialogflow
Choose one of your flows that you would like your Dialogflow agent to manage.
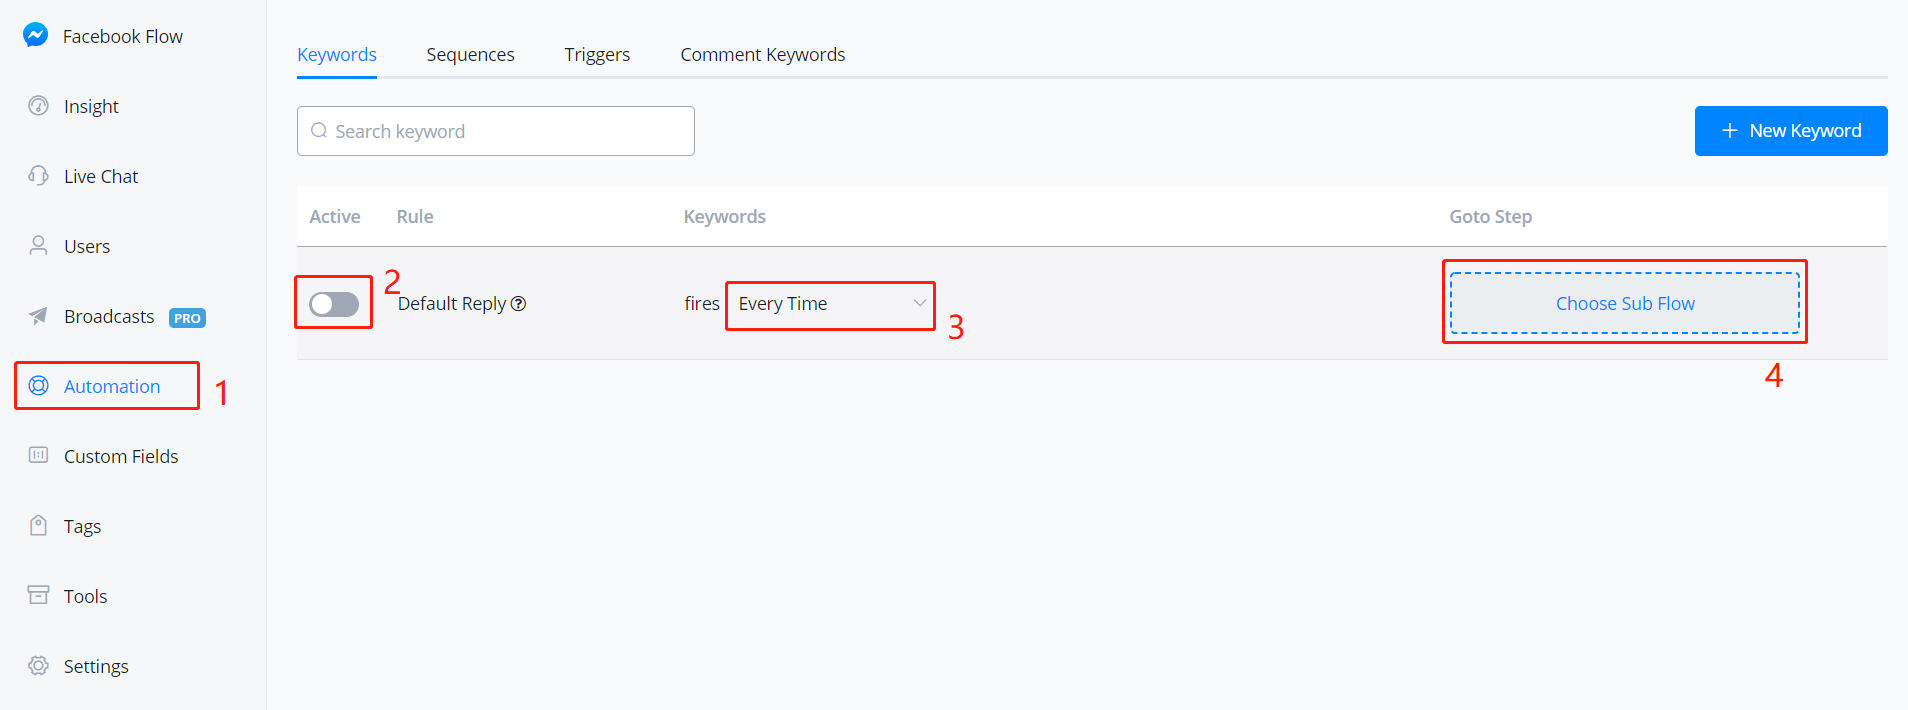
In the workspace of the flow,
- click “Automation” on the left sidebar
- activate the “default Reply”
- select frequency, usually “Every Time”.
- click “Choose Sub Flow”
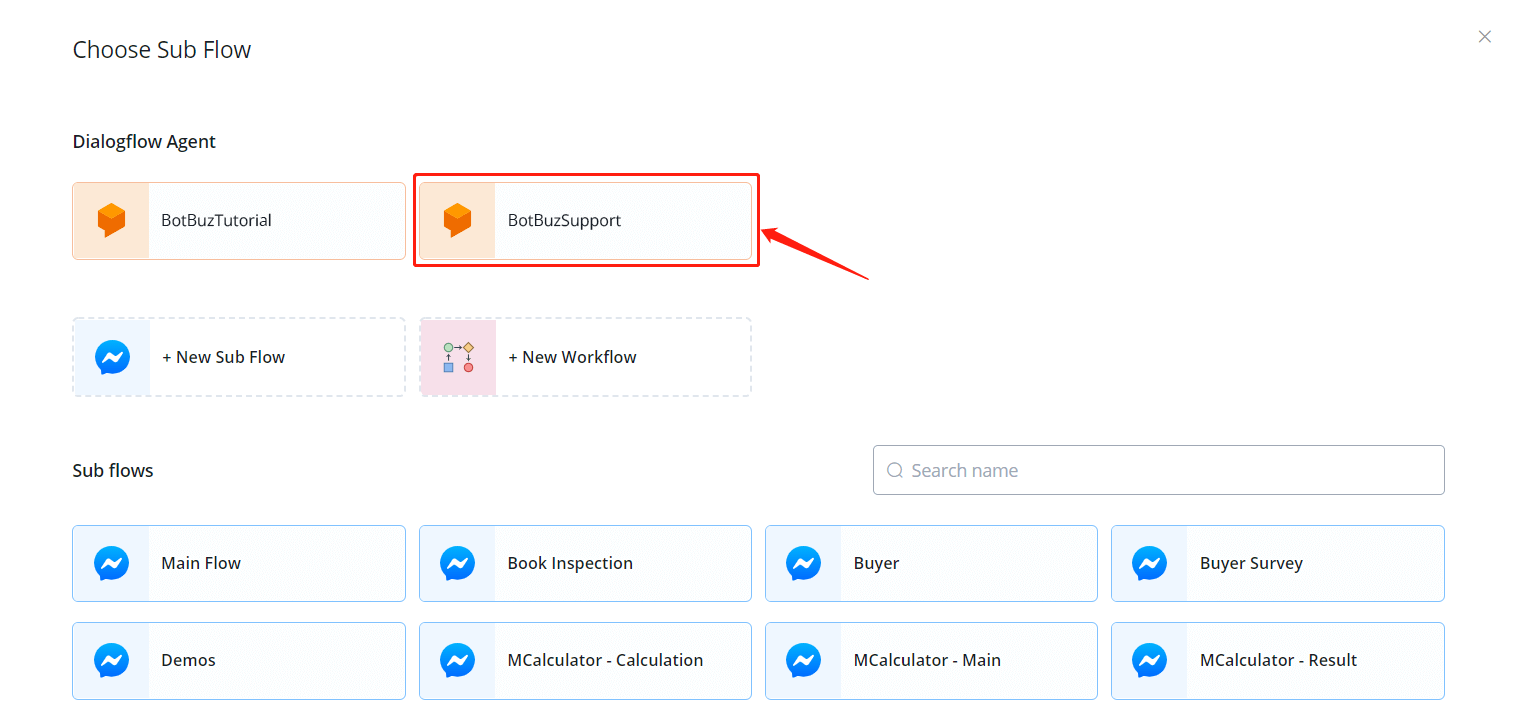
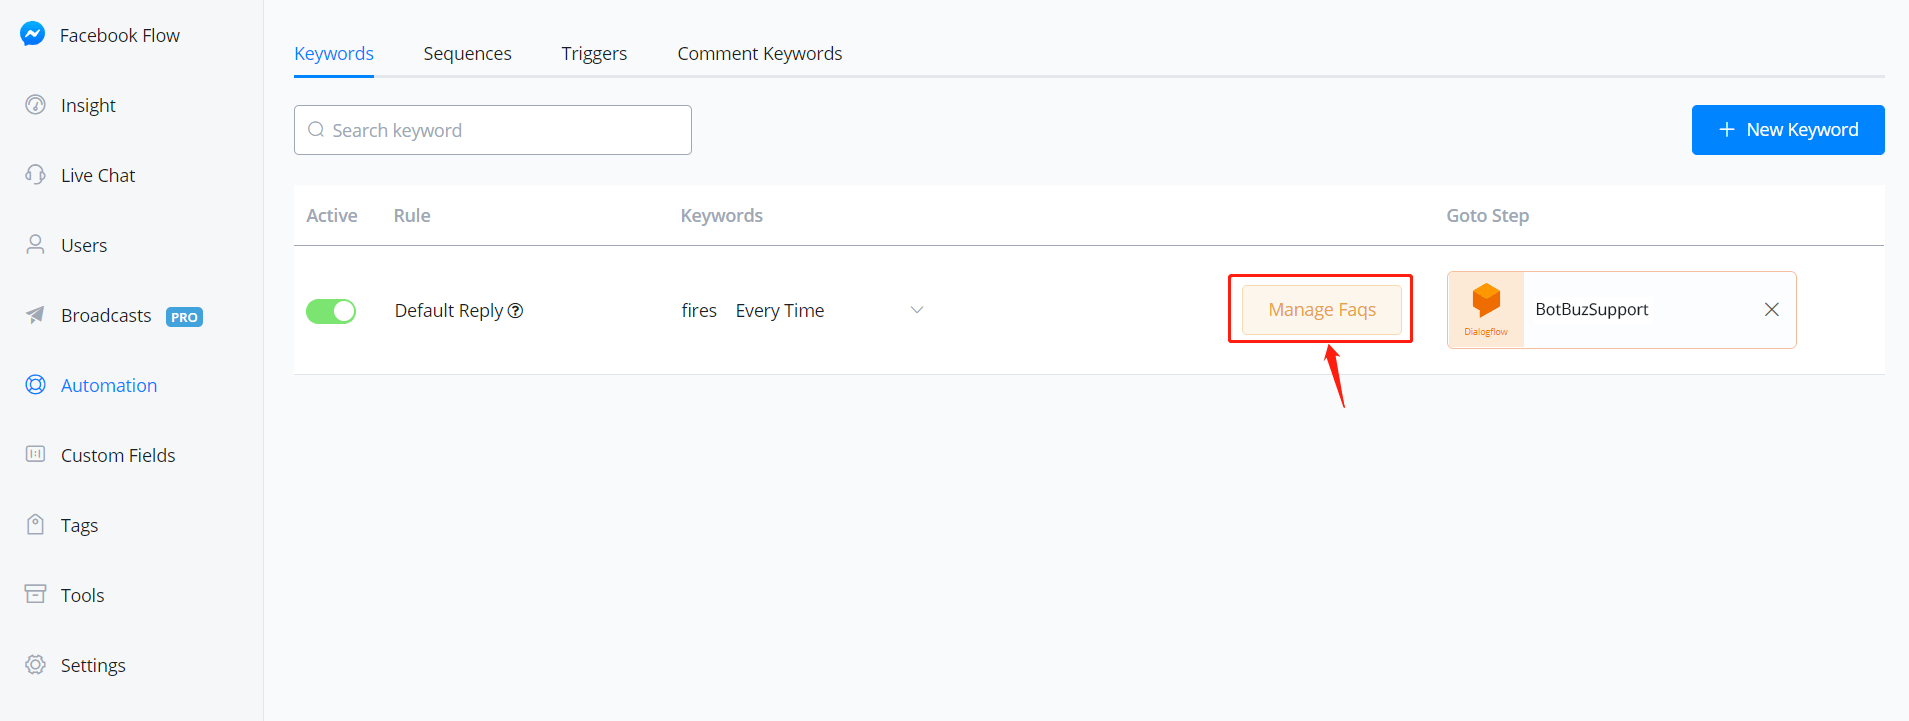
Select your agent and you are then able to manage your FAQs. Enter FAQ interface by clicking the “Manage Faqs” button as below:
This is how the FAQ interface looks like:
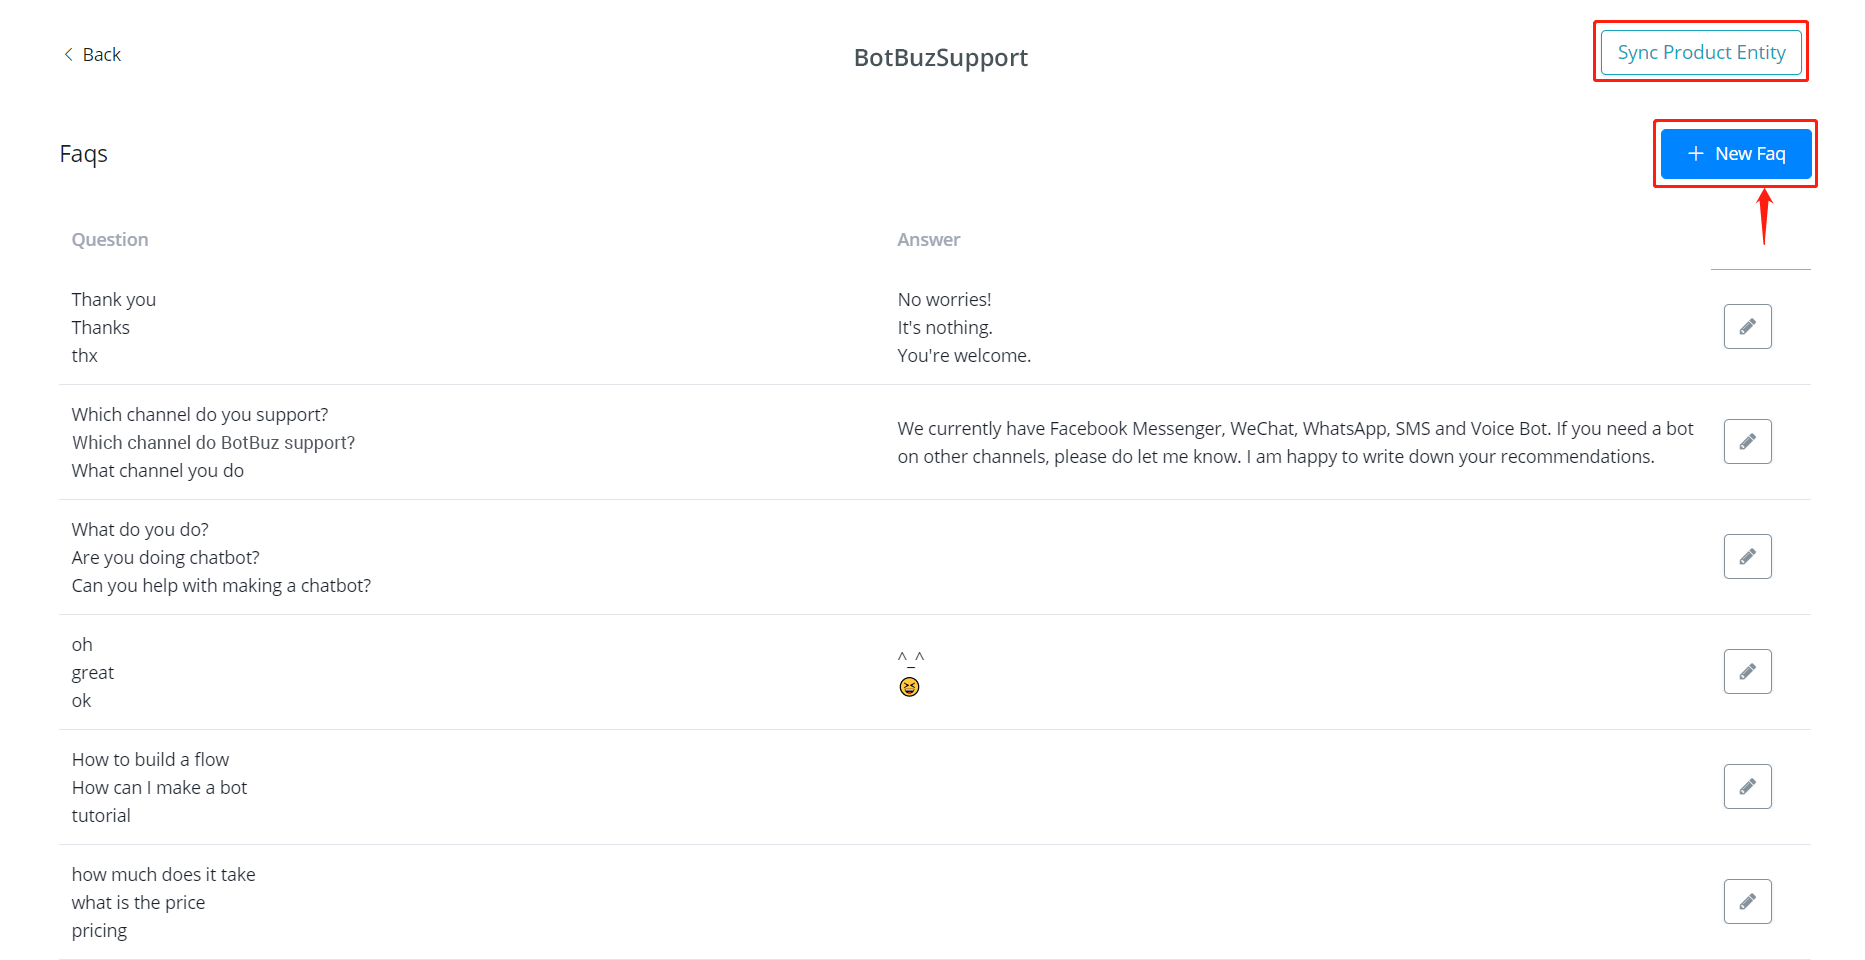
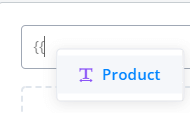
The “Sync Product Entity” button is for Ecommerce usage. By synchronizing product information in your Ecommerce system with Dialogflow, you can then recognize and reply to related products when users ask about them. To quote a product name, "{{"type to see the picture below
Click “+ New Faq” to start building your smart dialog:
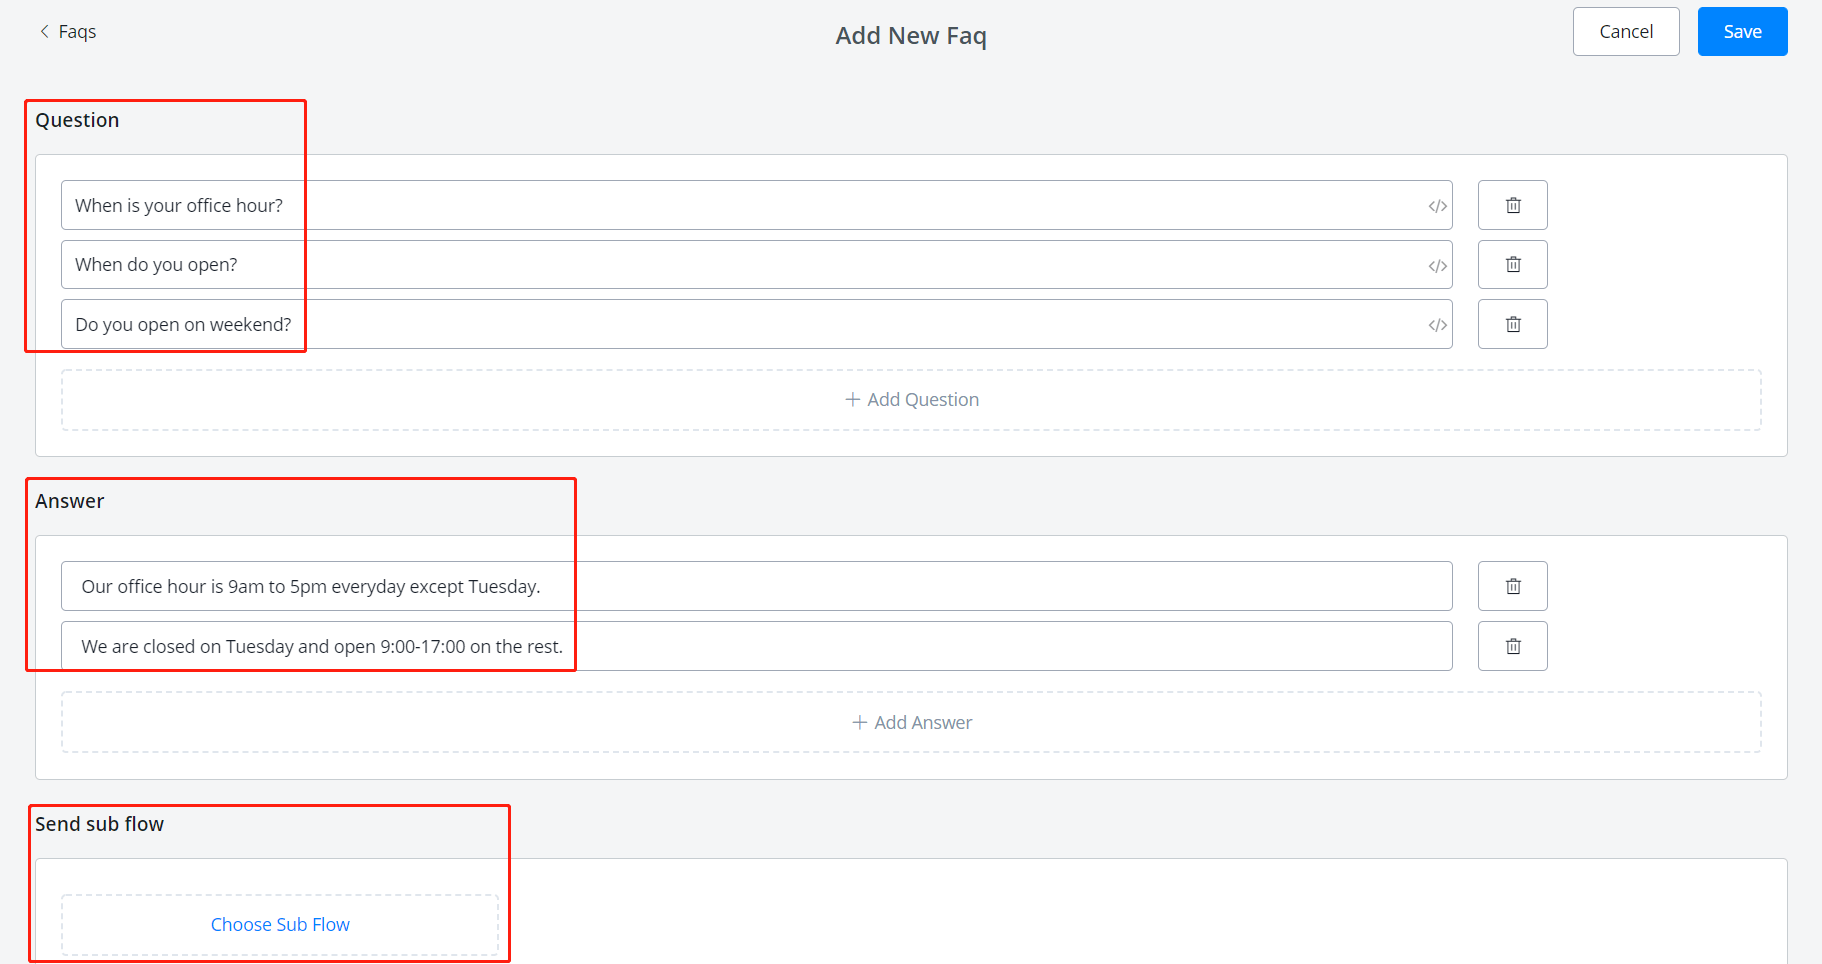
For each frequently asked question, put as many synonymous sentences as you can in the question area and Dialogflow will help with the rest.
You don't need to worry about too many details because Dialogflow is using fuzzy matching. For example, you have already put “When is your office hour?” and “When do you open?”. The bot can recognize it is asking about opening hours whatever user send “office hour?”, “when u open?”, etc even there is any abbreviation or grammar mistake.
The answer area is telling the bot what to reply when a question matched. The bot will randomly pick one answer from the answer list to send.
In “Send sub flow” area, choose a sub flow if needed. The sub flow will be sent just after the answer.
Finally, click “Save” and here you go, 🎉 your first FAQ has done. The bot is now understanding more human language! Keep testing and improving it.
Use Dialogflow
Choose one of your flows that you would like your Dialogflow agent to manage.
In the workspace of the flow,
- click “Automation” on the left sidebar
- activate the “default Reply”
- select frequency, usually “Every Time”.
- click “Choose Sub Flow”
Select your agent and you are then able to manage your FAQs. Enter FAQ interface by clicking the “Manage Faqs” button as below:
This is how the FAQ interface looks like:
The “Sync Product Entity” button is for Ecommerce usage. By synchronizing product information in your Ecommerce system with Dialogflow, you can then recognize and reply to related products when users ask about them. To quote a product name, "{{"type to see the picture below
Click “+ New Faq” to start building your smart dialog:
For each frequently asked question, put as many synonymous sentences as you can in the question area and Dialogflow will help with the rest.
You don't need to worry about too many details because Dialogflow is using fuzzy matching. For example, you have already put “When is your office hour?” and “When do you open?”. The bot can recognize it is asking about opening hours whatever user send “office hour?”, “when u open?”, etc even there is any abbreviation or grammar mistake.
The answer area is telling the bot what to reply when a question matched. The bot will randomly pick one answer from the answer list to send.
In “Send sub flow” area, choose a sub flow if needed. The sub flow will be sent just after the answer.
Finally, click “Save” and here you go, 🎉 your first FAQ has done. The bot is now understanding more human language! Keep testing and improving it.
Improve Dialogflow
Back to Dialogflow Website (opens new window), you will see Botbuz created many FAQ intents on behalf of you:
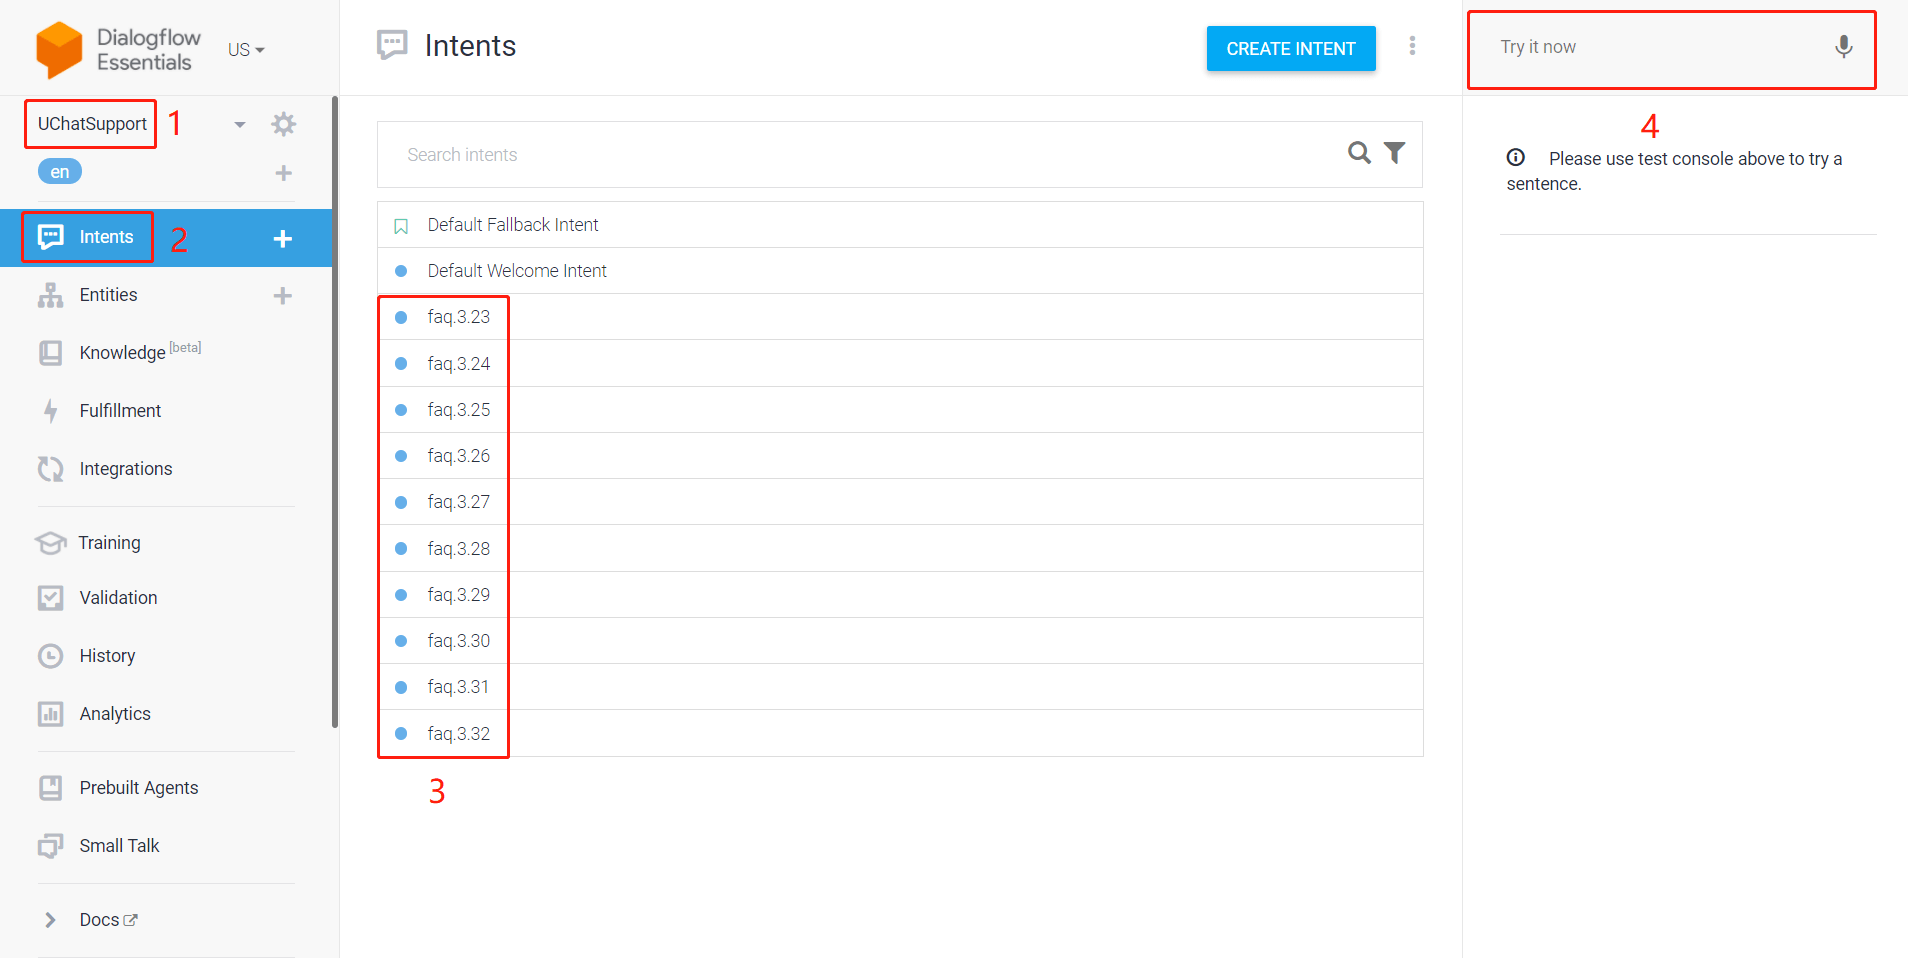
- choose your agent
- click “Intents”
- these are the intents synchronized from Botbuz
- Test your bot here, see whether it understand which FAQ you are asking about.
Check and adjust “Default Fallback Intent” or “Default Welcome Intent” if needed. “Default Fallback Intent” is matched when none of the FAQ is matched.
Select any intent, give it some more editing to help the bot understand more:
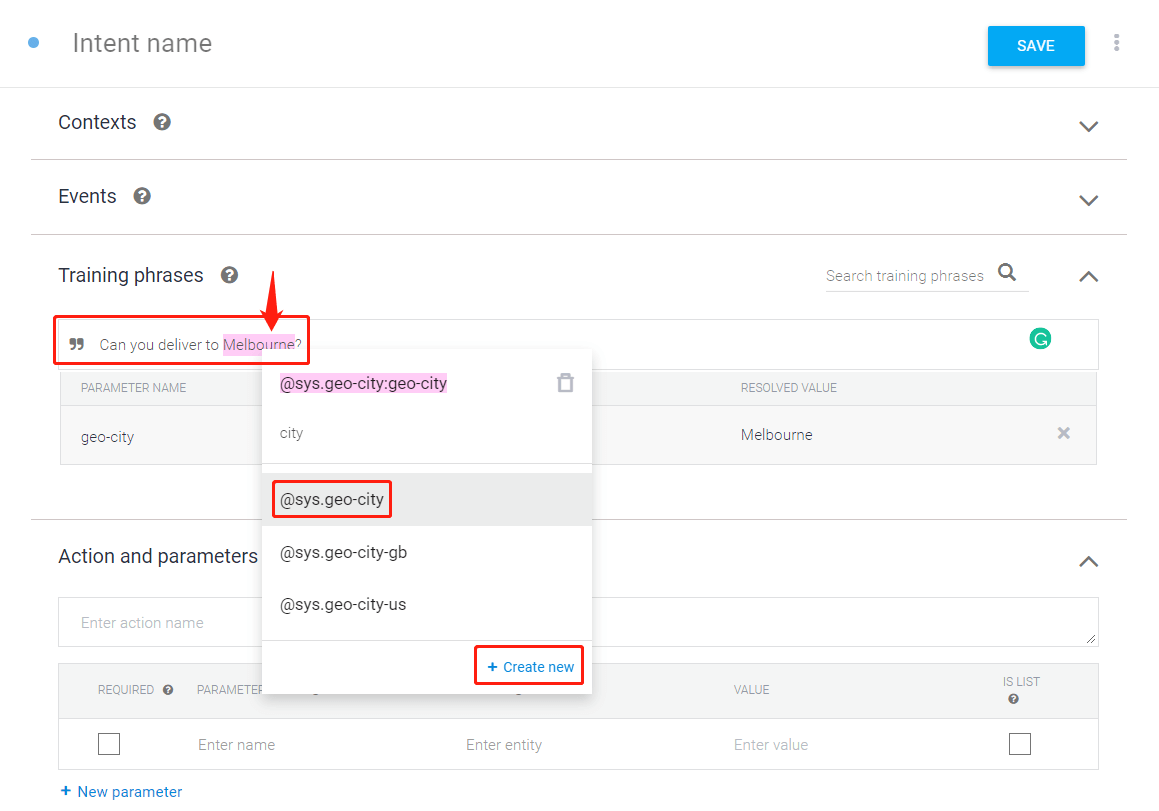
For example, in this case, double click to select “Melbourne”, then enter the keyword “city”, click on “@sys-geo-city”. This is telling the bot that the word “Melbourne” is a city. So next time when users asking “Can you deliver to Sydney?” or other cities, the bot can file the question to this FAQ.
There are various practical built-in lexicon includes color, time, post-code, country, street name, language, etc. You can even create your own!
Dynamic Content Response
Response answer is not limited to just text. Try custom payload!
To begin with, create a FAQ in Botbuz with only questions, no answer or sub flow.
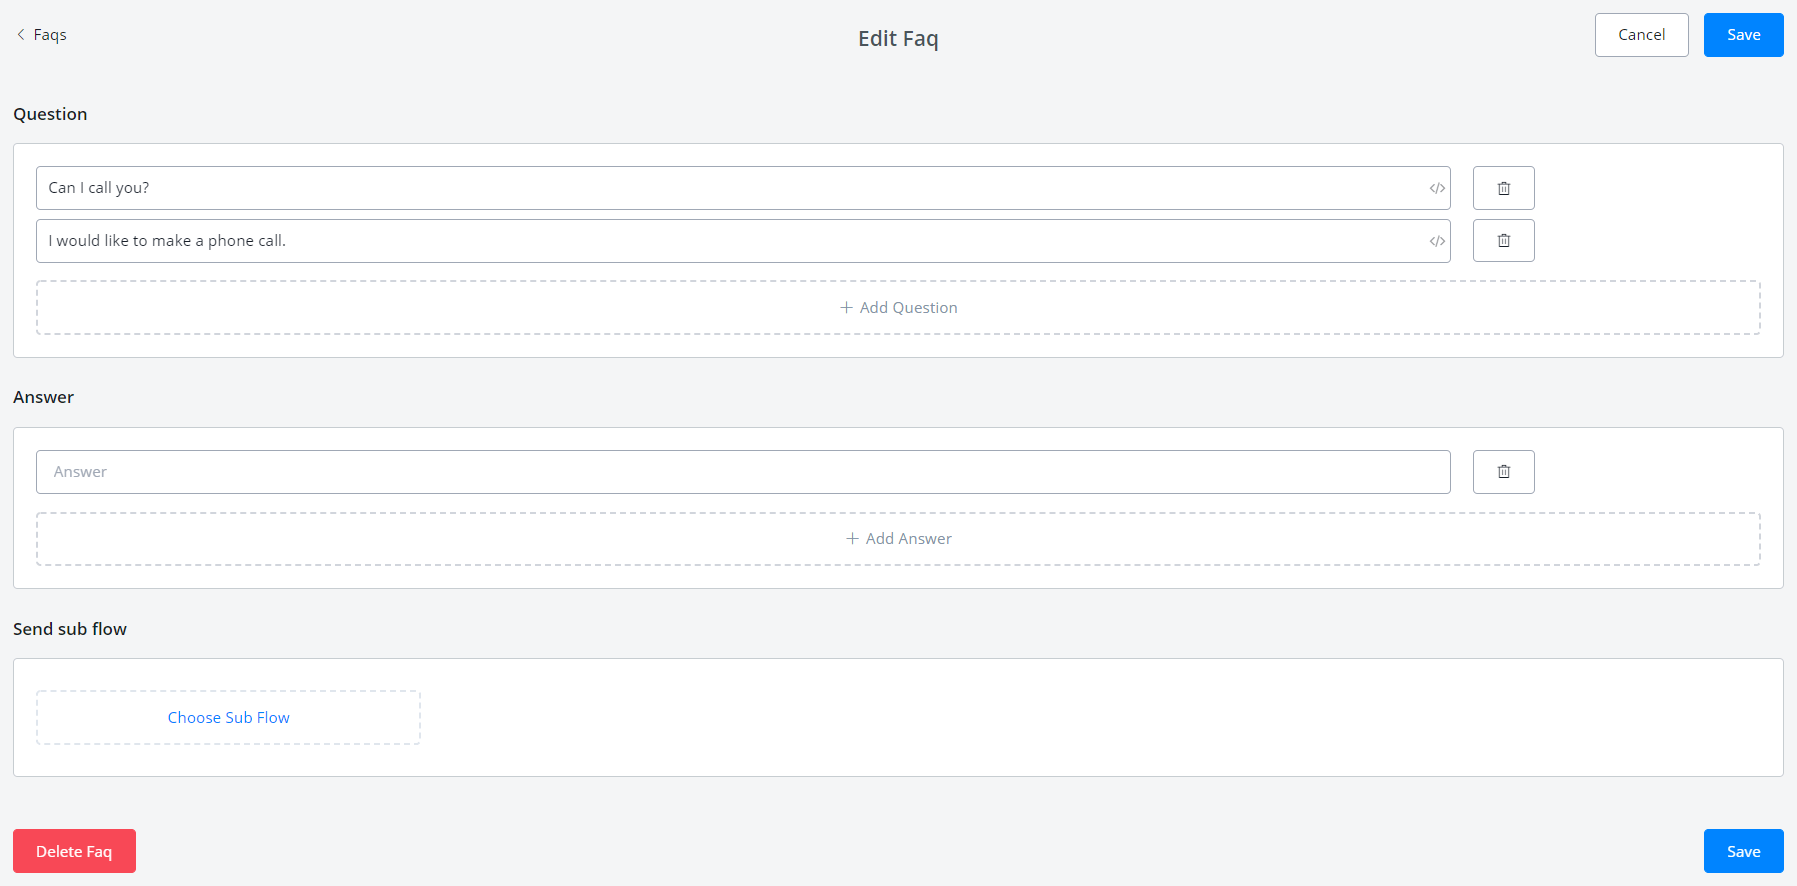
Wait a moment and refresh your Dialogflow intents until the new intent shows.
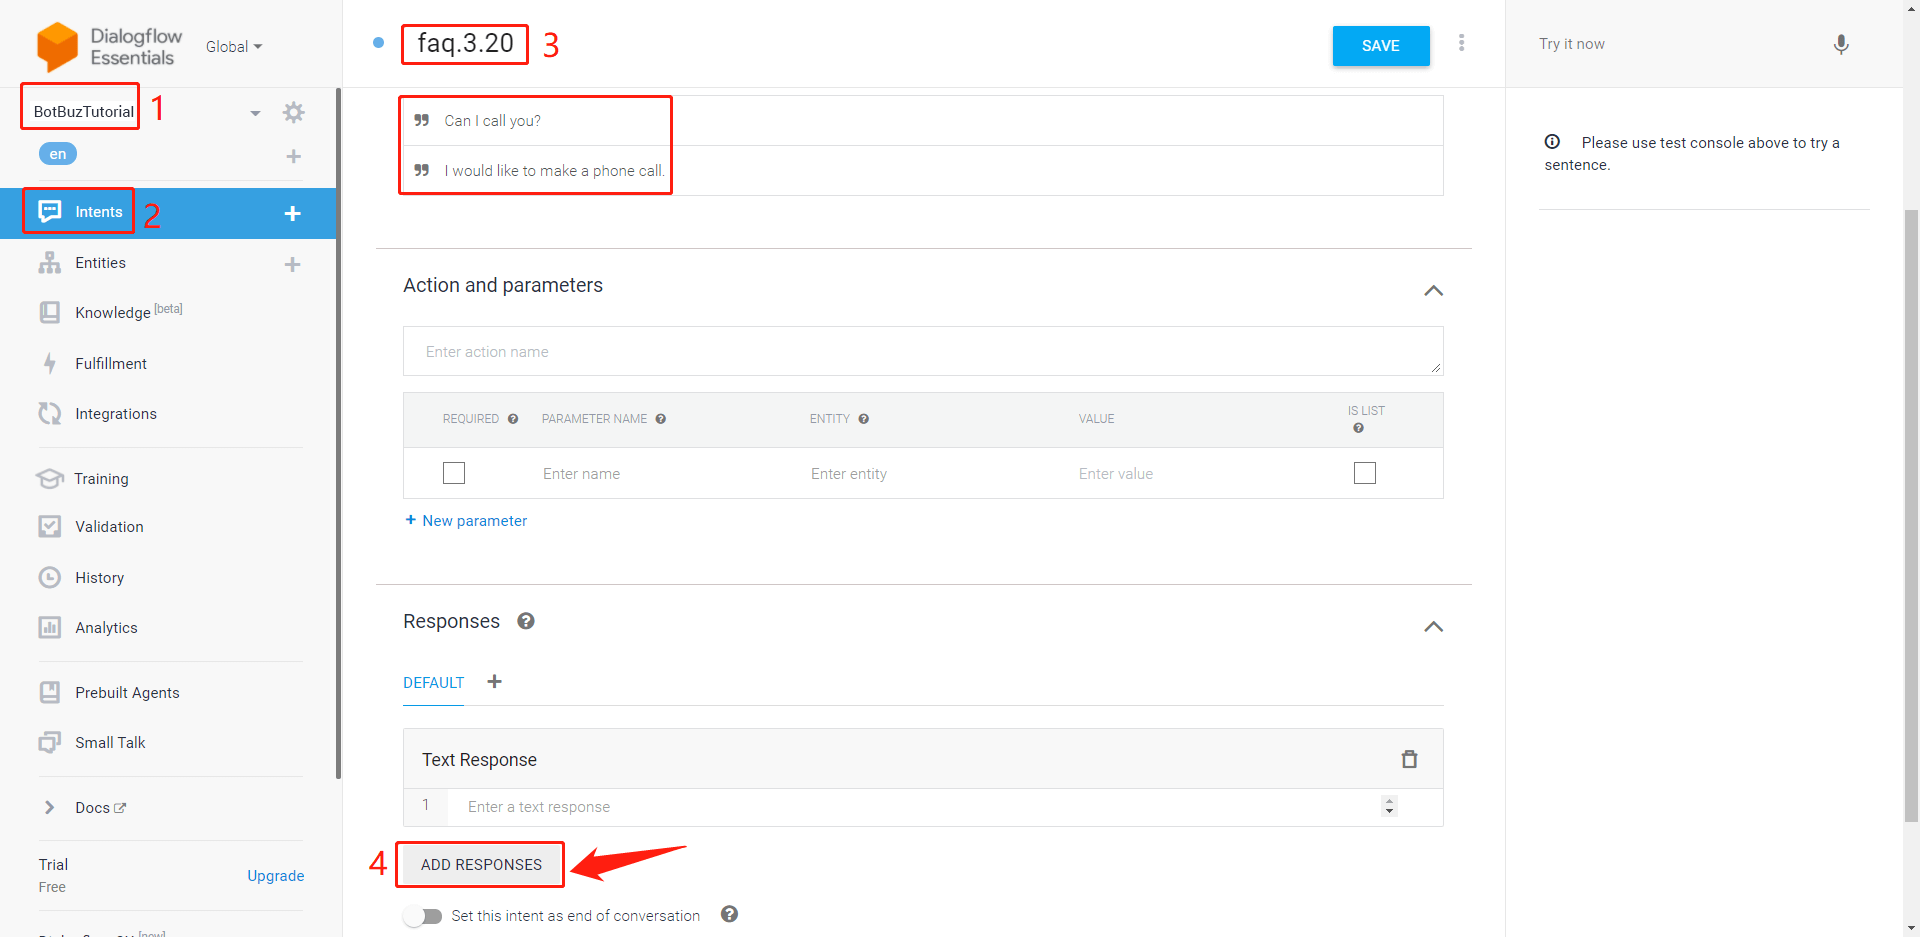
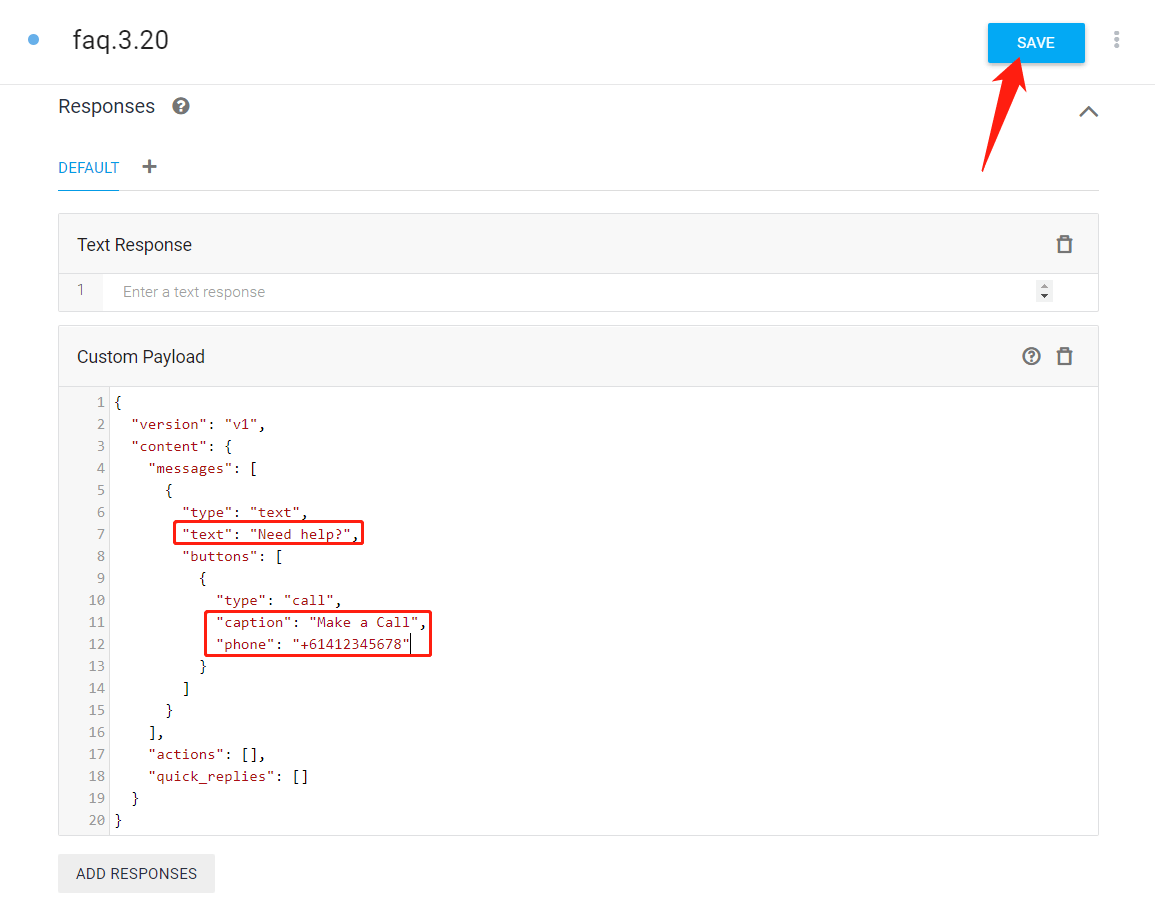
In the new intent, click area 4, “ADD RESPONSES”, then “Custom Payload”. Copy and paste any needed response format here, such as text/media/files, buttons, actions, quick replies and so on so forth.
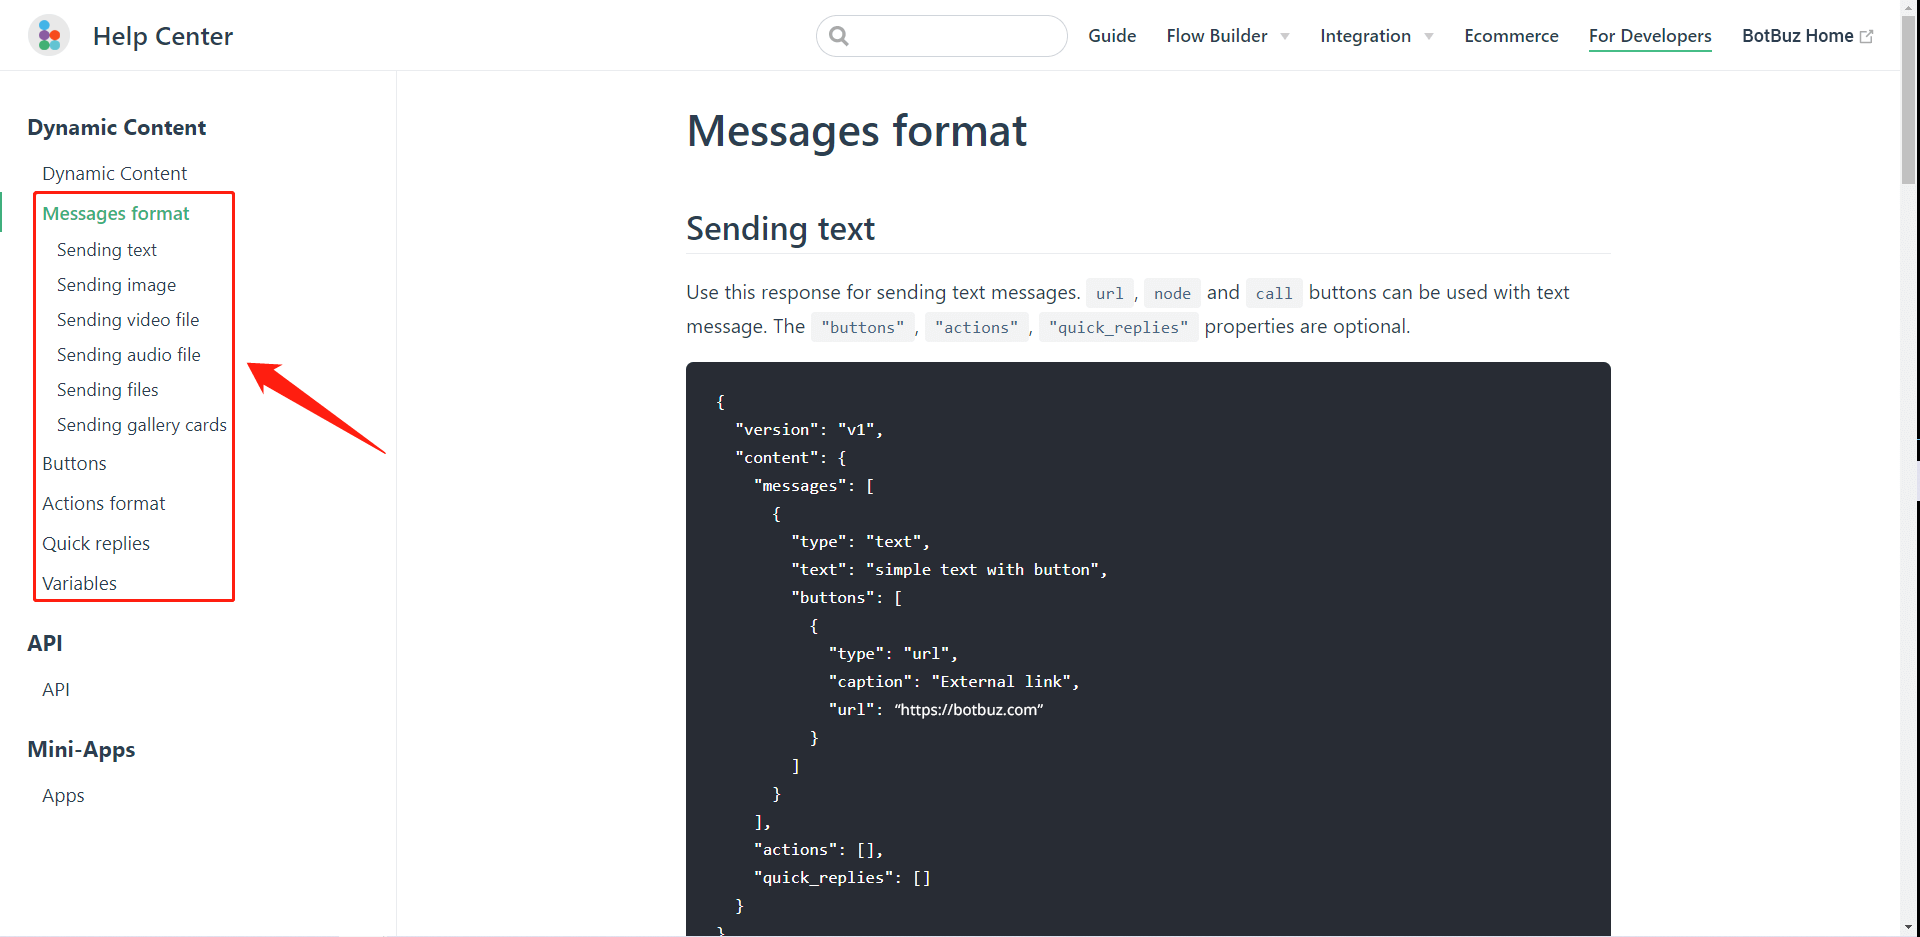
In this case, a call button will be sent. So copy the following code to Dialogflow:
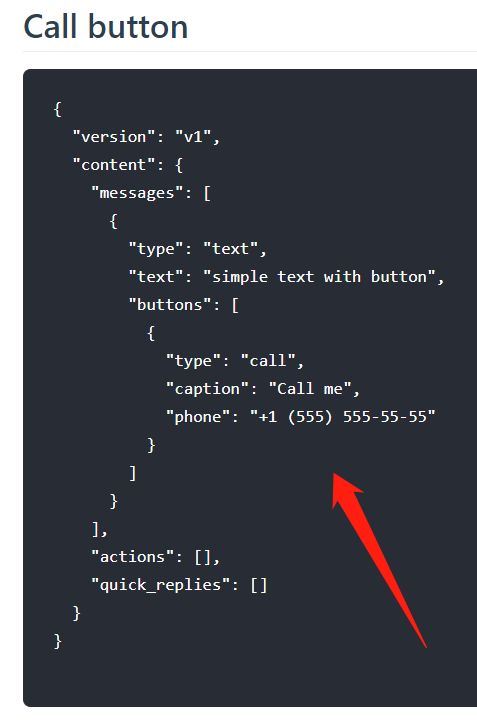
Adjust text, button title, number, etc as needed and click “Save”:
Let's test it from the testing area on the right:
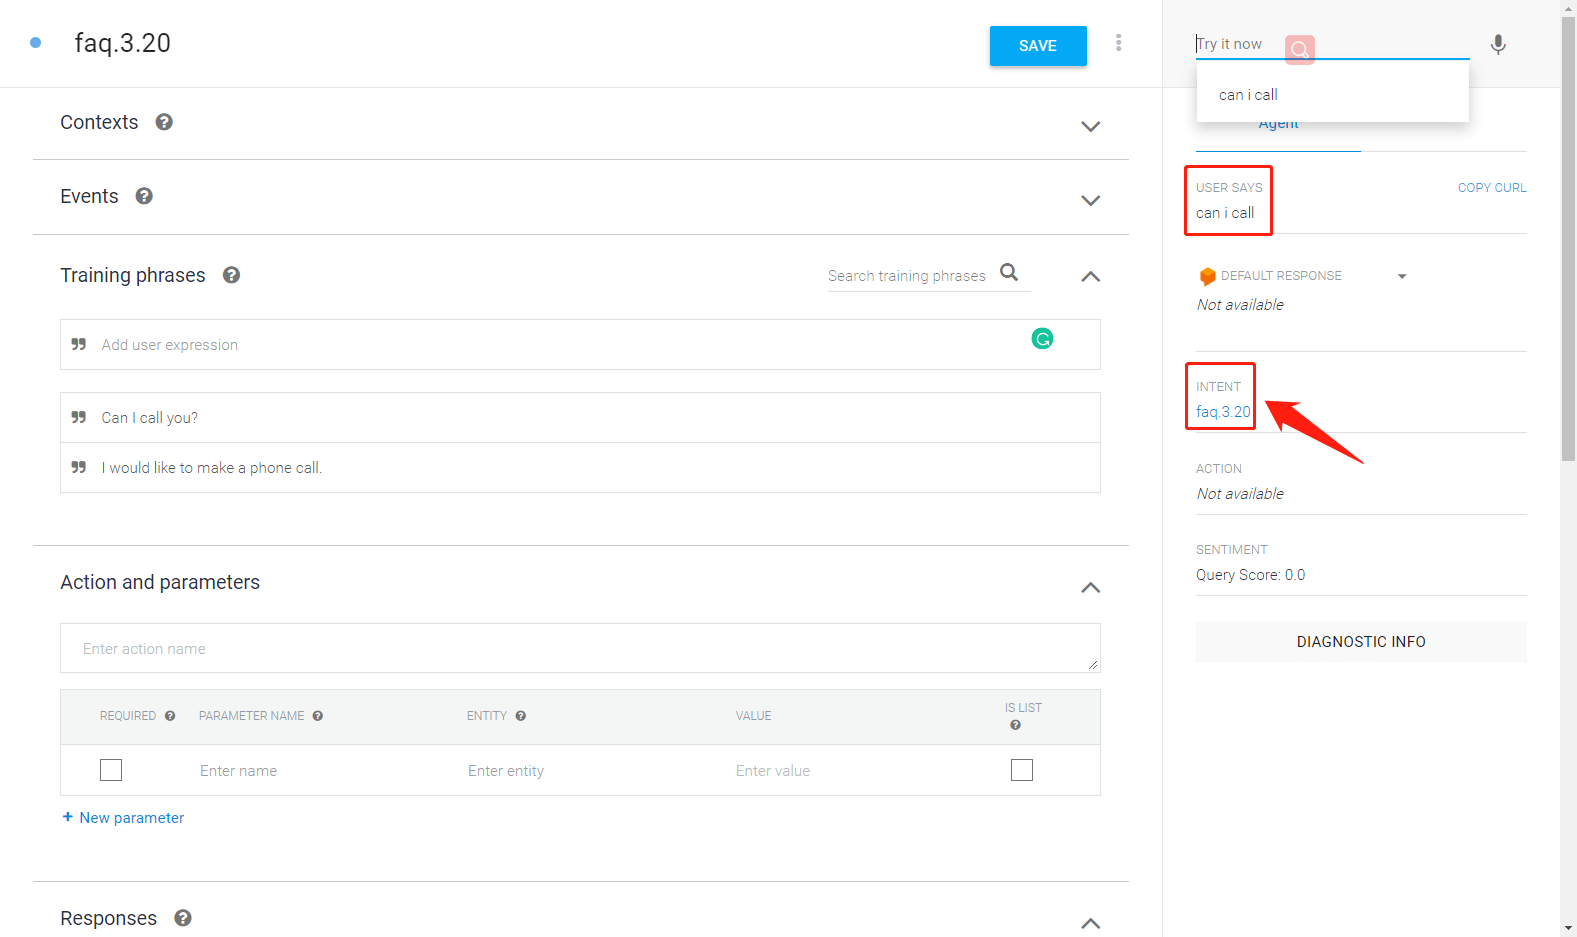
Well done! the bot recognizes that “can I call” is asking faq3.20.
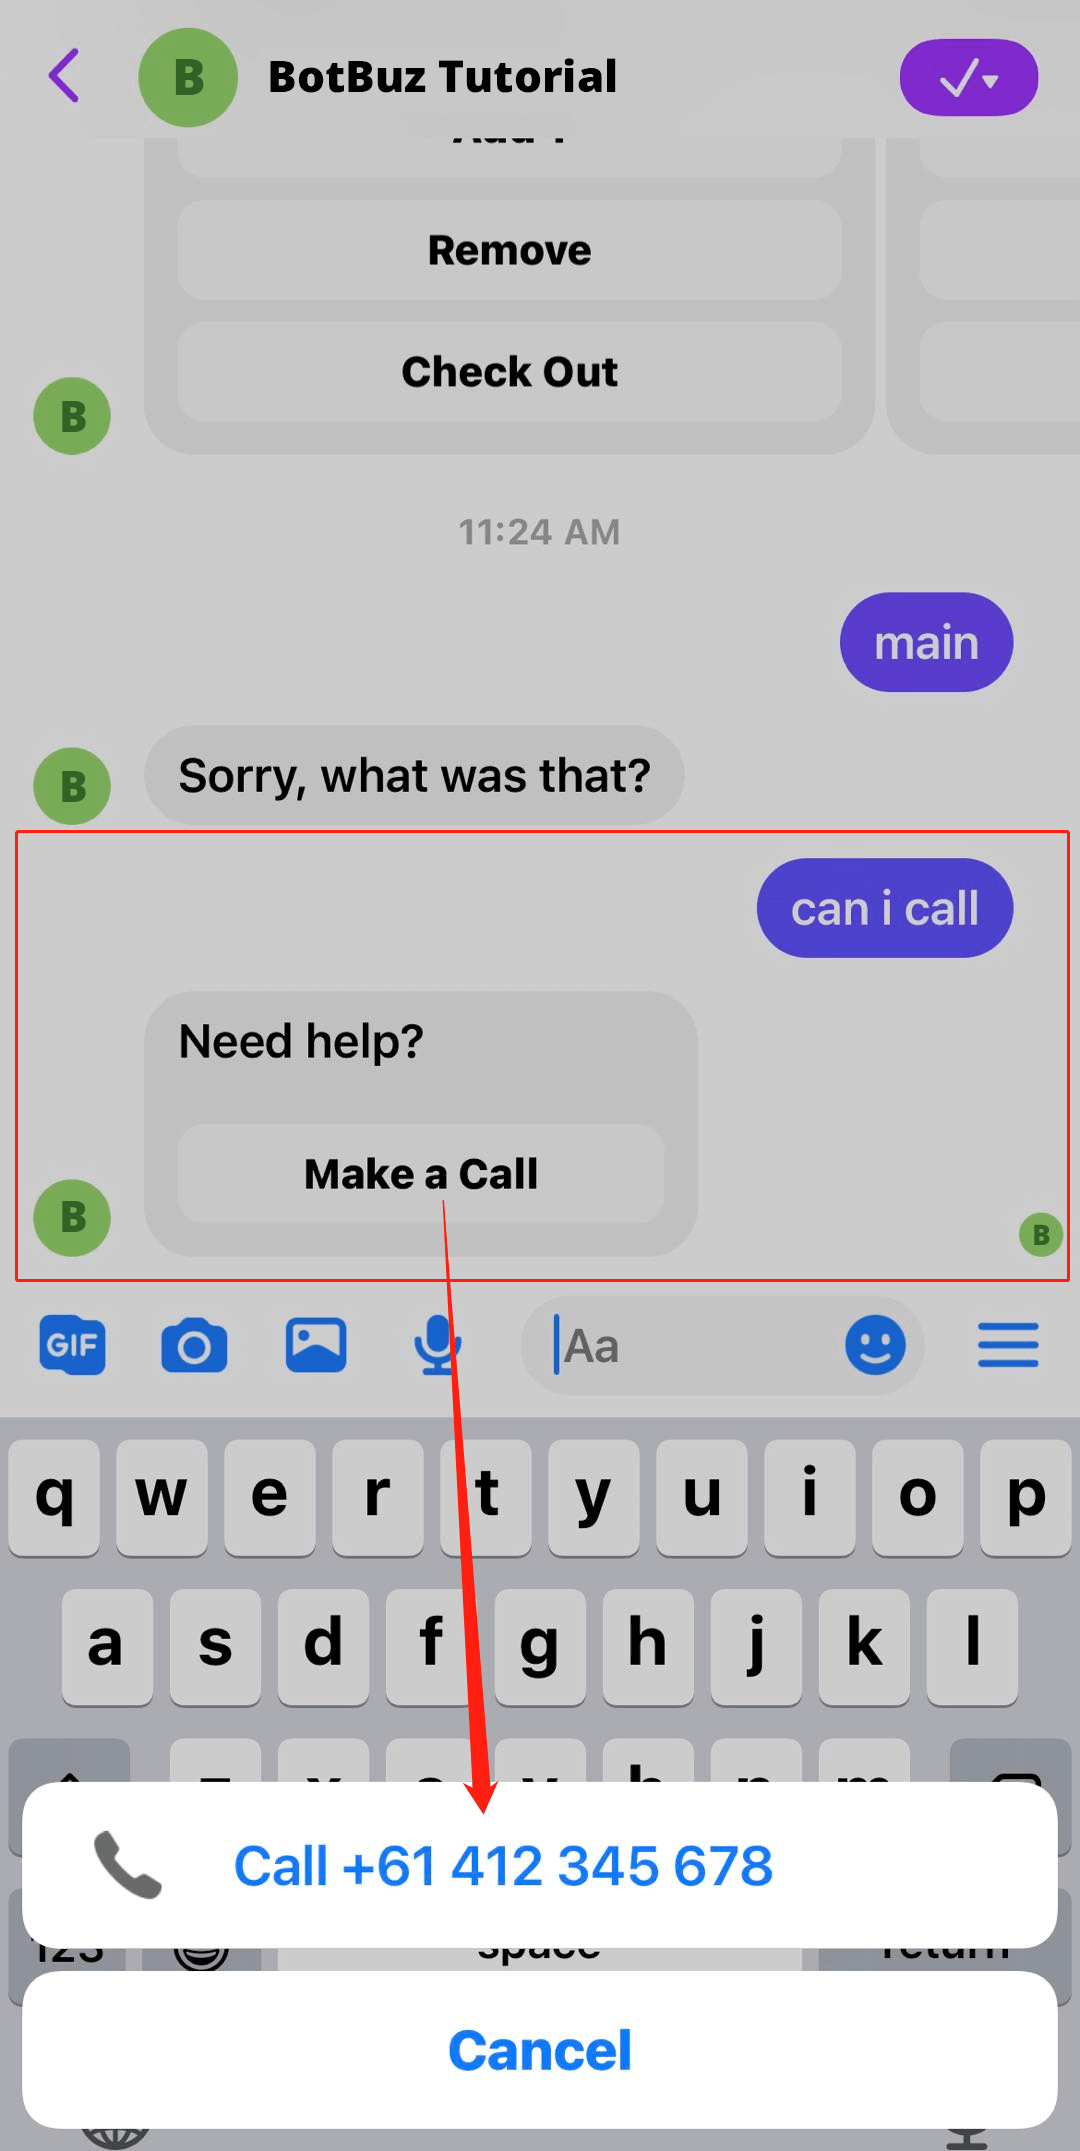
The user side looks perfect as well. Feel free to explore other response types!
Google Spreadsheet
With Google Spreadsheet, you can add, update and look up your data in a spreadsheet as well as process the data with various built-in tools with Google.
Setup Google Spreadsheet
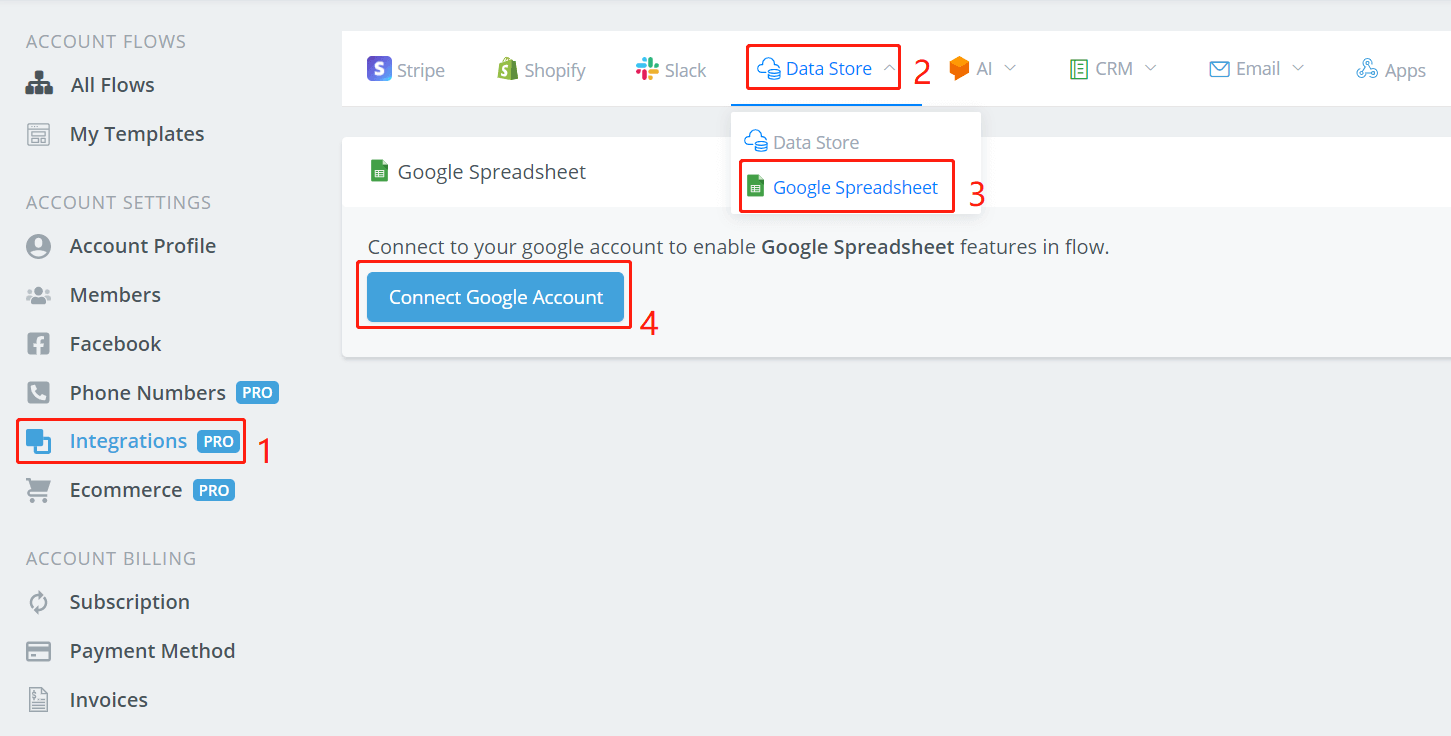
Follow steps 1 to 4 to connect to your Google account. Allow Botbuz to access your Google spreadsheet. When you come back, if nothing changed, click step 1 to 3 again to refresh and you will see this:

Create a new spreadsheet or make sure you have one in the Google account that you just connected to.

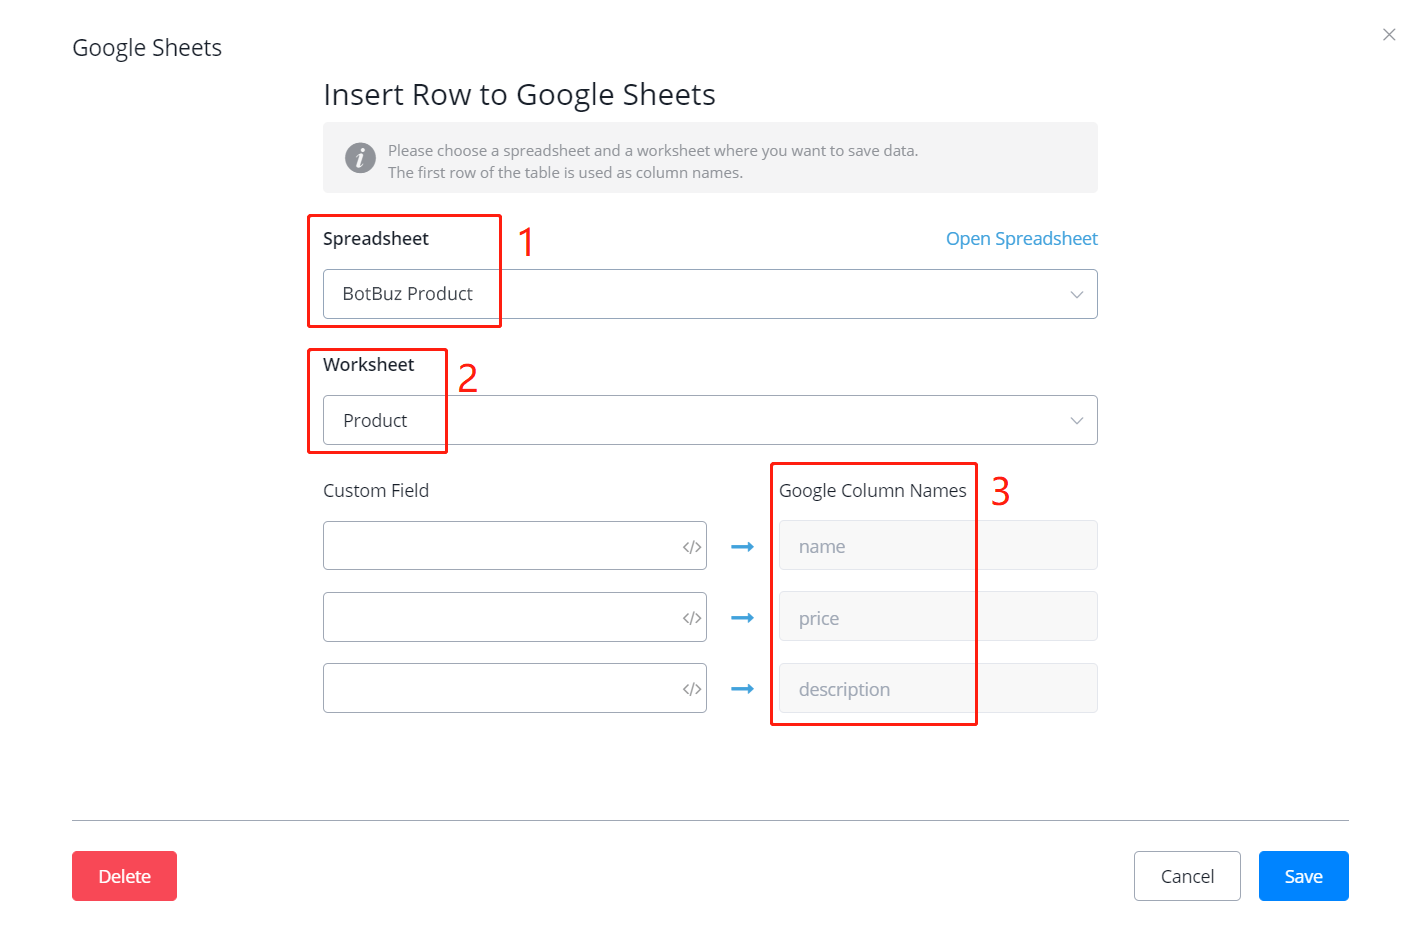
Name the spreadsheet and worksheet properly at area 1 and 2. You will need them when you manage your data in the Action step.
WARNING
Importantly, remember to give column names for the worksheet in the first row (see area 3 in the above picture). You must do this by manually type in what fields do you need. For example, this is a product worksheet and each product has a name, a price and a description.
Later when you manage your data, this is how it looks like when the column names are set correctly (area 1,2,3 in the above picture are correspond to 1,2,3 in the following picture):
Manage Spreadsheet in Action Step
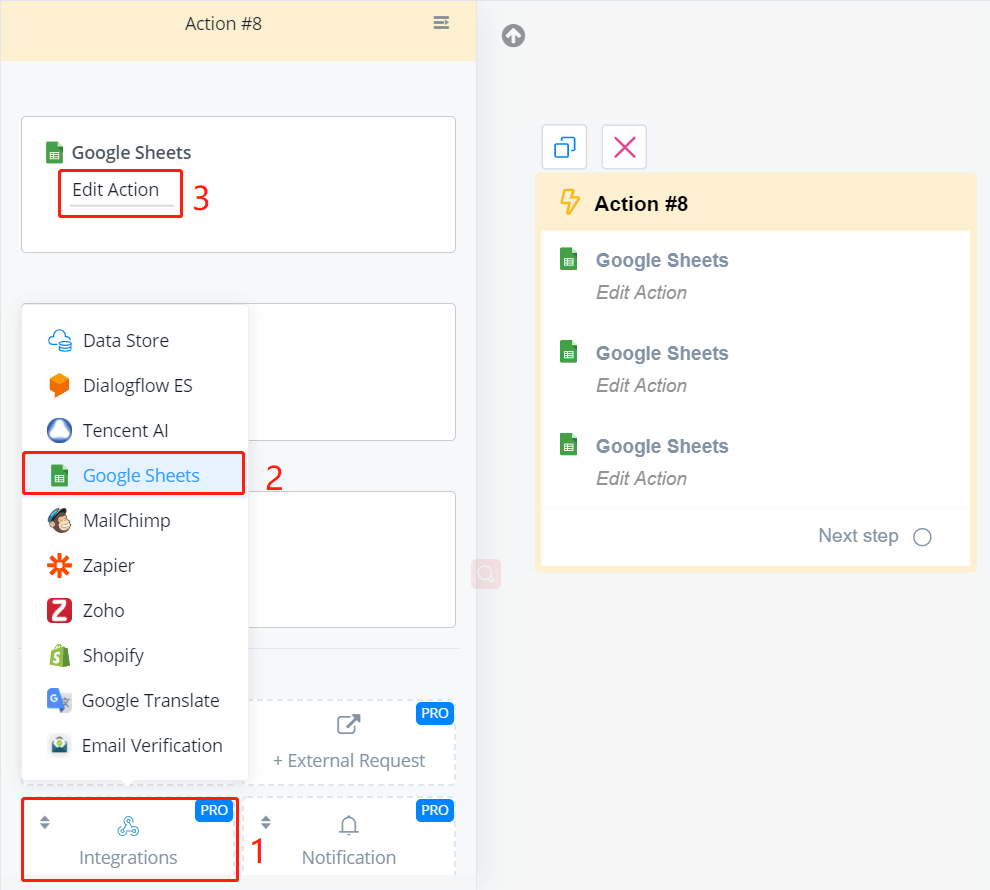
In an Action step, follow steps 1 to 3 in the above picture. Then you will see a list of functions.
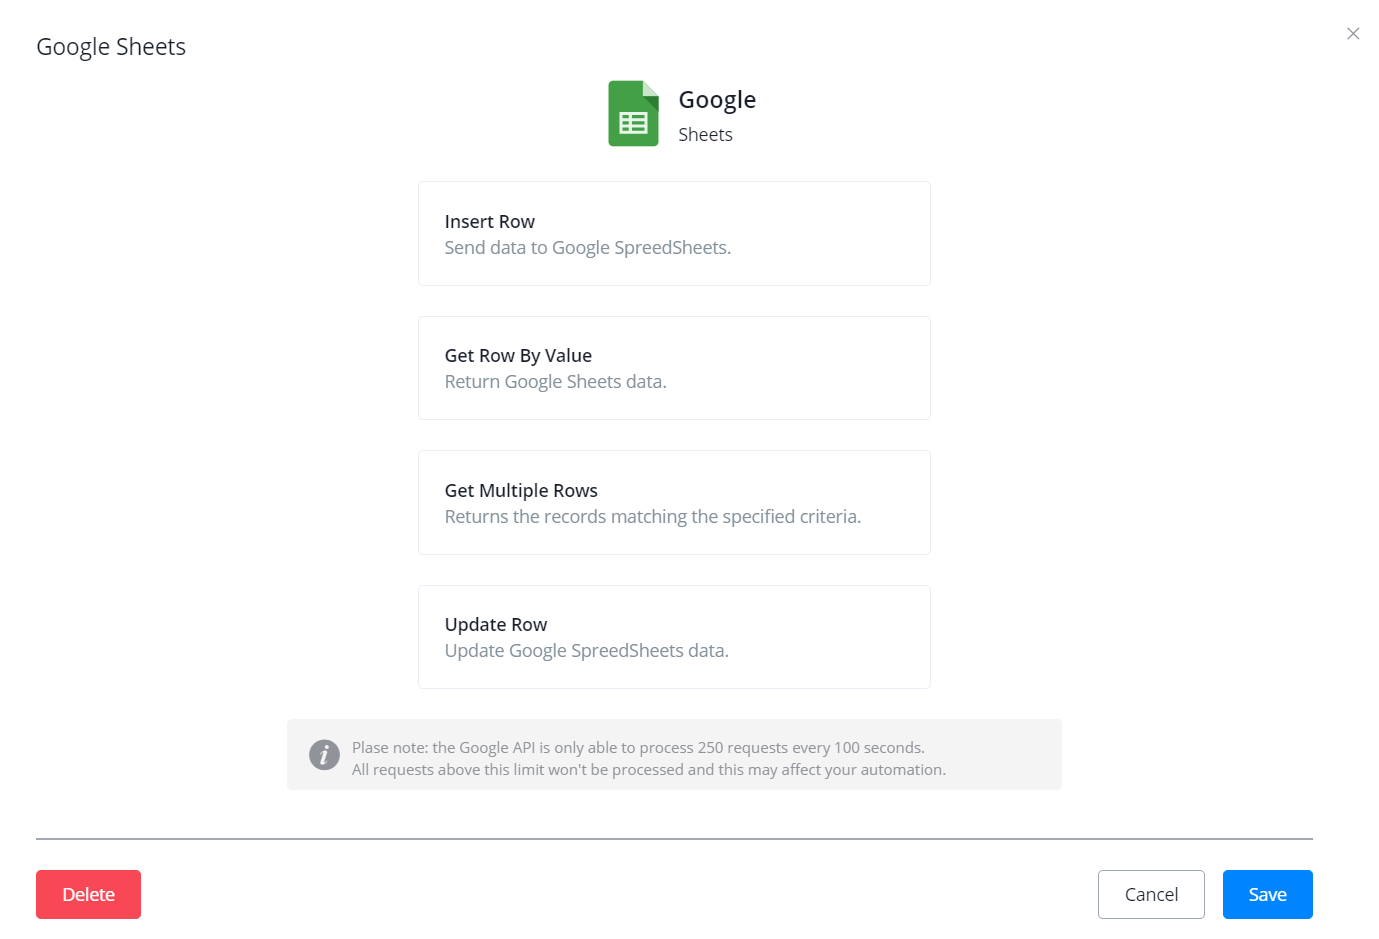
Insert Row
Get Row by Value
Get Multiple Rows
Update Row
Data Store
Data Store is a built-in data storage system provided by Botbuz. With Data Store, you can easily add, delete, update, check up your data either manually or in Action steps.
Setup Data Store
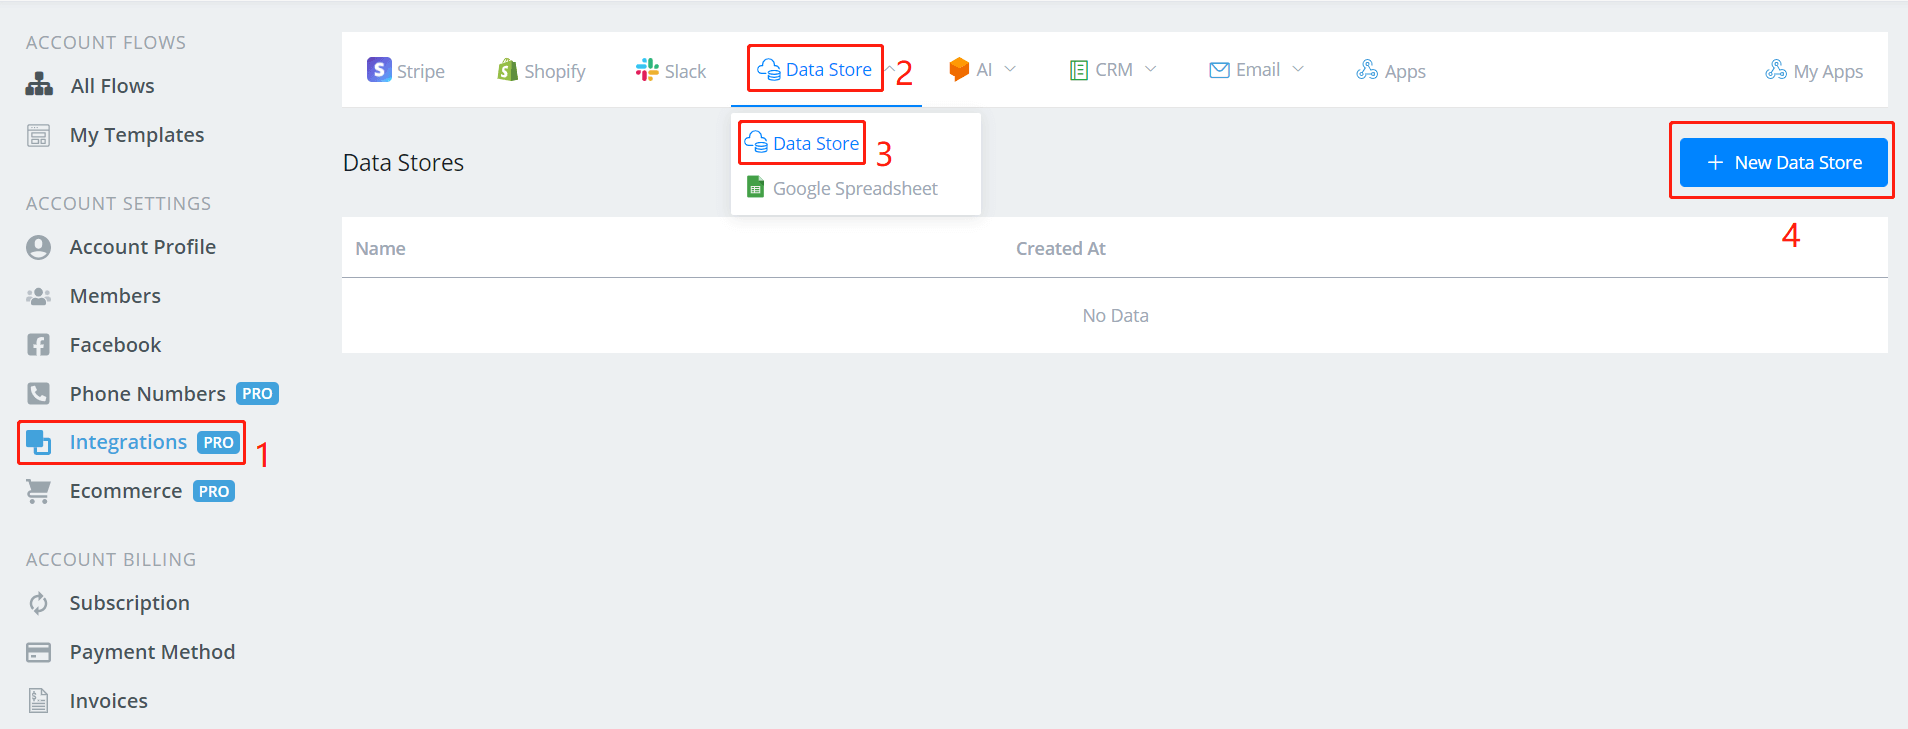
On your dashboard, click 1 to 4 to add a new data store.
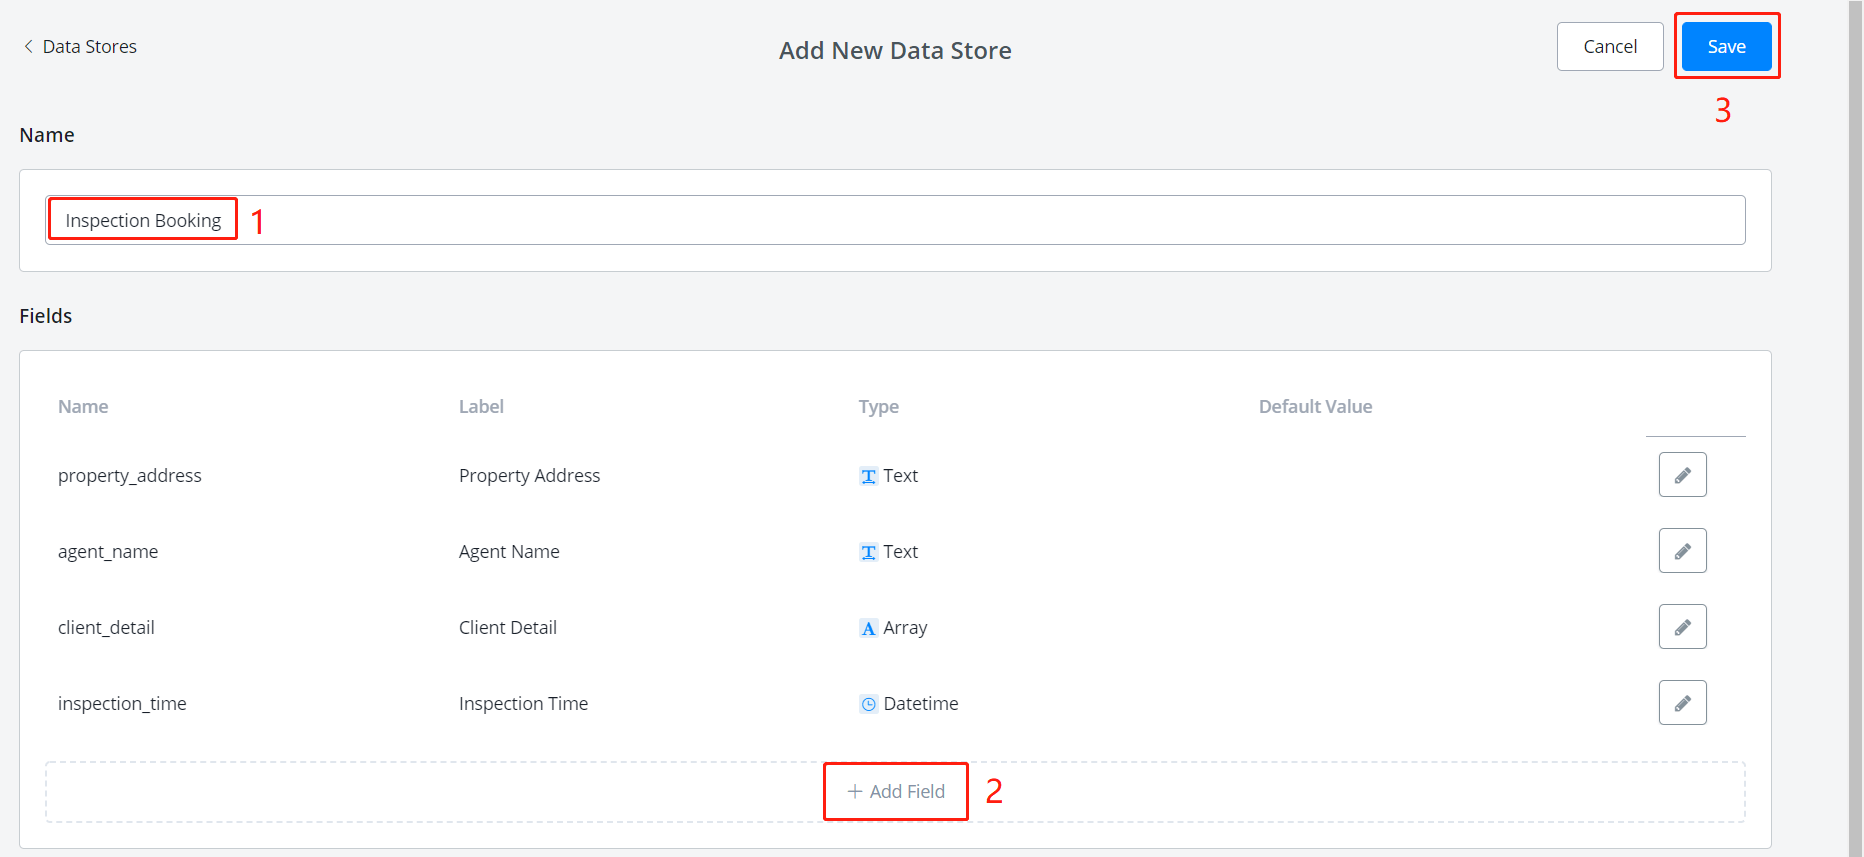
- name the Data Store
- click “+ Add Field”, the following window will pop up.
- when finished, click “Save”.
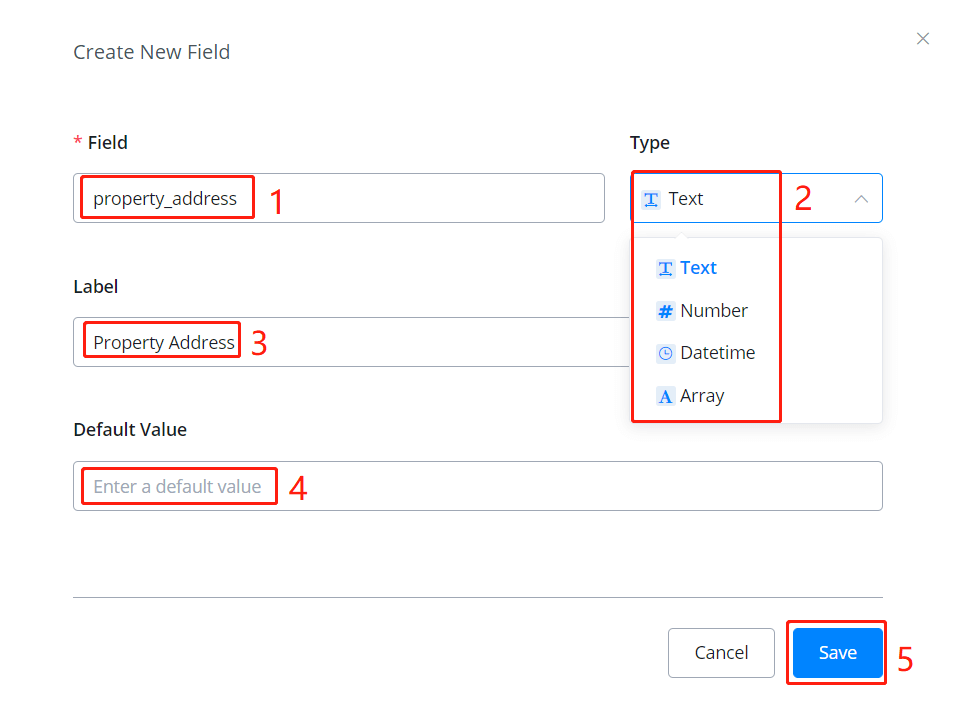
- name the field (used in the system, no space allowed)
- choose a value type (an Array can have several values like JSON variable)
- give a label if needed (for prettier display)
- give a default value if needed
- once finish, “Save”
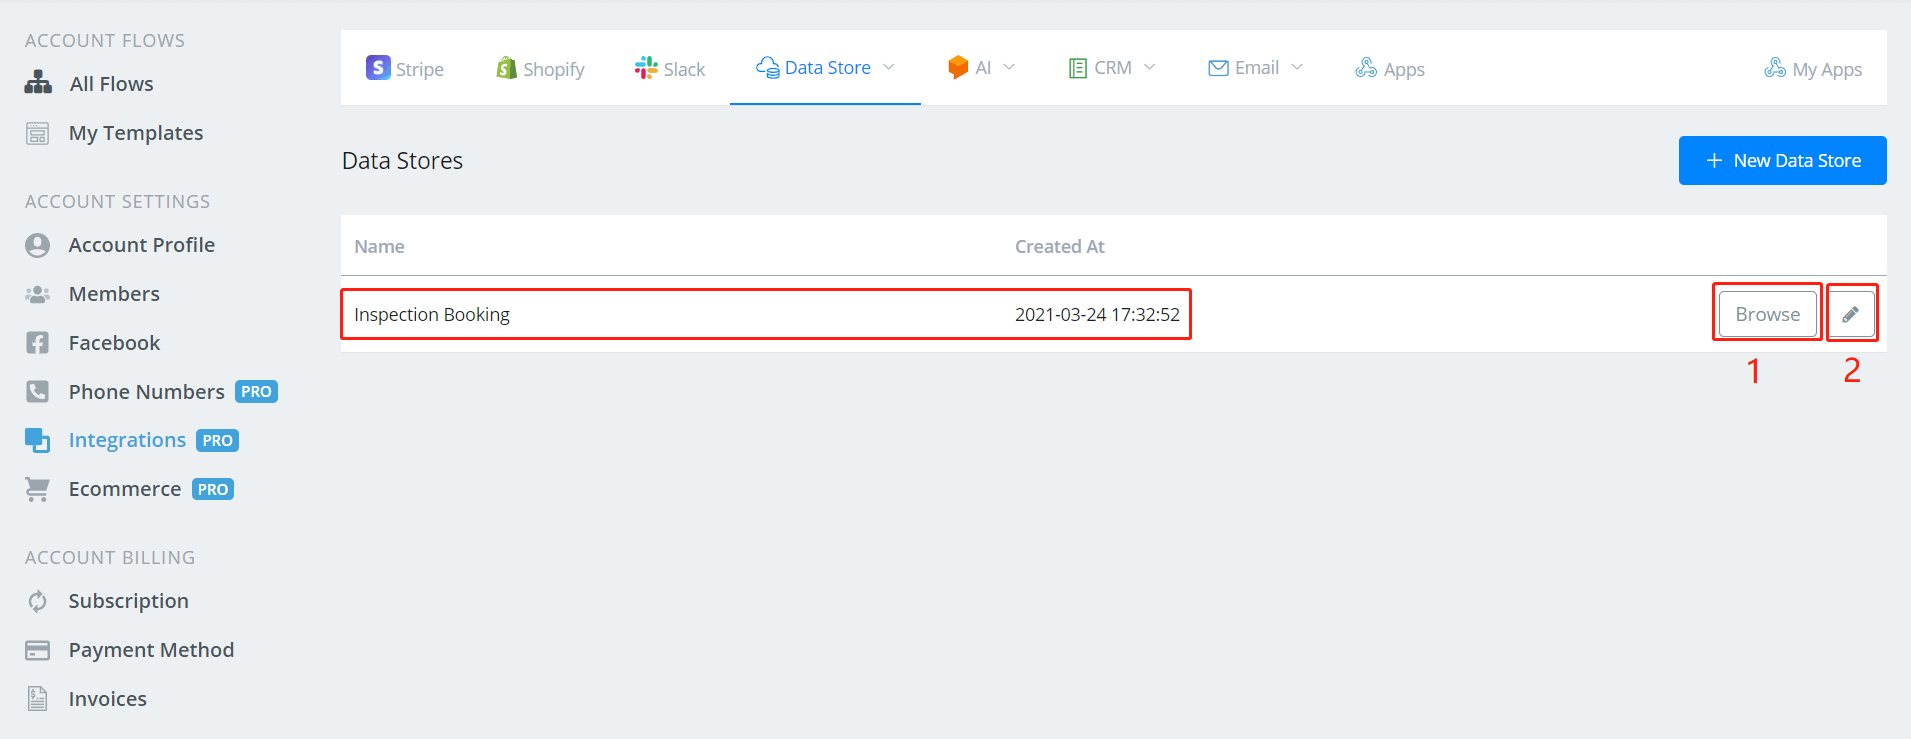
- click “Browse” for viewing and editing records
- click the pencil for editing fields of Data Store
You can add/edit/delete records in the data store in 2 ways:
- do it manually in the “Browse” window in the following picture
- put it in the Action step and the flow will automate the process
Please not that
When you add a new record, the system will assign a unique “Record Id” to it automatically. You can access this value by using the field name “_id”.
Manage Records Manually
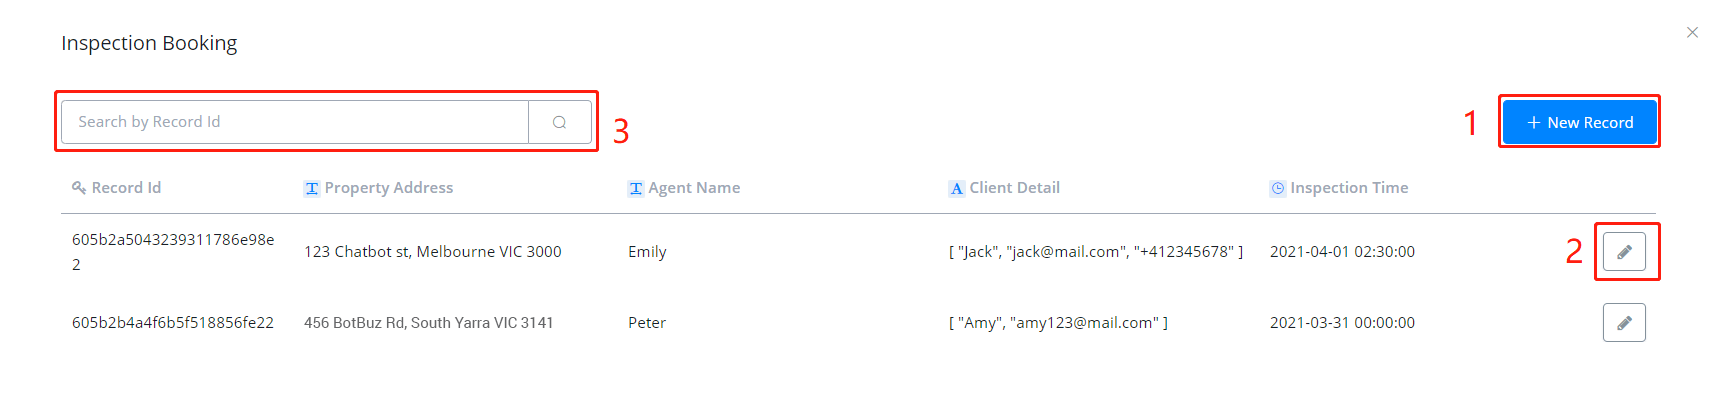
- add new records, see picture below
- edit/delete records
- search records
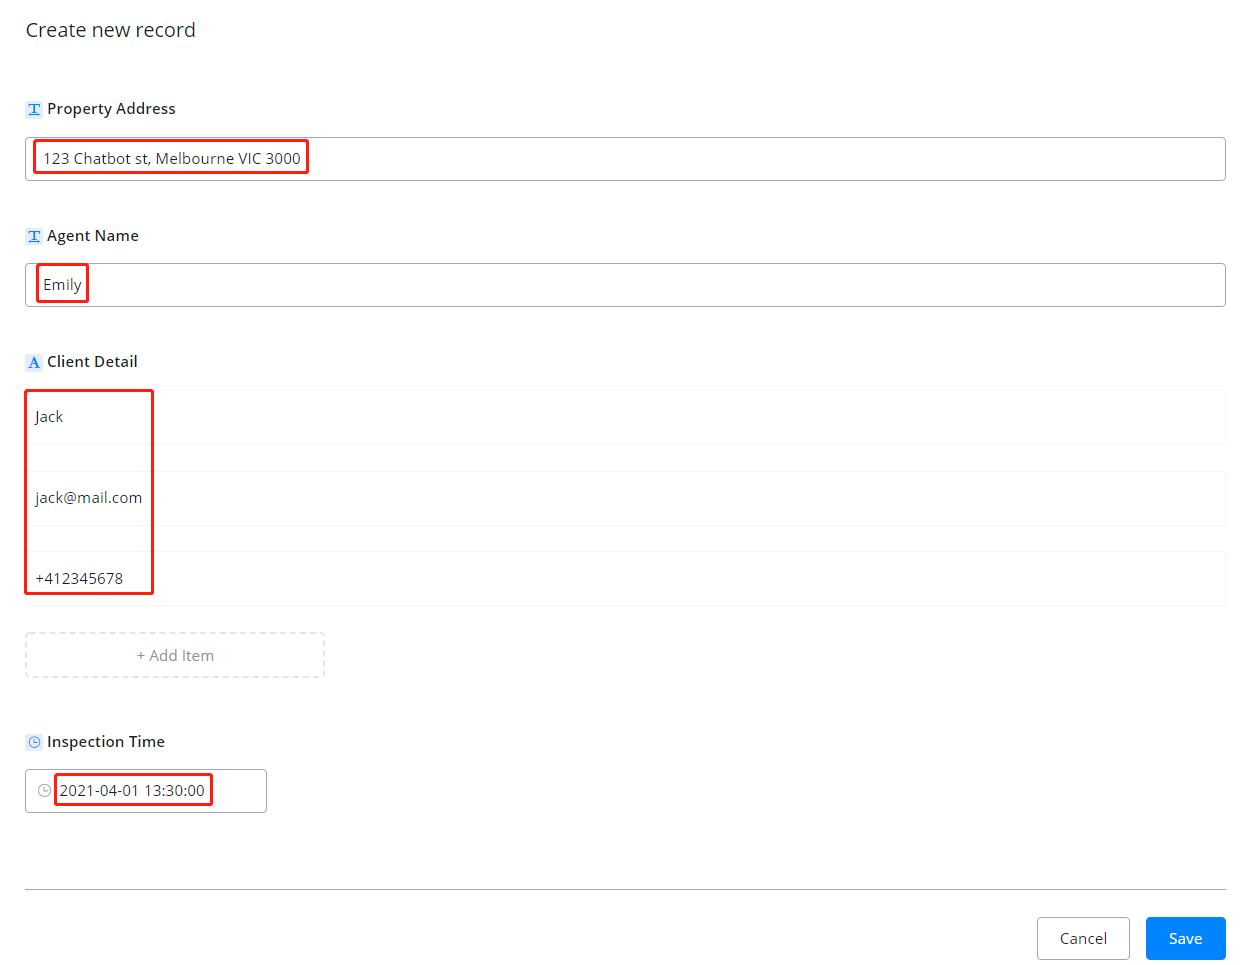
A new record requires values for the fields you set in the data store (value can be blank). There will be a “Delete” button in the editing window and the rest look the same as above.
Manage Records in Action Step
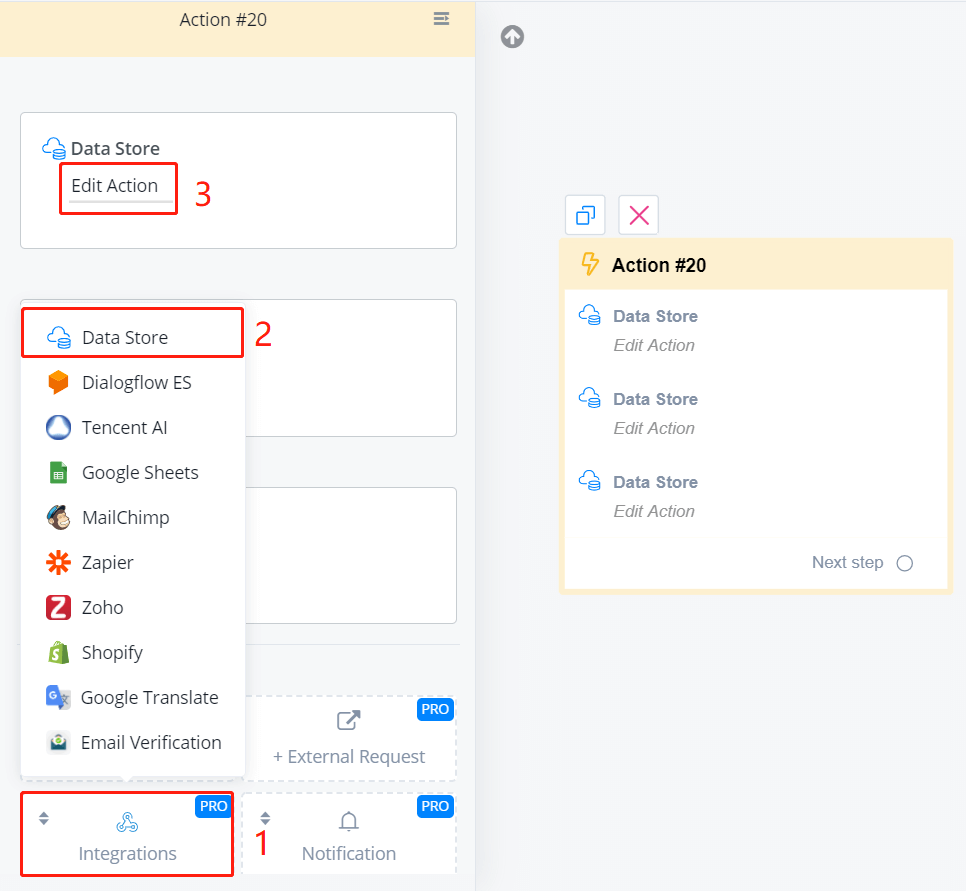
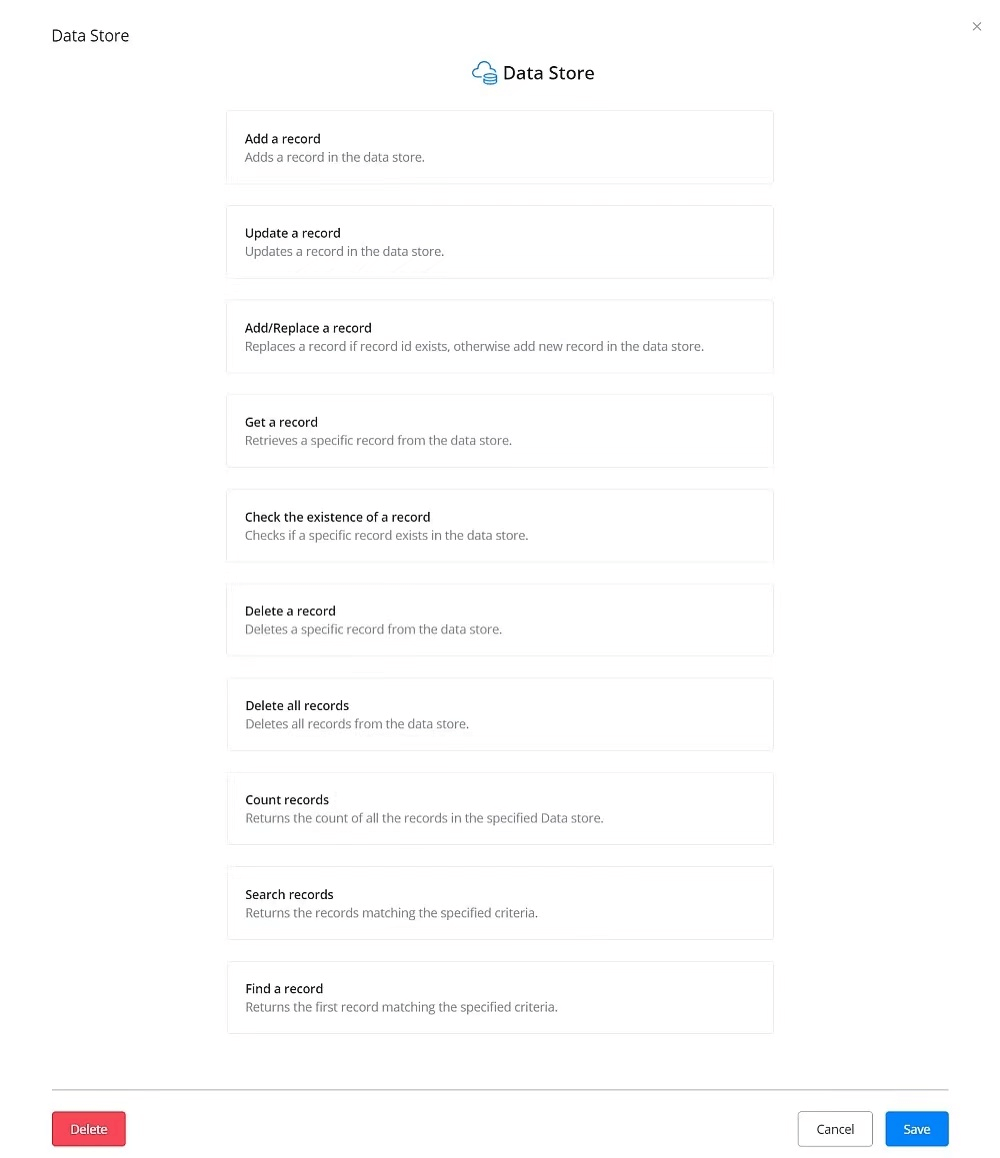
In an Action step, follow steps 1 to 3 in the above picture. Then you will see a list of functions.
TIP
The functions work via API calls. This means that, by giving some inputs, you get your outputs from the data store. The outputs are saved in custom fields for future uses.
Add a Record
Update a Record
Add/Replace a Record
Get a Record
Check the Existence of a Record
Delete a Record
Delete All Records
Count Records
Search Records
Find a Record
Twilio
With Twilio you are able to create voice, SMS and WhatsApp chatbots. In order to connect your Twilio account go to the integration section from the left-hand menu and select Twilio.
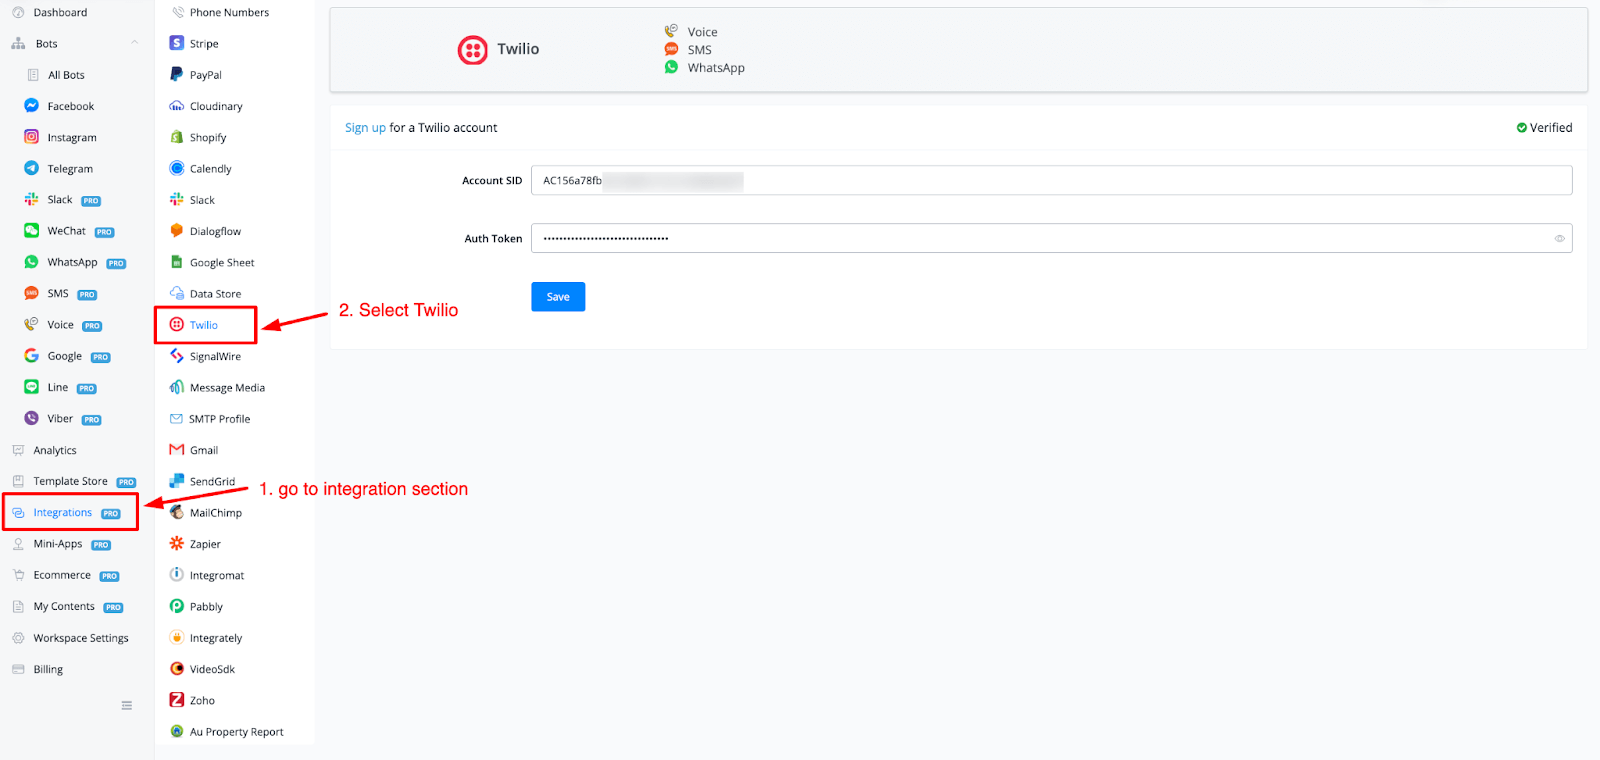
As you see you only need to insert two pieces of login details to connect your Twilio account:
- Account SID
- AUTH Token
Login to your Twilio account
Login to your Twilio account (opens new window)and when arriving at your dashboard overview you will be able to directly grab the Account SID as well as the AUTH token
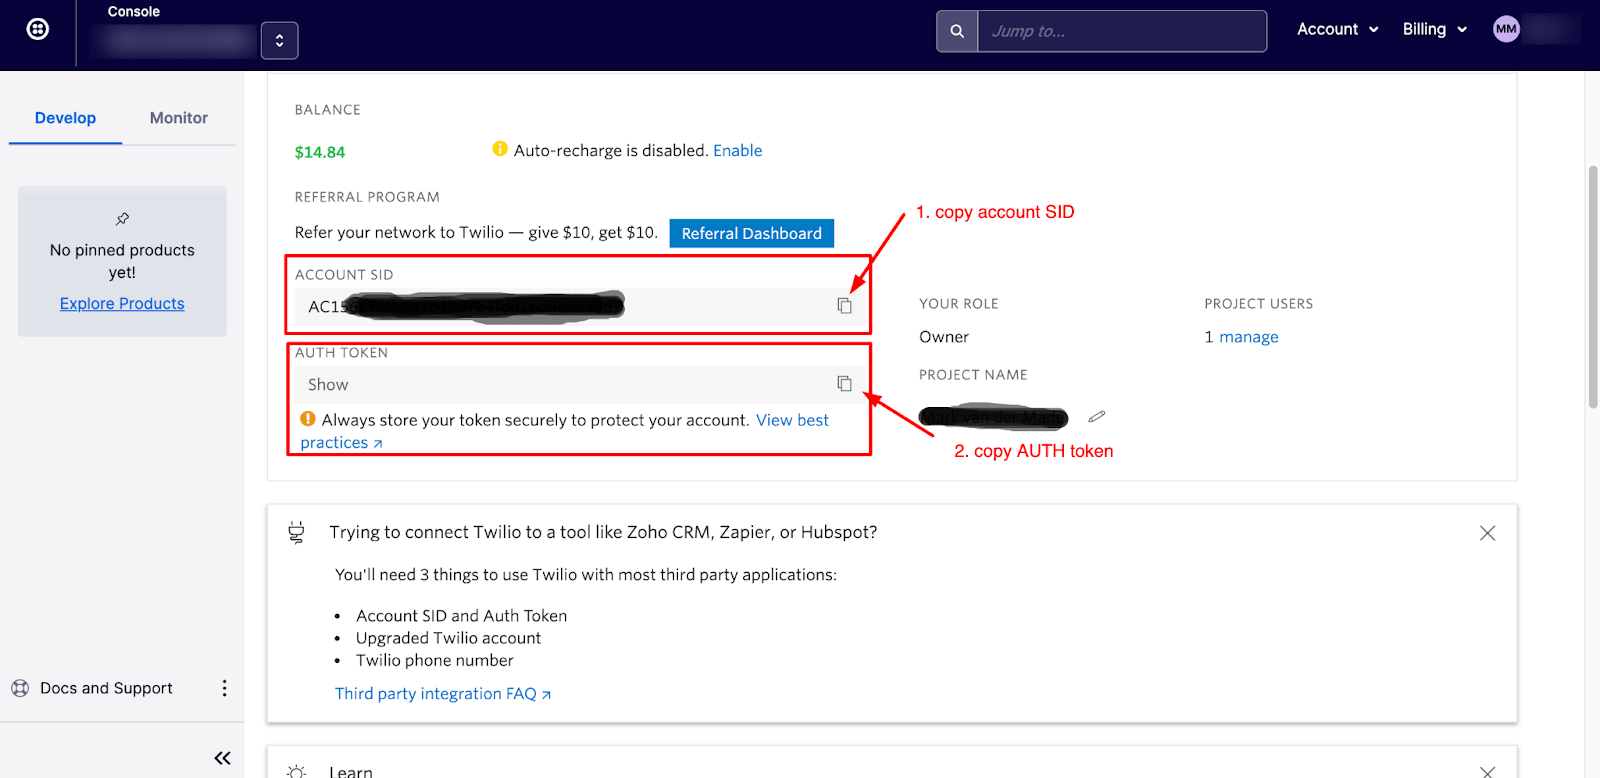
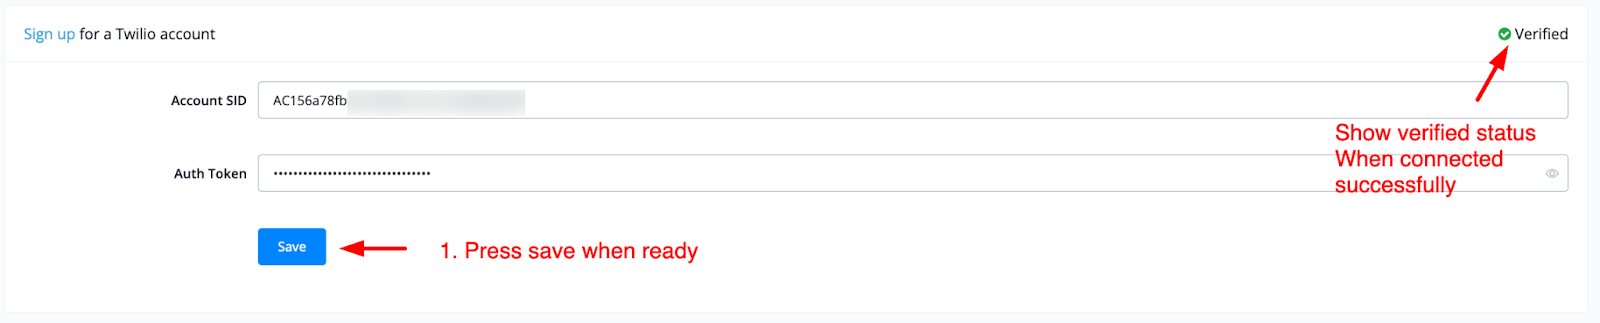
Copy and paste both into your workspace Twilio section and press the save button. If all goes well then you should also see a verified status in the top right corner of your screen.
How to use Twilio
Now your account is connected you are now able to create a chatbot on one of the following channels:
- Voice
- SMS
- WhatsApp Do take note it depends on which channel you can use due to the settings of your connected phone number.
If we take a look at the example below we will select a voice channel and Select Twilio as the provider you will get something like this;
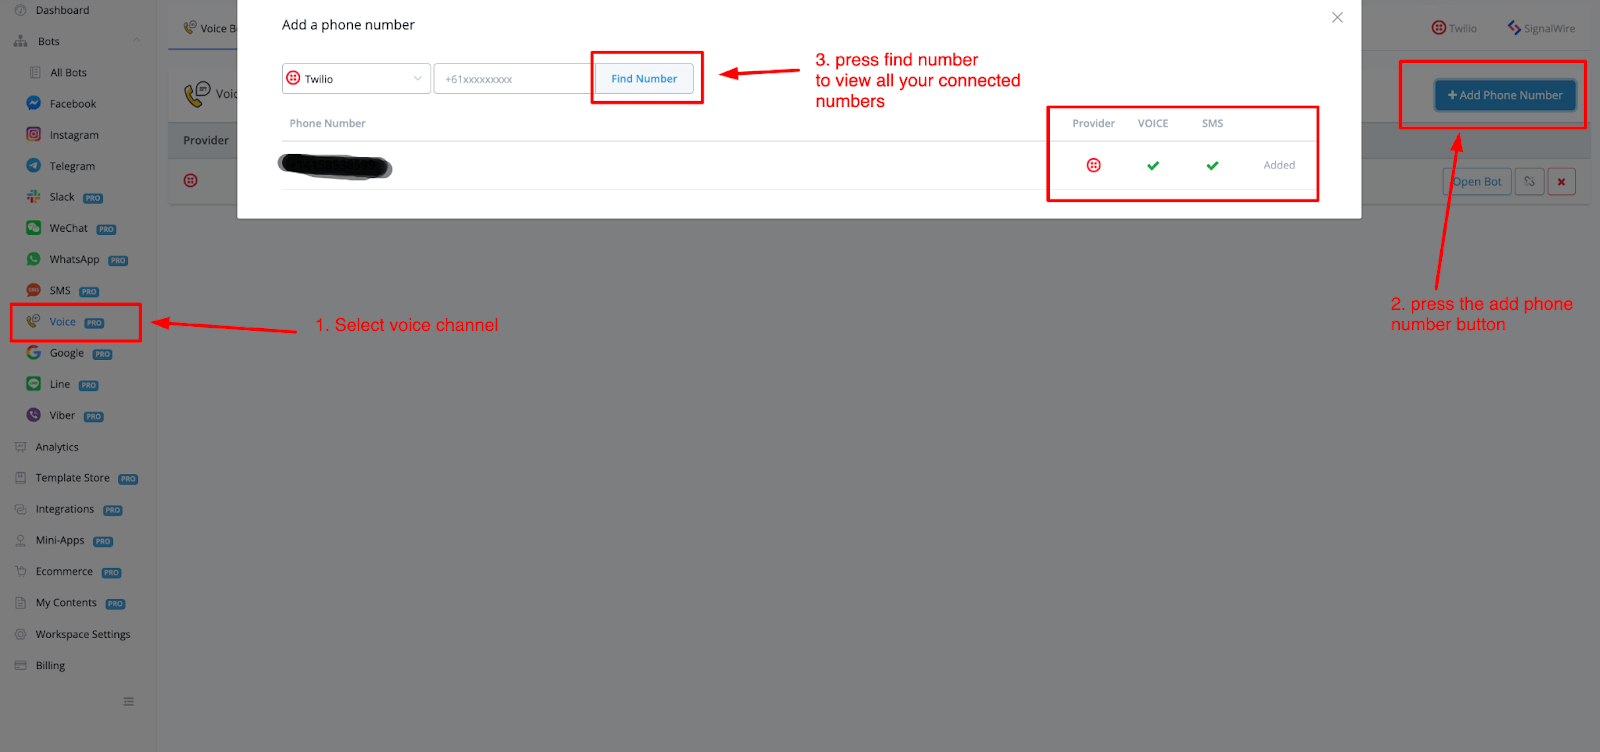
You will also see which channels you have connected to which phone number.
Signalwire
With Signalwire you are able to create voice and SMS chatbots inside of your Botbuz account. This native integration allows you to connect to your account in just a few steps.
From the main dashboard overview, choose integrations on the left-hand side, then select Signalwire from the list.
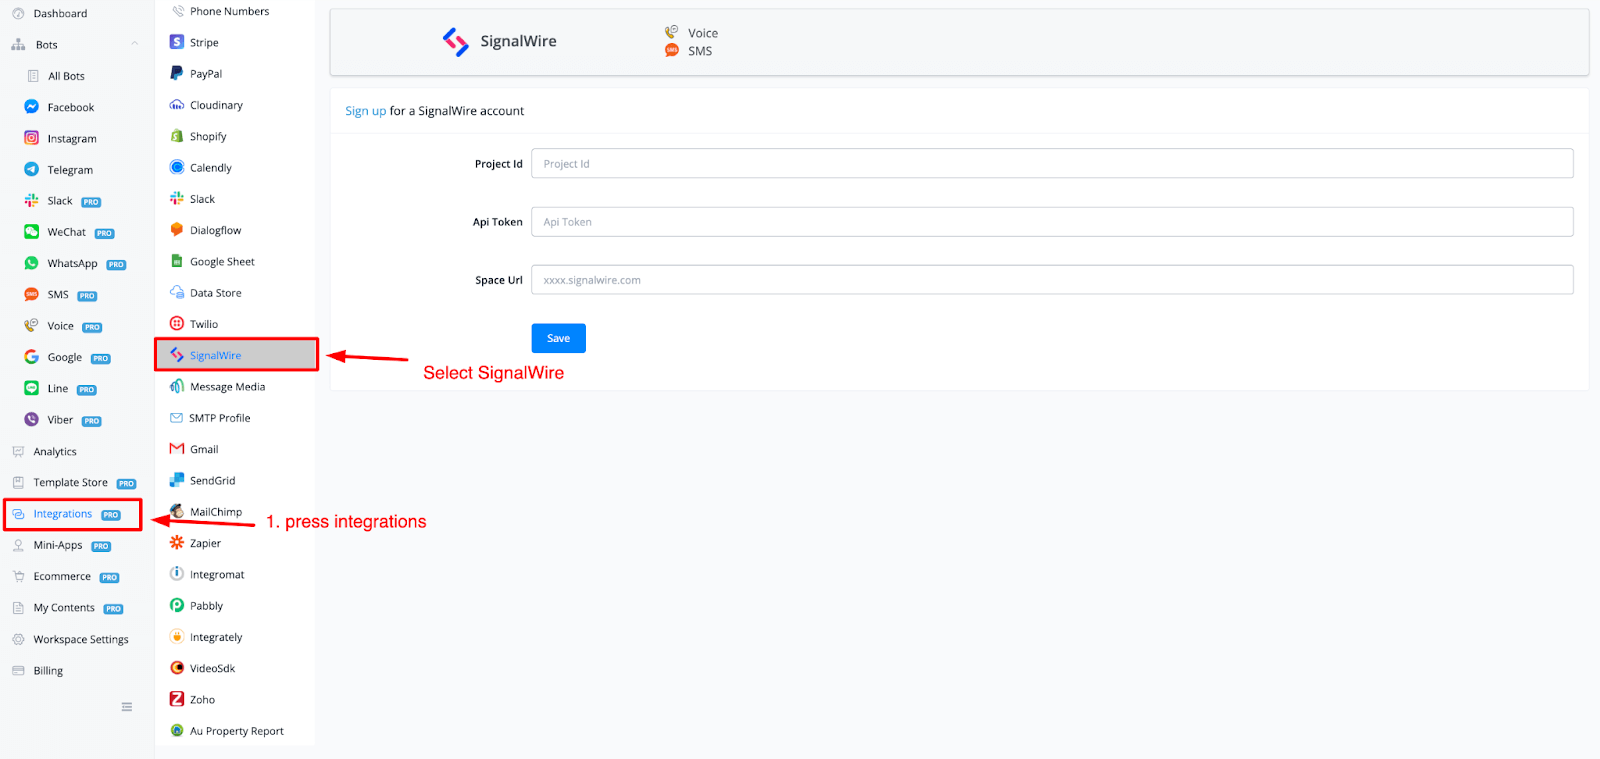
You will need 3 kinds of login details in order to connect to your SignalWire account:
- Project id
- App Token
- Space URL
Login to Signalwire
In order to grab your credentials, you will need to login into your SignalWire account (opens new window).
Once inside you should have a similar overview when being directed to your dashboard
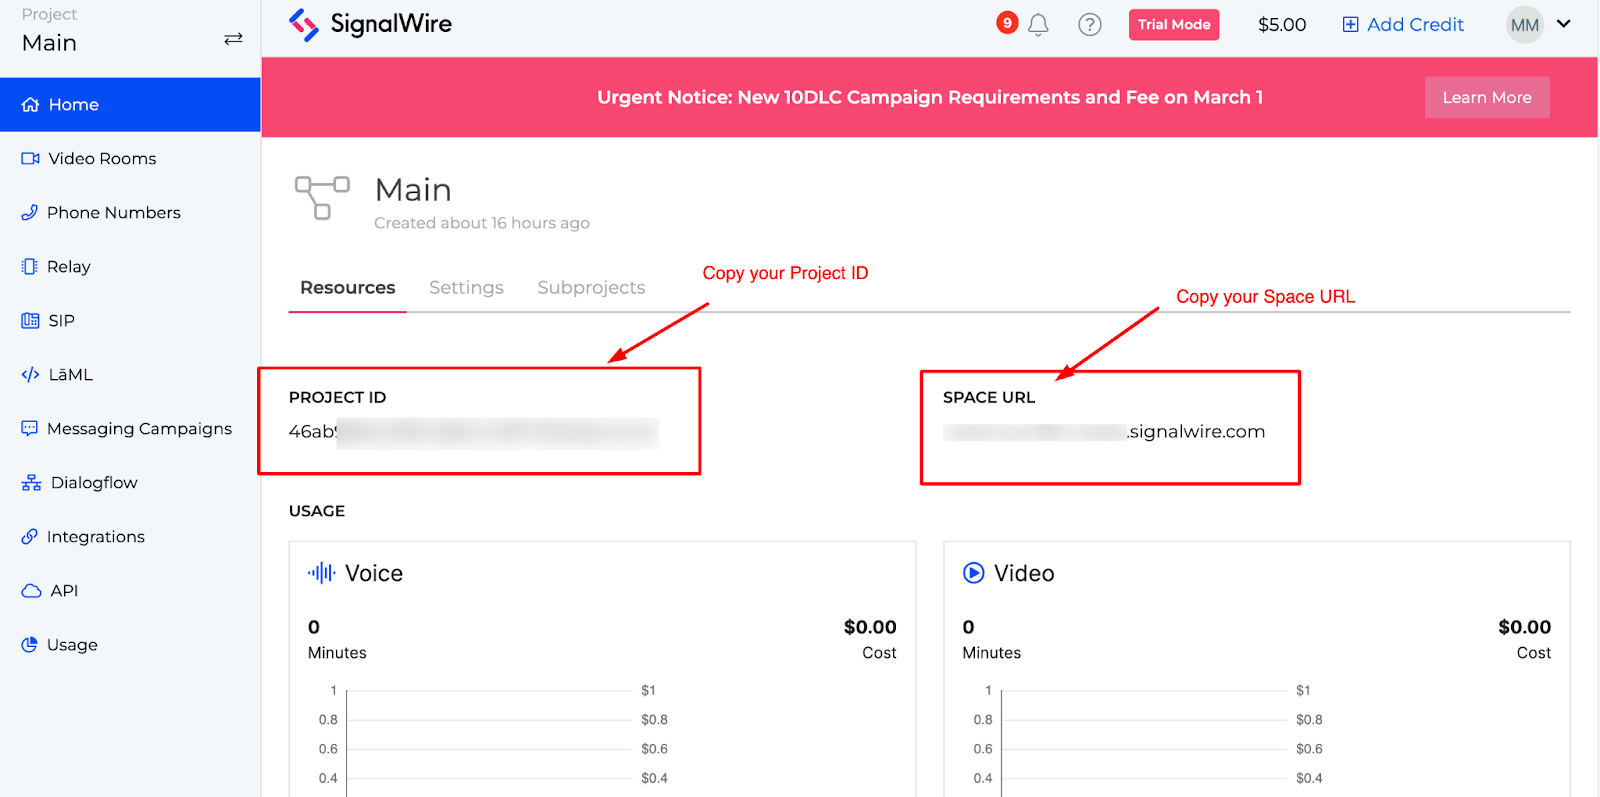
From this main dashboard overview, you will be able to directly grab your Project ID and Space URL.
Creating or fetching your token
To grab your token go to the API menu option on the left-hand side and from there press the generate a token button.
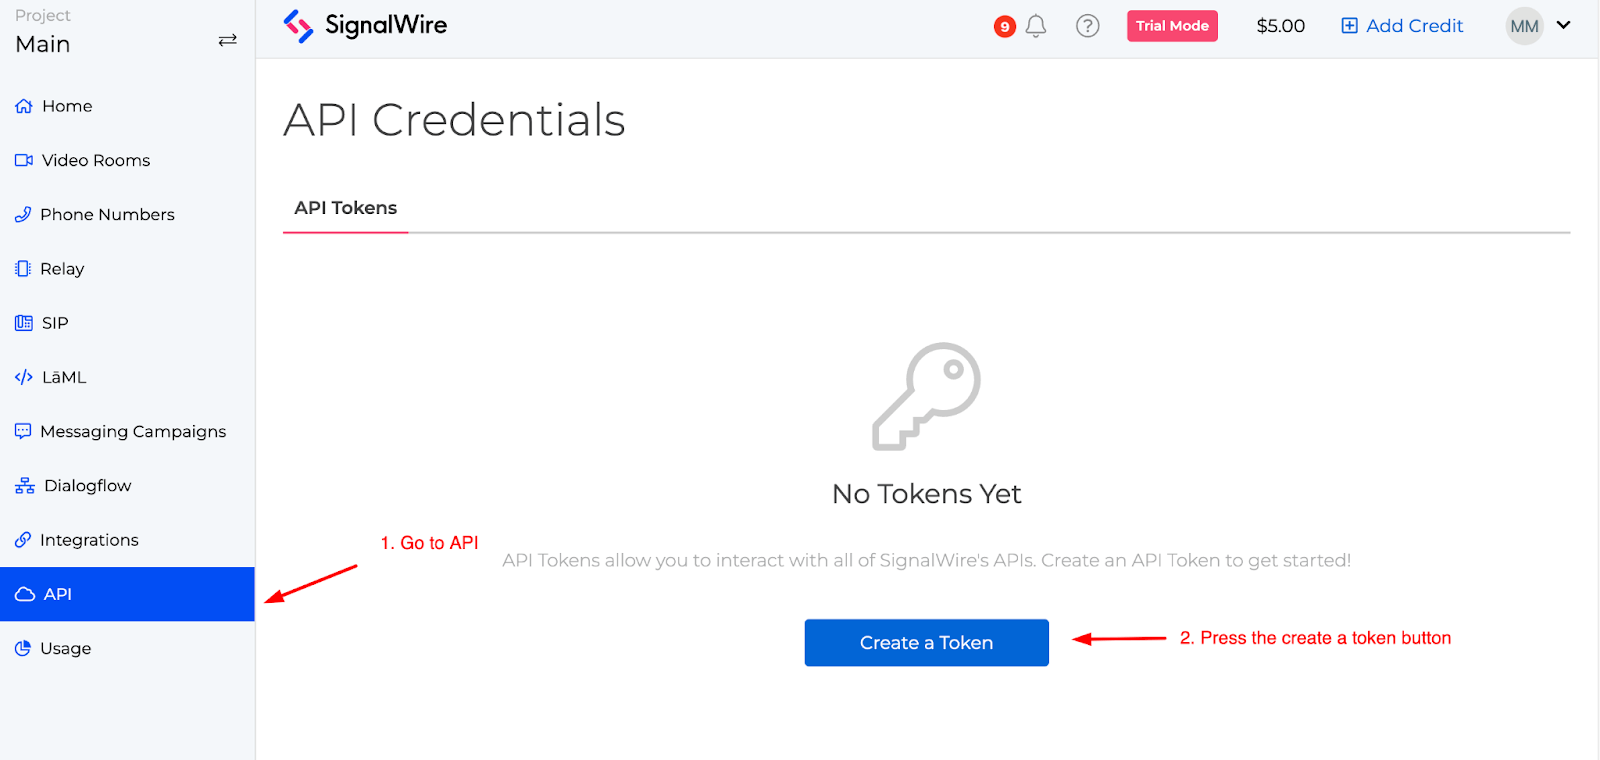
Fill in the needed credentials and you will get a token in return.
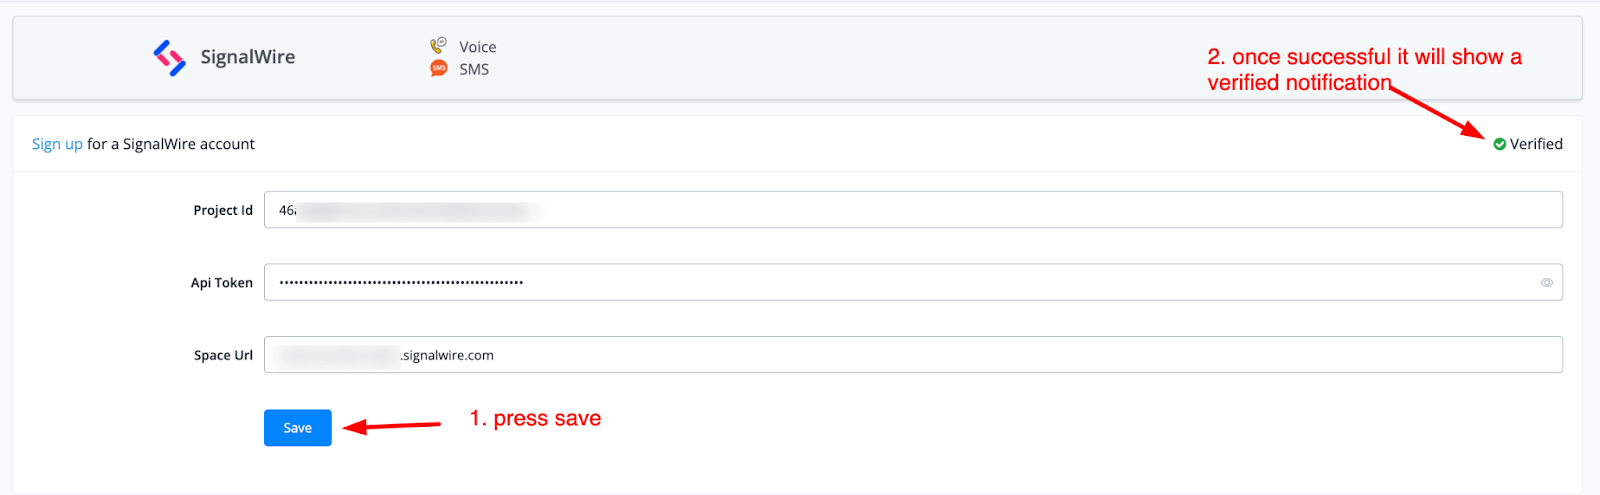
Once done paste all the credentials into your workspace and don’t forget the press the save button.
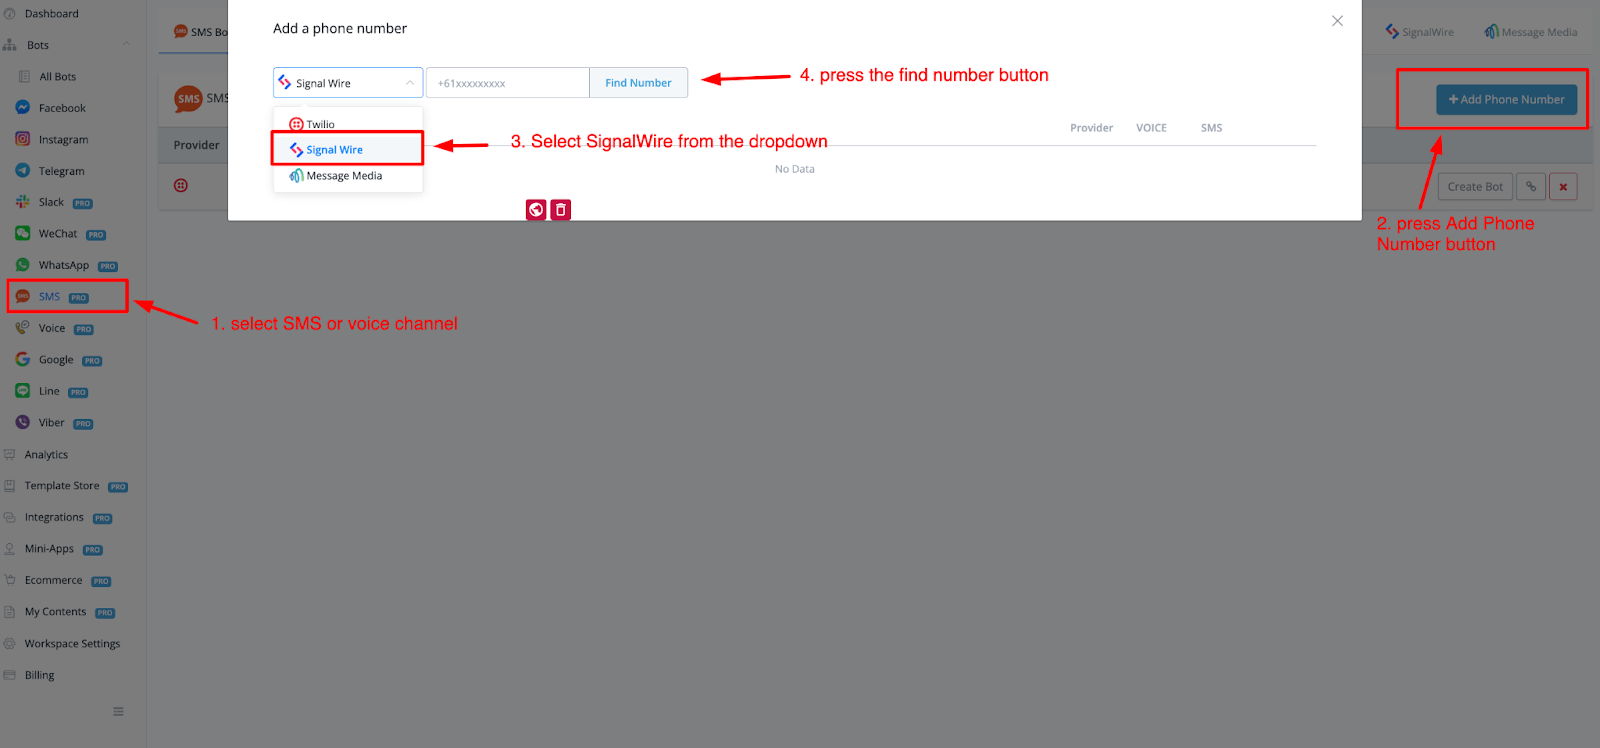
How to use SignalWire
Now that your account has been connected you can start creating voice and or SMS chatbots.
Just go to the left-hand menu, select either the voice or SMS channel and press the add phone number button.
From the dropdown select SignalWire, then press the button find number.
Email (SMTP / Gmail / Sendgrid)
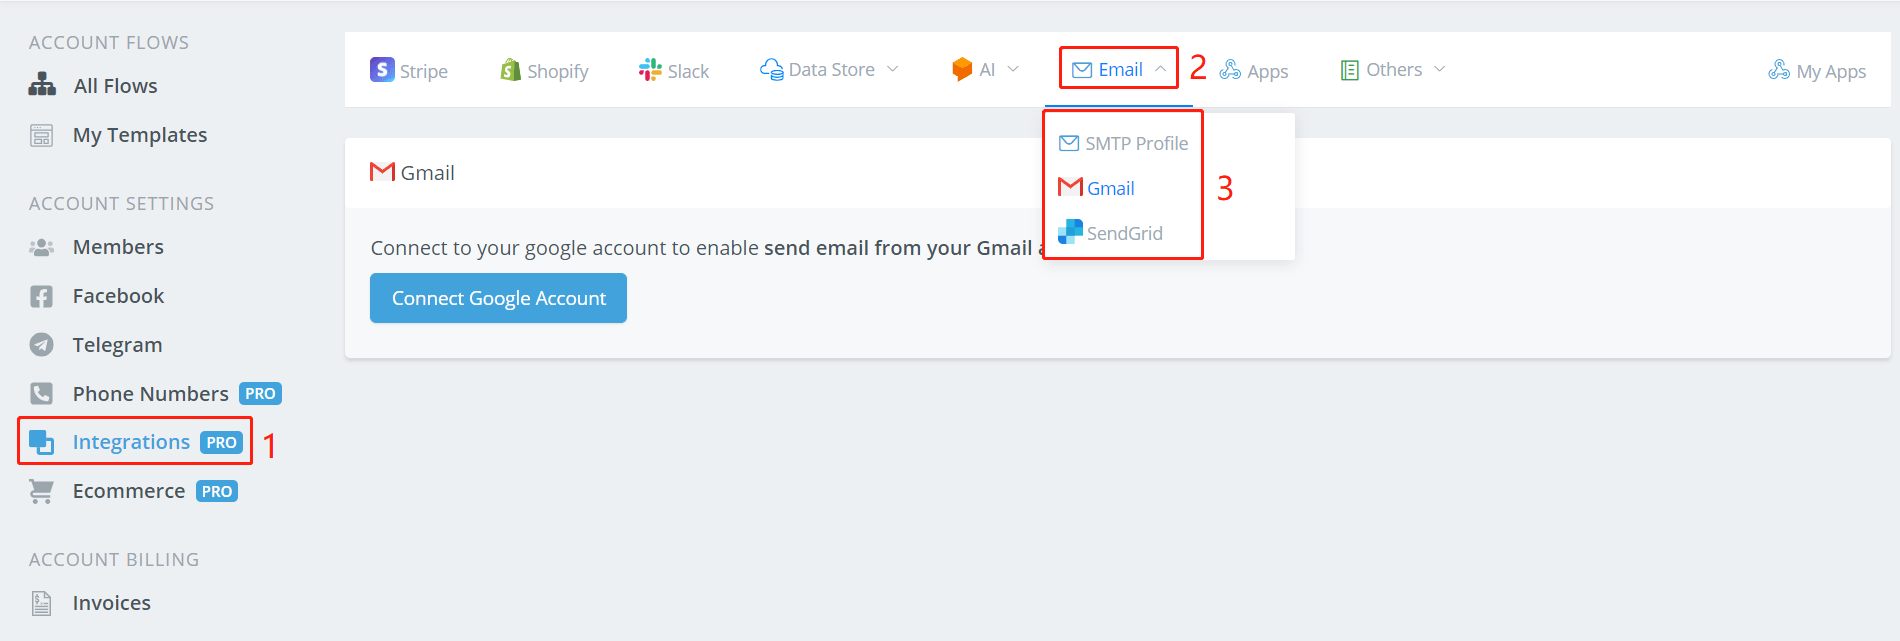
Botbuz supports 3 email integrations: SMTP Profile, Gmail and SendGrid. Follow step 1 to 3 to find them.
SMTP Profile Setup
Let's take Hotmail as an example.
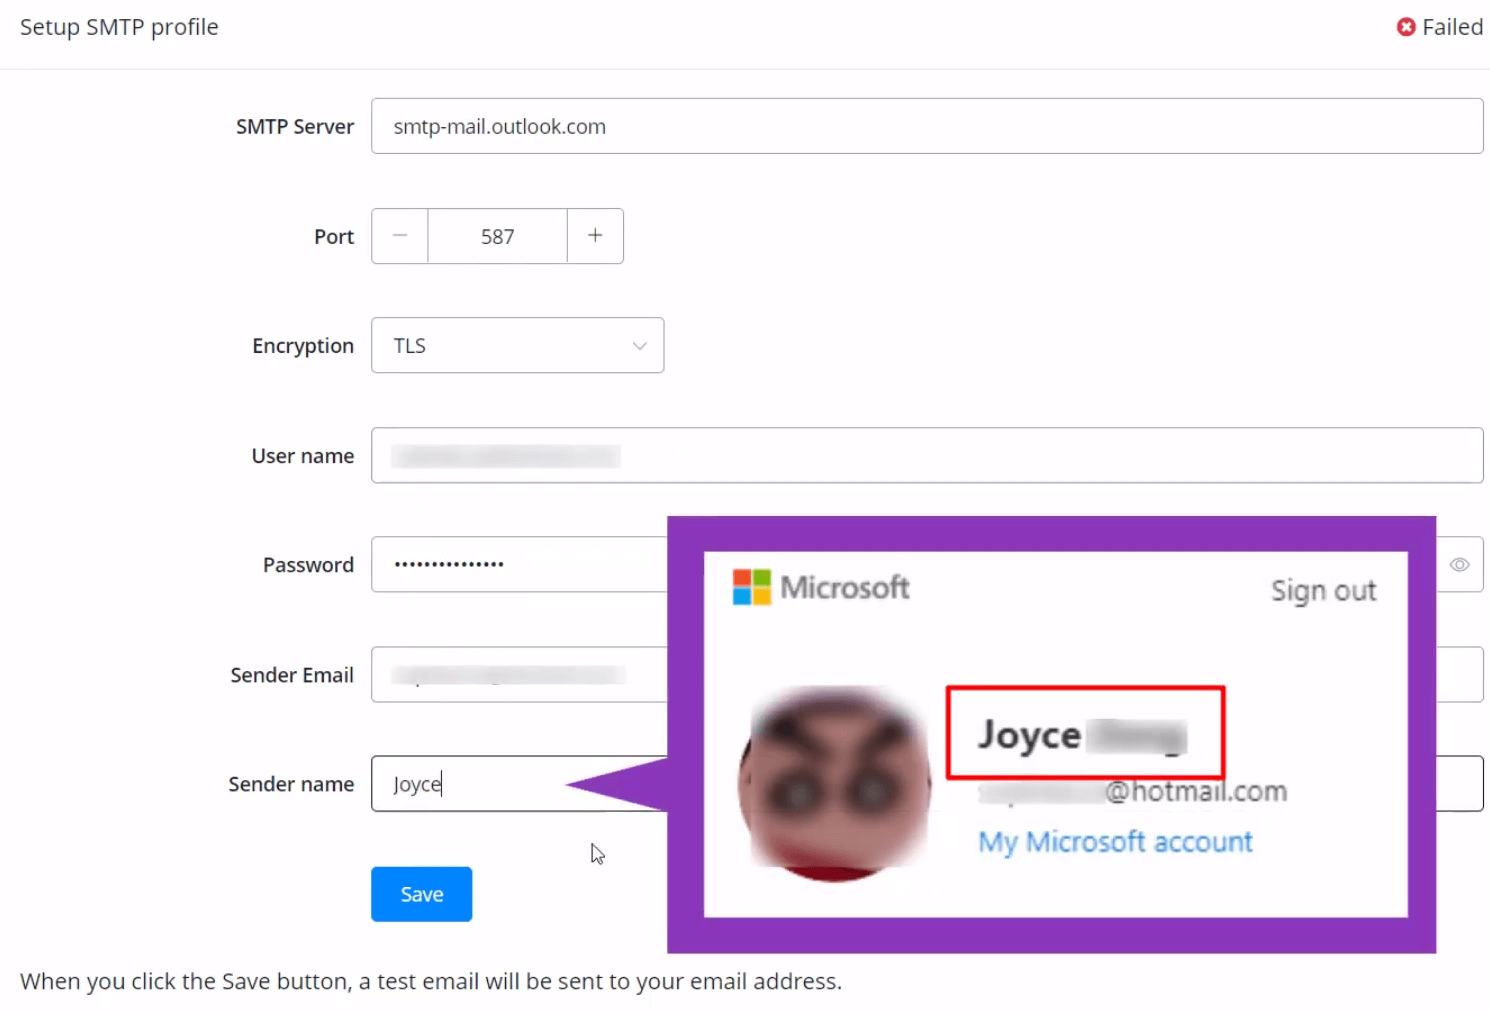
Fill in the fields as shown in the picture. Note that you can find your “Sender name” in your account detail. Once done, click “Save”. The sign at the upper right corner will tell you whether you succeed or not, either “Failed” or “Verified” like this:
You will receive a test email if your email address gets verified.
Gmail Setup
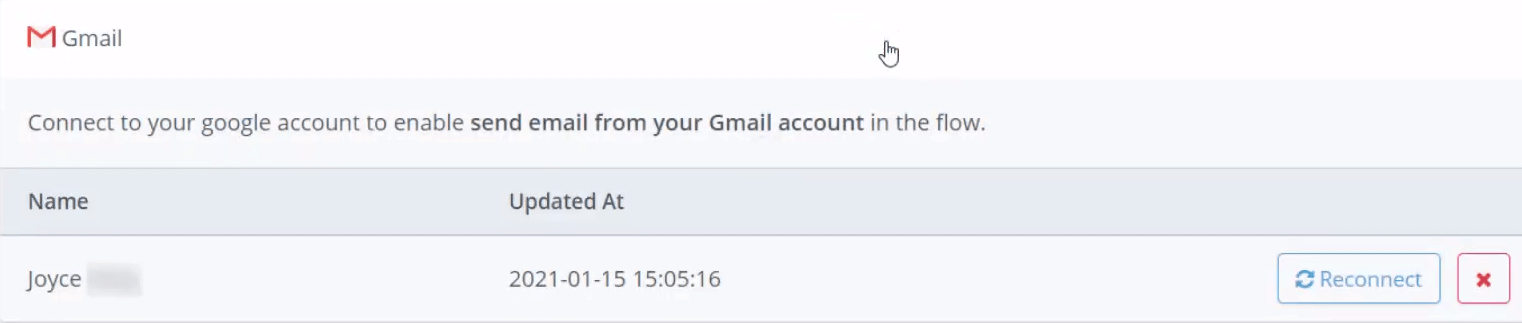
Click “Connect Google Account” after you choose “Gmail”.
Select one of your Gmail and “Allow” Botbuz to connect.
Once done, it looks like this:
SendGrid Setup
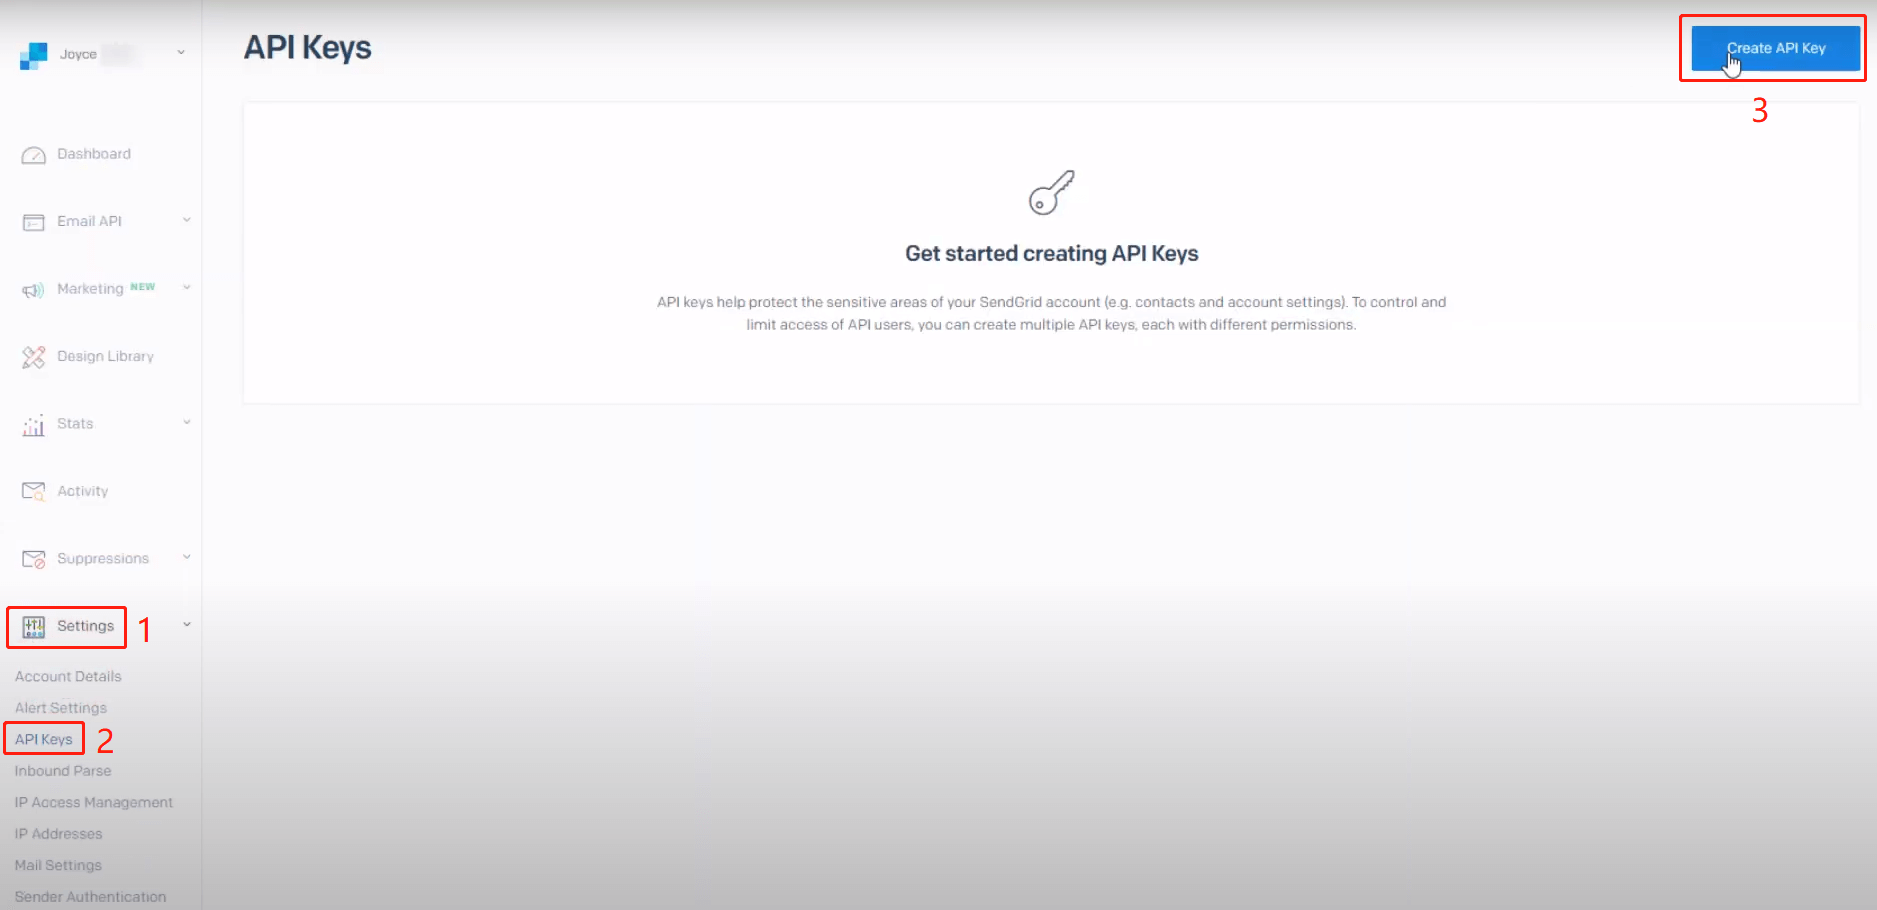
Select “SendGrid”, open its website:
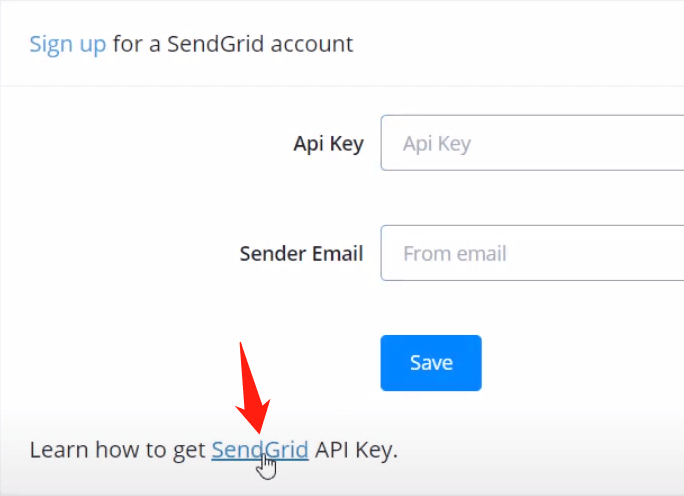
Log in yourself, enter your SendGrid “Dashboard” from the upper right corner.
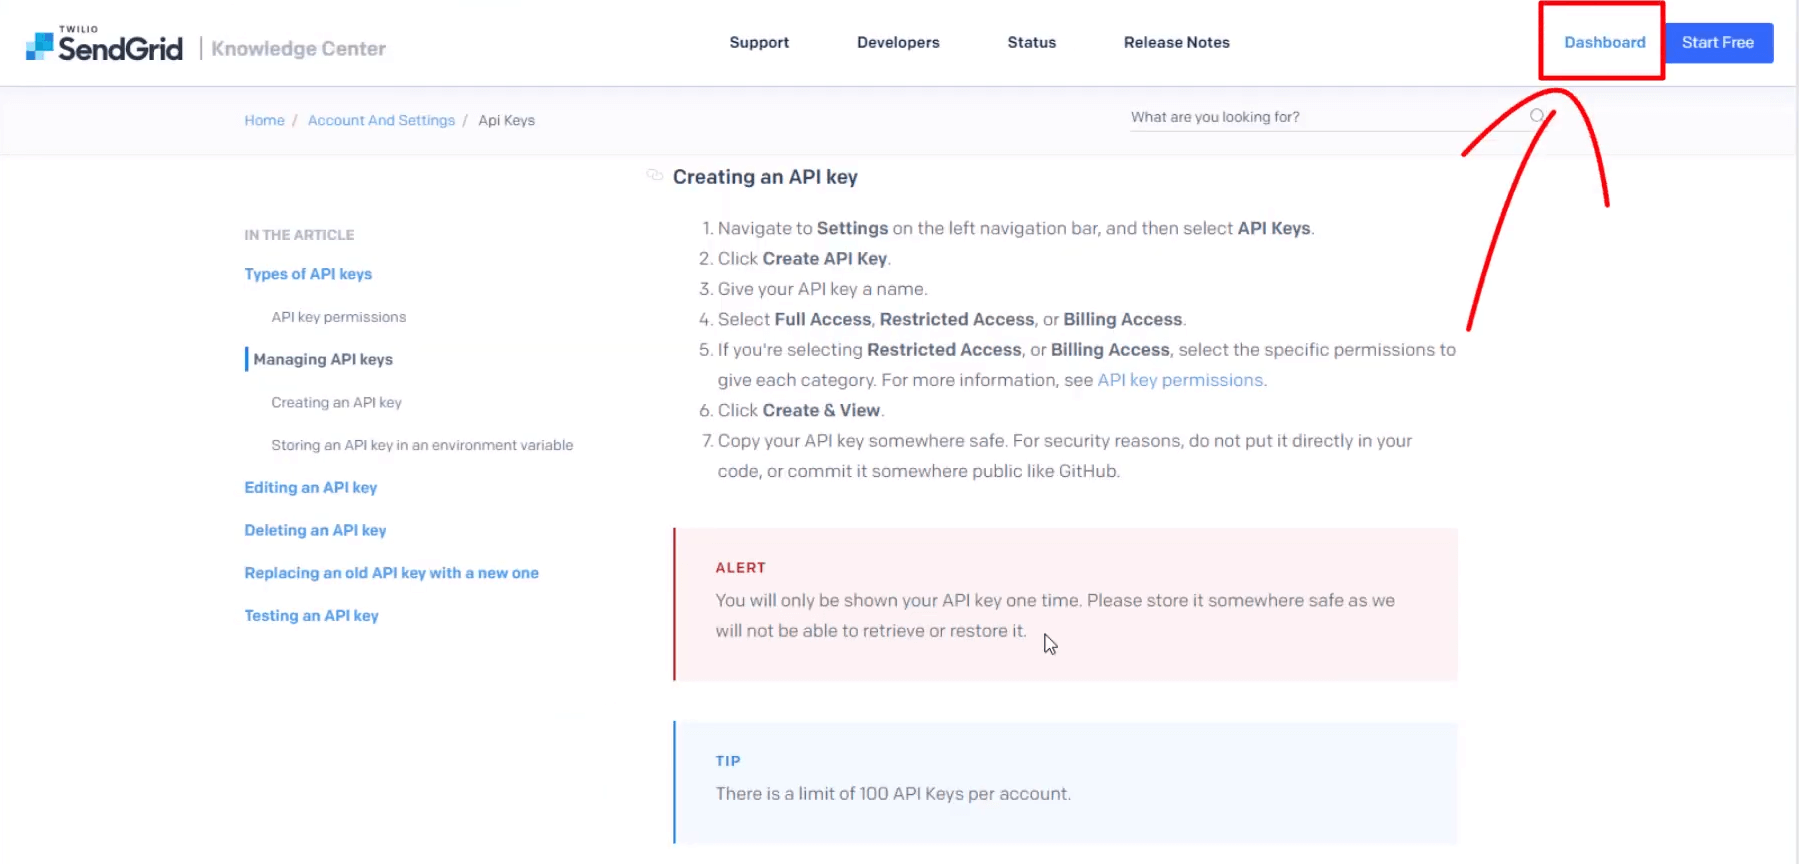
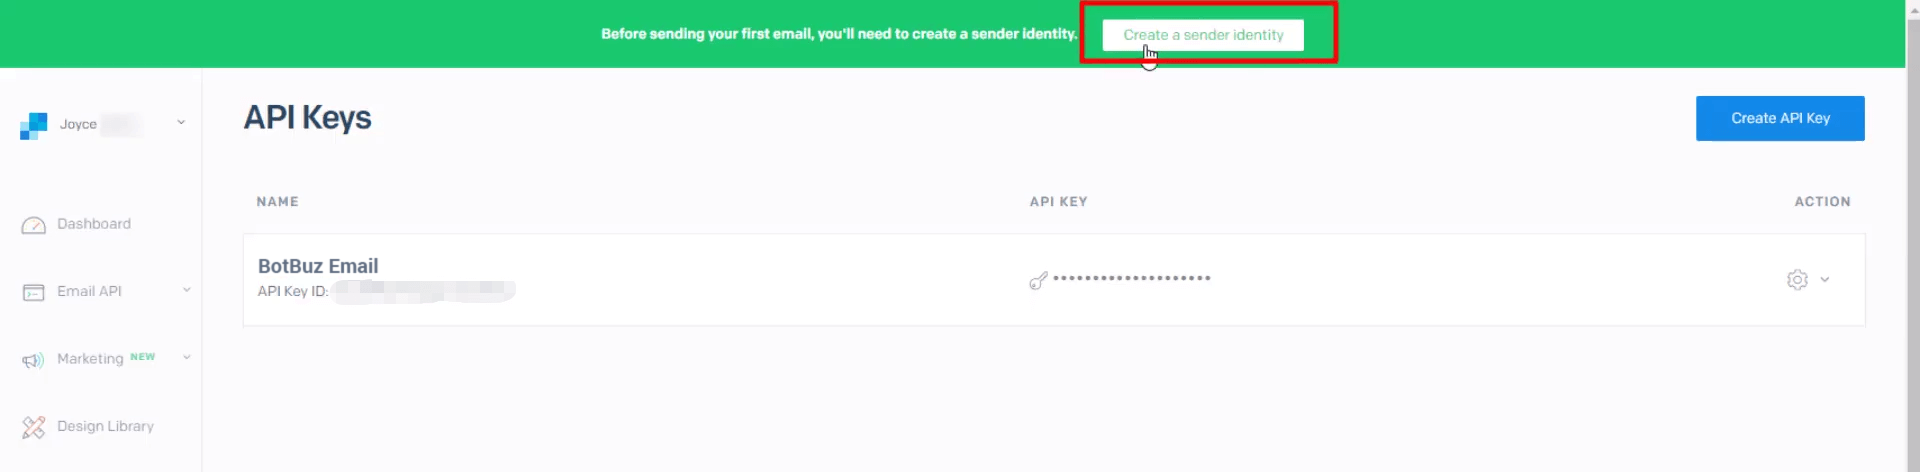
Follow step 1, 2 and 3 to create API key:
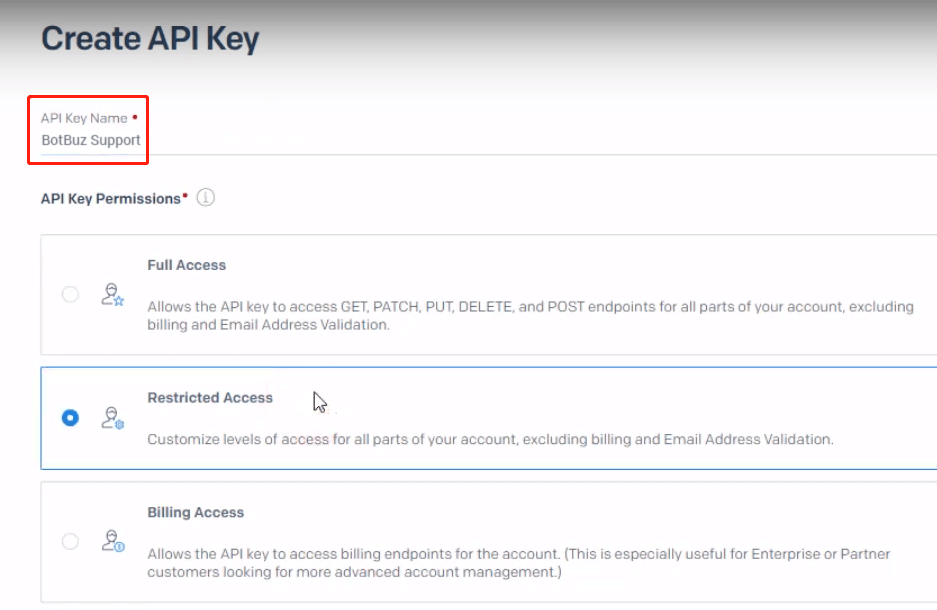
Give an API key name, select “Restricted Access”.
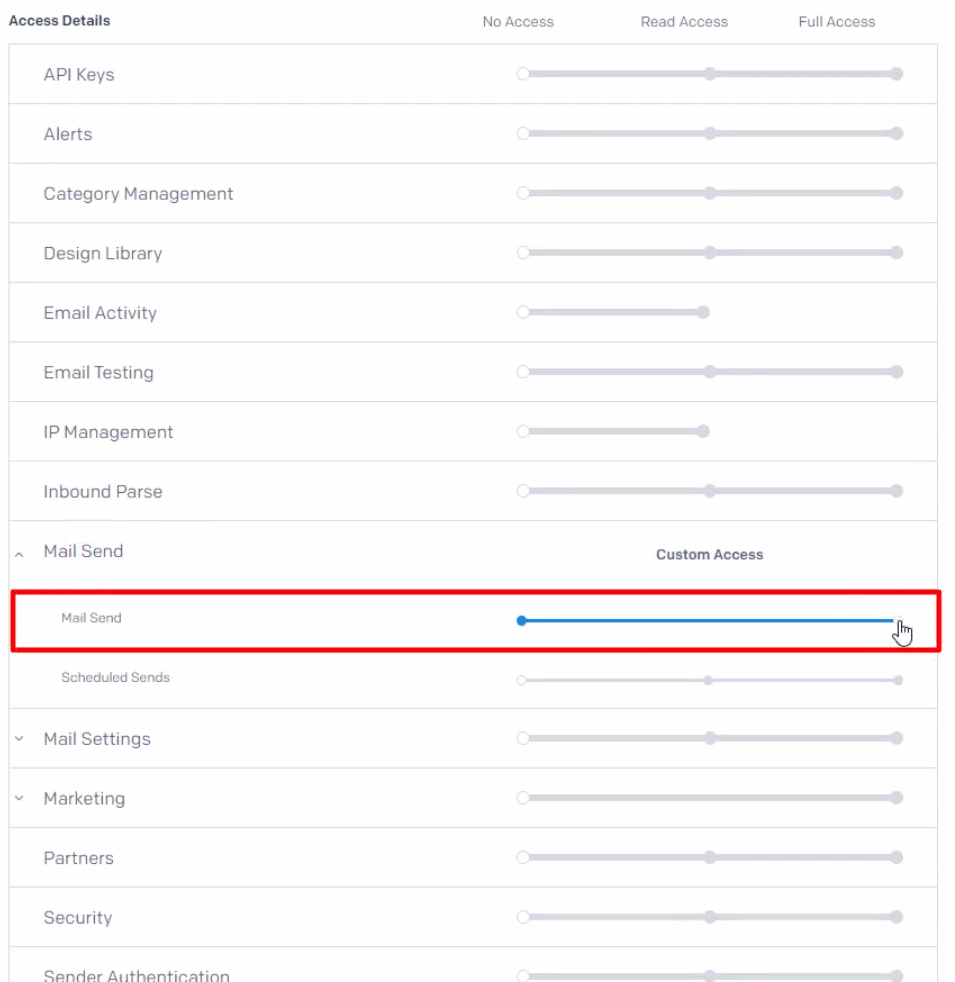
Make sure you give Botbuz full access to “Mail Send” and click “Create & View” at the very bottom of the page.
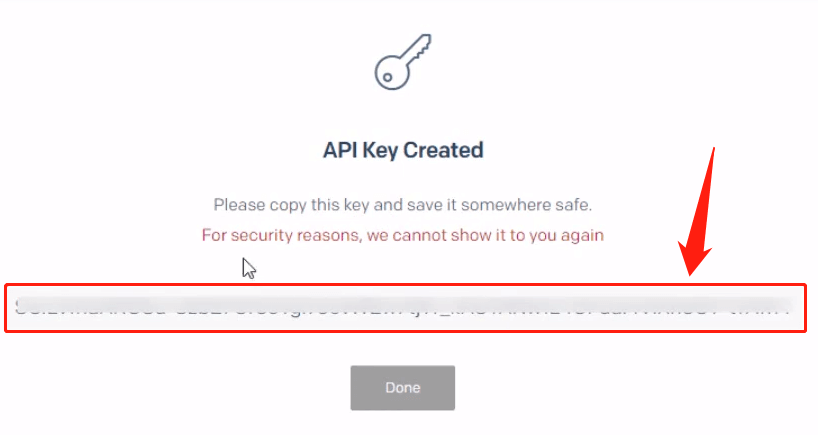
Once done, copy your key back to Botbuz.

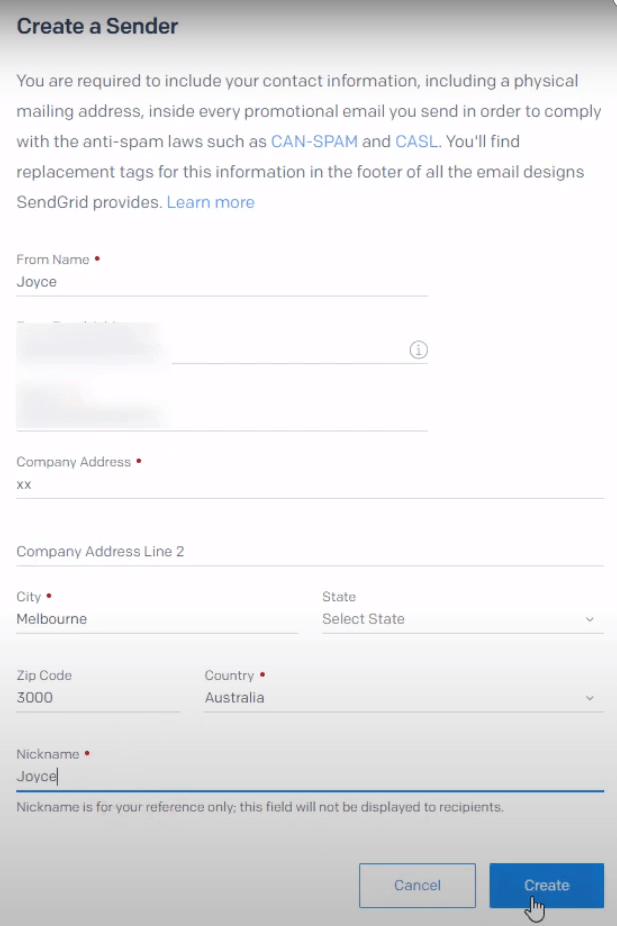
To get a “Sender Email”, let's get back to SendGrid's website again. Click “Create a sender identity” and “Greate a Single Sender”:

Fill in your details and “Create”:

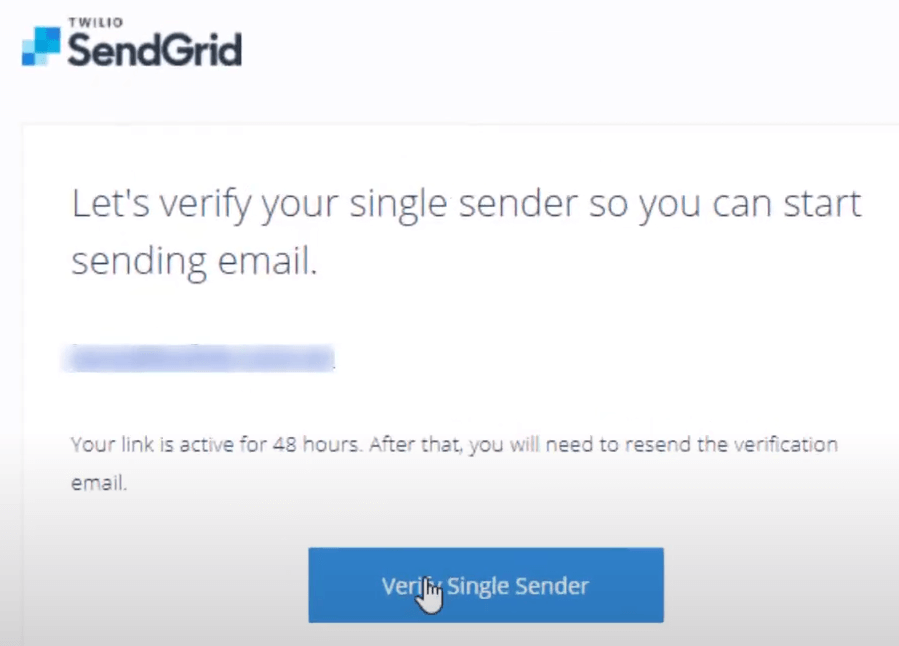
A verification link will be sent to your email, click it to get verified.
Send Email Notification
After setup your email integration, you can select it as a sender in your “Email Profile” list
Send Email Step
Add a Send Email step by right-clicking in your workspace or from the “Add new step” button:
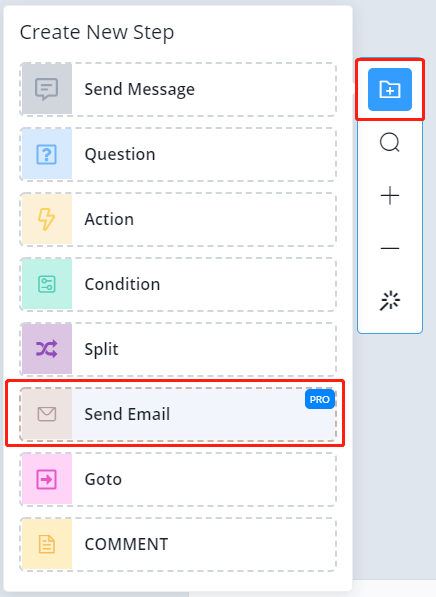
This is how a Send Email step looks like:
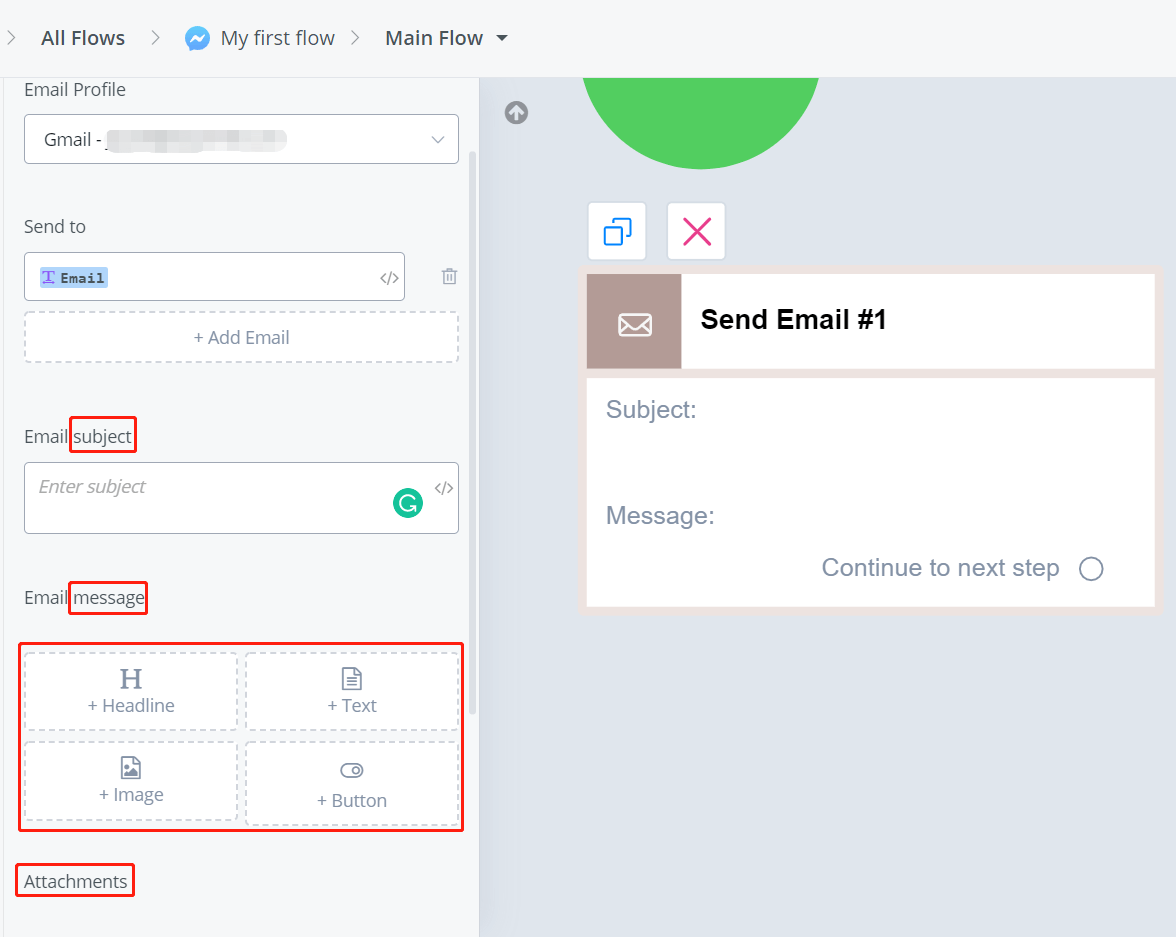
Name a sender and receiver. There are 3 blocks of information, subject, message and attachment. Feel free to add what you need.
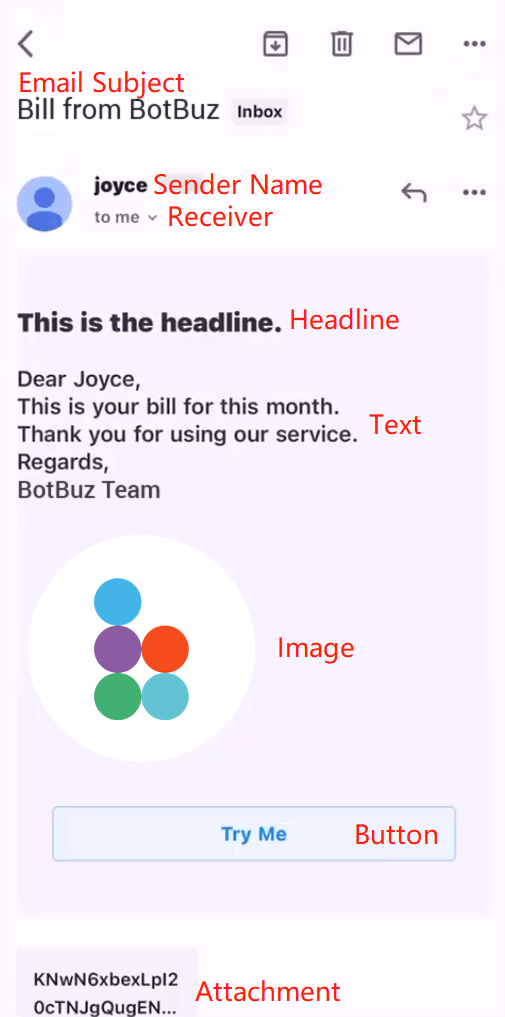
This is an example of an email from the user's side:
MailChimp
Setup
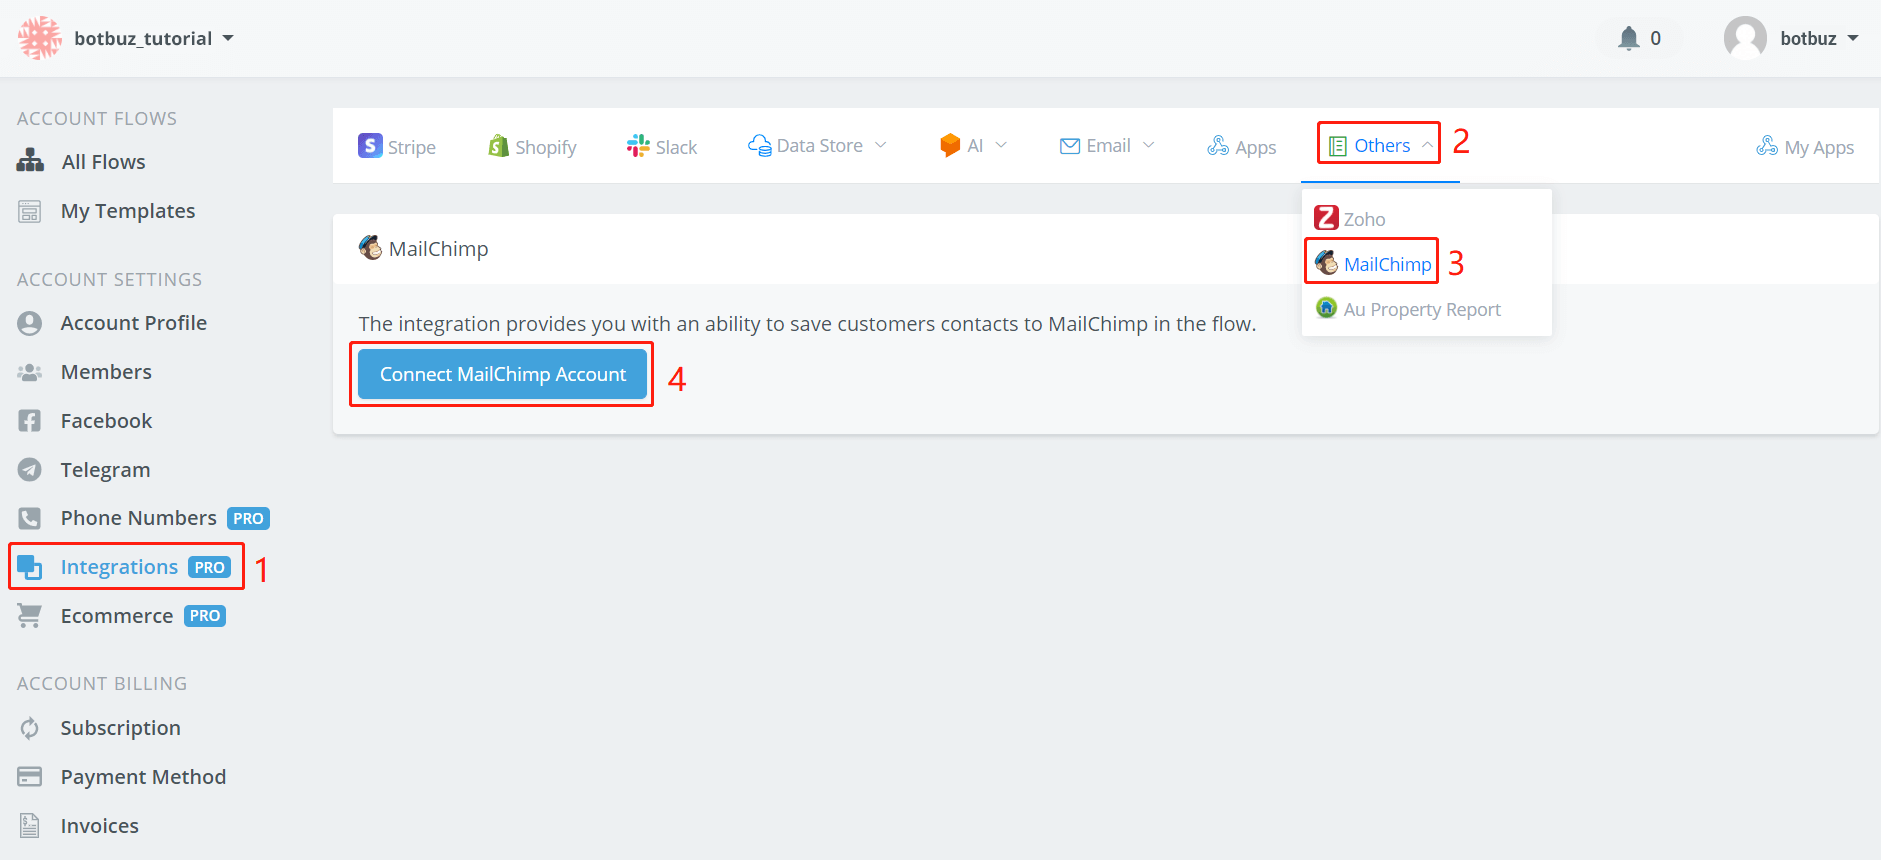
Follow step 1 to 4 in the above picture, open MailChimp's website.

Log in yourself and authorize Botbuz.
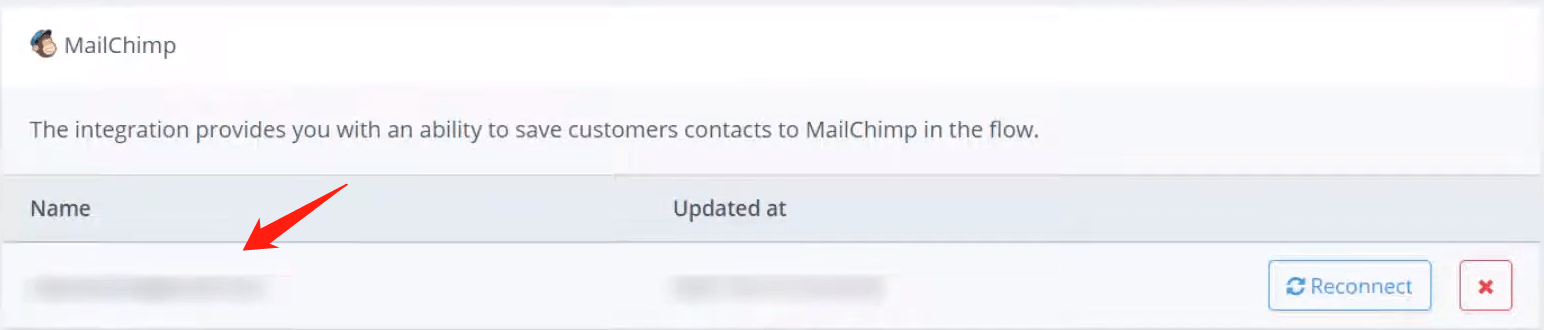
The page will then bring you back to Botbuz. You can see your account name now.
Use MailChimp in Action Step
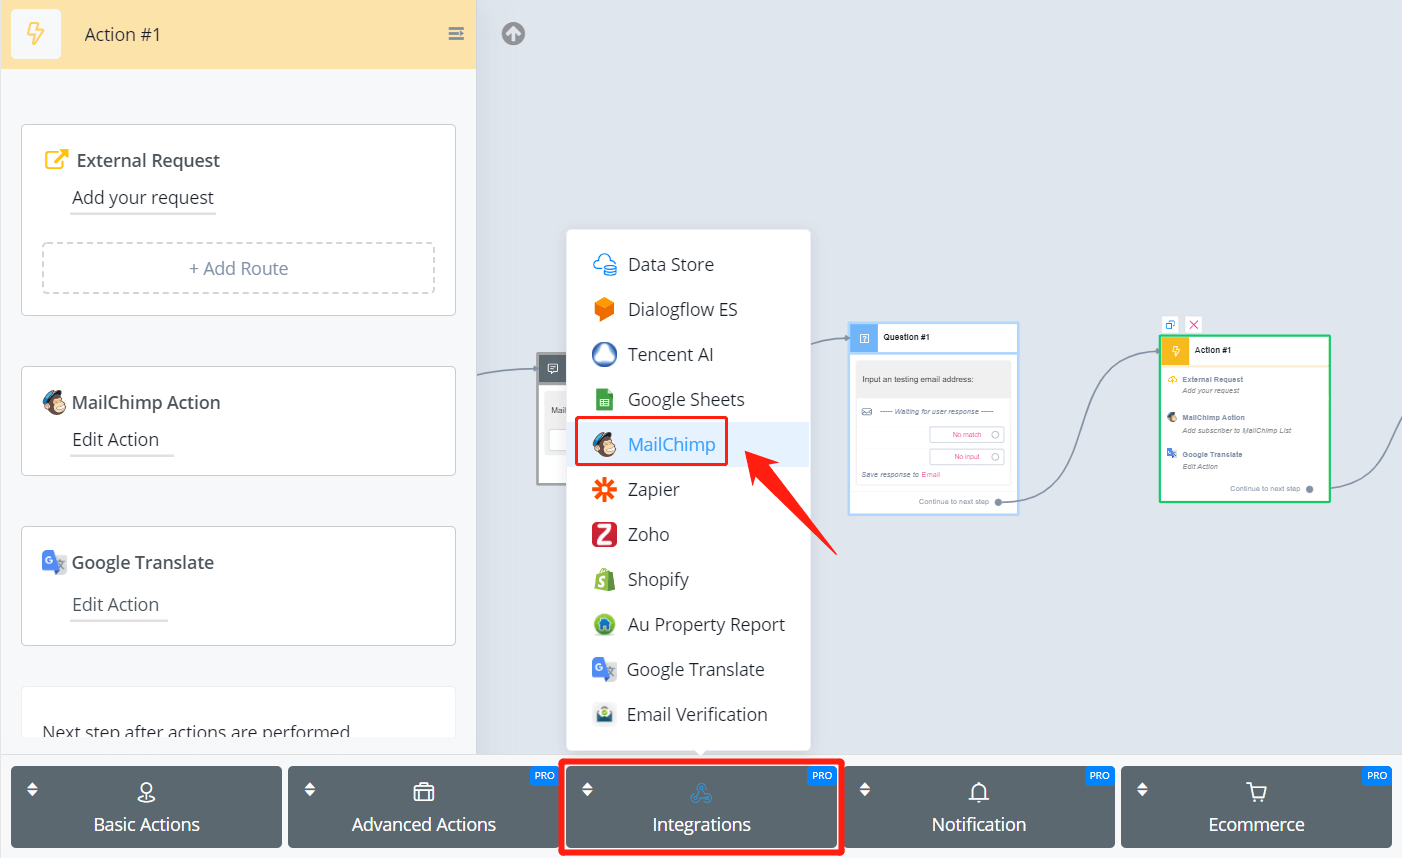
In your Action step, find “MailChimp” in the “Integrations” list.
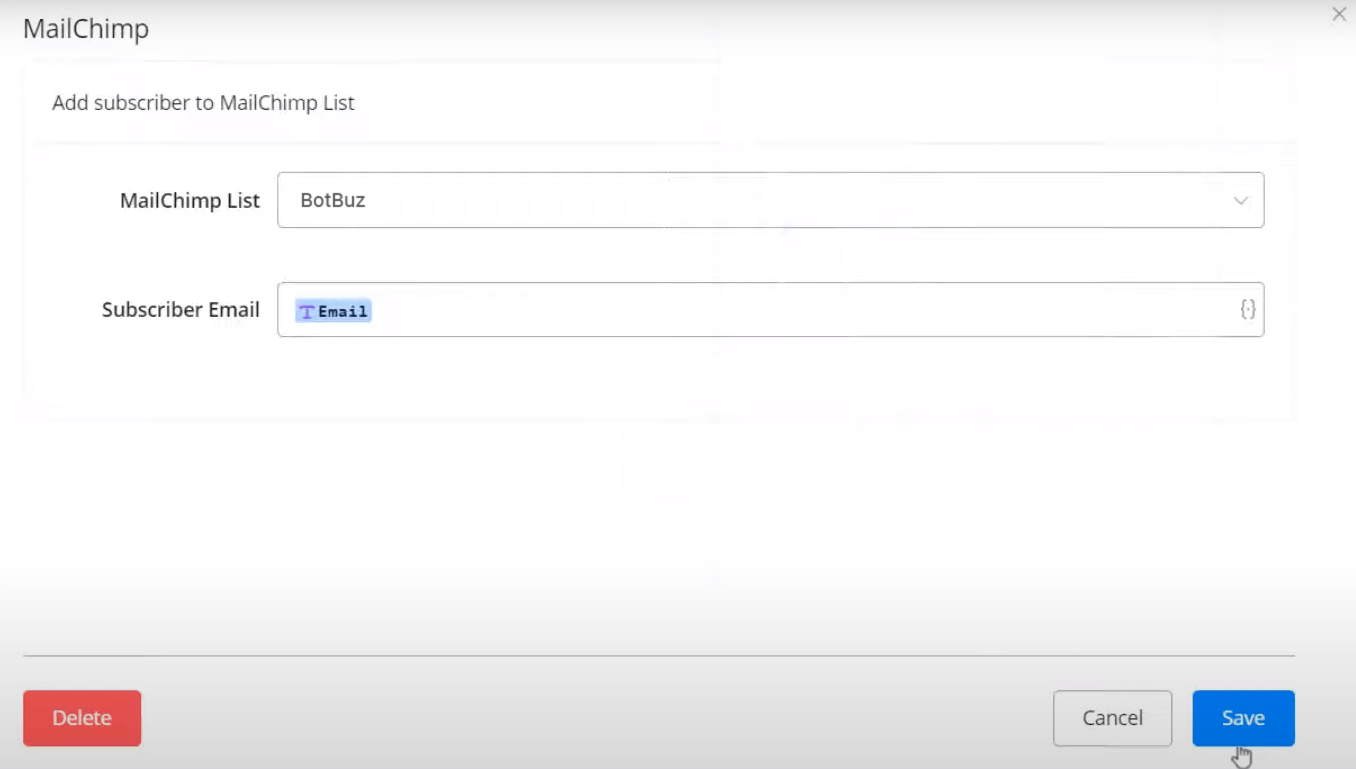
Simply put this Action after a Question step. Pick a MailChimp list and put users' email address. That's all about it!
Let's see what happen in MailChimp:
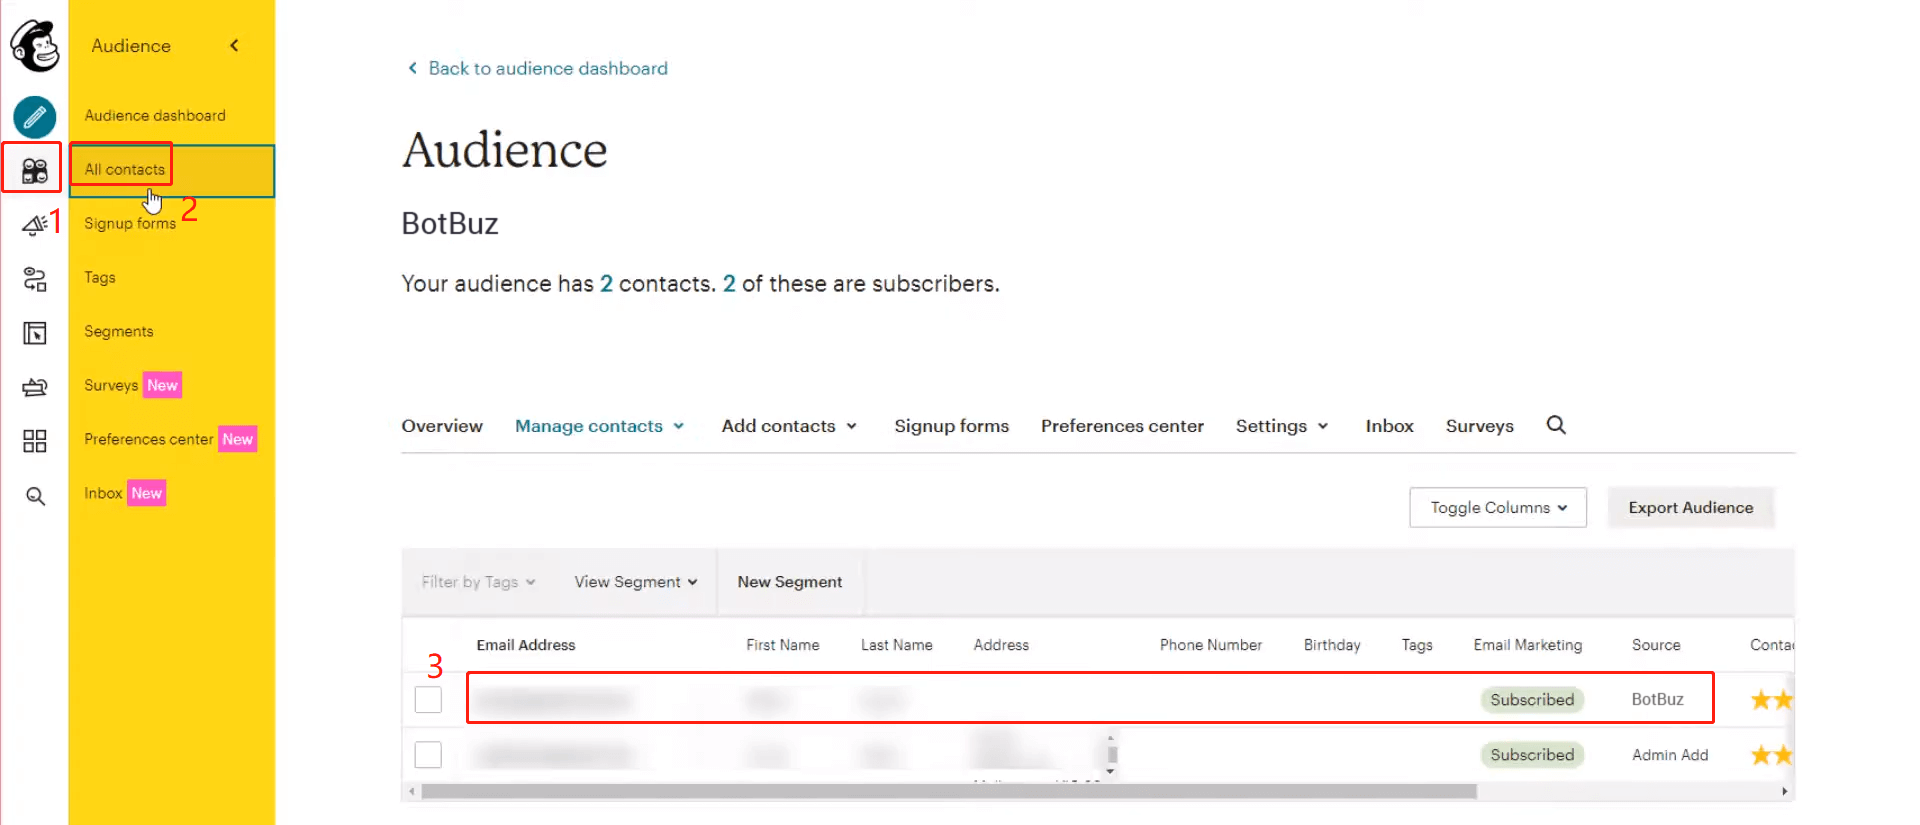
In your MailChimp dashboard, click area 1 and 2 from the left sidebar. Then you will see the audience added from the source Botbuz.
Note that
only a valid email address can be added to your MailChimp. If nothing happens after the Action step, the email address from the user might be incorrect.
TIP
So you might want to add one more action to check whether the input email from the user is correct or not. There are various third-party APIs for verifying email, like mailboxlayer (opens new window). You can call these APIs from External Request or an easier way Mini-App.
More details click → Mailchimp
Integromat
Integromat just like Zapier is an automation platform where you can connect to hundreds of third-party software.
To integrate Integromat with your you only have to make a few steps.
From your dashboard go to Integrations from the left-hand menu. Then select Integromat.
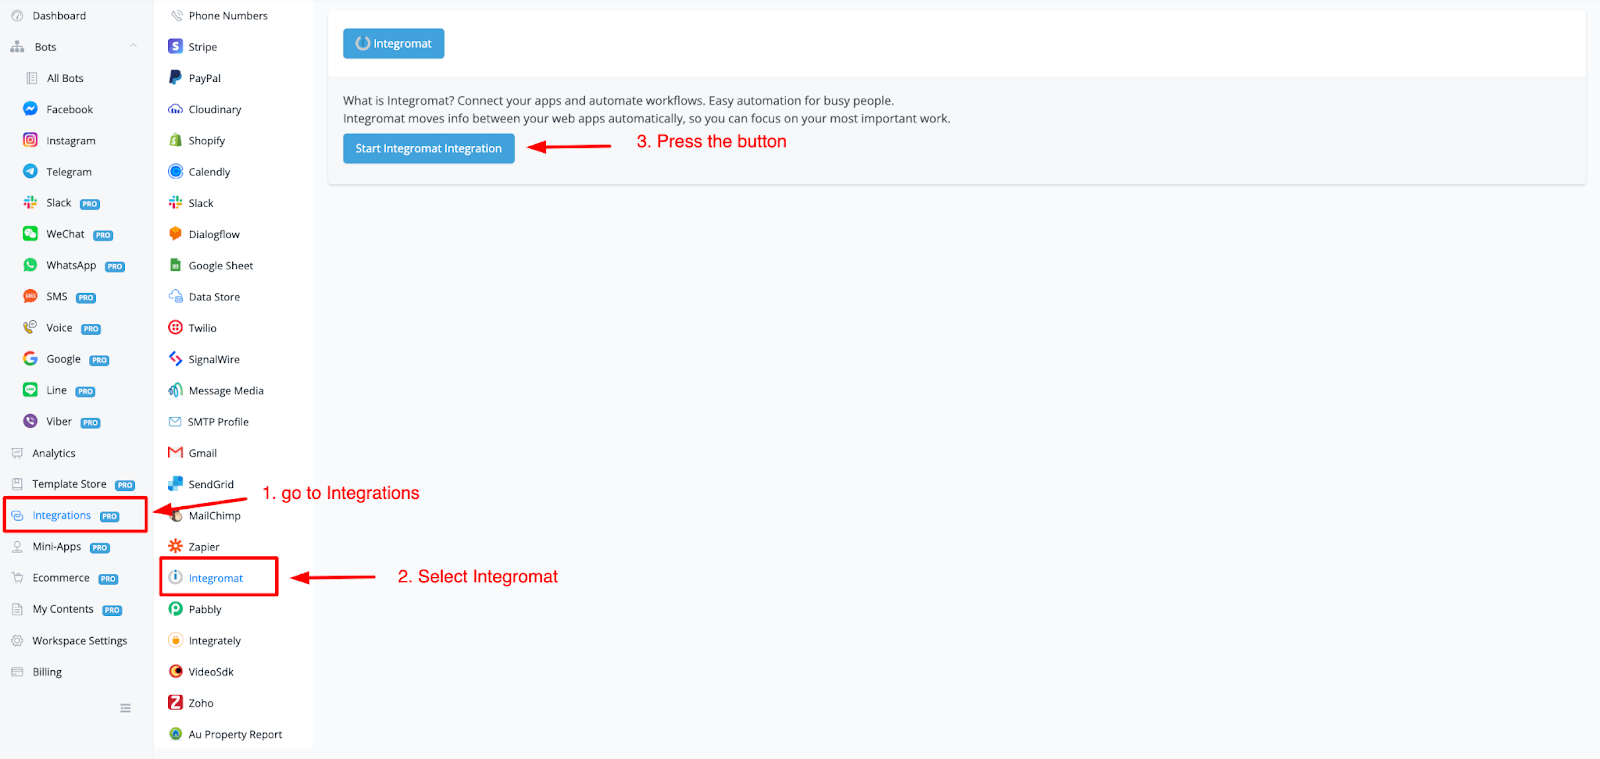
From here press the button mentioned in step 3 called Start Integromat Integration.
How to add Botbuz to your Integromat account
How to use Integromat
Once added you can build a new scenario. Search for the app Botbuz and you should find it now
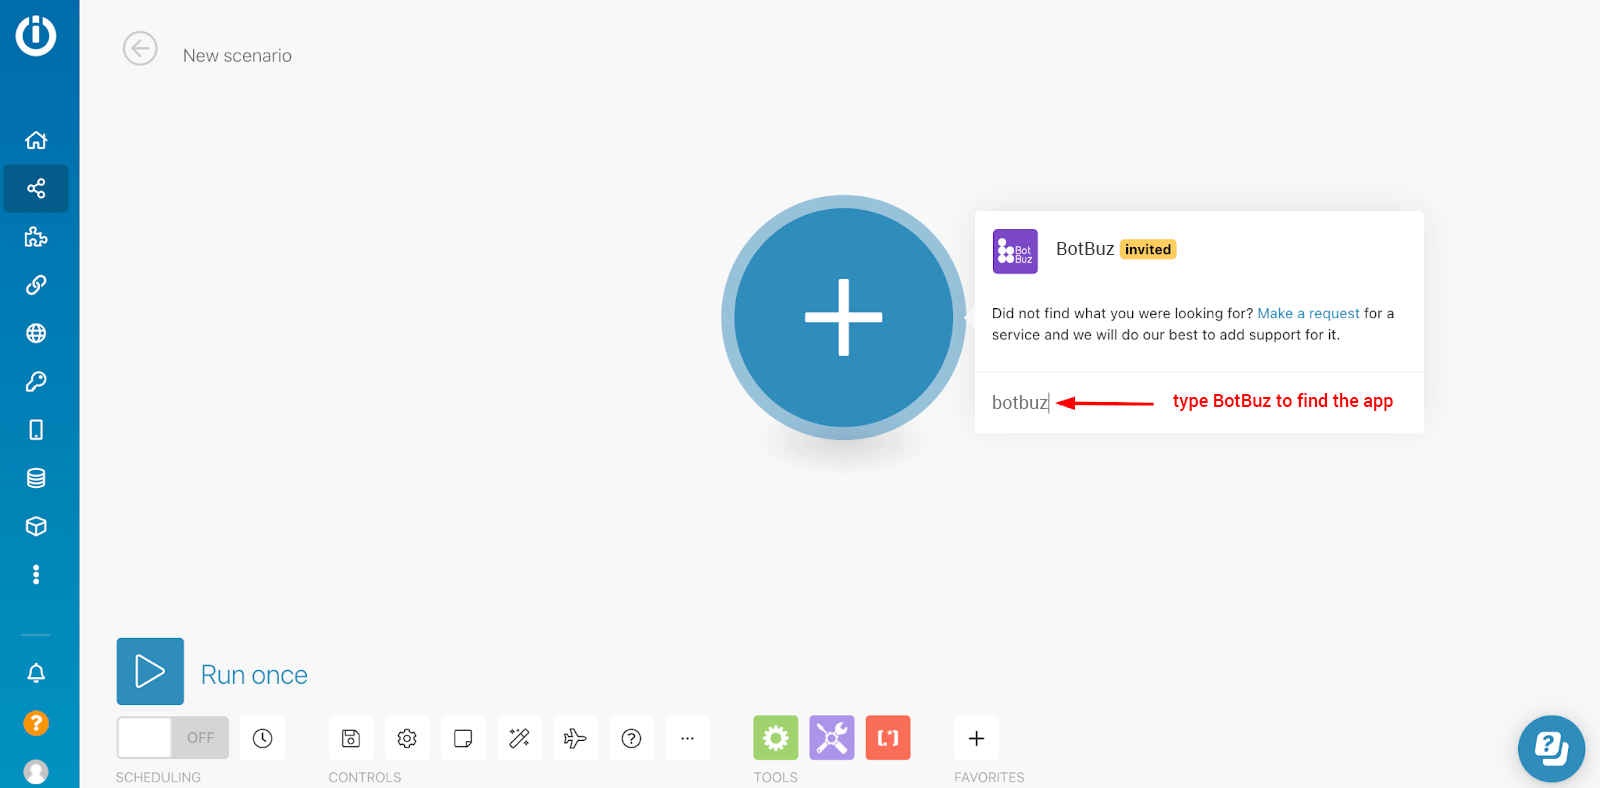
Once you have added the app inside the scenario you will have access to different triggers and actions.
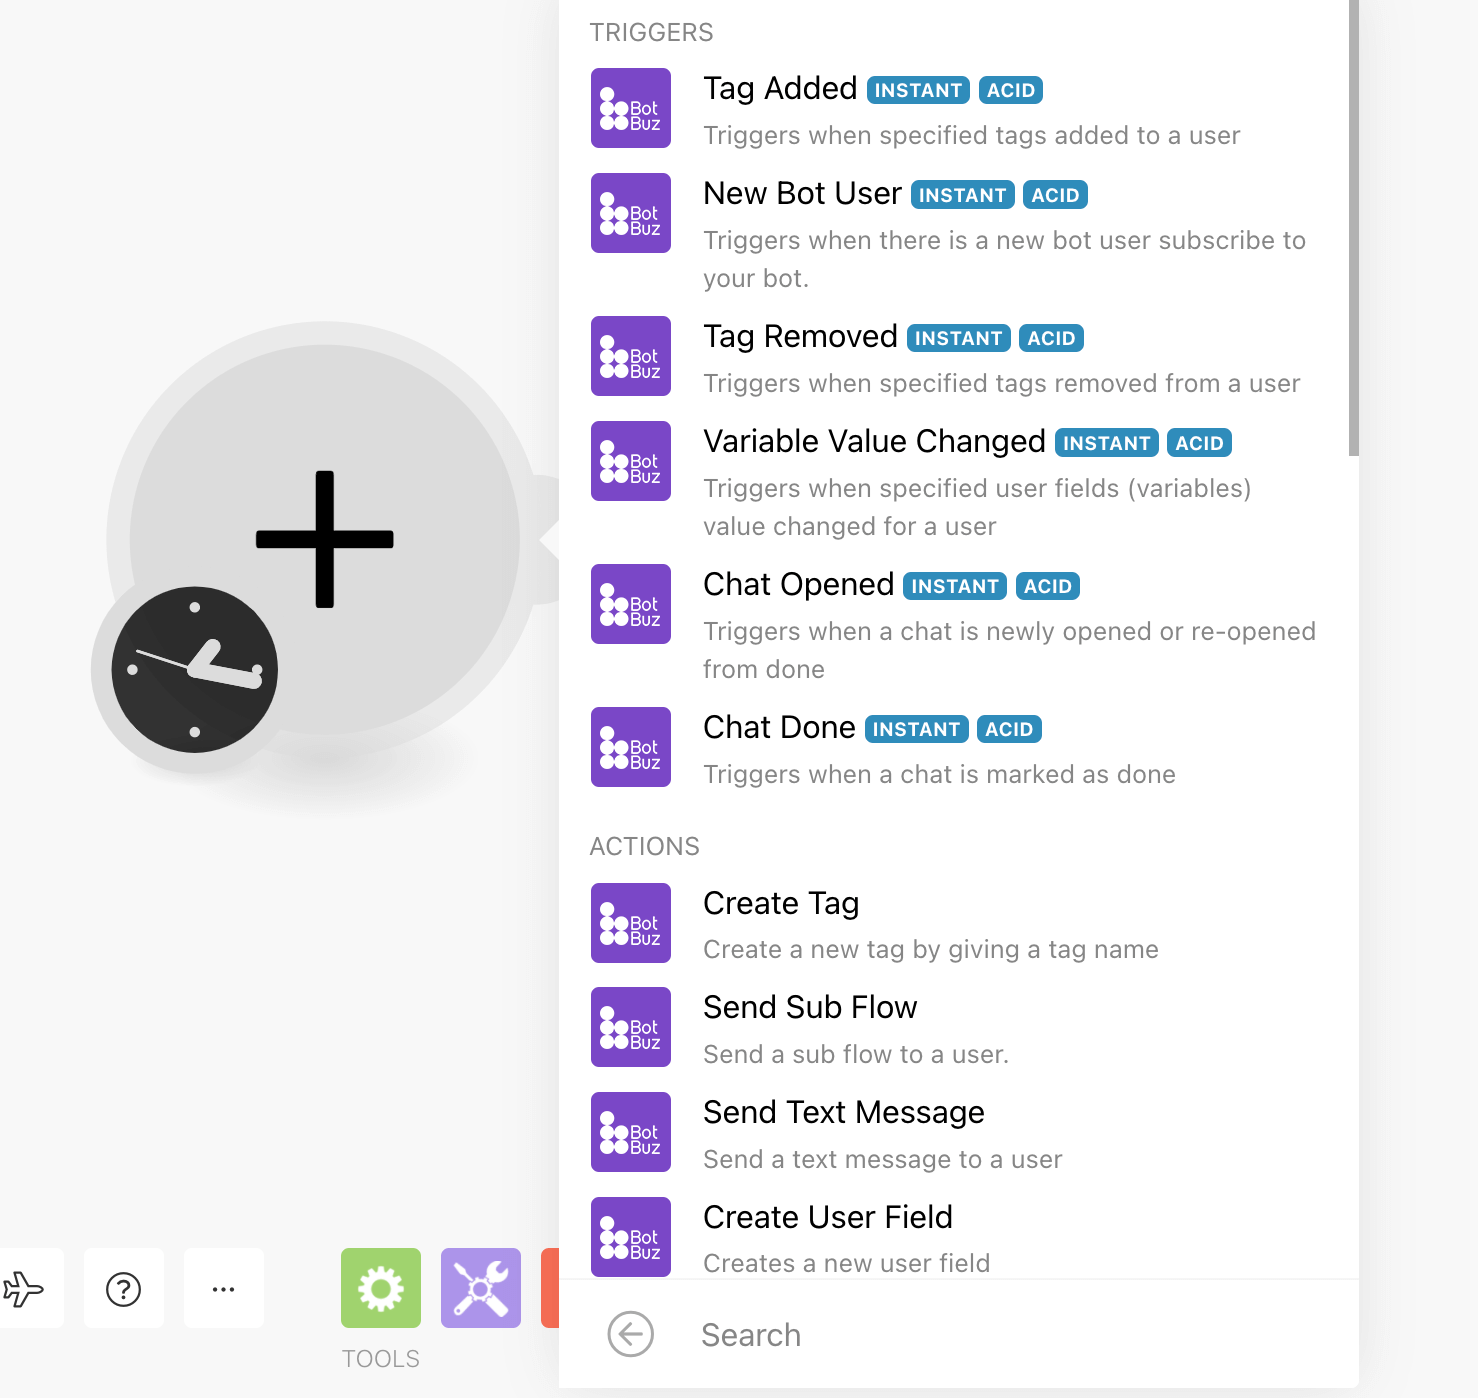
If we want to create a tag for example then we will need to be able to connect to our Botbuz chatbot.
For this you will need an API key.
Insert your API Key and then press the button Continue.
Once connected you can set up your entire automation inside of Integromat
Pabbly
Like Zapier and Integromat Pabbly is another automation platform that allows you to connect to different third-party software.
To start connecting to your Pabbly account go to the Integrations from your left-hand menu, then choose Pabbly.
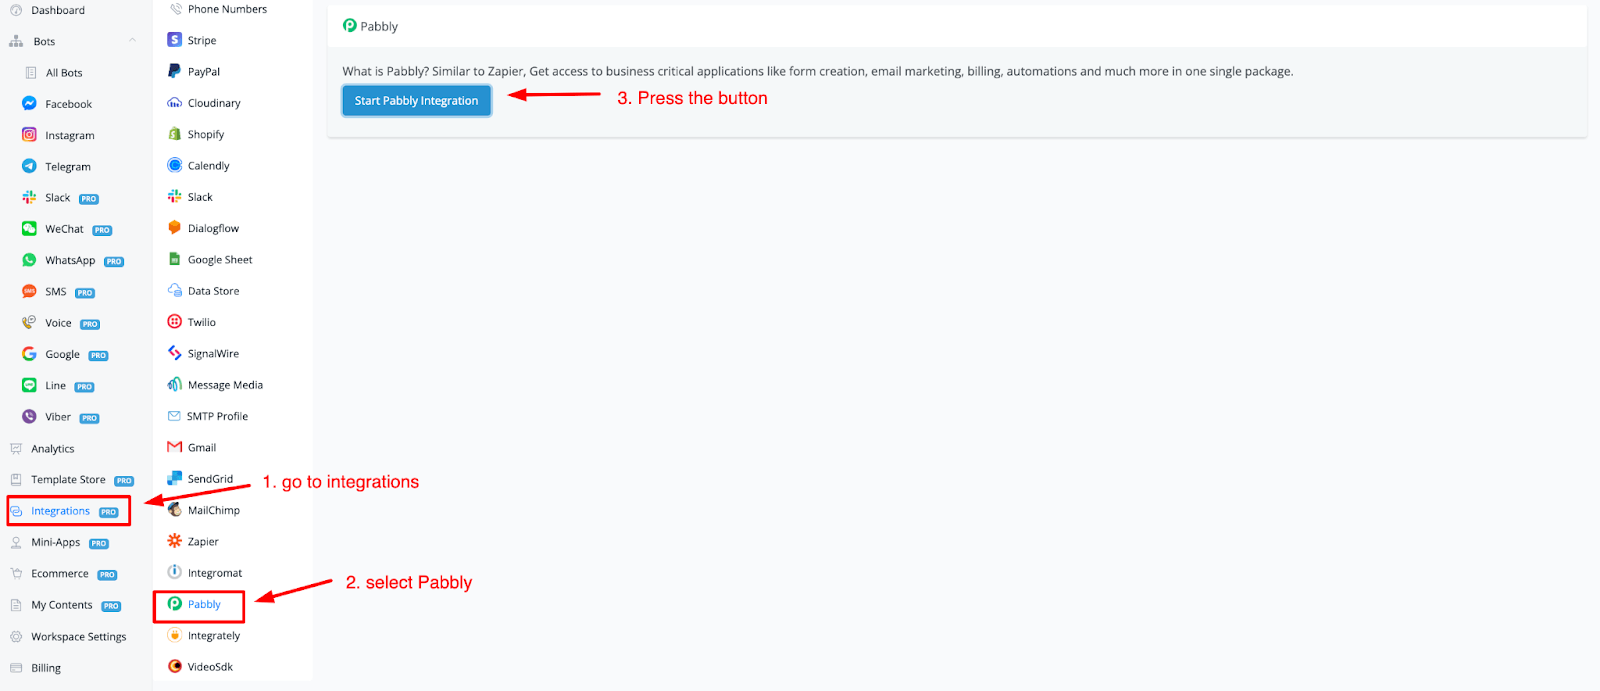
How to add Botbuz to your Pabbly account
Once the above button is pressed it will take you to a webpage. From here press the button Connect Botbuz for free.
When you are signed into Pabbly it will take you to the main dashboard at Pabbly (opens new window).
From here you can go to Pabbly Connect and create your automation. When searching for apps type in Botbuz and it should show up now.
Select the action and or trigger then press connect to select the chatbot connection.
Once inserted press save and your account should be connected.
From here you can use Pabbly and Botbuz to set up your automation.
Integrately
Just like Zapier and Integromat, this is an automation platform where you can connect to countless third-party software straight out of the box.
In order to connect to your Integrately account go to the integrations section from the left-hand menu on your main dashboard. Then select Integrately from the list. Press the button to start the integration.

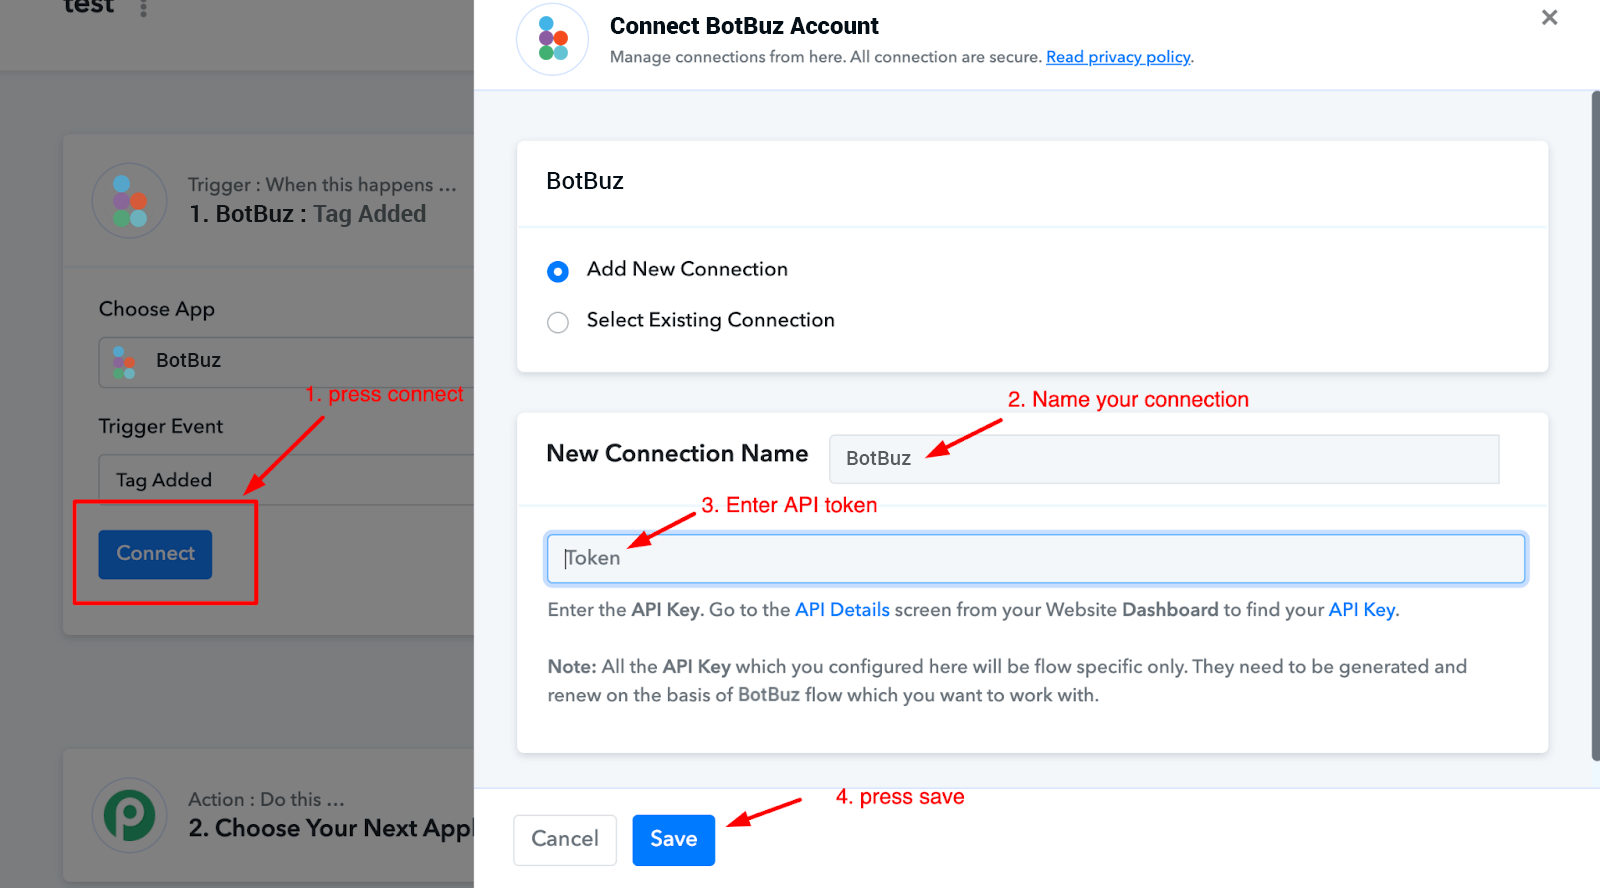
VideoSdk
With this native integration, you will be able to create live meetings directly inside your chatbot.
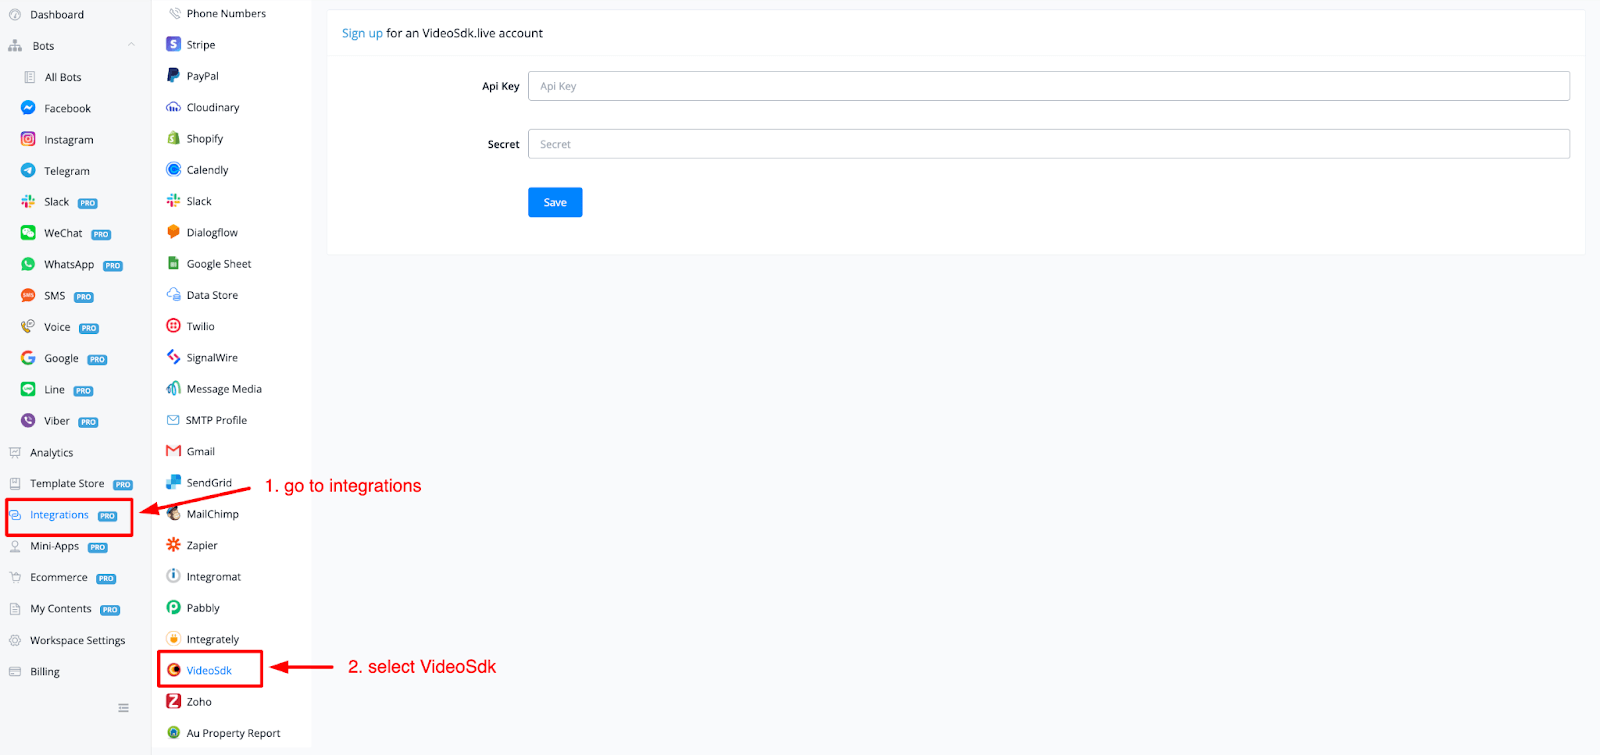
To connect to your VideoSdk account go to Integrations from the left-hand menu in your main dashboard overview. Then select VideoSdk in the list.
You will see that you need two pieces of credentials:
- API key
- Secret
How to fetch your credentials
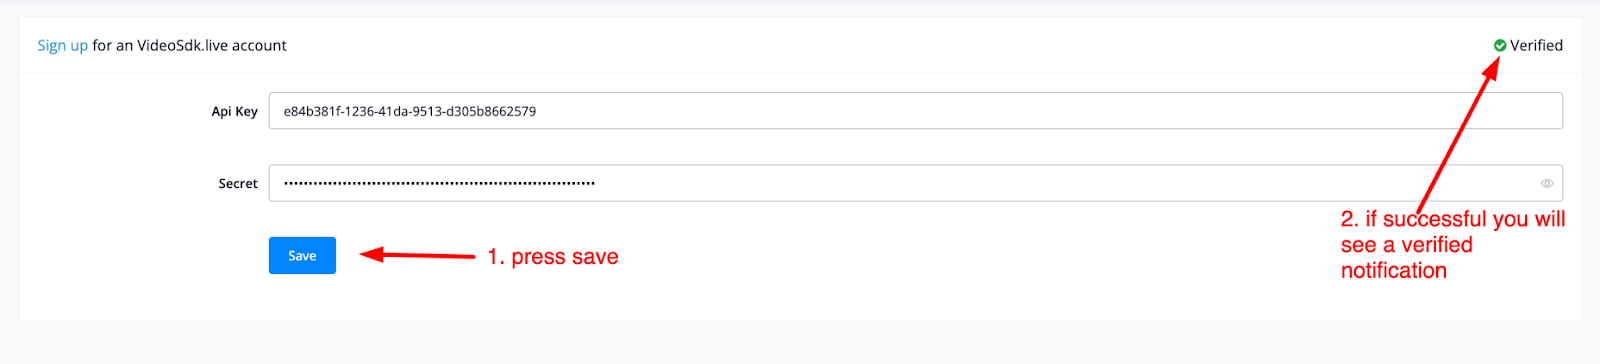
Login to your VideoSdk account, then go to the API keys section (opens new window). Copy your API key and secret from this page.
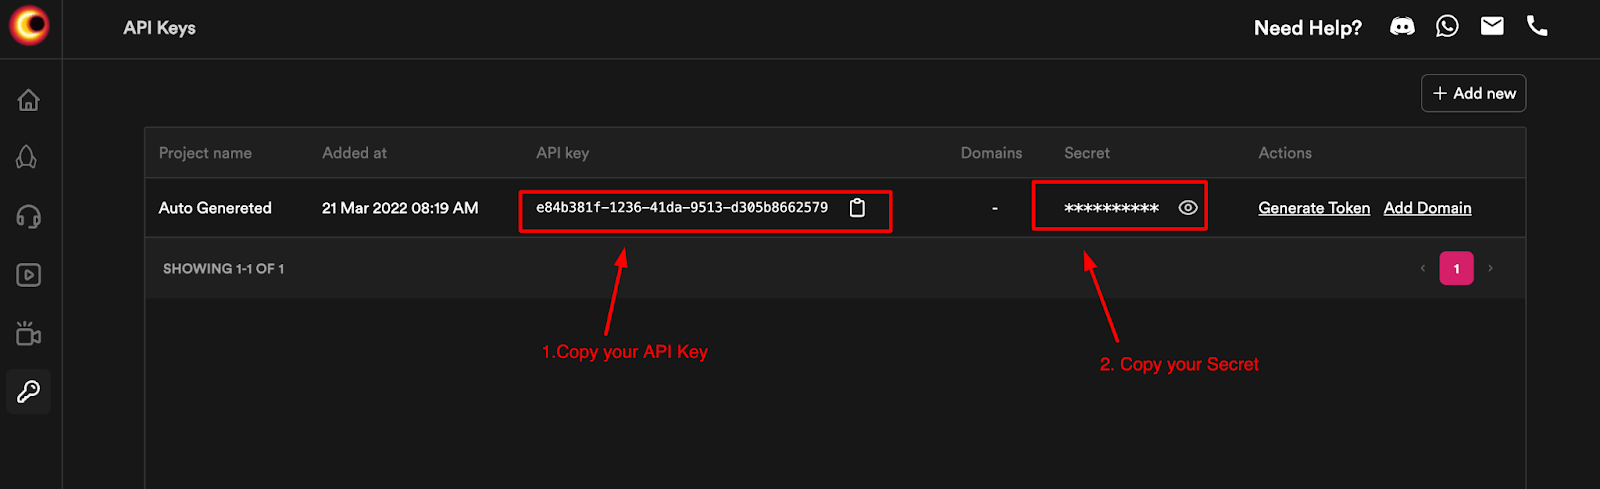
Then go to your Botbuz workspace and paste in these two credentials. If successful you will see a verified status message in the top right corner.
How to use VideoSdk in your chatbot
Now that your account is connected you can use it in any of your chatbots throughout any channel.
Inside a flow create an action block, then choose integrations -› VideoSdk
You will then get the following popup screen;
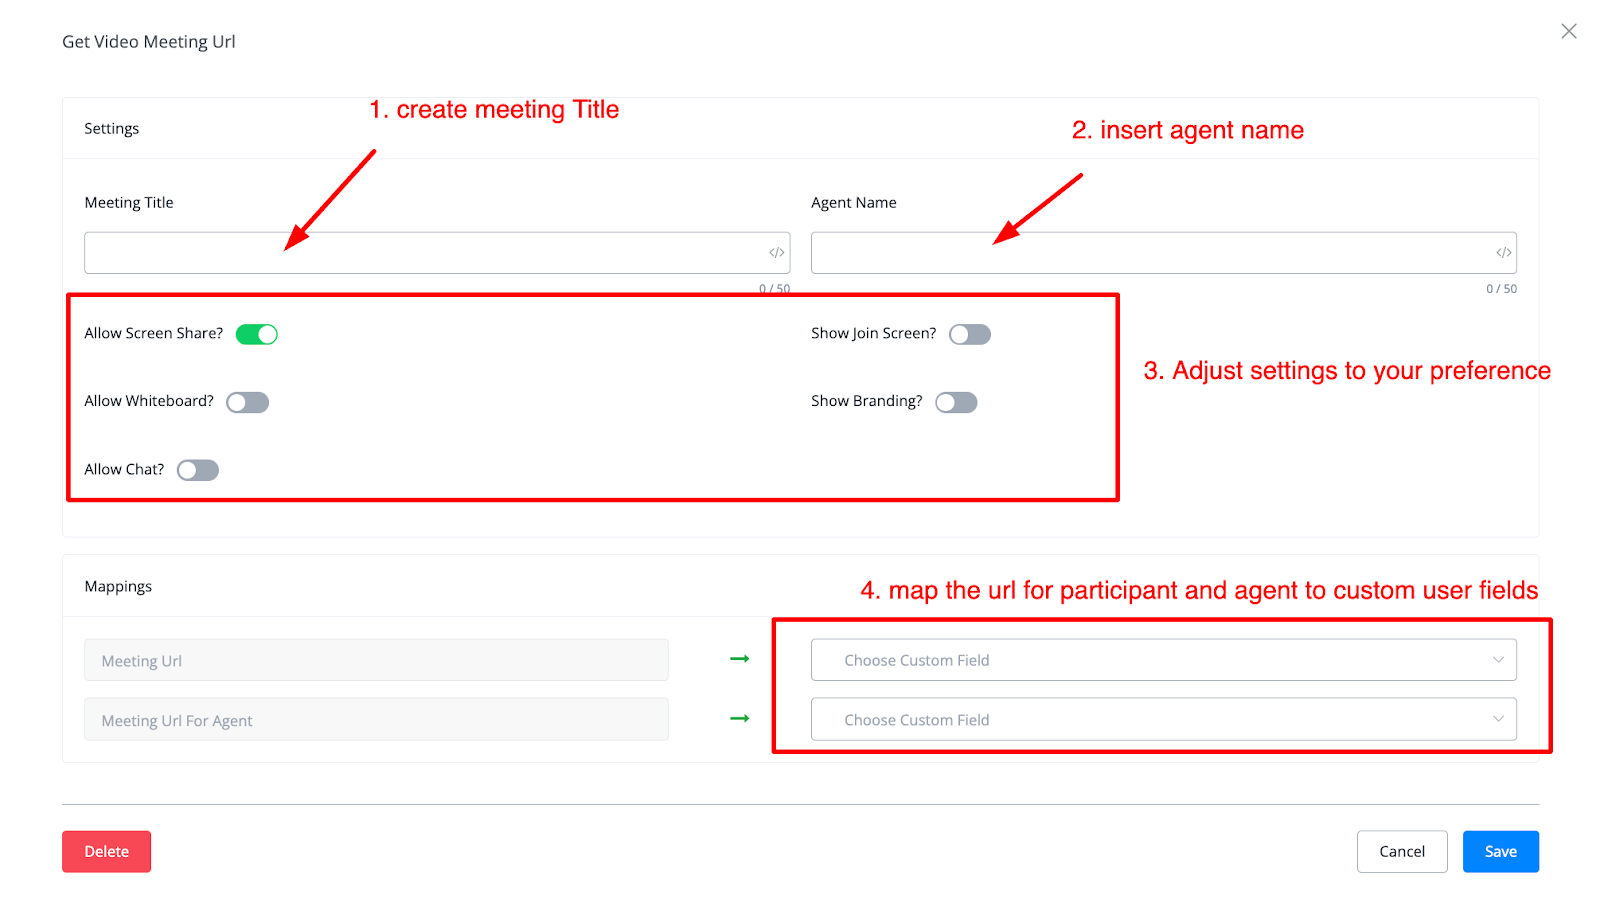
Fill in all the information then press the blue button named Save. You will be able to share the meeting URL with your participant and the agent taking the meeting.
Intercom
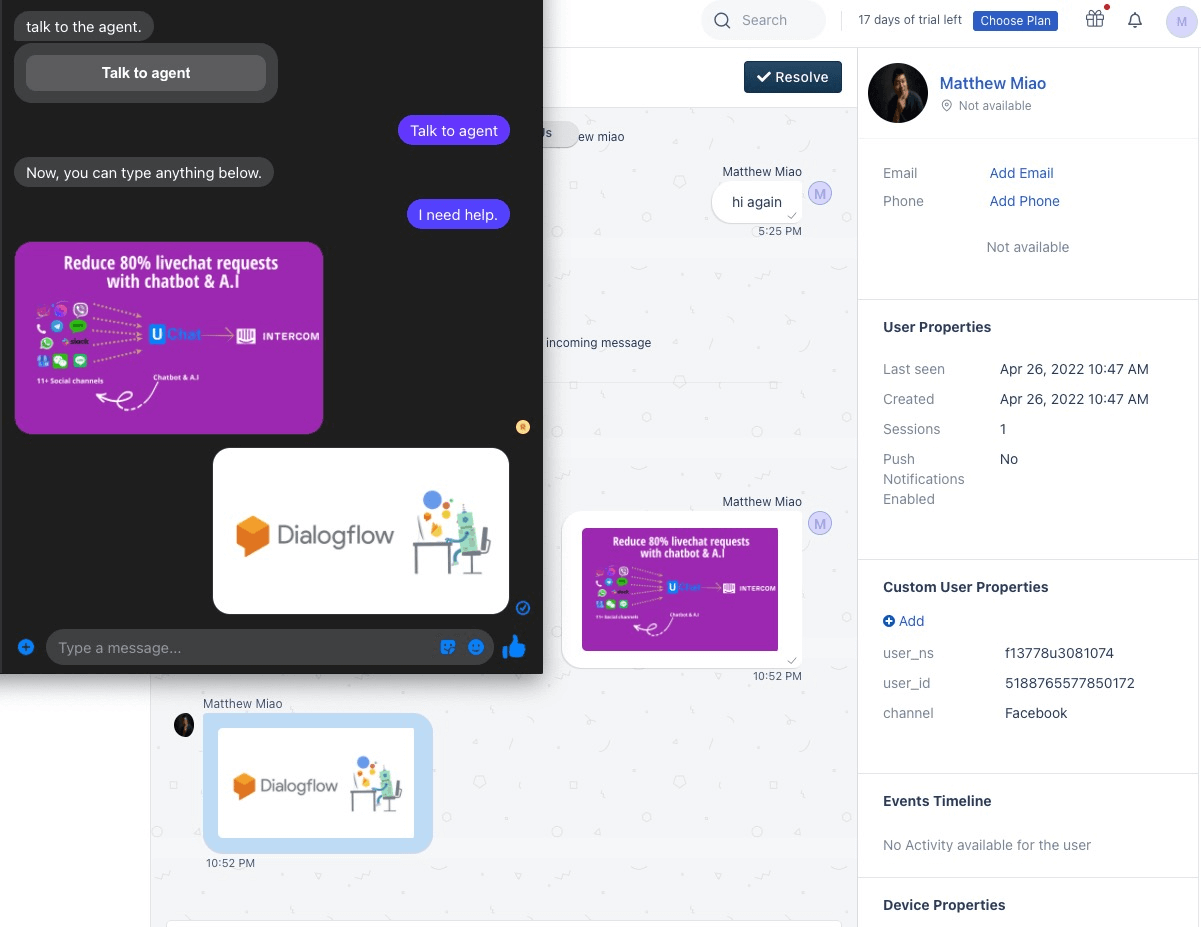
Intercom is a popular live chat platform, Botbuz integration with Intercom will help reduce 80% of the support through chatbot automation & A.I.
Key Benefits
Solve the customer's support issues in the chatbot automation and Google Artificial intelligence before they hit your support team.
No Coding Knowledge Required You don’t need to be a developer or learn coding to use Botbuz. With our drag & drop flow builder, you can easily build out your automation logic.
11+ channels supported & increasing Currently, Botbuz connects your intercom with your customers from Instagram, Messenger, WhatsApp, Google Business Messenger, Telegram, Viber, Line, SMS, Voice, Slack, Wechat, and more channels are added to the platform. Reach your customer through automation & live chat wherever they are.
Omnichannel flow builder
With our omnichannel flow builder, you can build your automation logic once, and apply it to all the social channels we support(Instagram, Messenger, WhatsApp, Google Business Messenger, Telegram, WeChat, Line, Viber)
Artificial Intelligence Recognize customer intent using Google Dialogflow, and redirect them to your chatbot automation. Only transfer the unrecognized intent to your live chat support. It will save you huge time on your live chat support.
Integration with 3rd party Botbuz has built-in integration with Stripe, Paypal, Cloudinary, Shopify, Woocommerce, Calendly, Slack, Google Sheet, Twilio, SingalWire, message Media, Gmail, Sendgrid, Mailchimp, ActiveCampaign, Zapier, Integromat & Pabbly Connect. You can easily sync the leads & sales into your own CRM or Project management tools.
Connect to Intercom
Step 1: Connect with your Intercom account
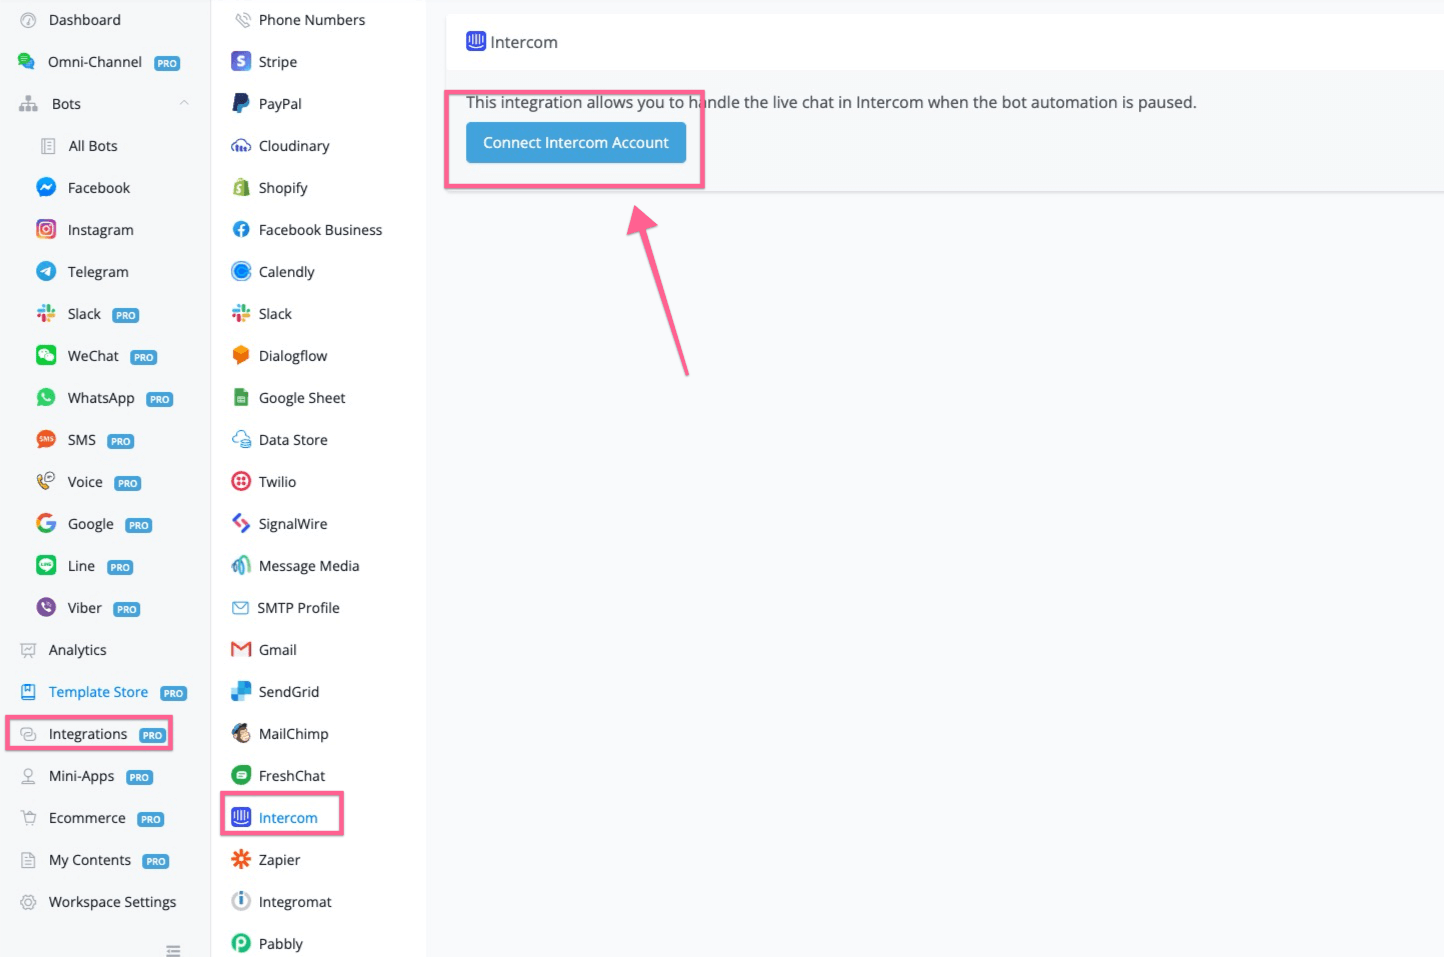
In this step, you will need to connect with your intercom account inside of Botbuz. After you log in Botbuz, you need to go to integration, and then go to Intercom, click the connect intercom account button.
Step 2: Authorize intercom account
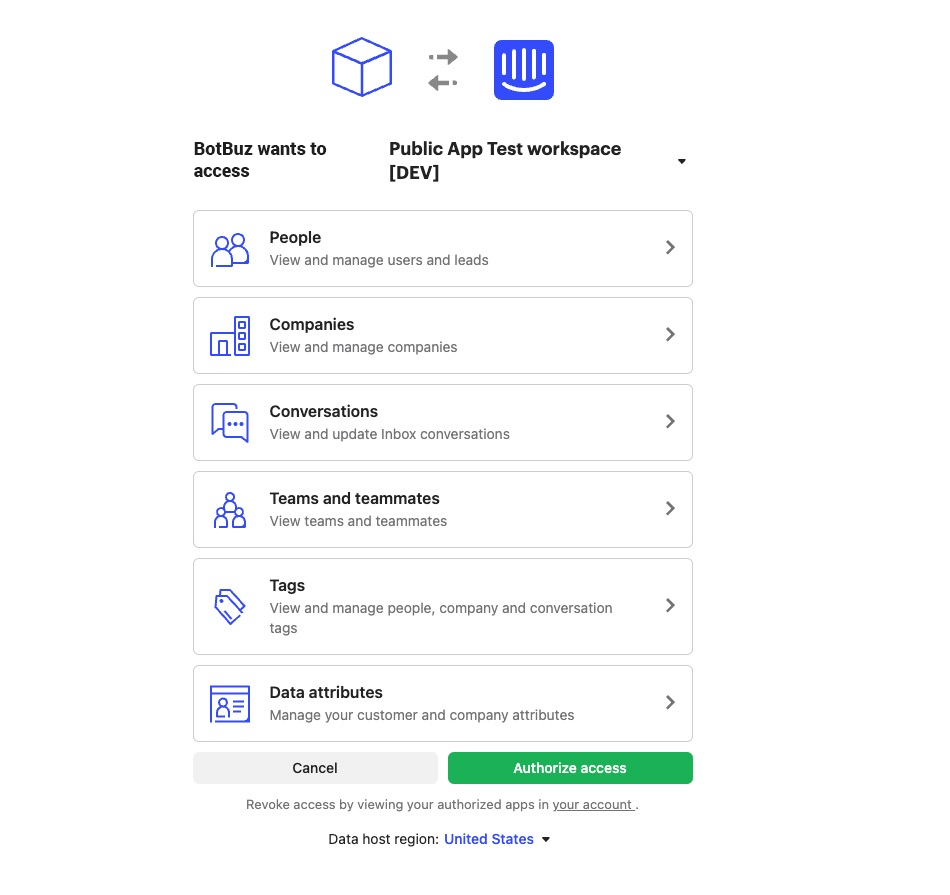
After you click connect intercom button, it will redirect you to log in to your intercom account and then you will see the screenshot above, click “Authorize access” and then you just added this app to your workspace.
After authorization, it will show up as below.
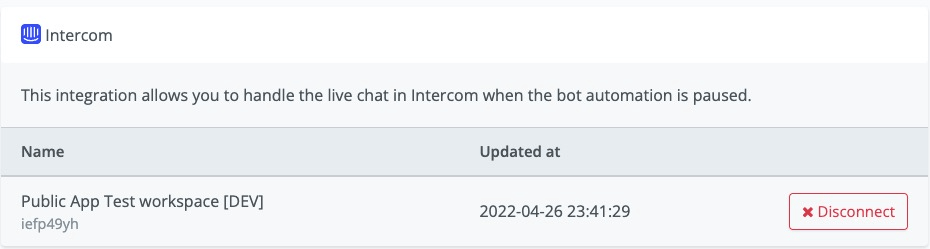
You can disconnect the app, by clicking the button to disconnect Intercom with this workspace.
Step 3: Switch livechat to intercom
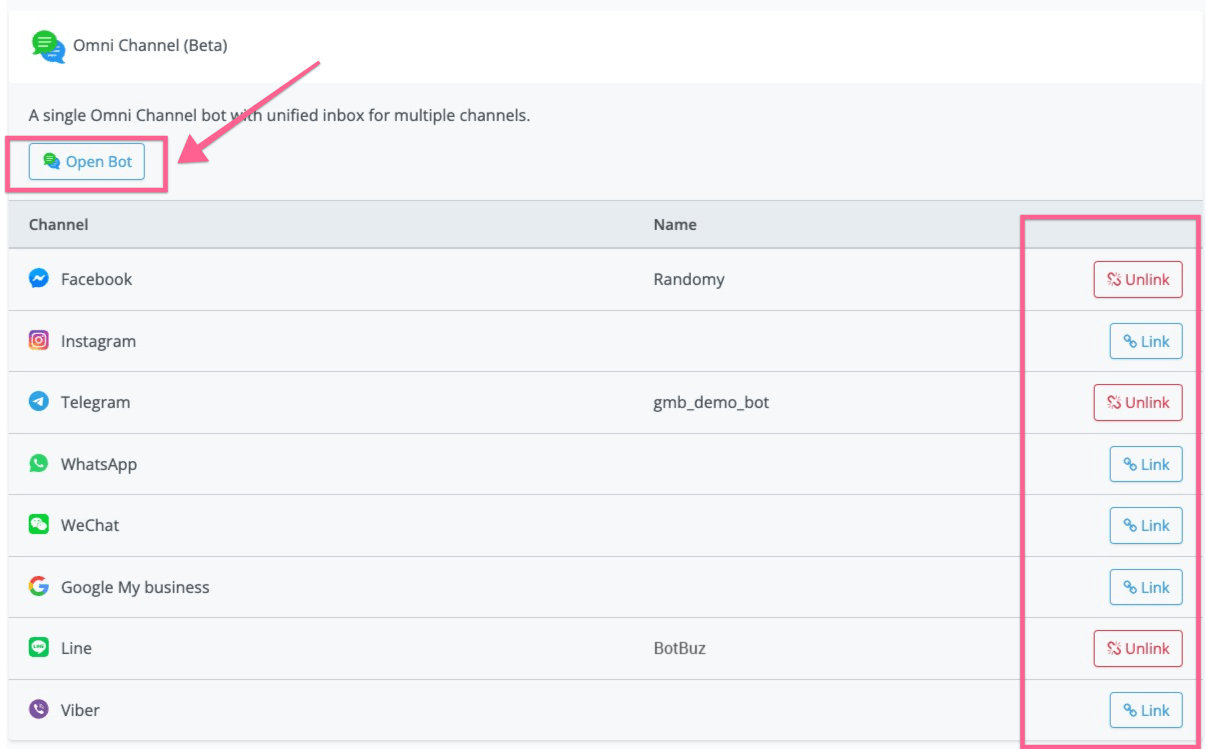
After you integrate with the intercom, you now need to create an omnichannel chatbot inside of Botbuz. You might need to link the channels we currently support(Facebook messenger, Instagram, WhatsApp, Google Business Messenger, WeChat, Line, Viber, Telegram).
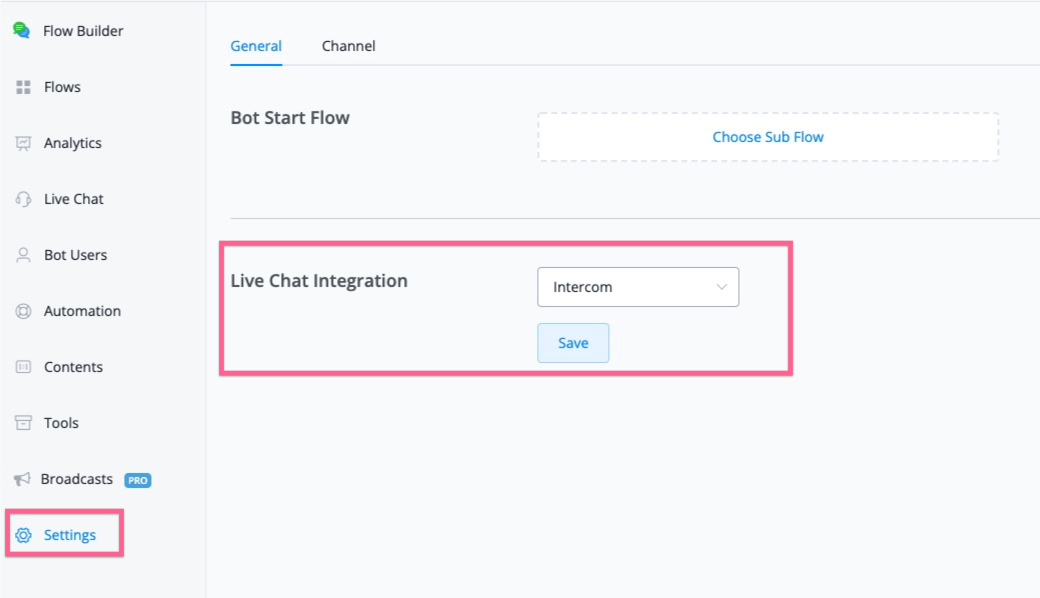
After you linked the channel, you can open the bot, then go to the settings of the omnichannel, and select intercom from the live chat integration.
Use Intercom
Step 1: Trigger “Talk to Human/Pause automation” anywhere in the flow
The benefits of using Botbuz with intercom is that, your business can automate at least 80% with chatbot & A.I. You can easily build your chatbot with our visual flow builder, and if at any point, your customer needs any help.
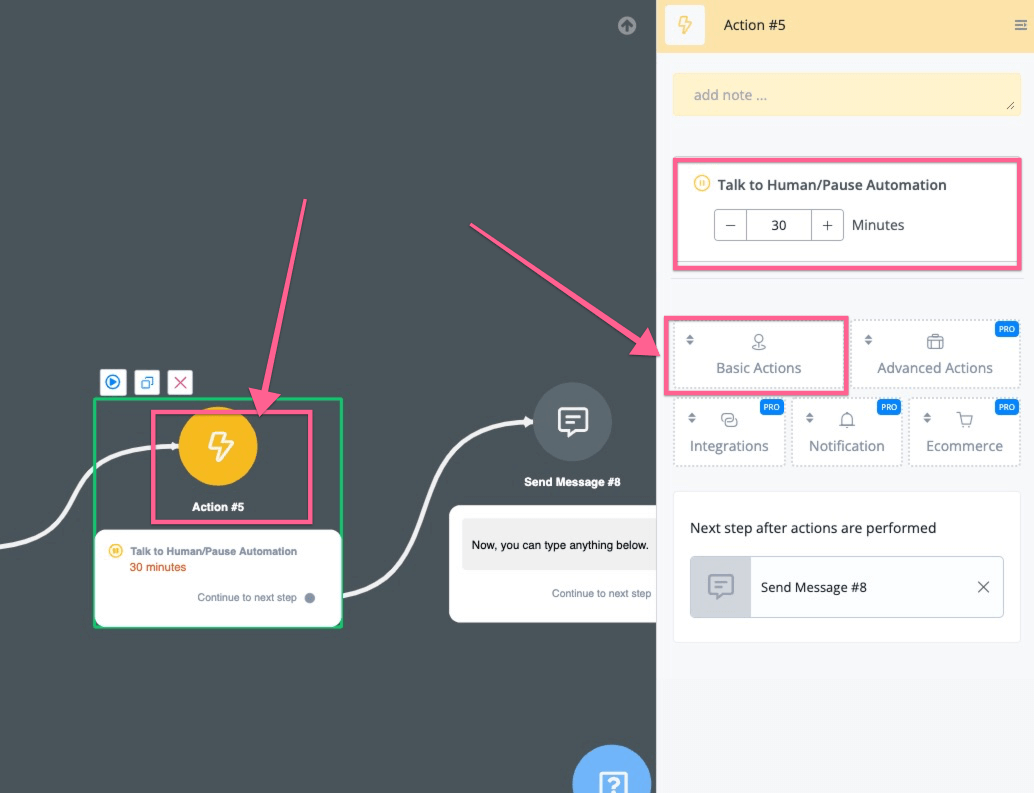
You can connect with an Action, and then go to Basic Actions, then you can find “Talk to human/Pause automation”, and then your customer from 11+ social channels can talk directly to your intercom live chat support. After your customer initiates a conversation, you will see the new contacts created from social channels along with their questions.
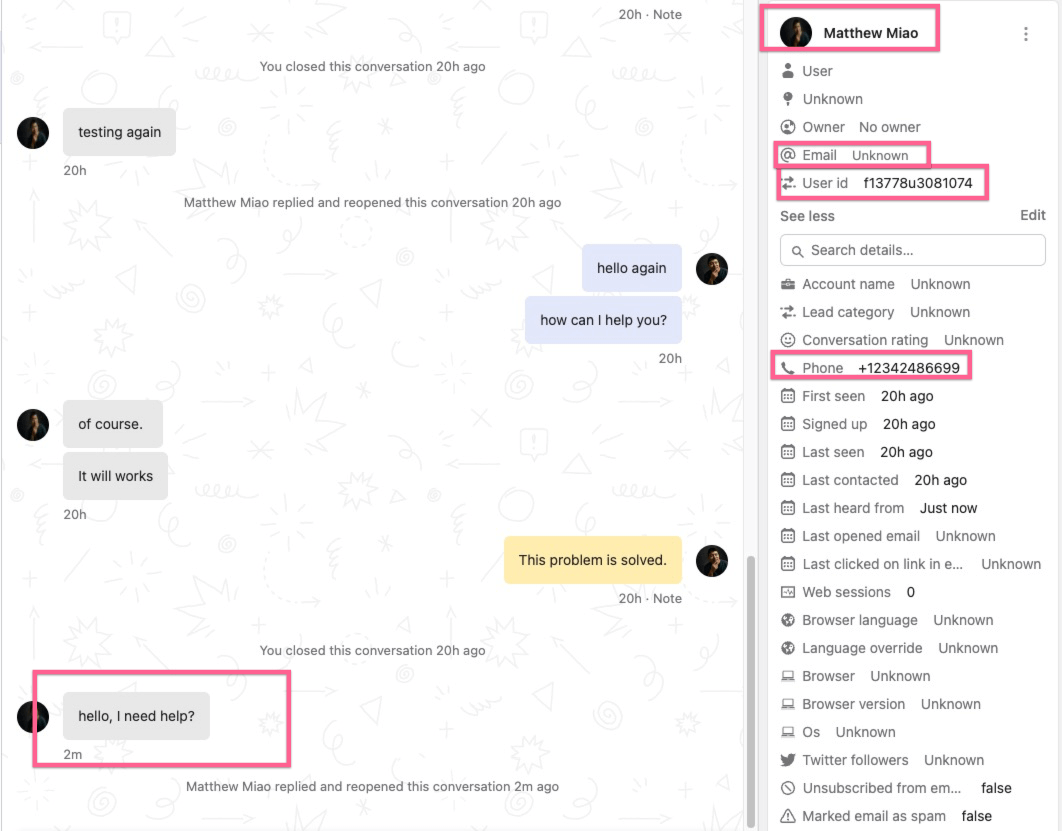
Botbuz will pull the user’s profile, email & phone to create the contact if there is any.
And now your intercom agent can talk directly back to the customer from 11+ social channels.
By default, the live chat is set at 30 mins, after the time passed, if there is no active conversation, the user will be sent back to chatbot automation.
Step 2: Sending files & Images
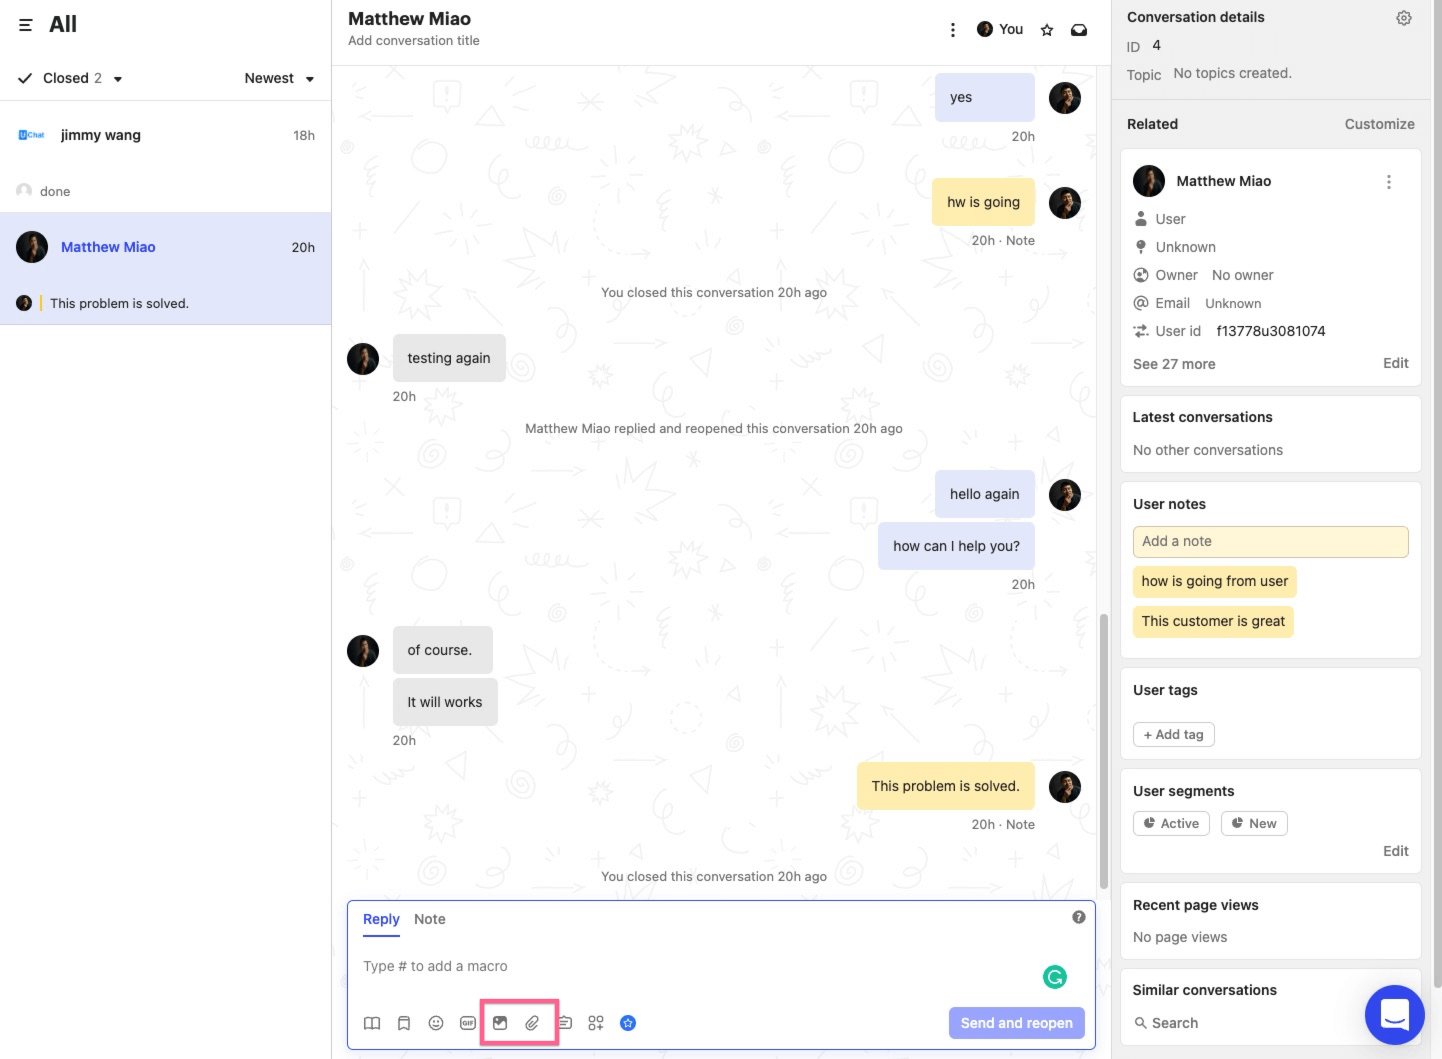
After your customer active live chat from our flow, your customers can send text, images & files to your agent.
Meanwhile, your intercom agent can also send images & files back to the user.
If the intercom agent adds any notes to the customer/conversation, the note content will also sync to Botbuz’s subscribers
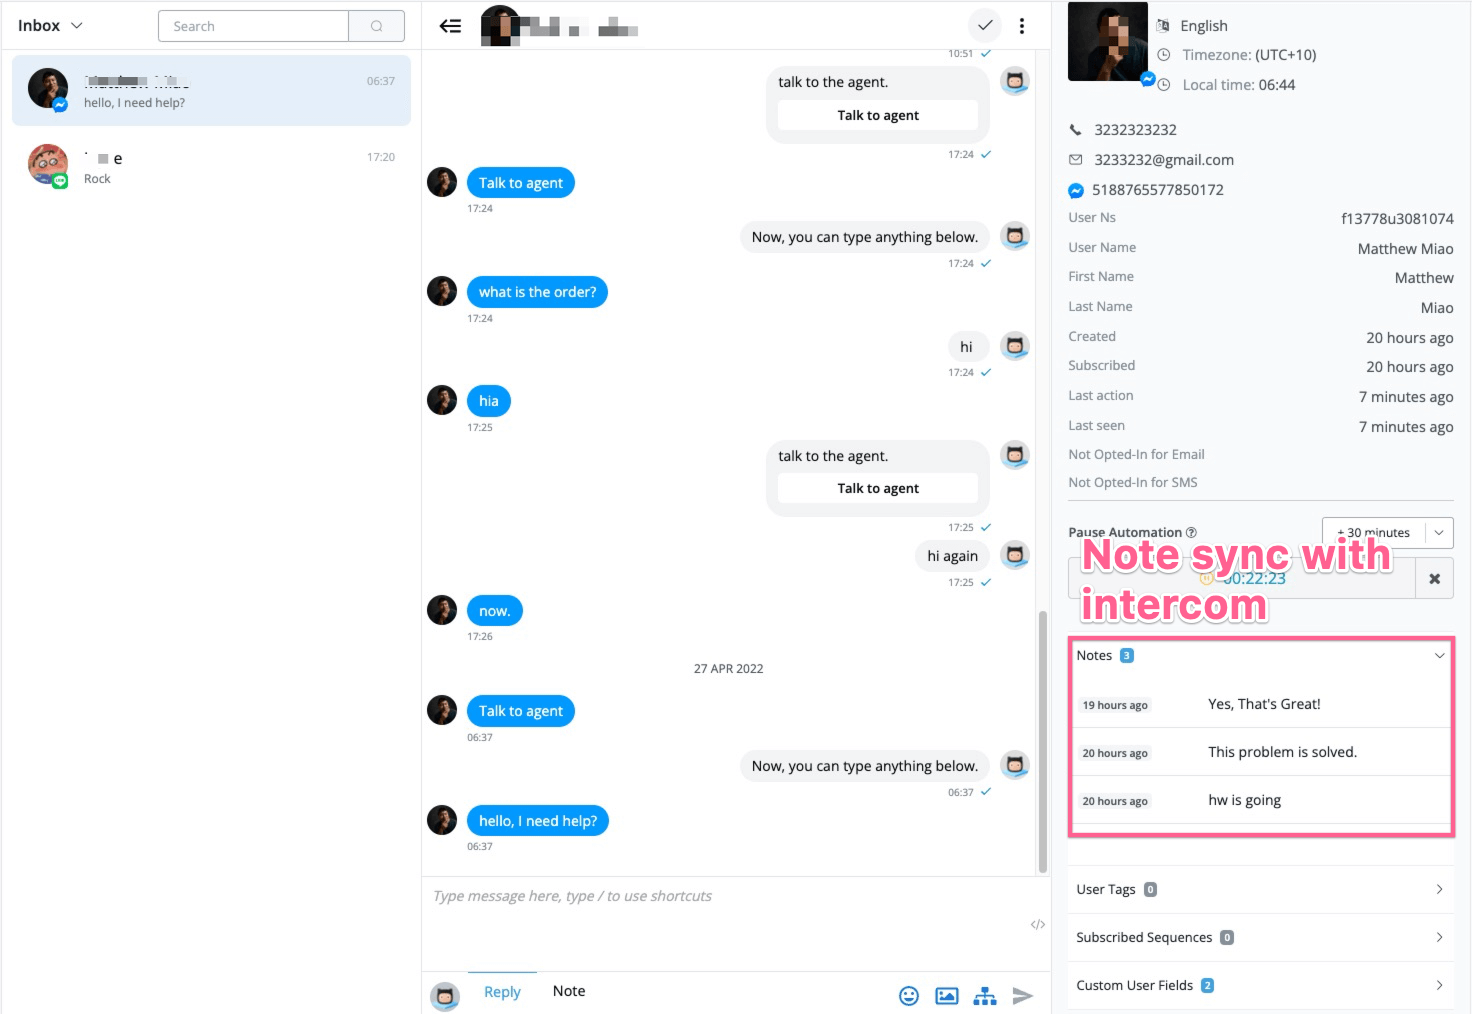
Please note that you can also see all the live chat history inside of Botbuz’s live chat.
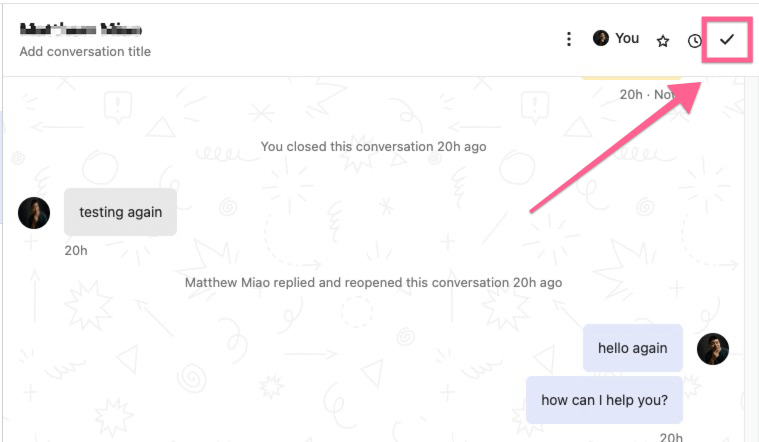
Step 3: Ending conversation
If your intercom live chat support helps the user solve the issue, and when they close the conversation, the user will be pushed back to the chatbot automation.
If intercom live chat decides to follow up on the issue, for certain channels(Messenger, WhatsApp, Instagram) if it’s within 24 hours window, we will deliver the message. If it’s out of the 24-hour window, we will reply that the user is out of the contact window.
If the user is within the contact window, any messages from the intercom agent will reset the 30 human support window & activate live chat with the user.
Freshchat
Freshchat is a popular live chat platform. Botbuz integrate with Freshchat for the live chat handover.
If you don’t have Freshchat account, you can sign up here(opens new window)
The benefits of integrating with Botbuz can reduce your support cost, and increase your support satisfaction rates.
You will be able to:
- Reduce 80% of the support by filtering out support through chatbot automation & A.I
- Receive & respond to customer inquiries across all 11 social channels
- Build your smart chatbot with Botbuz visual flow builder & Google’s A.I
How to set up your Freshchat integration
Once you login your Botbuz dashboard, you should be able to find the Freshchat in the integration tab.
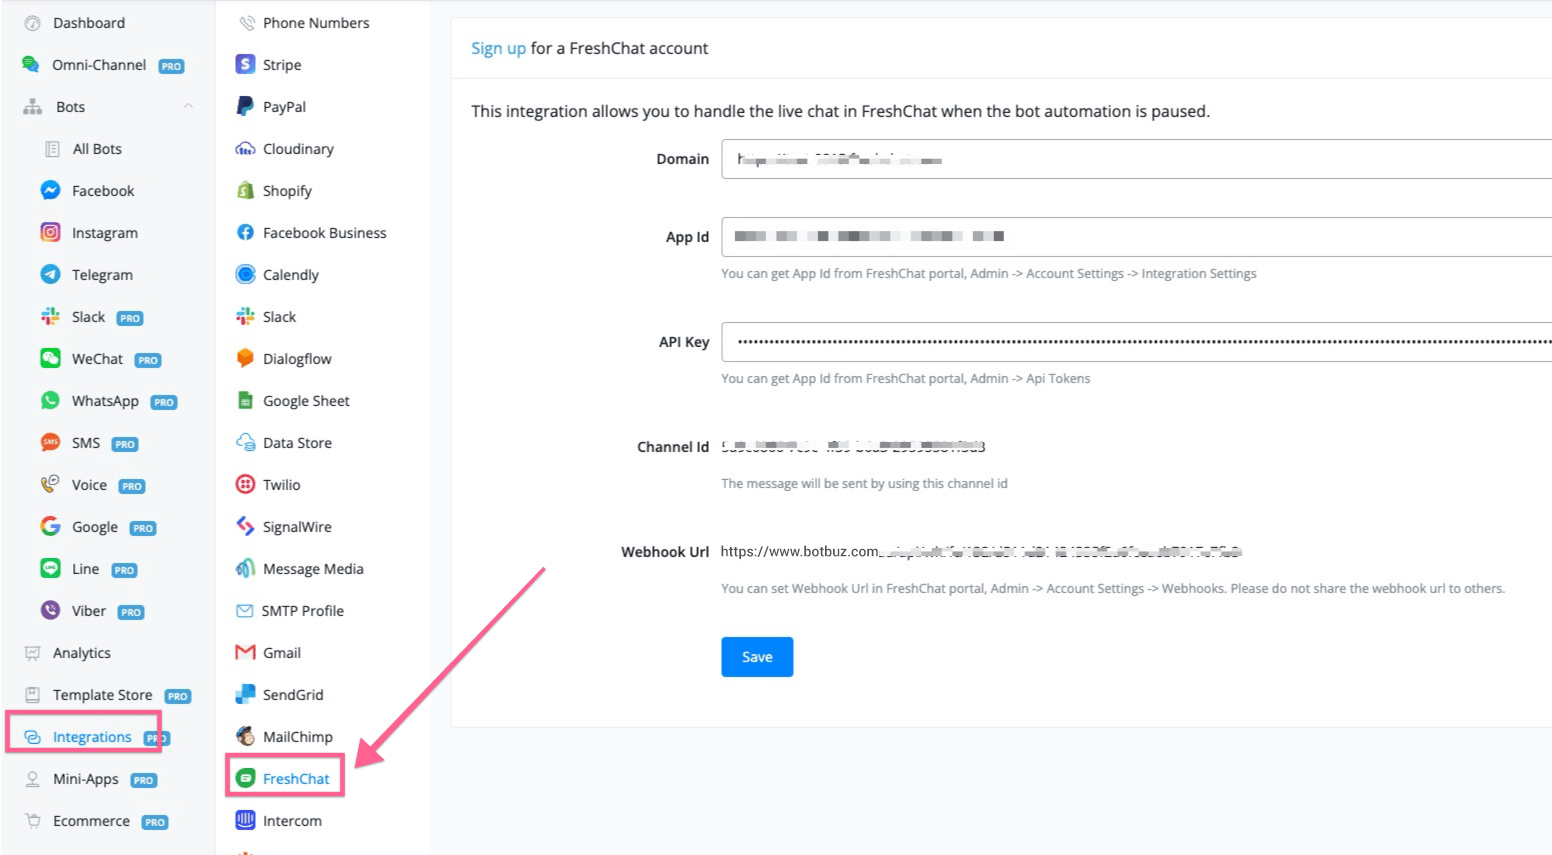
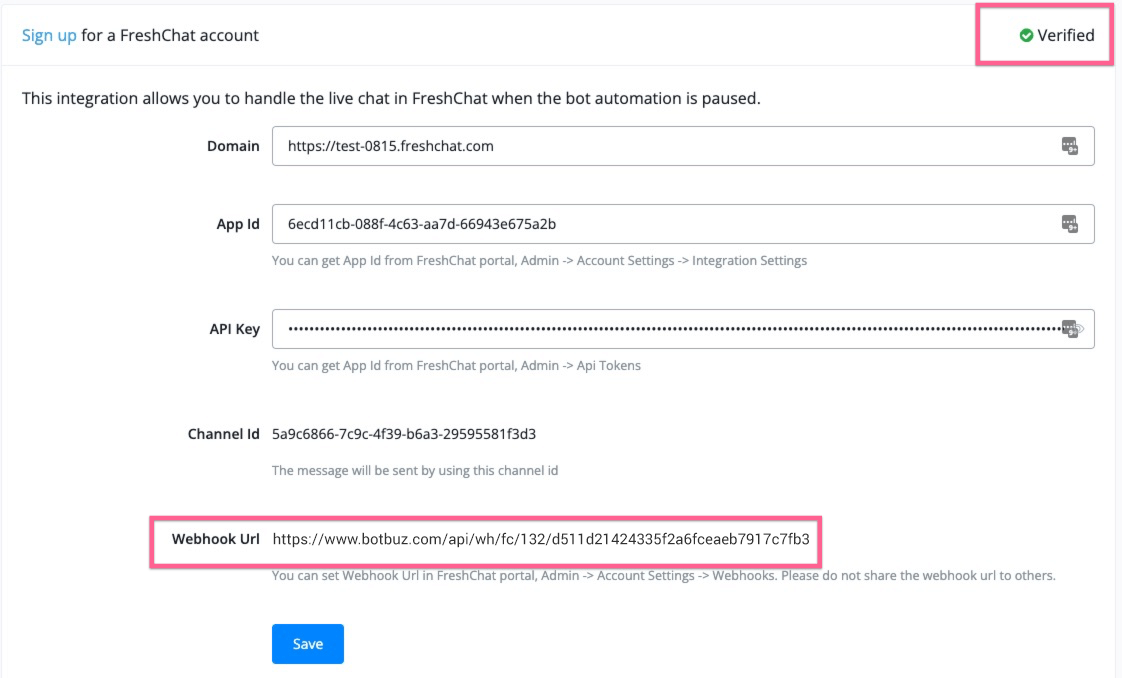
Now, you need to login your Freshchat account, we will need to get your domain, App Id & API key into the settings.
Domain: you should be able to grab from the url of your dashboard. As per the screenshot below.
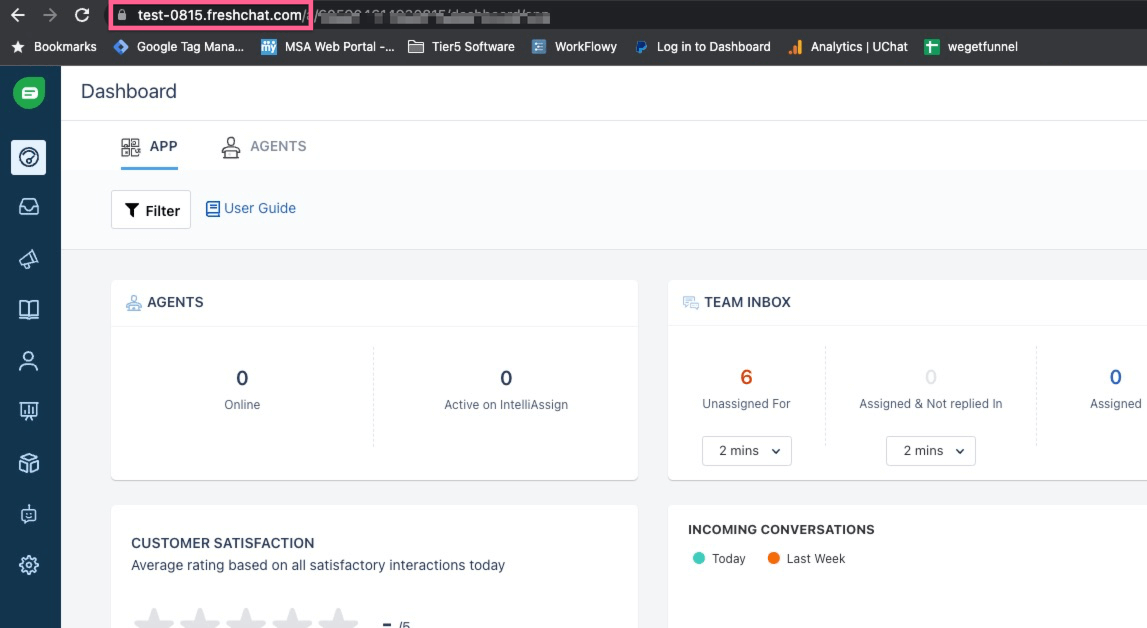
Then, you should add https:// at the front of the domain, and then paste your full domain at the domain field. You should be able to find your App ID at Settings -> Account Settings, and then Integration settings.
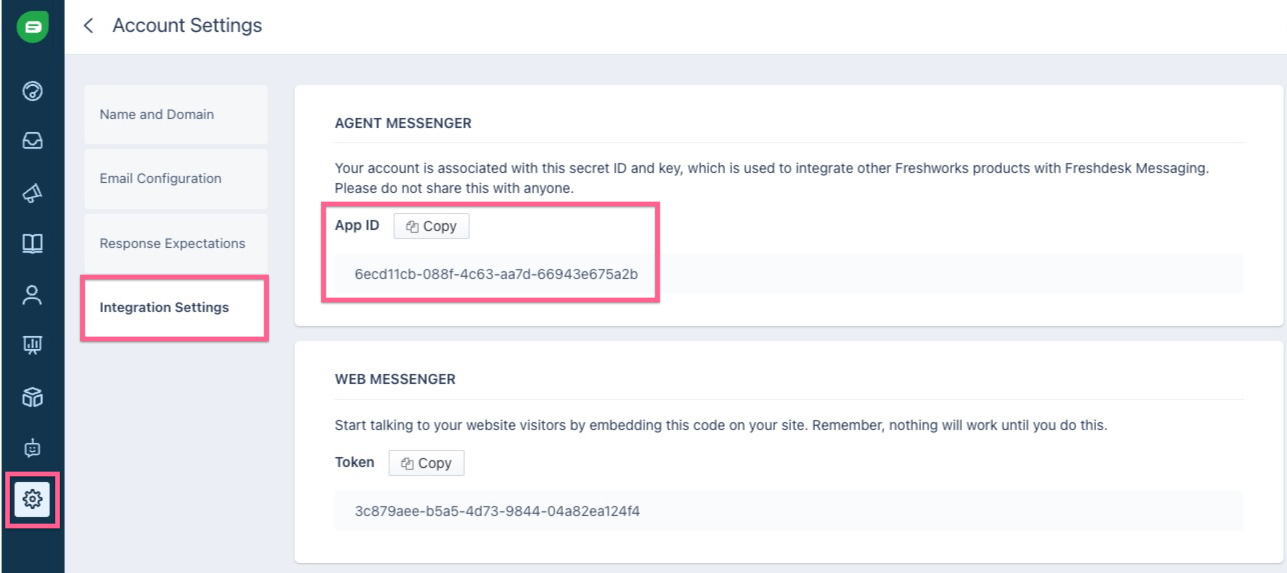
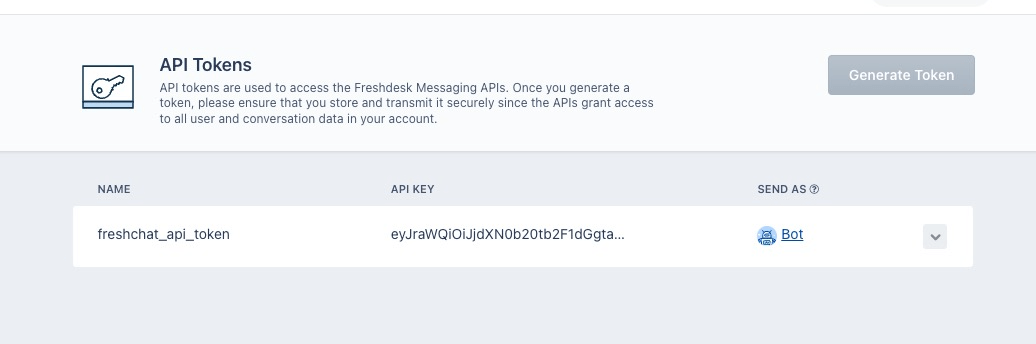
And the last thing you need is the API key, you can find in the API tokens, as per screenshot below:
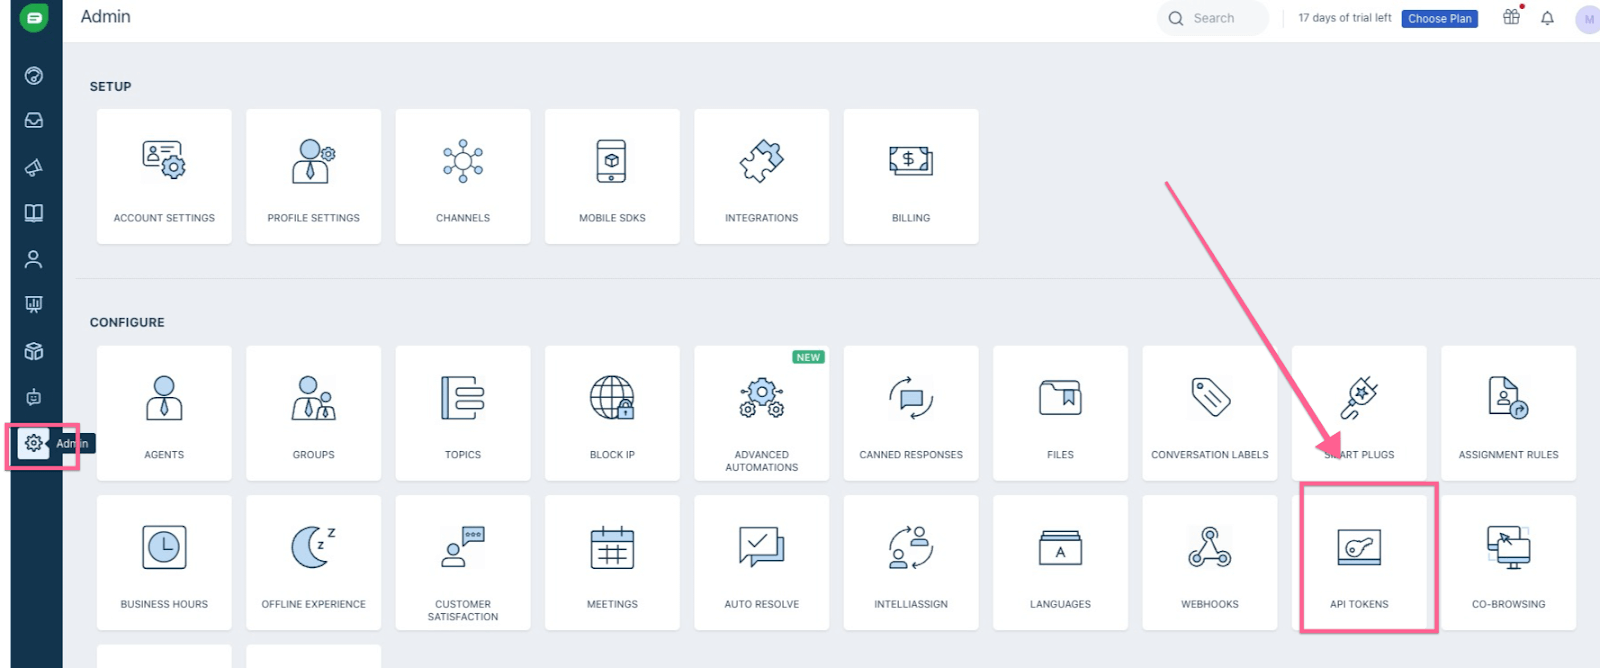
And then after you click in the API tokens, you can copy your API keys and paste them into Botbuz integration.
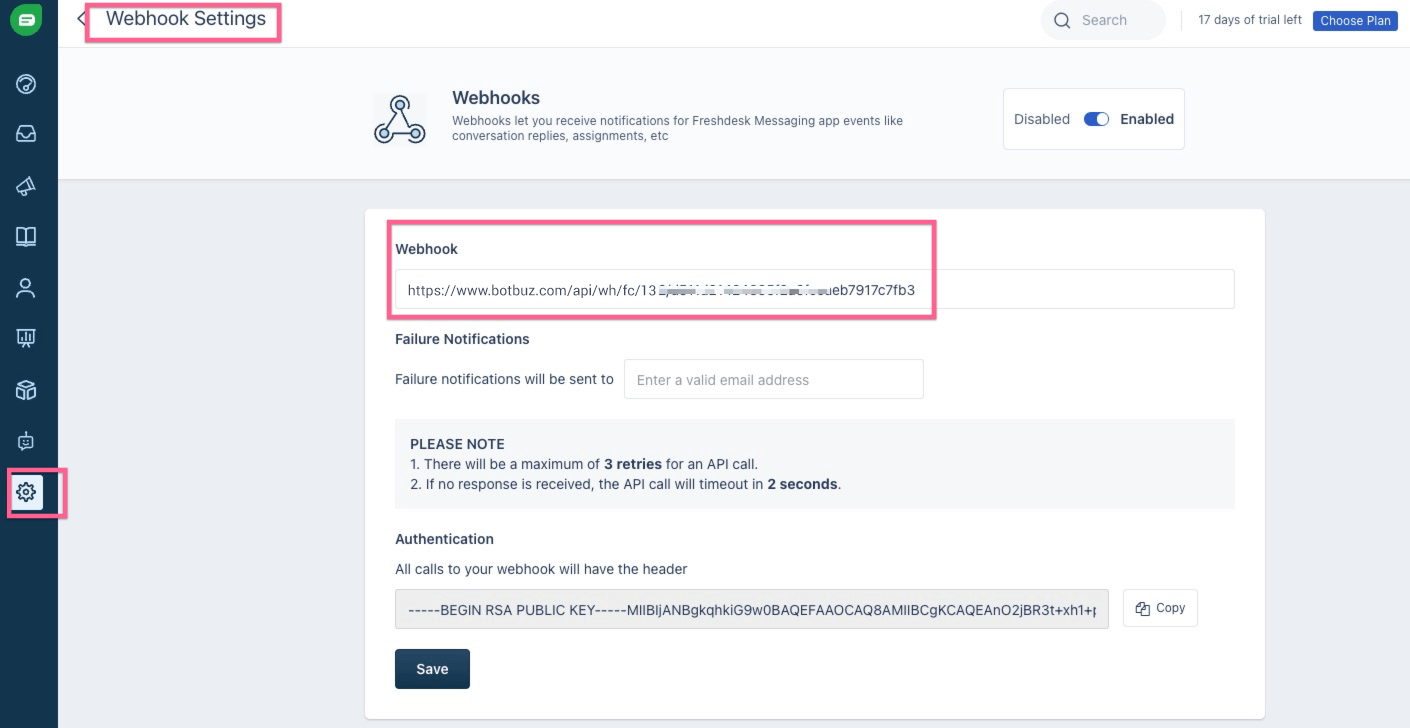
After you paste all the 3 values, and then click save. Botbuz should verify your connection. If it’s valid, you should be able to see the verified as per screenshot below, and also you need to copy the webhook url generated from Botbuz, and paste the webhook to your Freshchat account.
In your Freshchat account, you need to go to admin, and then go to webhook settings, and paste the webhook generate from Botbuz, and paste the url in the webhook settings.
And up until now, you have done all the settings in Freshchat. And now there is one last thing you need to do.
Currently only omni channel support live chat integration settings.
You need to go to your omni channel settings, and select Freshchat from the live chat integration dropdown.

And now all your set up is ready.
How to trigger live chat to Freshchat
Once you have set up everything, and now you can build the chatbot to automate your business, also you can integrate with Dialogflow to reconganize the user’s intent and redirect them to your chatbot automation as well.
This should dramatically reduce your live agent support workload. But still if the user want to reach out to support anywhere in the flow.
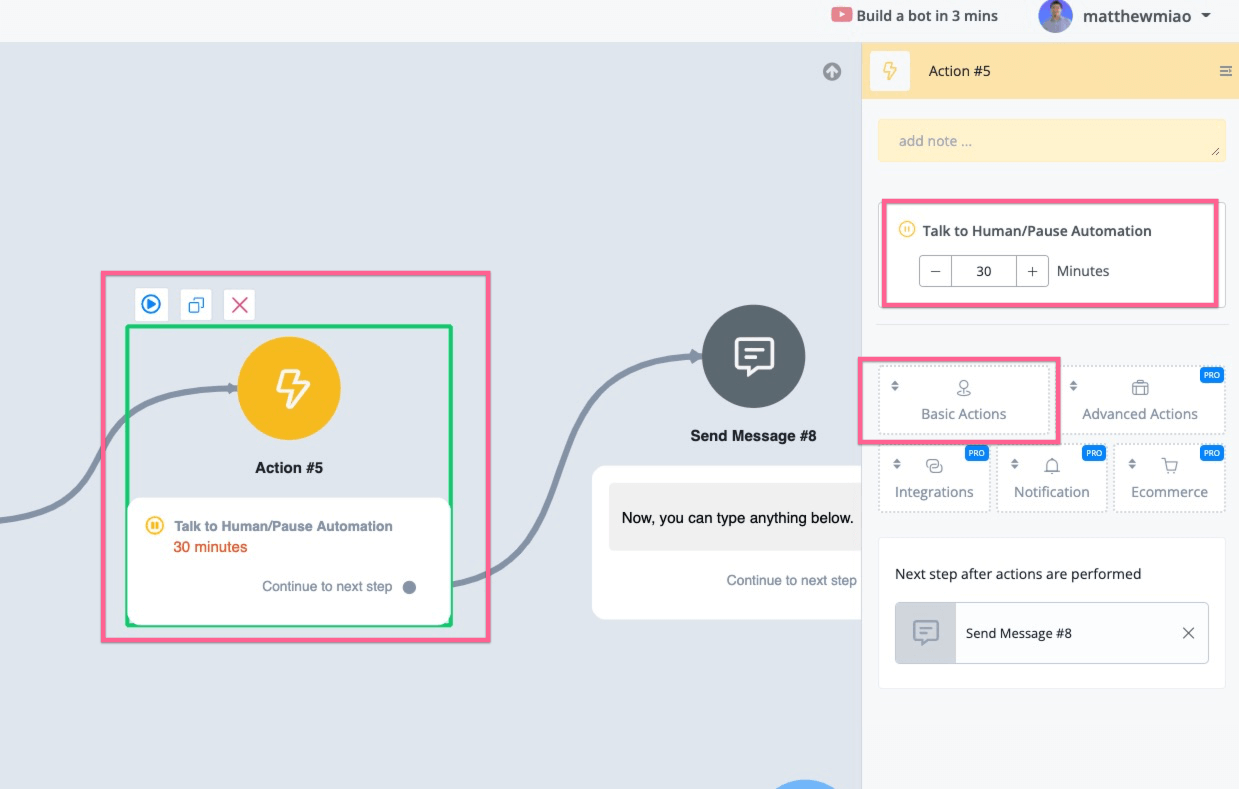
You can use the action of “Talk to human/Pause Automation” in the basic action, and also you will have the option to set the default timer to pause the automation.
All the messages send from the user will be forward to Freshchat dashboard. You should be able to see the user from the inbox.
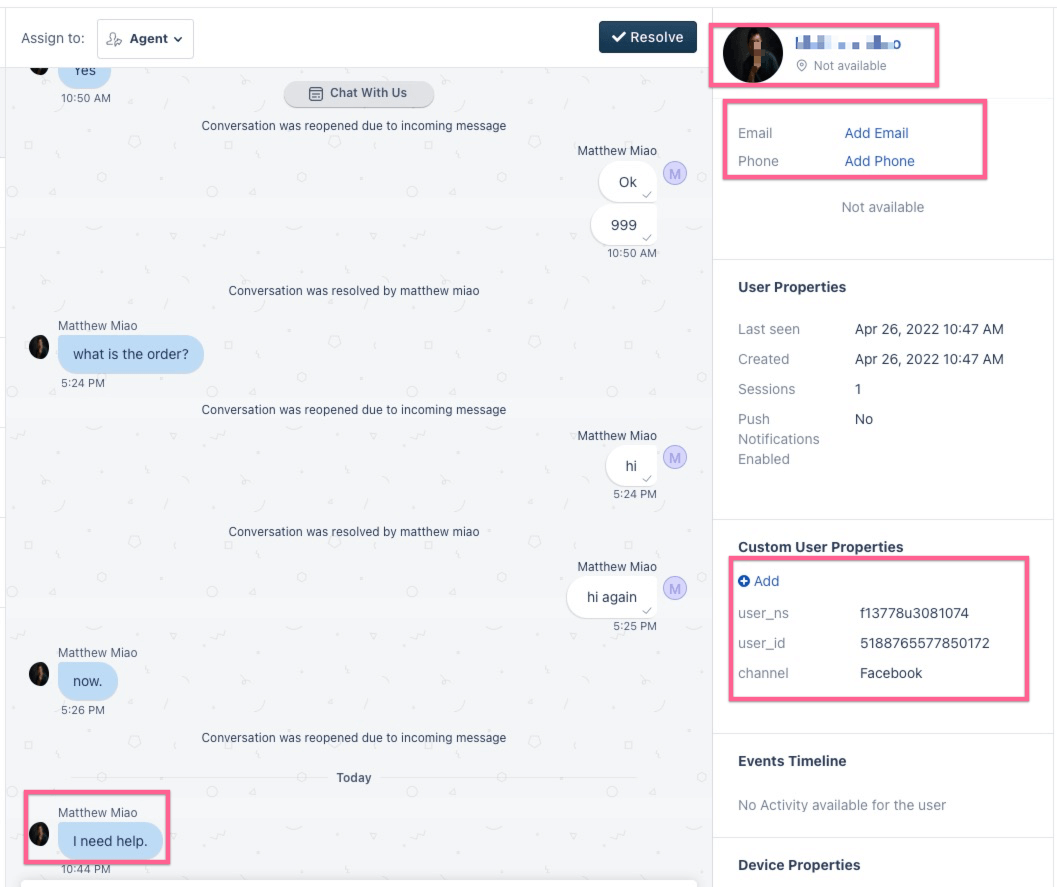
Please note that Botbuz will push the user’s social profile image & name, phone number, email to Freshchat.
Also the user_ns, user_id and channel will be also added to the custom user properties.
And then you can send text, image or files to the user.
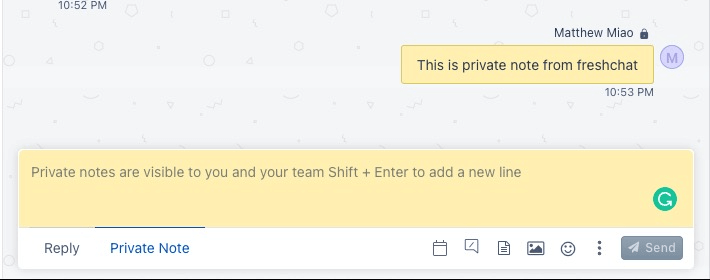
And also Botbuz support you to add note to the user, and the note will sync to Botbuz user.
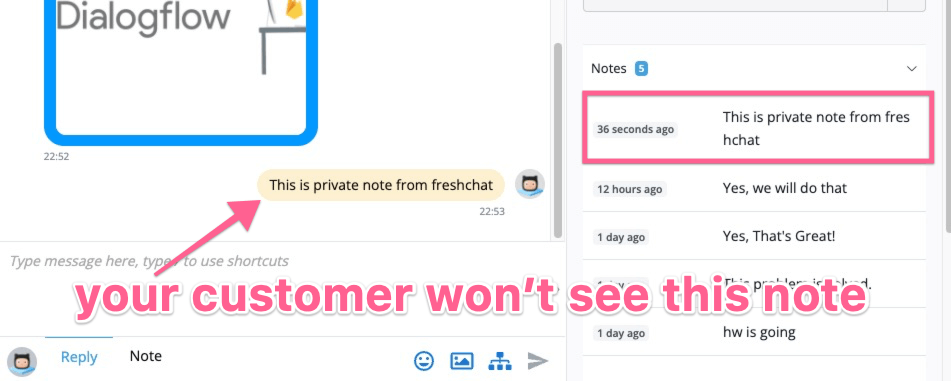
Below is screenshot of sending private note from Freshchat.
In Botbuz, you can find the note have been added to the user.
If live agent click the resolve button in Freshchat, then the live chat sesion with the Botbuz chatbot user will be ended.
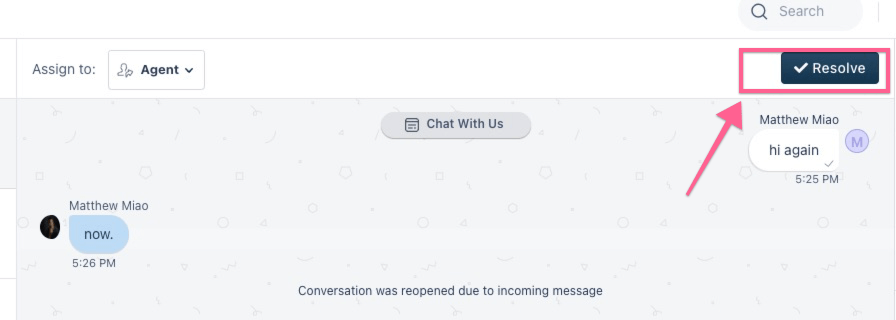
After the Freshchat agent resolve the conversation, any message sent from Botbuz will trigger the chatbot again.
However, the user can trigger live chat again if this is needed.
One thing to note is that, If the Freshchat live chat agent decided to send follow up message from the Resolved folder, depending on if there is 24 hour window restriction, if there isn’t, the message will delivered to the user, and reactivate the live chat session.
If the user is out of 24 hour window for particular channel(WhatsApp, Messenger, Instagram), then we will return the message “ The user is out of contact window, please contact through email or sms”.
And last thing to note is that every time the Freshchat live agent send message to the Botbuz user, the time will reset to default 30 mins, so that the conversation can continue without accidentally push the user back to chatbot.