Table of Contents
Guide
Introduction
👋 Create your first Chatbot on the Botbuz platform. To begin with, have a look at the documentation In this section, you will learn
- How to register
- Platform overview
- Workspaces & members
- How to set up your bot in each channel
- Ecommerce system overview
- Integrations overview
- How to upgrade your account
Registration
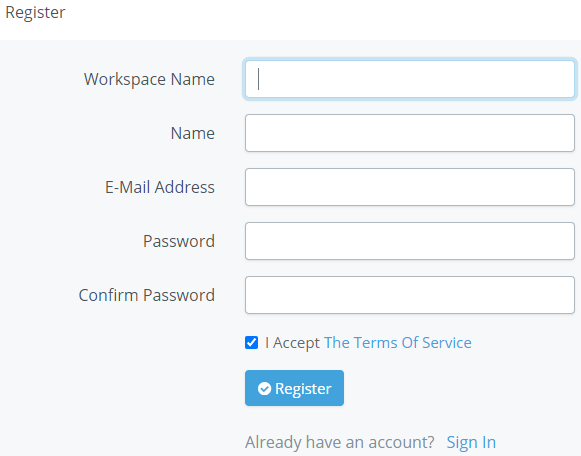
To begin the process of creating your own chatbot, you'll need to register (opens new window)with Botbuz. The platform is built with robust administrative features and uses high-grade security that complies with all regulatory mandates, so data is secure and safe.
TIP
Workspace Name refers to your company's name or name of a project/team while Name is the name/alias of a person.
Fill in all the fields, tick “I Accept” after viewing the terms of service and click “Register”. You will then receive a verification email from Botbuz, click on the button to verify your address.
Login
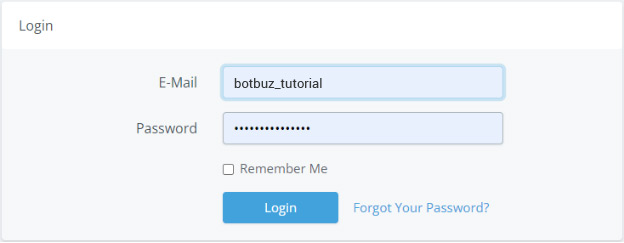
Fill in your account details to login. Once you’re authorized you will get to your account dashboard.
Platform Overview
Overview
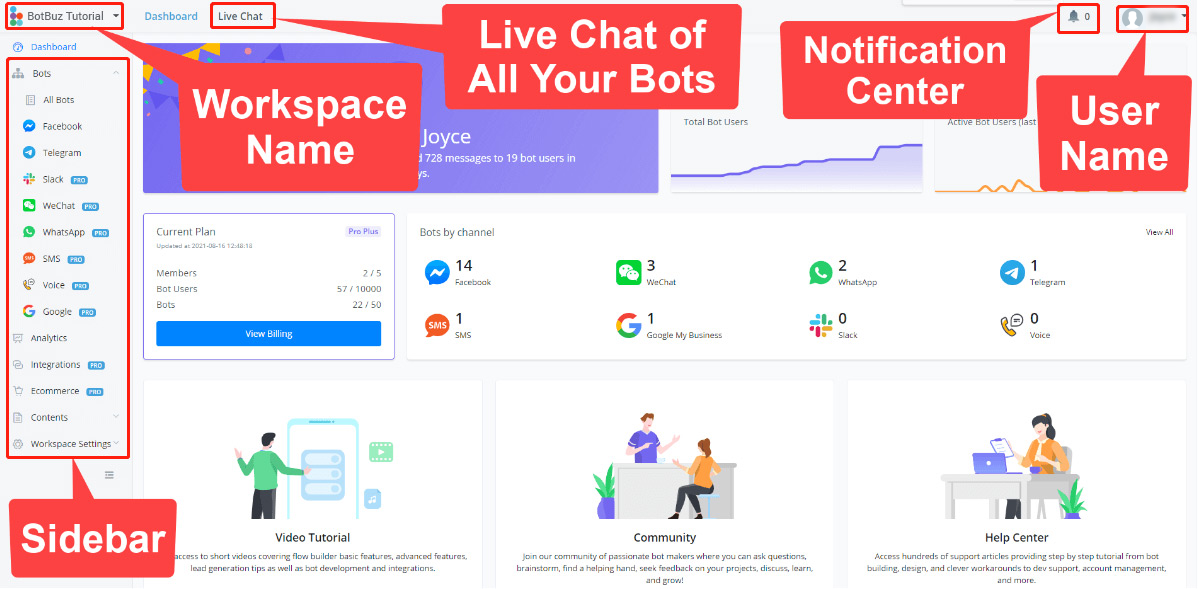
After logging in, your dashboard will look like the above. Feel free to explore it! 😆
Sidebar
Dashboard
The dashboard shows you an overview of your workspace (team). Click the three buttons at the bottom for linking to our Facebook Community, YouTube Channel and Documentation.
Bots
Currently, Botbuz supports 12 types of channels. Facebook, Instagram, Telegram, Slack, WeChat, WhatsApp, SMS, Voice, Google, Line, Viber and Vk.
Analytics
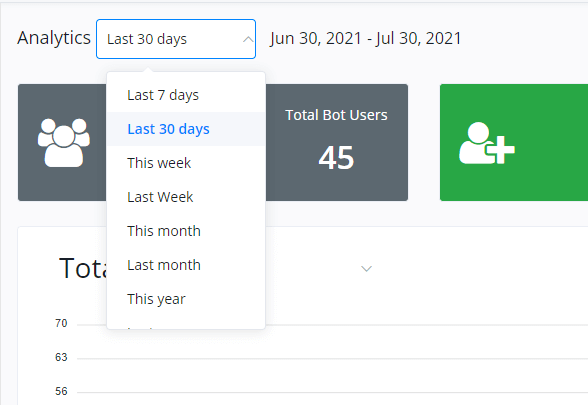
Check analysis data here. You can click the “Last 30 days” dropdown list to adjust the period.
Template Store
Template store lists all publicly shared templates across the system. All Botbuz users can publish their templates and install others' templates here.
Integrations
Here is where you manage all your integrations including your phone numbers, installed mini-apps, and other third-party services. Check the “Integration” document for detailed guidance accordingly
Mini-Apps
Mini-Apps store lists all publicly shared mini-apps across the system. All Botbuz users can publish their templates and install others' mini-apps here.
Ecommerce
Ecommerce section is for managing an e-commerce system for the whole workspace. Your products information can be used across all channels and all chatbots. Also, orders from any channel any chatbot will be listed here.
My Contents
In “Contents”, you can manage all the templates, mini-apps and email templates that created by you.
Workspaces & Members
As mentioned previously, workspace is to be seen as a team while members/users are the people working in the team.
Note
A workspace can have many members and a member can join many workspaces in different roles
Workspace Limitation
Generally, a workspace is designed for one business and it organizes all the resources for the business, such as payment accounts, email sender profiles, products information, etc. Each workspace has it's own billing and limitation on members, bot users and bots amount (fees applied for flexible add-ons).
1 workspace can connect to:
- only 1 omni bot (8 channels)
- only 1 Facebook account
- only 1 Google account for Google My Business
- only 1 Google account for Google Sheet
- only 1 Google account for Gmail
- only 1 Google account for Dialogflow
- only 1 Intercom account
- only 1 Stripe account
- only 1 PayPal account
- only 1 Cloudinary account
- only 1 Calendly account
- only 1 MongoDB Cloud account
- only 1 Twilio account
- only 1 SignalWire account
- only 1 Message Media account
- only 1 SendGrid account
- only 1 MailChimp account
- up to 10 SMTP profiles (SMTP email sender)
Moreover, 1 workspace can download each mini-app only once. For example, you download a WooCommerce mini-app and connect your workspace to a WooCommerce account, you are unable to download it again for connecting another WooCommerce account. Unless the app developer design it to be connecting more than 1 account.
Important
You are allow to connect your workspace to only 1 Facebook/Google(for Google My Business) account but you can create bots for more than 1 Facebook Page / Google Business.
Connect to Multiple Facebook Pages / Google Businesses

You can connect to any Facebook Page / Google My Business and create bots for them as long as you are the owner / admin of those pages / businesses.
When you connect to your Facebook account, make sure you select all the pages that require management and there you go. For example, you wanted to build bots for your clients, simply have your clients invite your Facebook account to be an admin of their Facebook pages. Same for Google My Business, have your clients invite your Google account to be an admin of their businesses and then you can build Google bots for them.
Should I use different workspaces for different business?
It's of your own choice
Workspace Settings
Workspace Profile (Timezone)
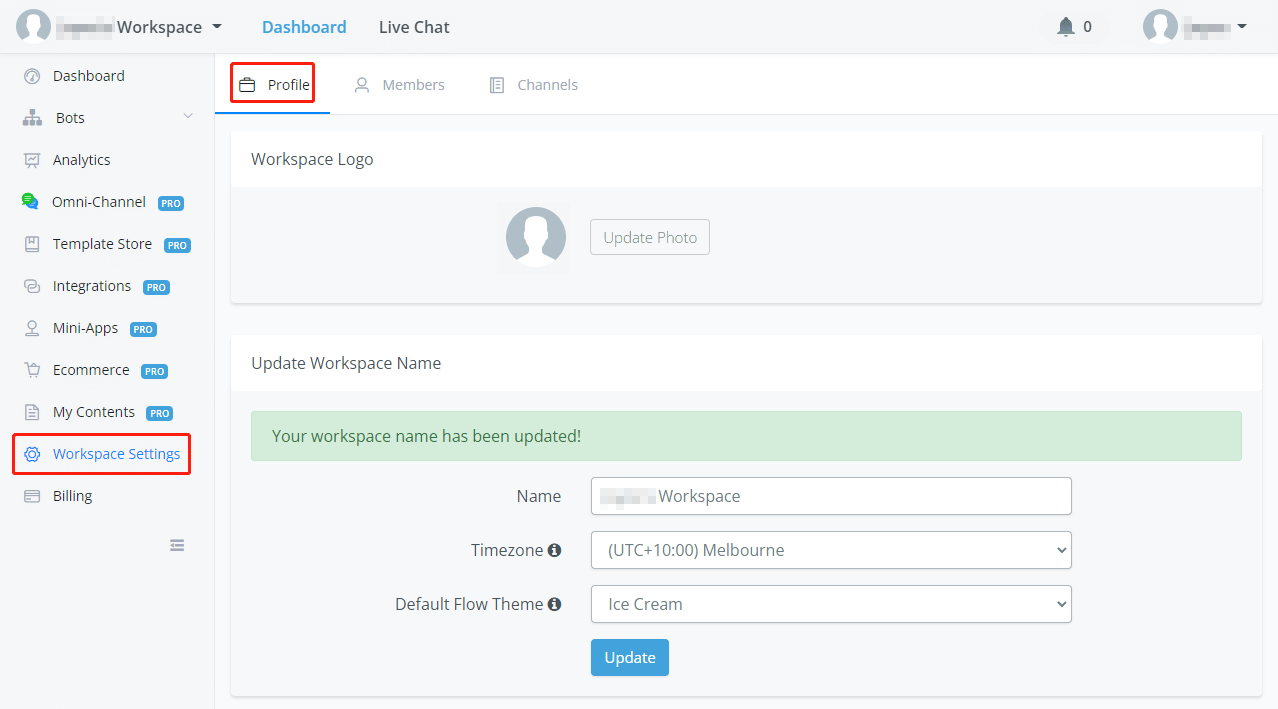
To edit the profile of your workspace, click Workspace Settings and profile in the above screenshot. You can change your logo, workspace name, timezone and default flow theme.
TIP
The timezone setting of a workspace will affect how your bot process time value. For example, the system value "BOT_CURRENT_TIME" is different when you have different timezone settings. Moreover, system value "NOW" and "TODAY" is based on bot users' timezones, if they don't have a timezone in profile, workspace timezone is used.
Workspace Management
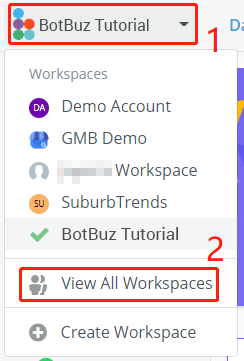
On the upper left corner of your dashboard, click a workspace name to switch to the workspace. By clicking 1 and 2, you will jump to the workspace management page:
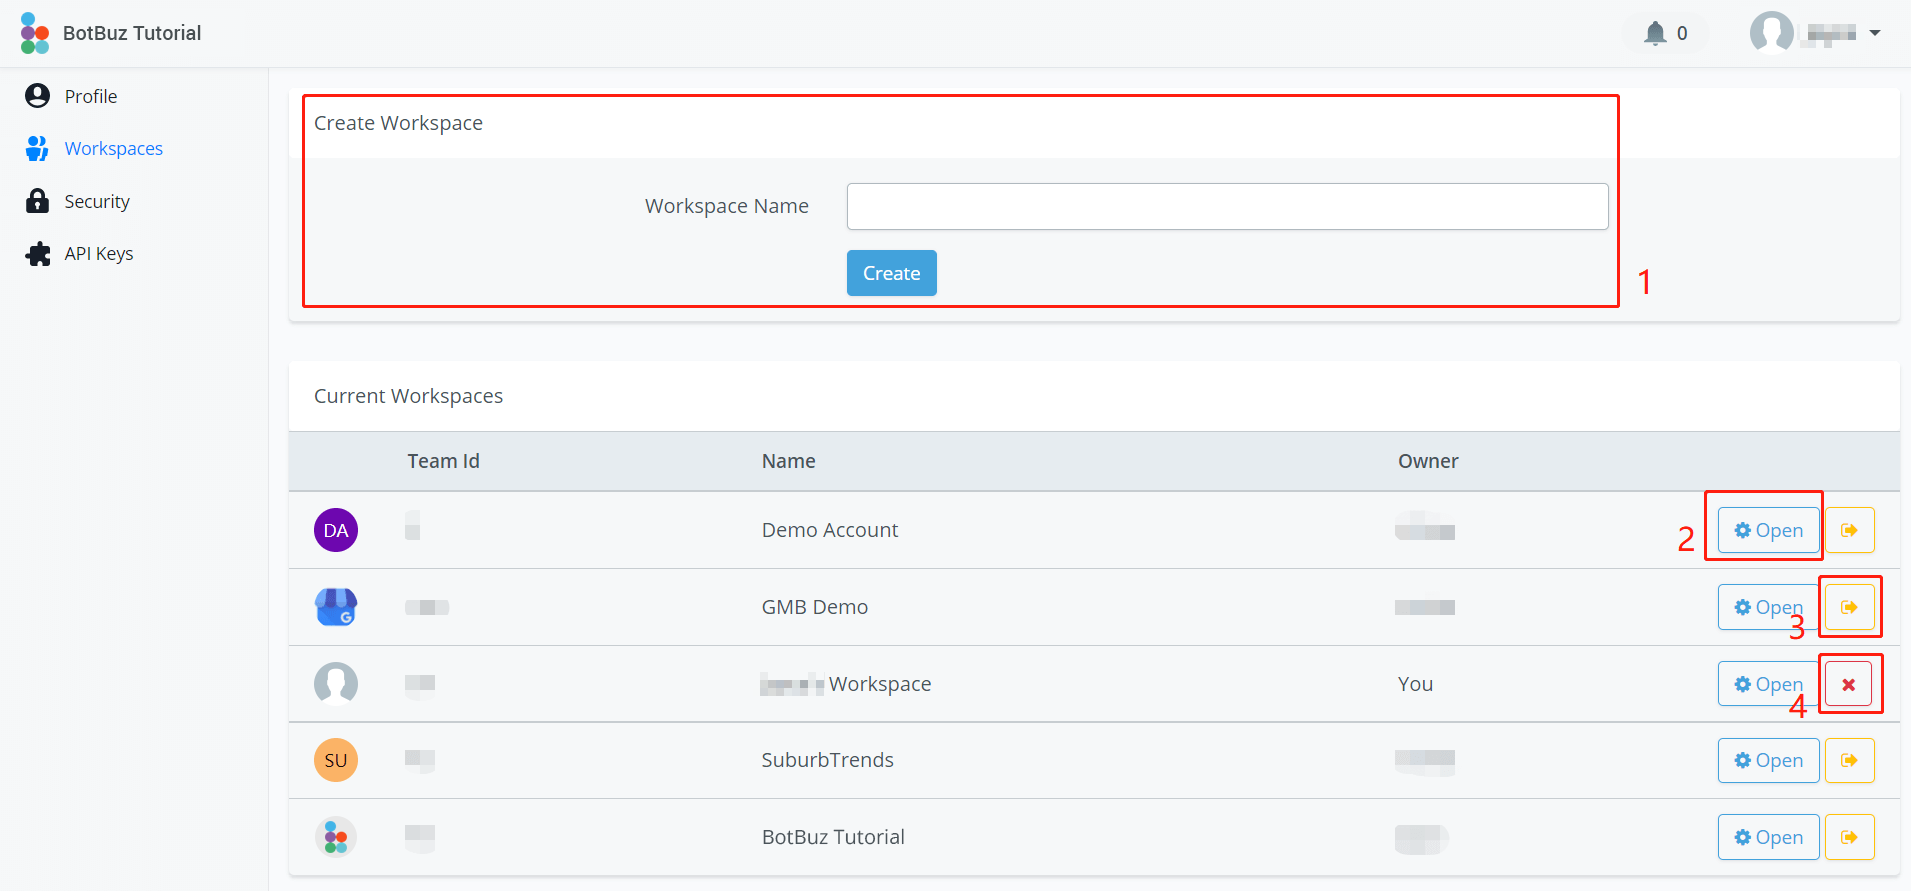
Here you can see all the workspaces you've joined. As marked in the screenshot, you can:
- Create new workspaces (the creator of a workspace becomes the owner)
- Switch to that workspace
- If you are not the owner of the workspace, click the yellow arrow to leave the workspace.
- If you are the owner of the workspace, you will see a red x instead. Click it to delete the workspace
API Keys
You can access the “API Keys” page from area 1 in the above screenshot.
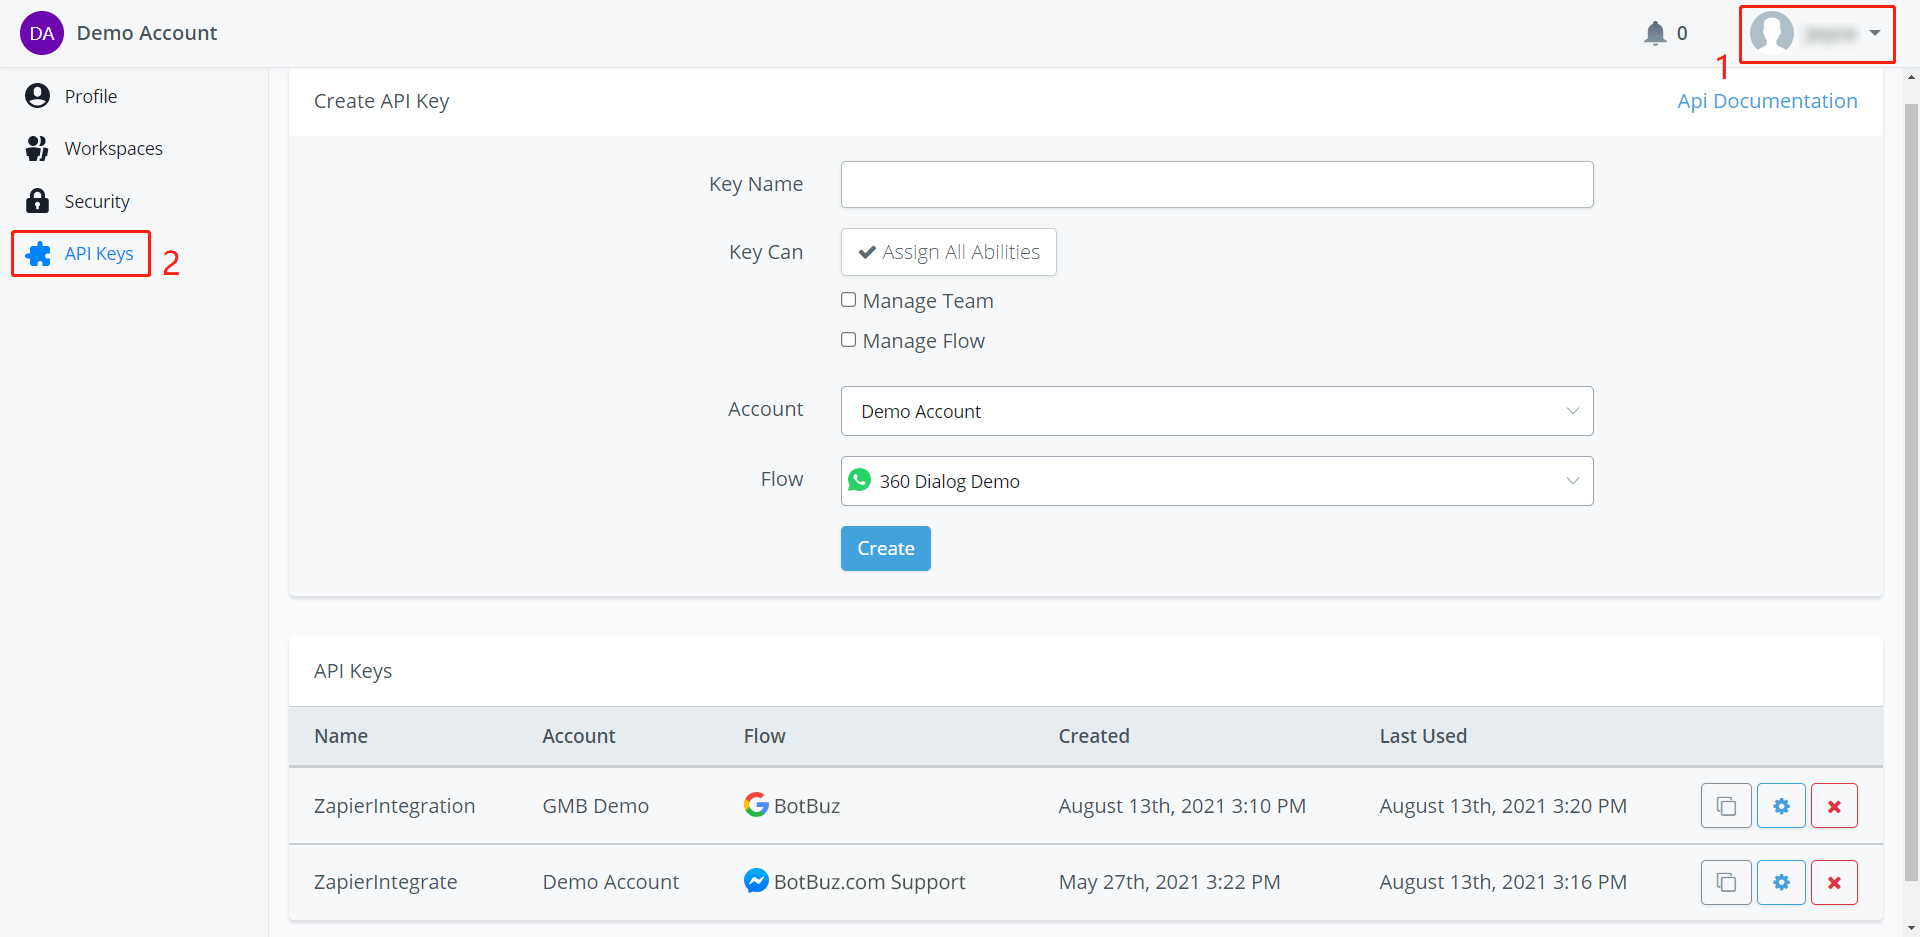
Select a workspace and a flow to create an API key to access the flow from API calls. Try our APIs here (opens new window). Botbuz has also integrated with many third-party automation services such as Zapier, Pabbly Connect, Integrately, Integromat, etc.
User Settings (Timezone)
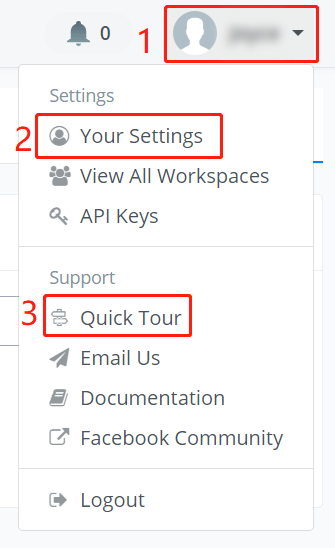
In the upper right corner, click your user name and “Your Settings”. Moreover, you can find support links here. For example, try “Quick Tour” to get familiar with your dashboard!
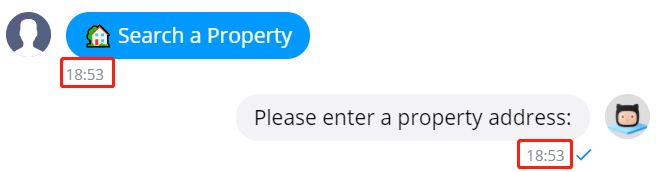
TIP
The timezone setting of an Botbuz user will affect the time shown in the web portal such as the time shown in the conversation in your Live Chat, Error Logs, etc. See the screenshot below.
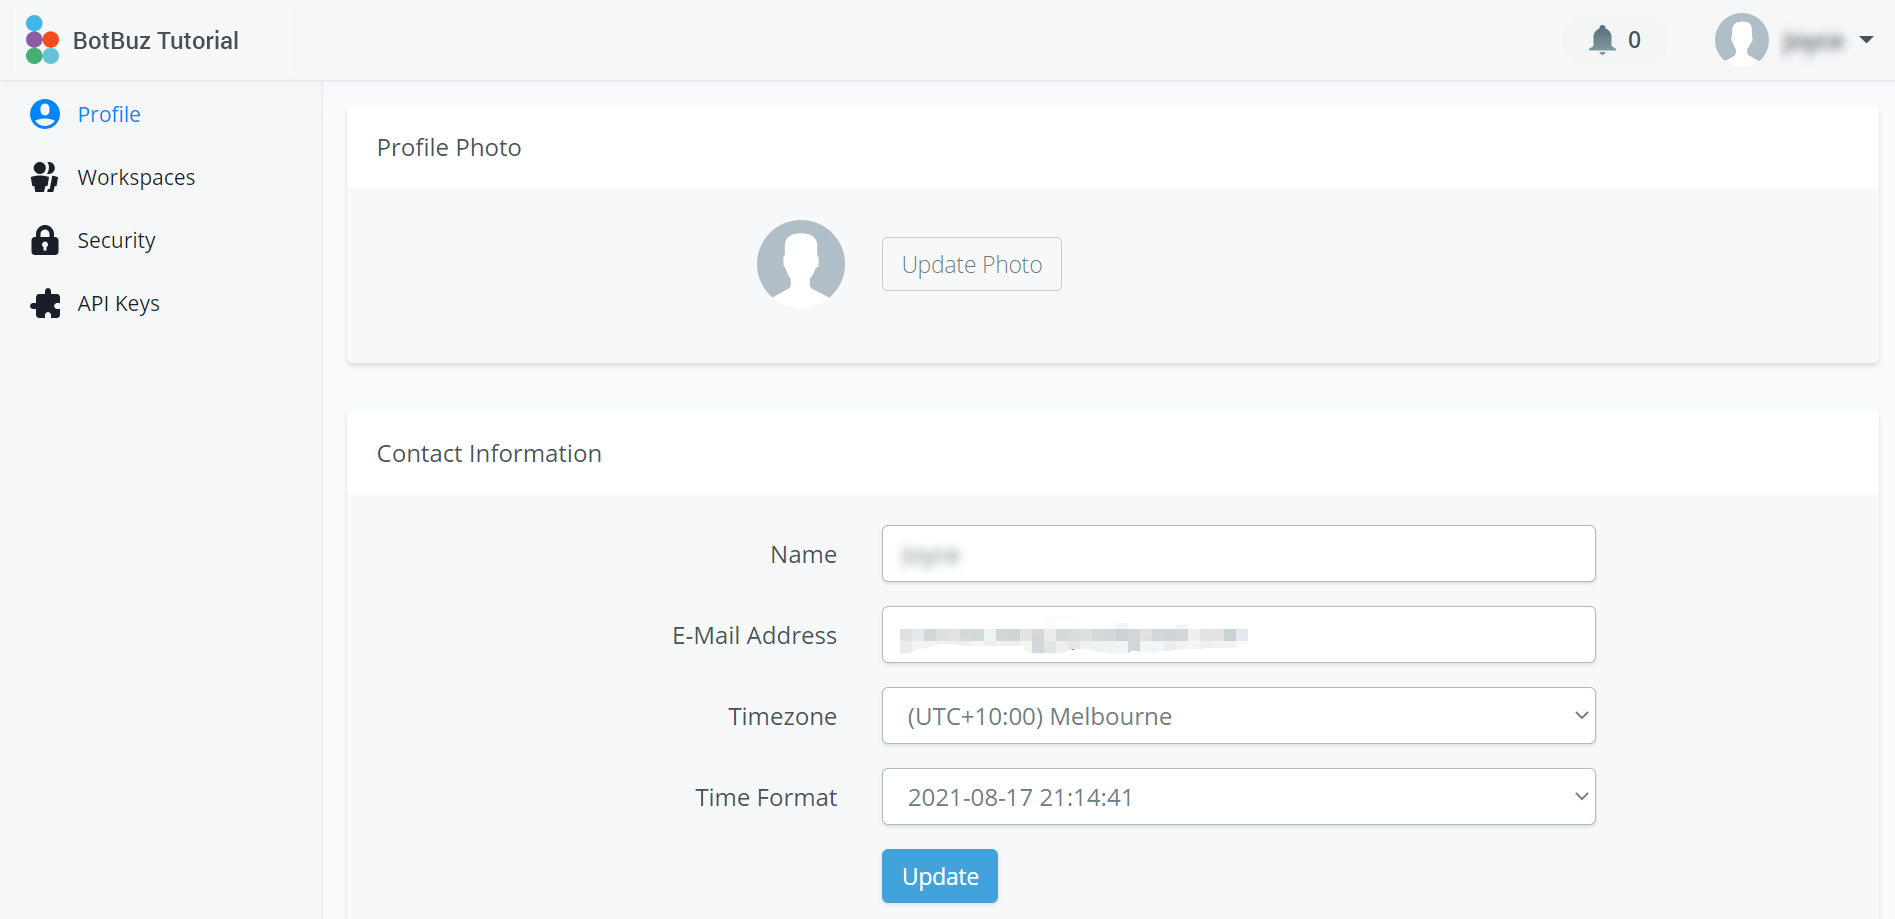
In profile, you can update your photo, user name, email address, timezone and time format.
Members and Roles
Each “BotBuz account” is to be seen as a person/user. Members are all the people that have limited or full access to the workspace. There are 3 types of roles, Owner, Admin and Member.
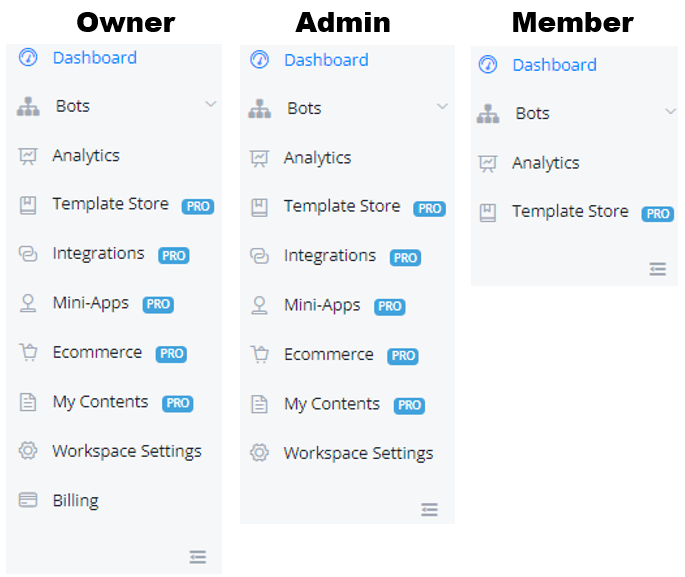
The first user who creates the workspace becomes the only owner of the workspace.
Member has limited access to the account. A member can
- View and edit all flows
- View analytics
Admin has limited access to the account. An admin can
- Have all features with Member
- Manage channel connections (add numbers, agents, connect pages, etc)
- Manage all integrations
- Manage the ecommerce system
- Manage templates
- Manage mini-apps
Owner has full access to the workspace. Owner can
- Have all features with Admin
- Manage workspace profile
- Manage members in the workspace (invite, delete, edit role)
- Manage subscription and payment
Invite, Delete & Edit Role of Member
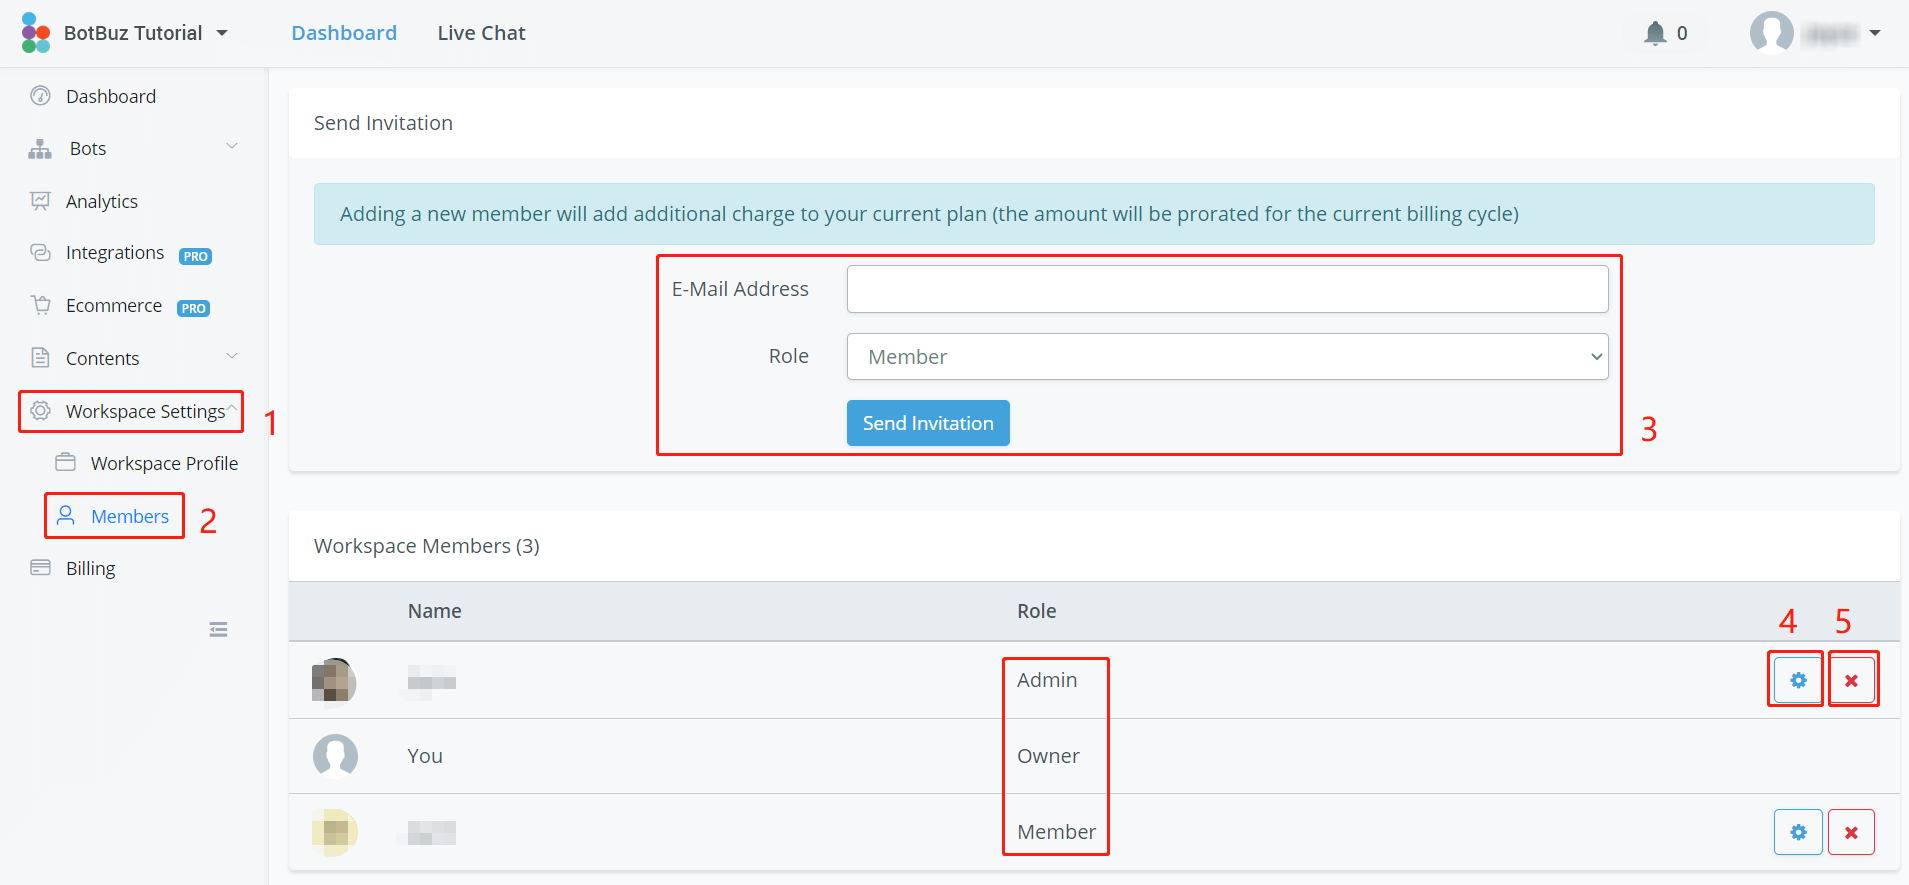
(Owner Only) Follow steps 1, 2 and 3 in the above screenshot to send out an invitation to a new member with his/her email address and role setting.
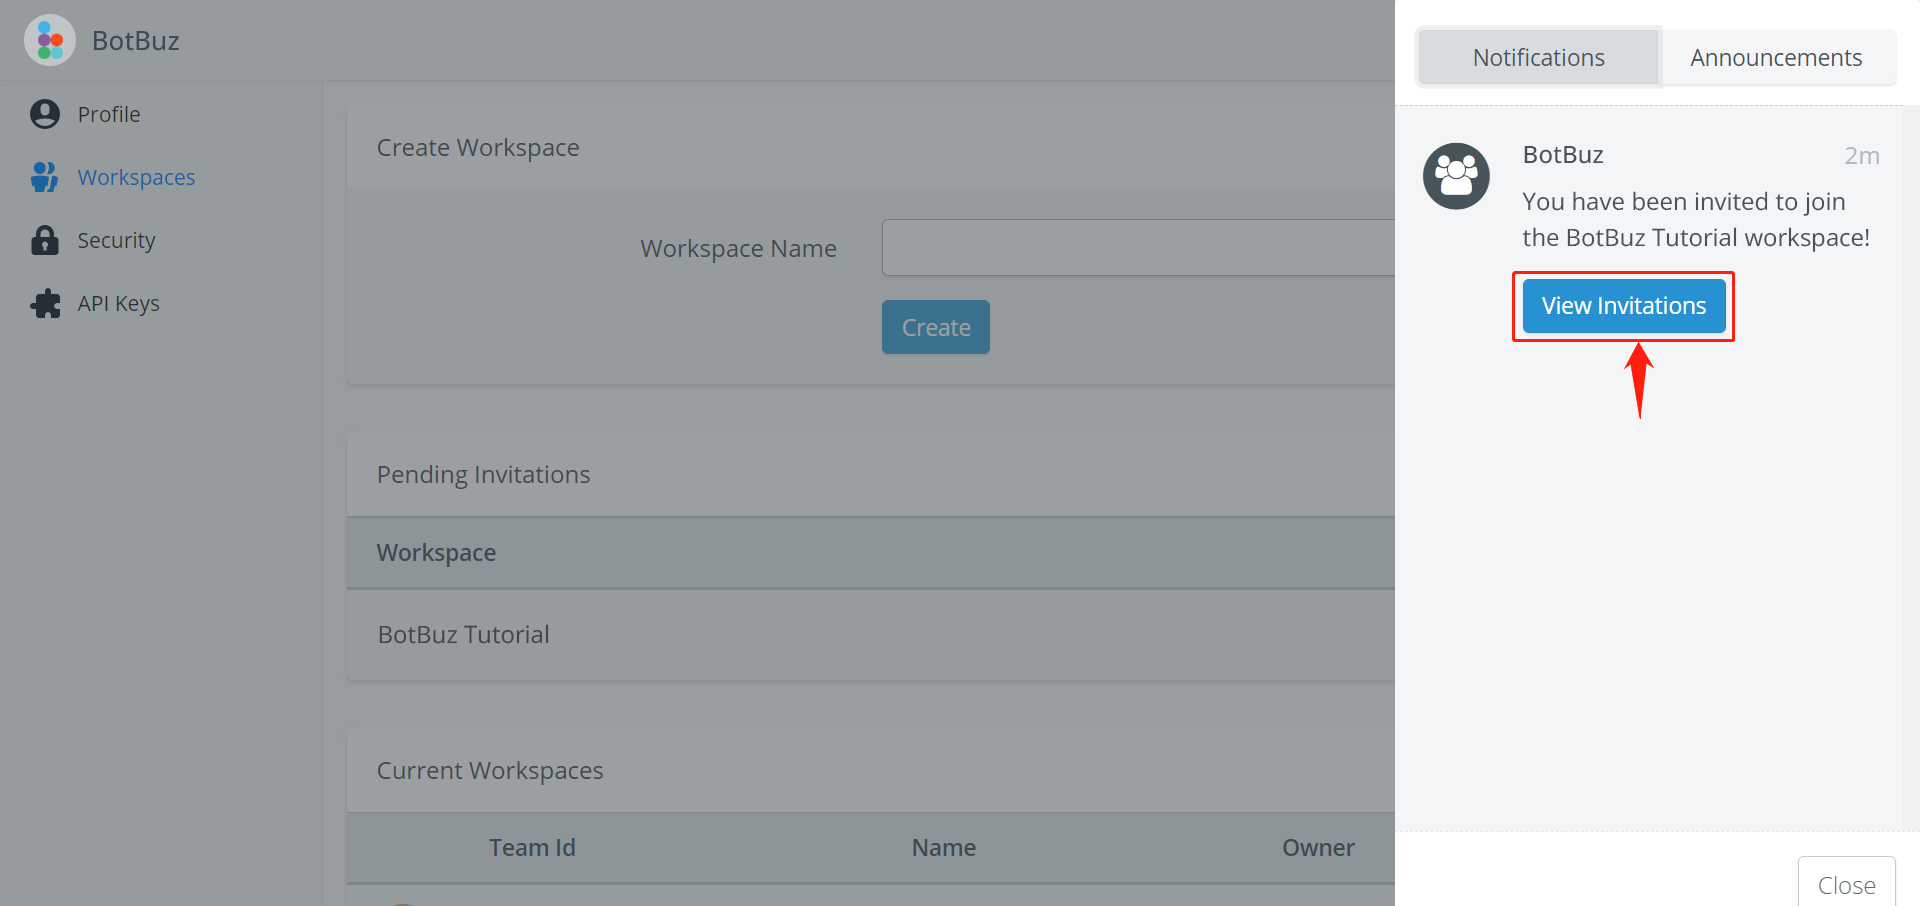
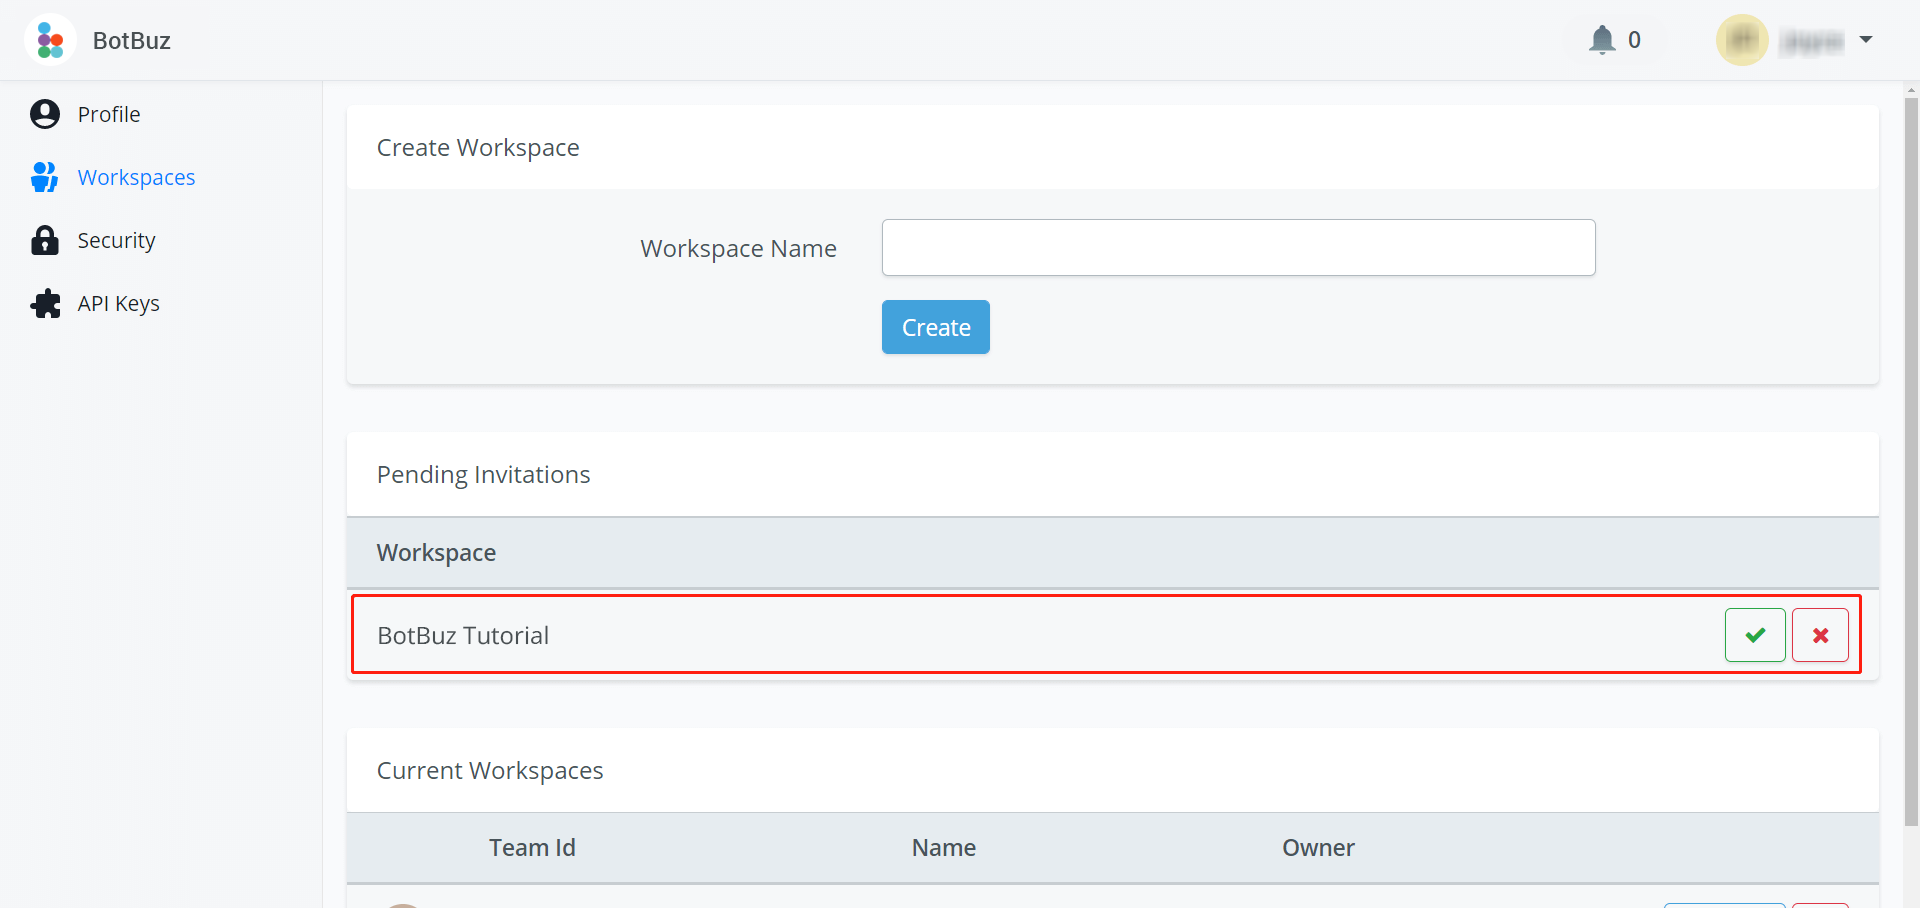
If the new member is already an BotBuz user, he/she can accept the invitation in the BotBuz notification center (the bell icon in the upper right corner, see 2 screenshots below).
If the new member is not an BotBuz user yet, the invitation email will contain a link to set up a new password. Once set up, the member can then also log into the workspace with their own login details.
Eidt Role of Members
(Owner Only) You can assign a role at the time you invite new members or edit it later on the member page. Click on the gear icon to change the role of a member.
Setup
Connect to Channels
Later after you set up your bot and create a flow, check how to build flow to send your first message.
Link & Unlink
After you connect create a bot, when you unlink a bot, all data in a flow is saved includes subflows, settings and bot users. You can link the flow to another bot connection but your bot users will be removed to avoid conflicts.
Omni Bot
Omnichannel gives you the ability to create 1 single bot and connect it to all channels supported in omnichannel.
Currently, there are 8 different channels but as we keep adding more you will be able to connect these as well.
So where you first needed 8 chatbots to each connect to their own channel you can now do the same with just 1 chatbot!
Unlike separate channels like Facebook, WhatsApp, Telegram and so on, you have 1 omnichannel per workspace. This might be subject to change in the future but keep this in mind for now when connecting your channels.
How to create a chatbot in omnichannel
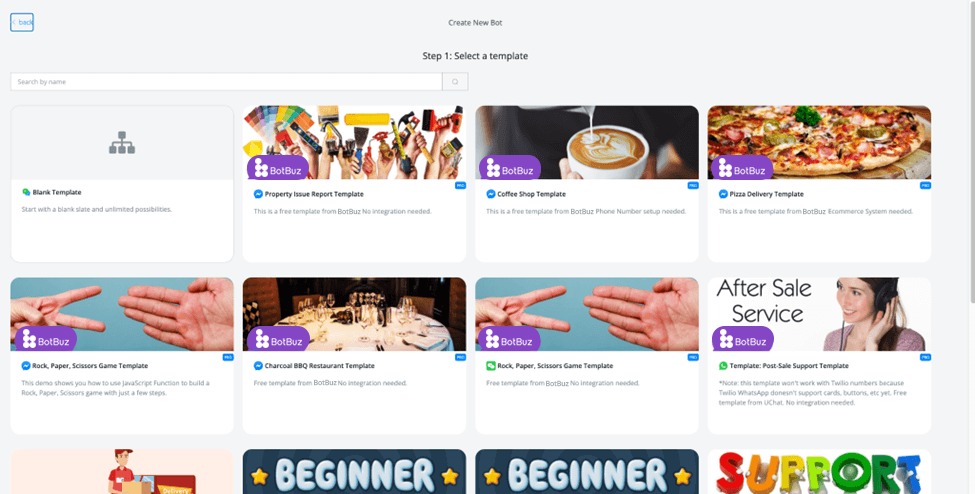
From the left-hand menu press omnichannel. You will then have two options to create your omnichannel chatbot.

- You can create a completely new chatbot. If you are starting with an empty workspace where you don’t have any chatbots yet, this will be the most likely option you will choose.
- If you already created a chatbot into a channel and want to use this same chatbot inside of your omnichannel, then you can choose the option “Convert Existing Chatbot”. This will also have the big advantage of importing the bot users you already have into the omnichannel chatbot.
Once you have chosen any of your preferred option you will continue to the next step.
If you selected the “create new bot” then you will be taken to the template store where you can select any of the available templates, or select the option “Blank Template”. This option lets you start from scratch and you can build the chatbot to your own liking.
Once you made your choice you will be taken to the window where you are able to name your chatbot, along with adding a description.
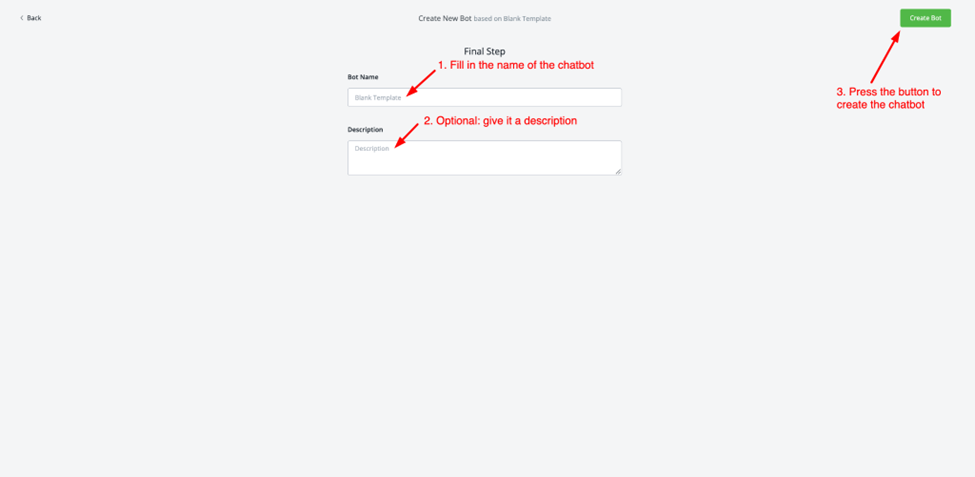
Once you are done press the green button named “create bot” and you will be able to connect the channels.
How to connect channels to omnichannel
Once your omnichannel chatbot has been created, head back to the main dashboard to connect the channels you like the omnichannel to manage with this chatbot.
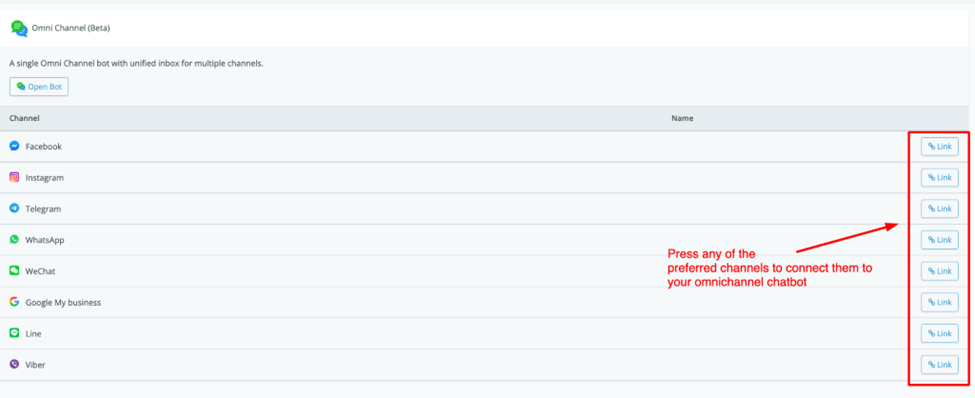
If you did not connect any channel yet to your workspace then it will take you to that specific channel to do so. Once you have added them you will be able to link them to this omnichannel chatbot.
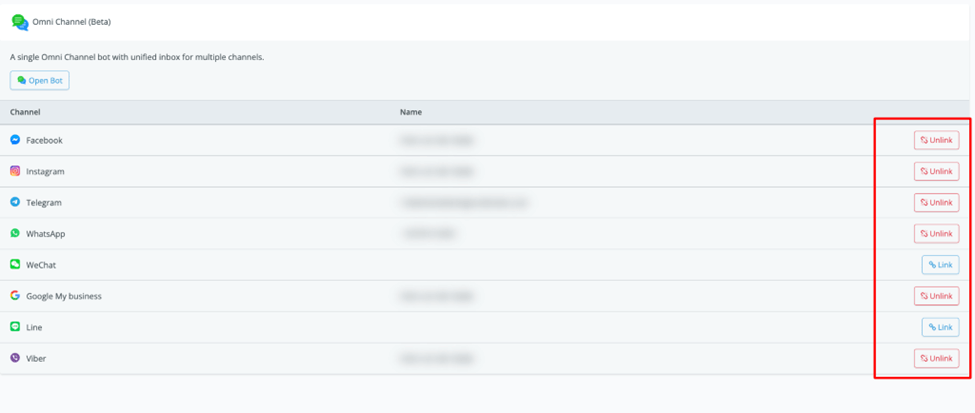
You can unlink them at any time by pressing the button on the right-hand side.
How to create an omnichannel flow
Now that you have created the chatbot and connected your channels you are ready to create your chatbot.
Now every single feature inside the flow builder will be available to you but do note that certain channels may not be able to use them.
Use conditions to determine where the user is coming from
We have a condition you can use to determine which channel a user is coming from.
Just go to creating a condition, then select the “channel” option.
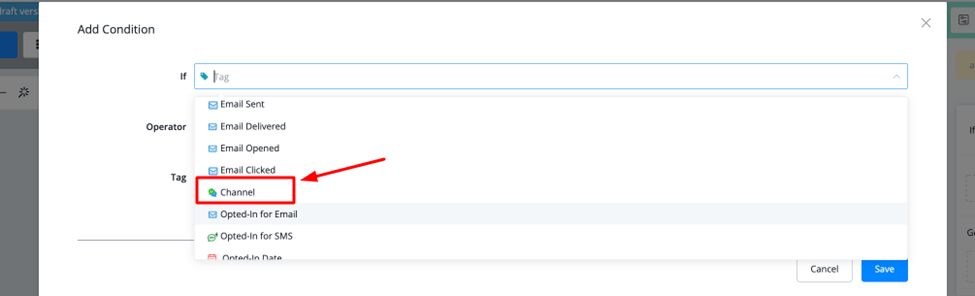
Once selected you will be able to choose from the available channels in omnichannel.
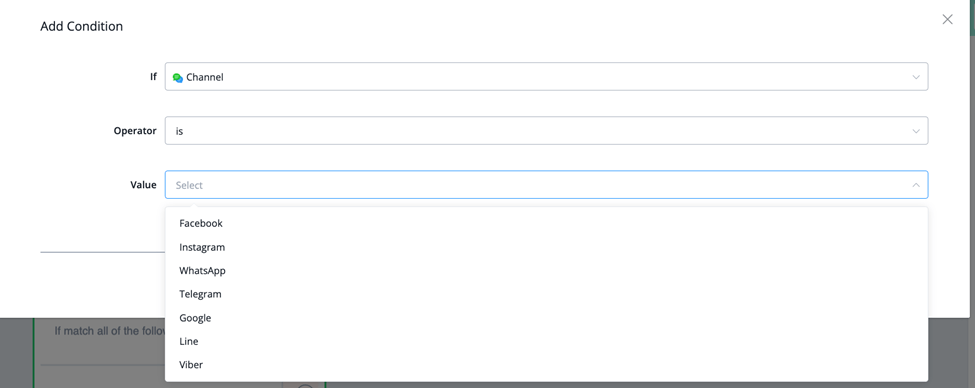
Once you set up this condition you can direct the user to specific channel features.
For example cards might be available to Messenger but not to Telegram. It does not show the same way.
So using this condition you can send a customized response for Telegram users.
How to determine which channels support which features?
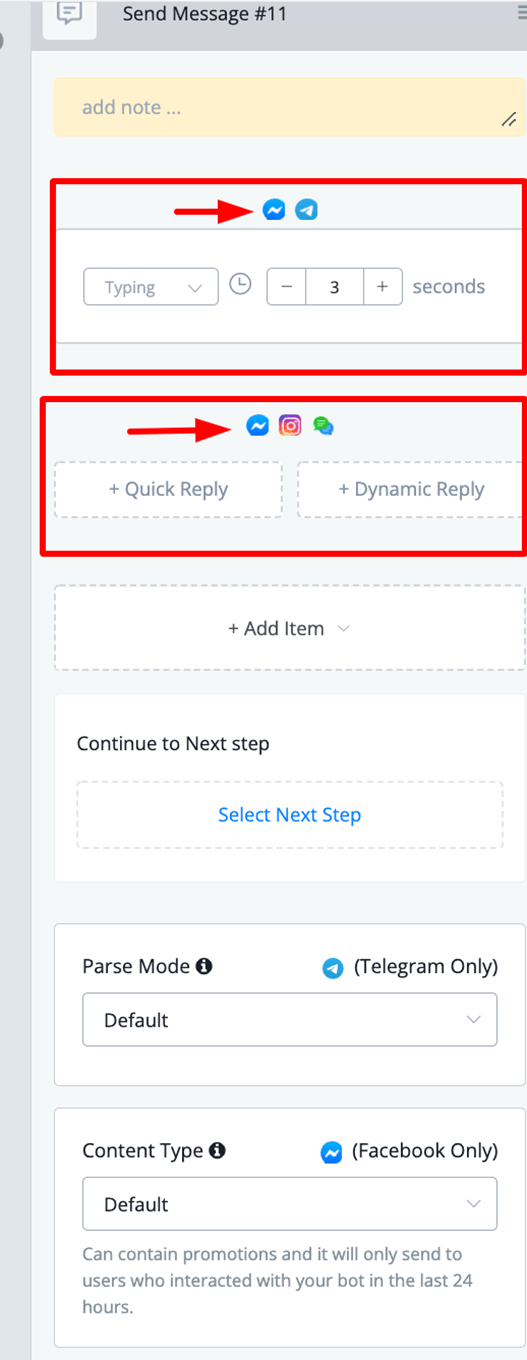
Every block when hovering over it will show the available channels by displaying the icons of those channels at the top.
You can also reference the same icons when inserting a node into the flow builder.
Facebook Bot
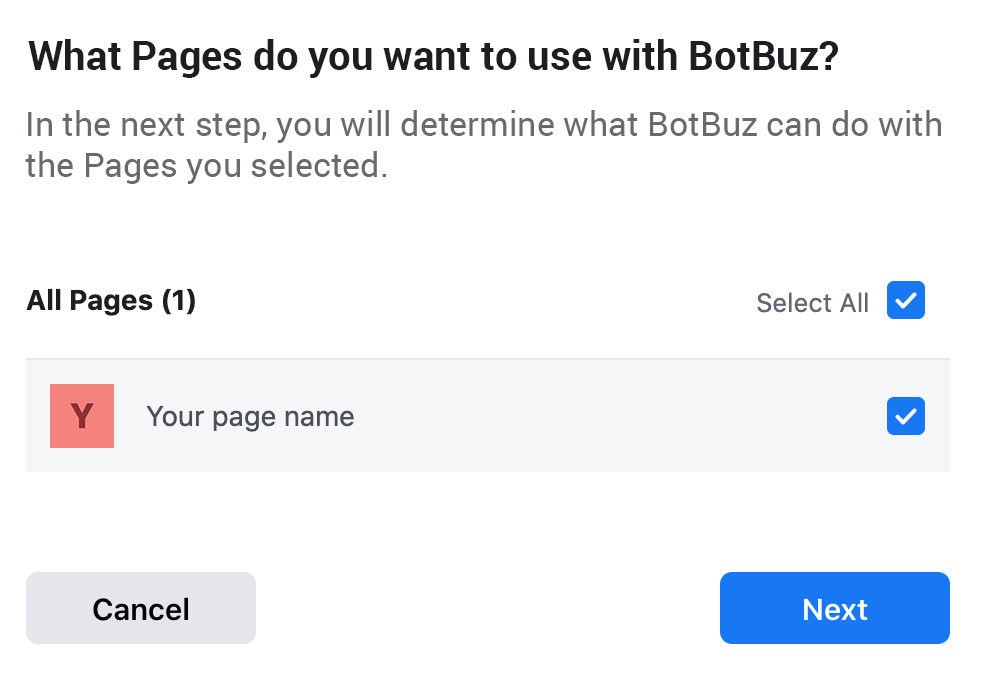
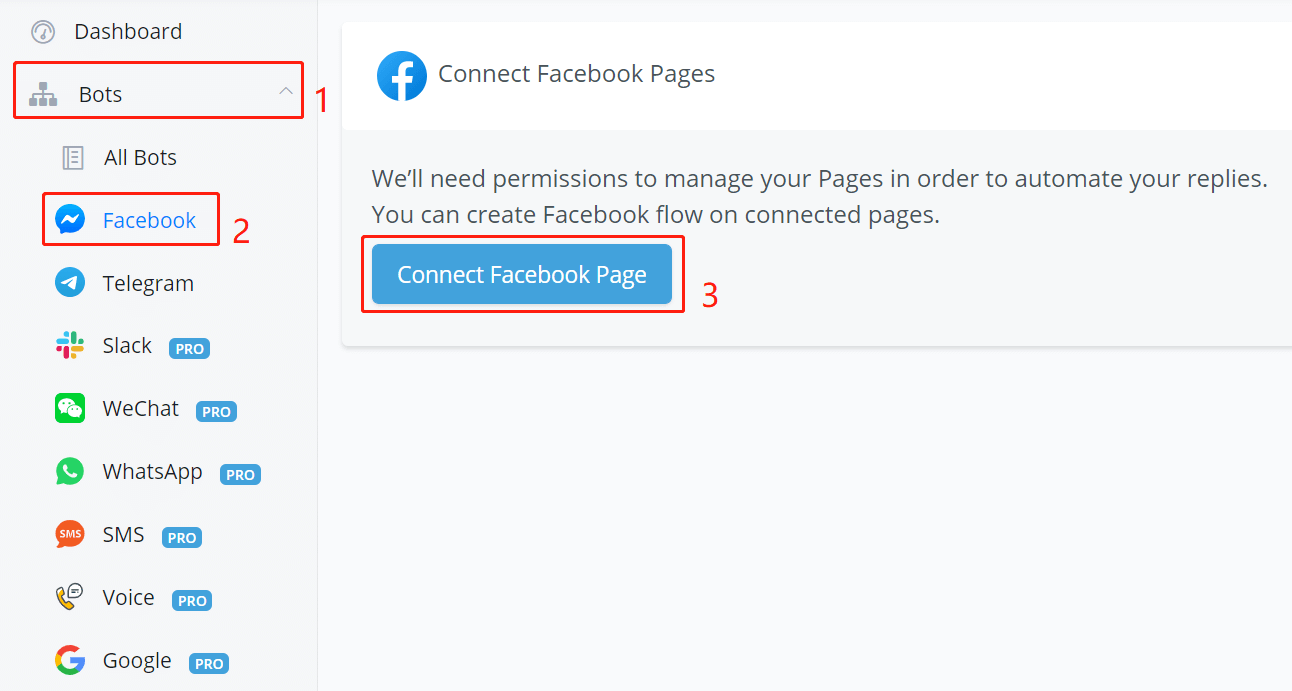 Follow steps 1, 2 and 3 in the above screenshot and jump to facebook.com, select all the pages in your page list, that you want Botbuz to help with the automation.
IMPORTANT
If you connect your Facebook Account with more than one workspace, remember to select all pages that require management on Botbuz regardless of workspace.
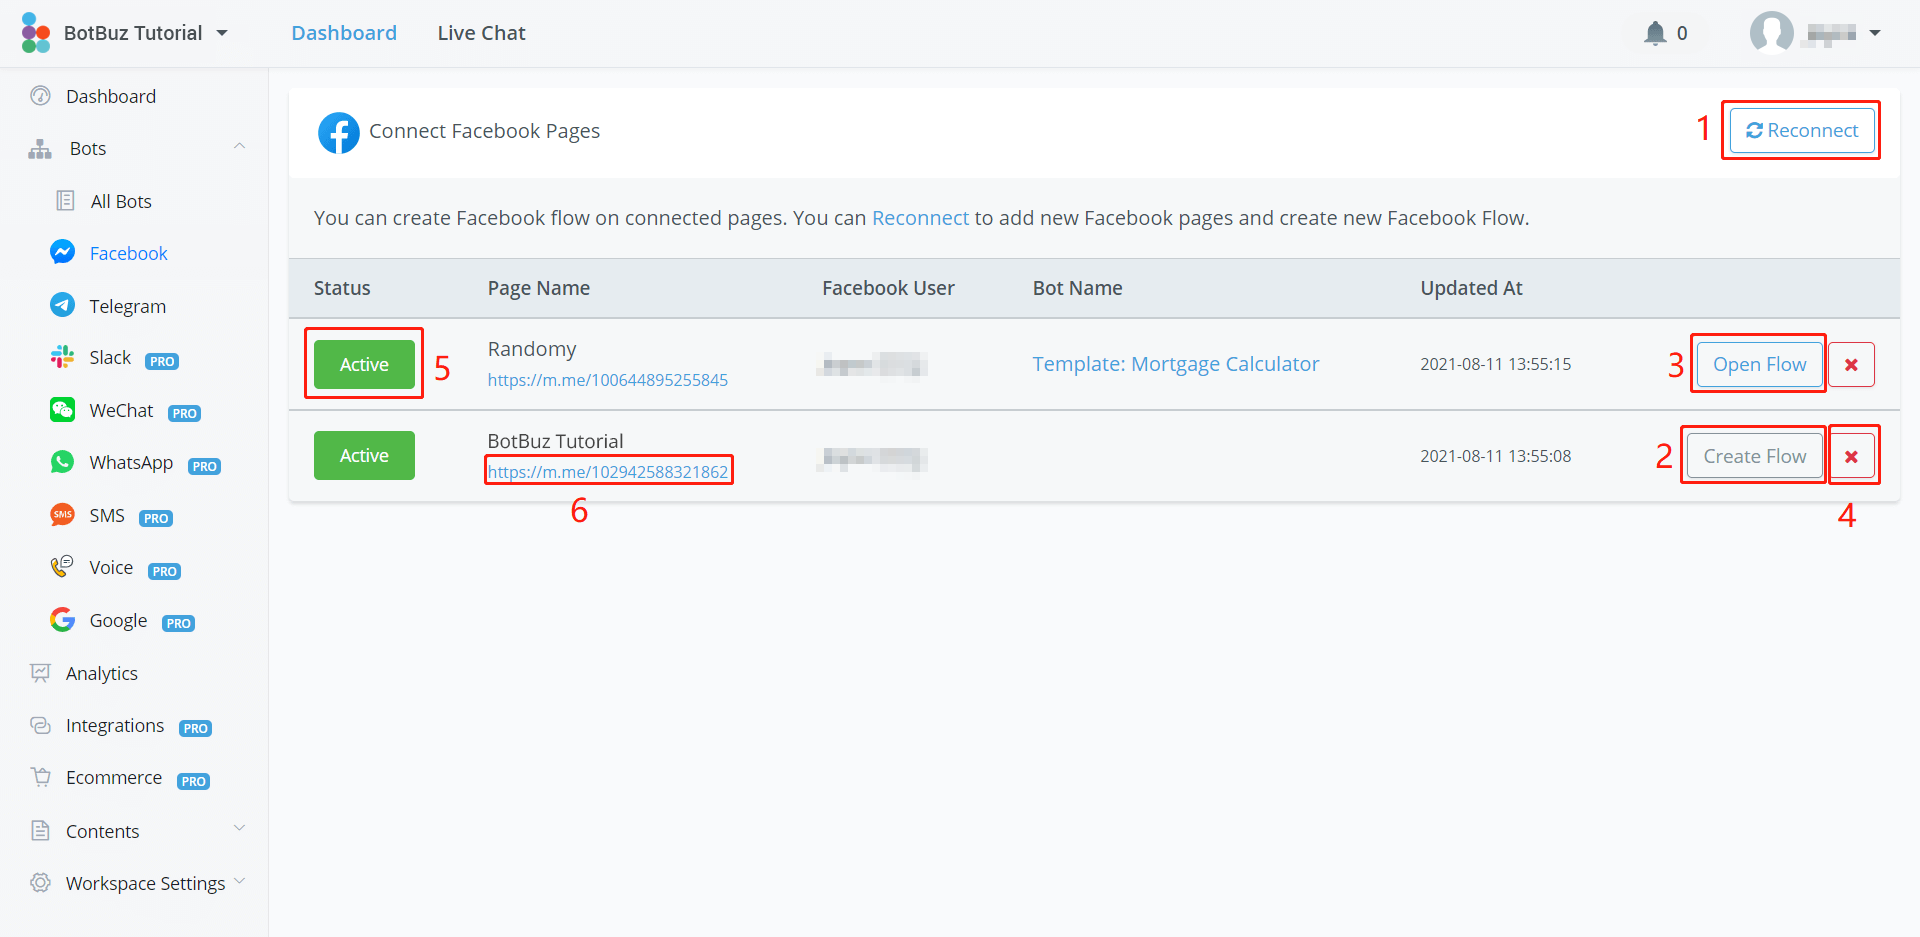
After connection, these are some of the operations in the screenshot above:
- Click “Reconnect” when you want to add/remove a page or refresh.
- Click “Create Flow” to create a new flow for the bot.
- Click “Open Flow” to enter the flow.
- Click the red x to remove the connection between the bot and your page.
- Flip the status to stop/start the automation.
- Click the link to talk to the bot. You can also share the link with other Facebook users.
Please note that
the red x is for disconnecting the flow with your page only. Your flow won't be removed. It will still stay in your workspace remain intact (in "All Bots").
Talk to Facebook Bot
3 ways:
- Click on URL in step 6 in the above screenshot.
- Use the preview button in your flow.
- Search your page name on Facebook to visit your page and click Send Message or Message.
Instagram Bot
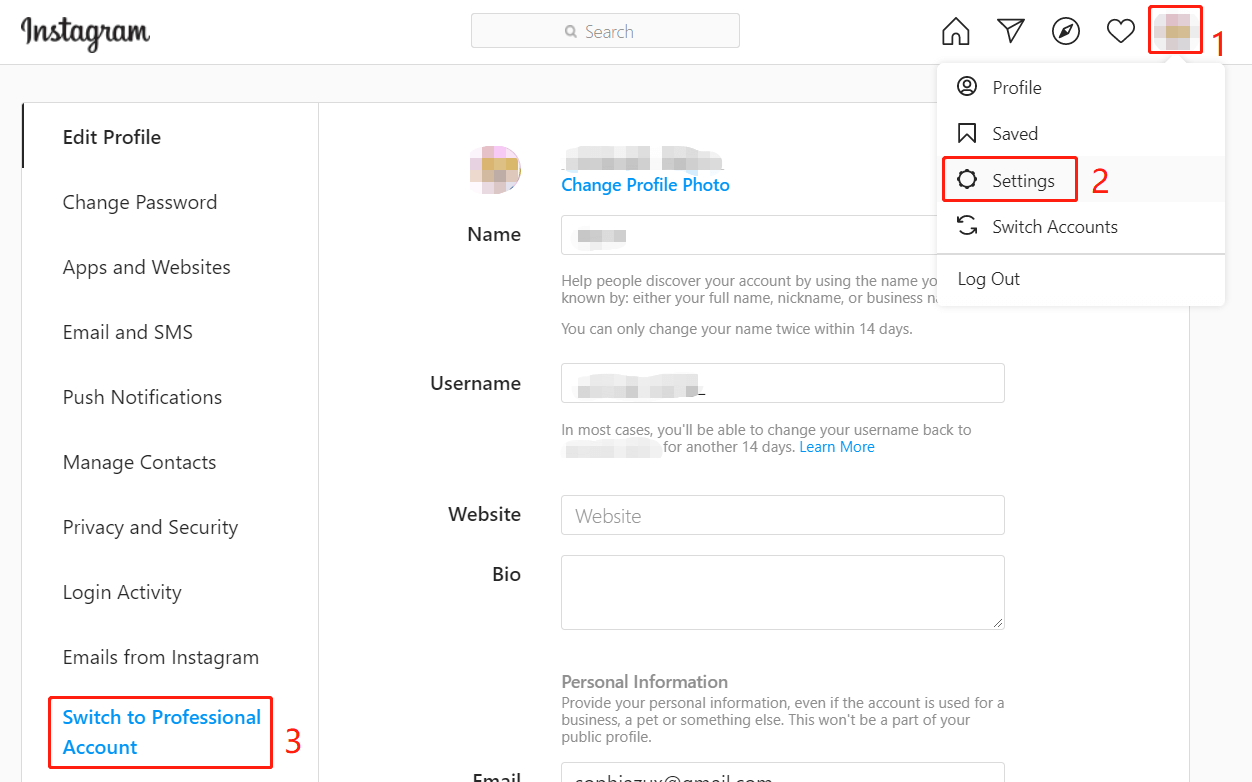
Firstly, you need an Instagram business account. To change from personal account to business account, follow steps 1, 2 and 3 in the following screenshot and choose “Business”:
Then connect your Instagram business account with your Facebook page. A Facebook page is a must, if you don't have one, create a new page.
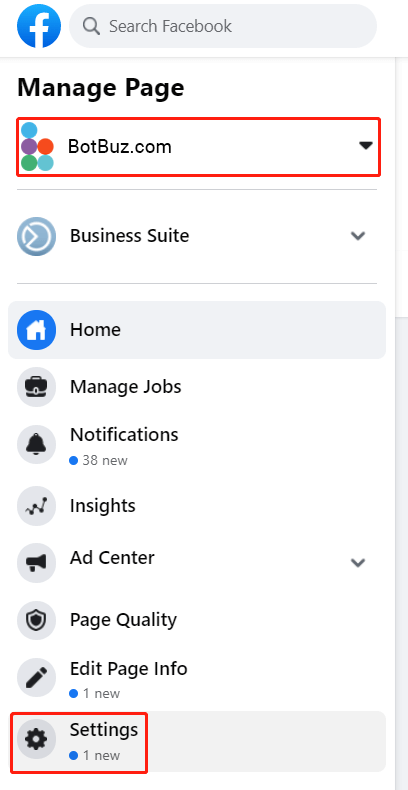
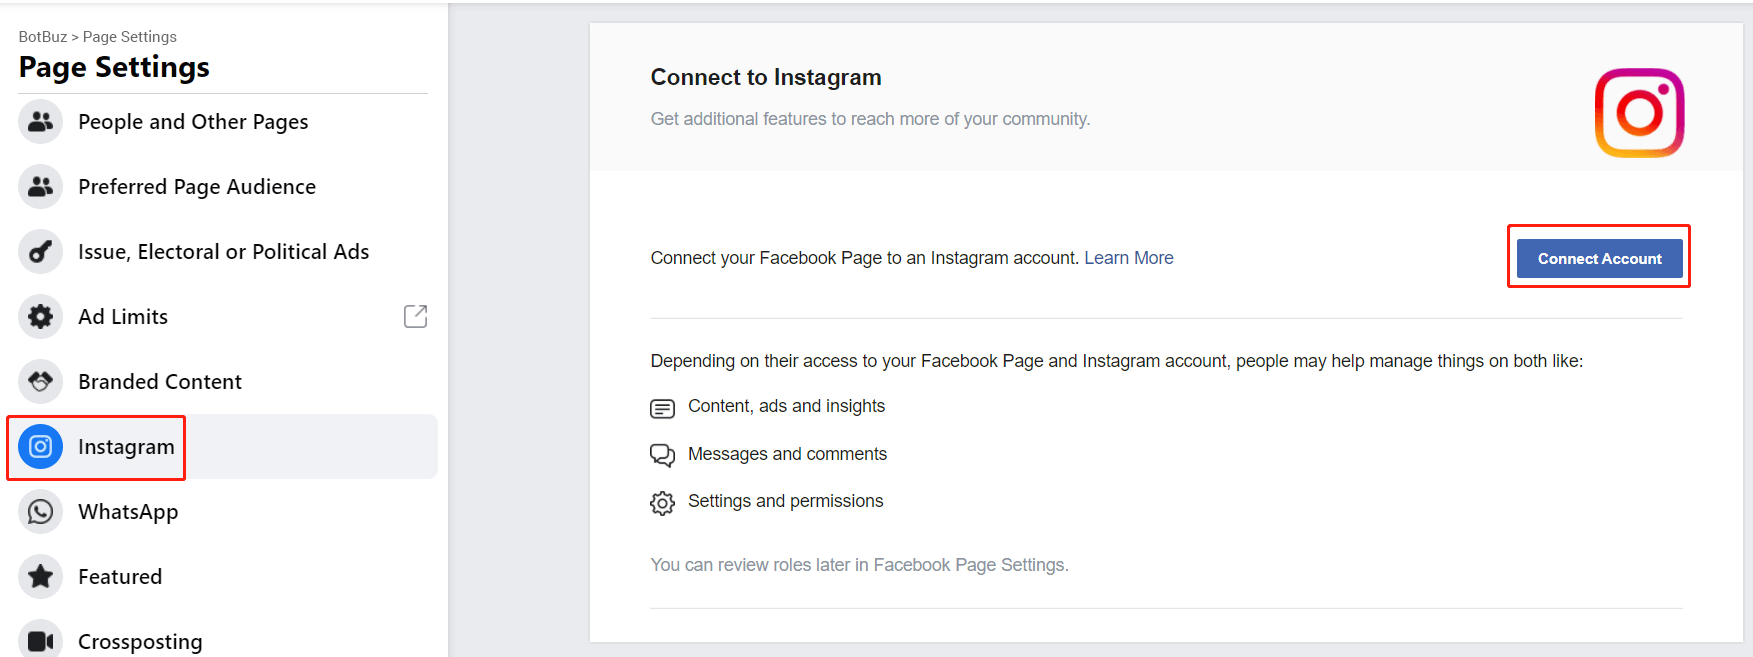
Go to the “Settings” of your Facebook page, then “Instagram”, “Connect Account”.
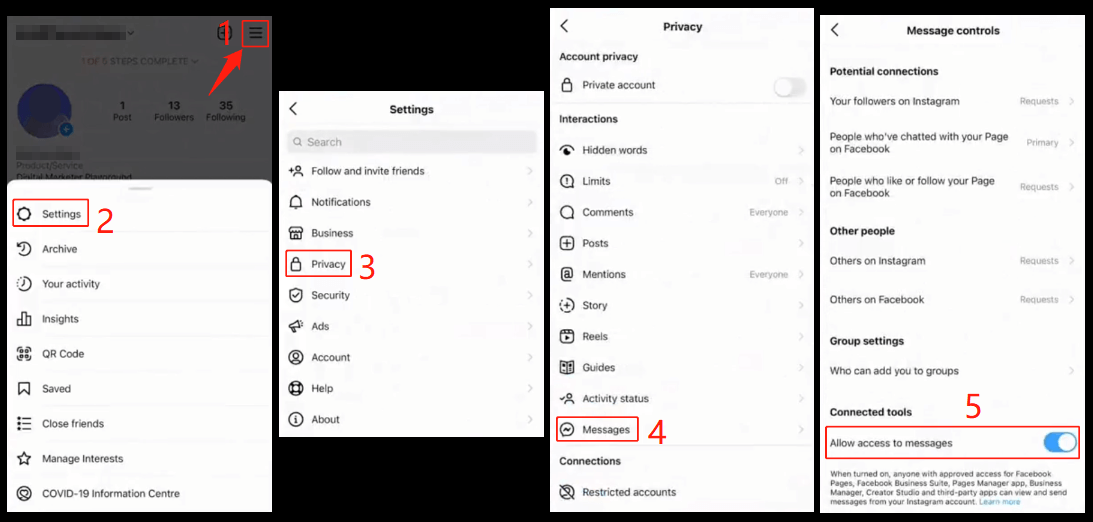
The next step is to turn on the “Allow access to messages” in your Instagram app, see steps 1 to 5 in the following screenshot: Menu - Settings - Privacy - Messages - Allow access to messages.
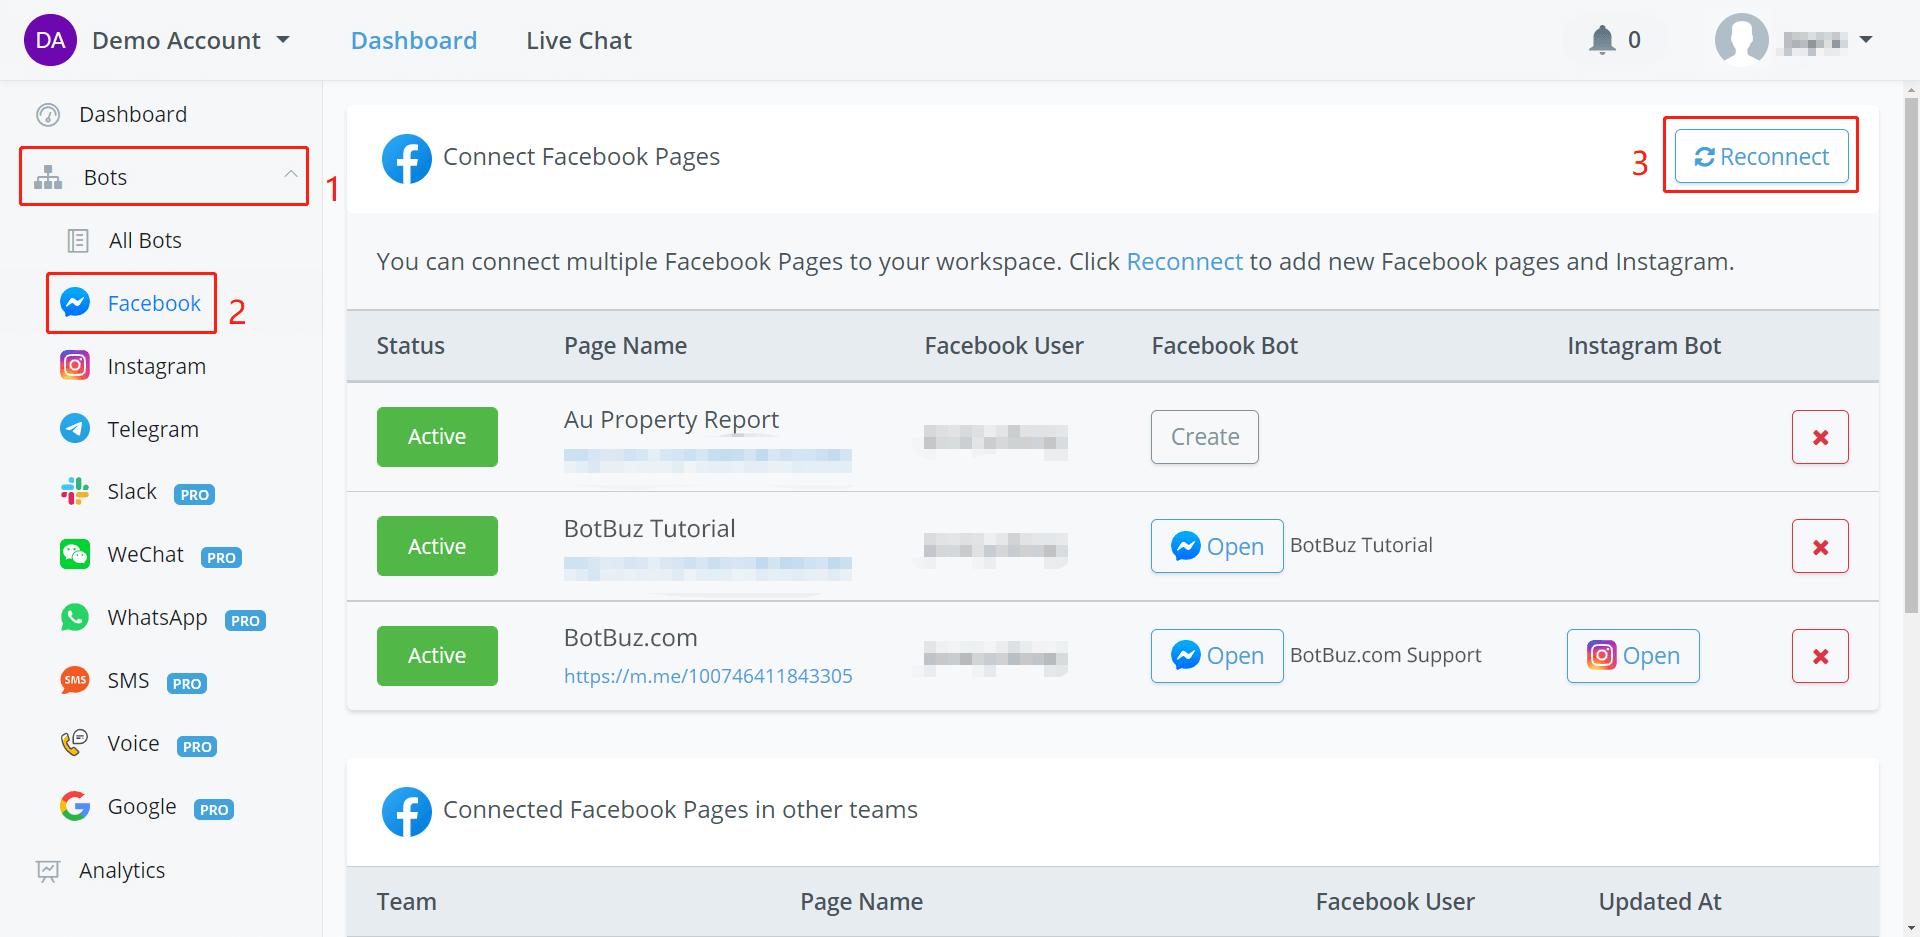
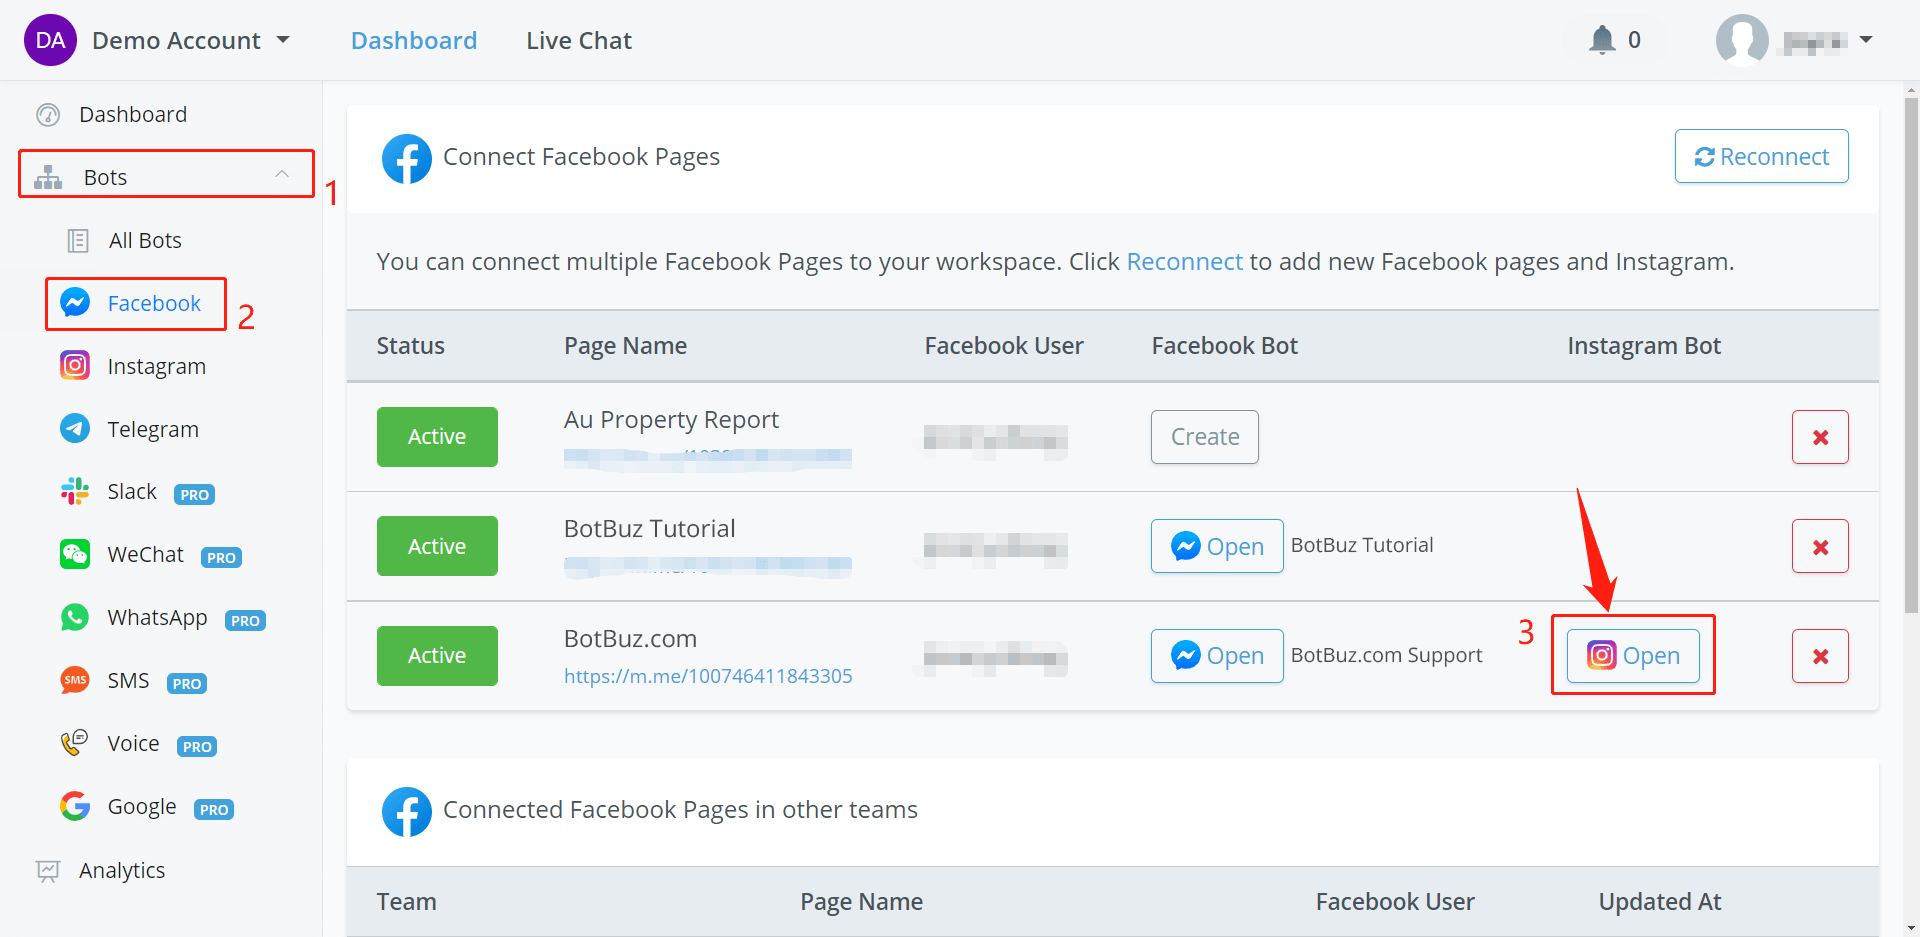
Finally, in Botbuz, let's connect your Instagram with Botbuz. Go “Facebook” and “Reconnect” (Yes, Facebook, not Instagram):
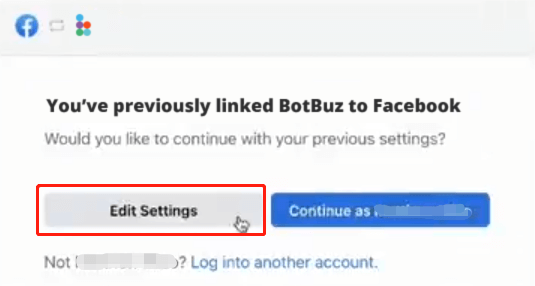
Continue as yourself or click “Edit Settings” if you've previously linked Botbuz to your Facebook.
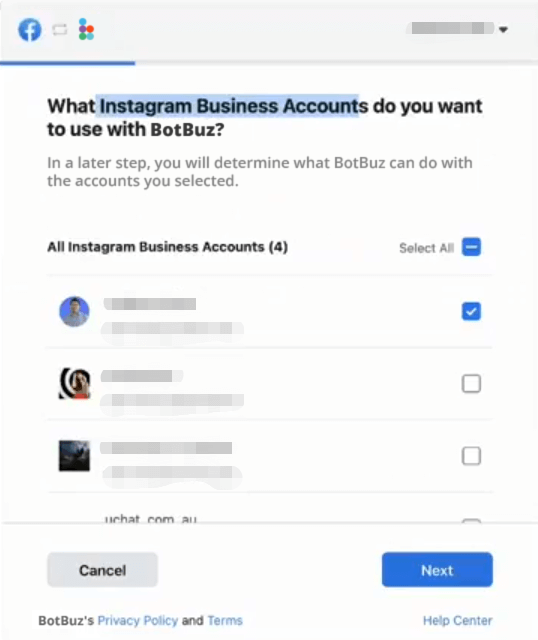
IMPORTANT
In the above screenshot, select ALL the Instagram Business Accounts that you wanted to use with Botbuz, not just for the current workspace.
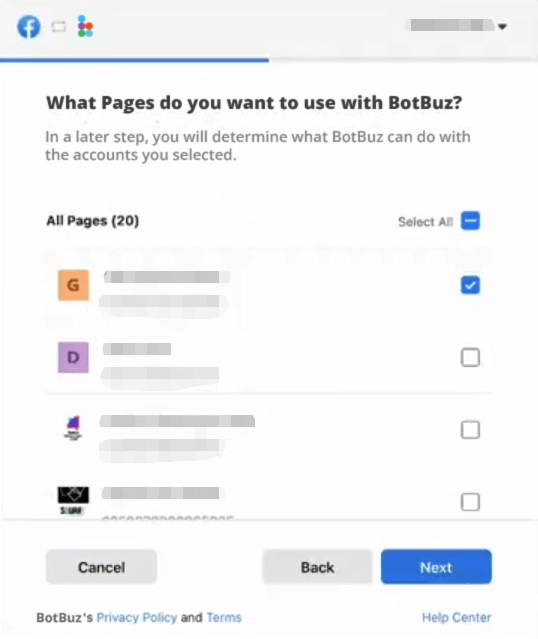
IMPORTANT
Similarly, in the above screenshot, select ALL the Facebook pages that you wanted to use with Botbuz, not just the page that connects to the Instagram account.
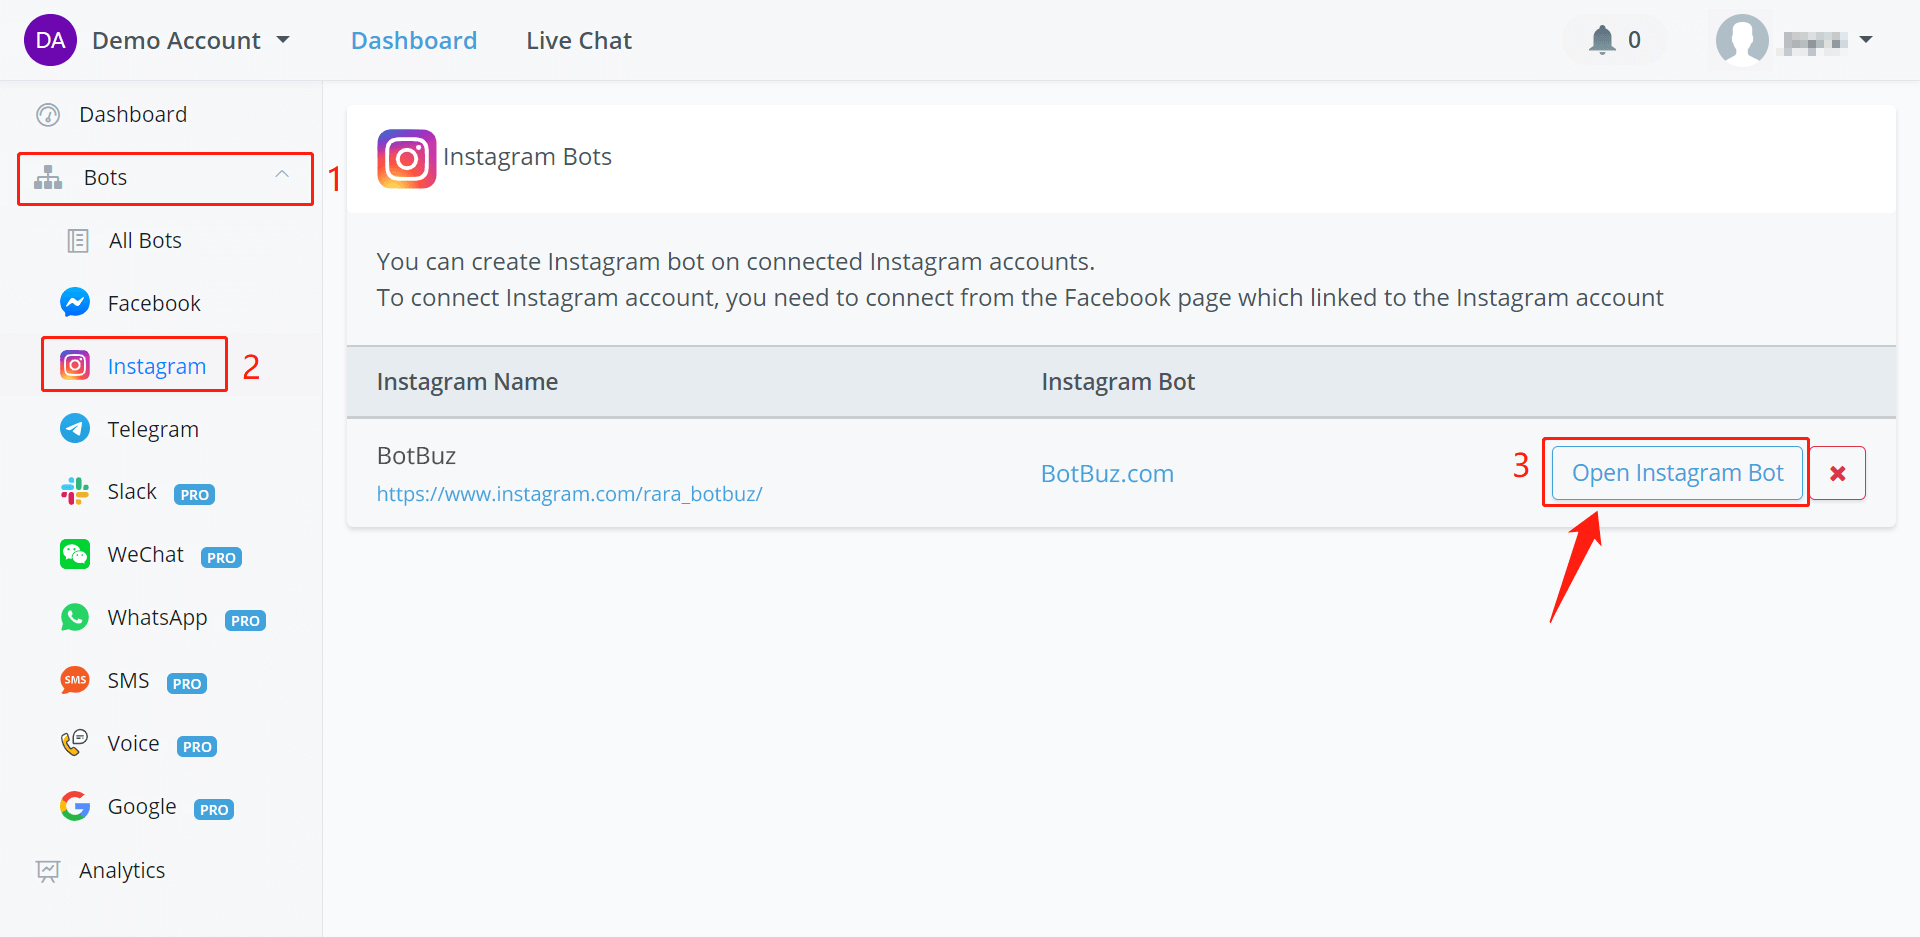
Give all permissions and after the connection, you are able to see your Instagram flow in both “Facebook” and “Instagram”:
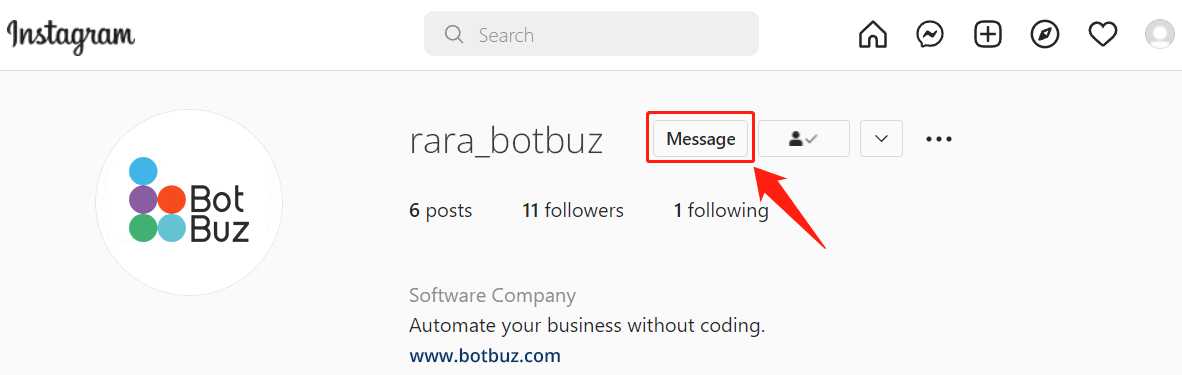
Talk to Instagram Bot
Instagram doesn't support Preview feature, so to talk to your Instagram bot:
- Search your account name on Instagram or goto the Instagram section on Botbuz dashboard, click on the URL link below the bot name to visit your Instagram page
- follow the account and click Message to start the conversation.
Telegram Bot
On your phone, visit https://t.me/BotFather (opens new window)from a browser. Click “SEND MESSAGE” and you will jump to the Telegram application. Click “Start” at the bottom to talk to @BotFather.
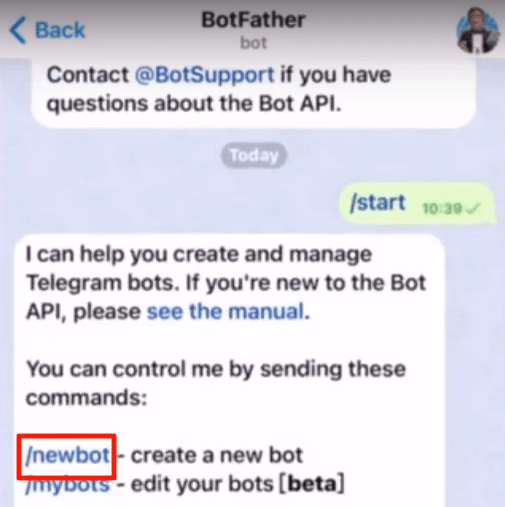
Send “/newbot”, then a username for your bot. You will get a token like this:
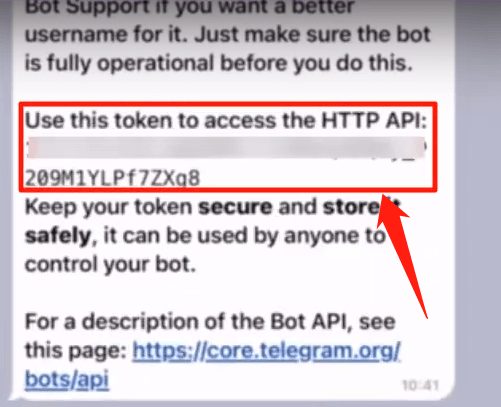
Copy the token and back to Botbuz.
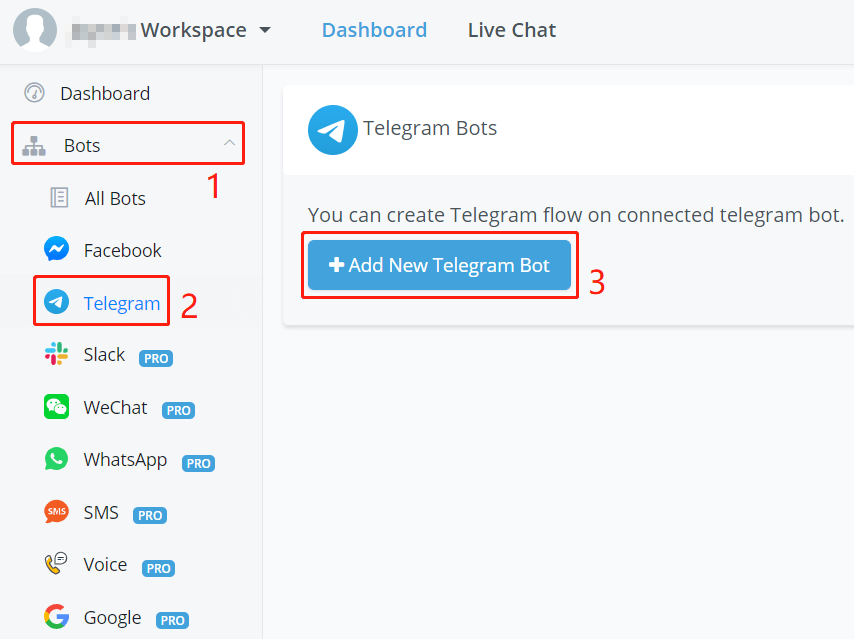
In Botbuz, click “Add New Telegram Bot” and put your token in the pop-up window. Finally, click “Create Flow” and there you go!
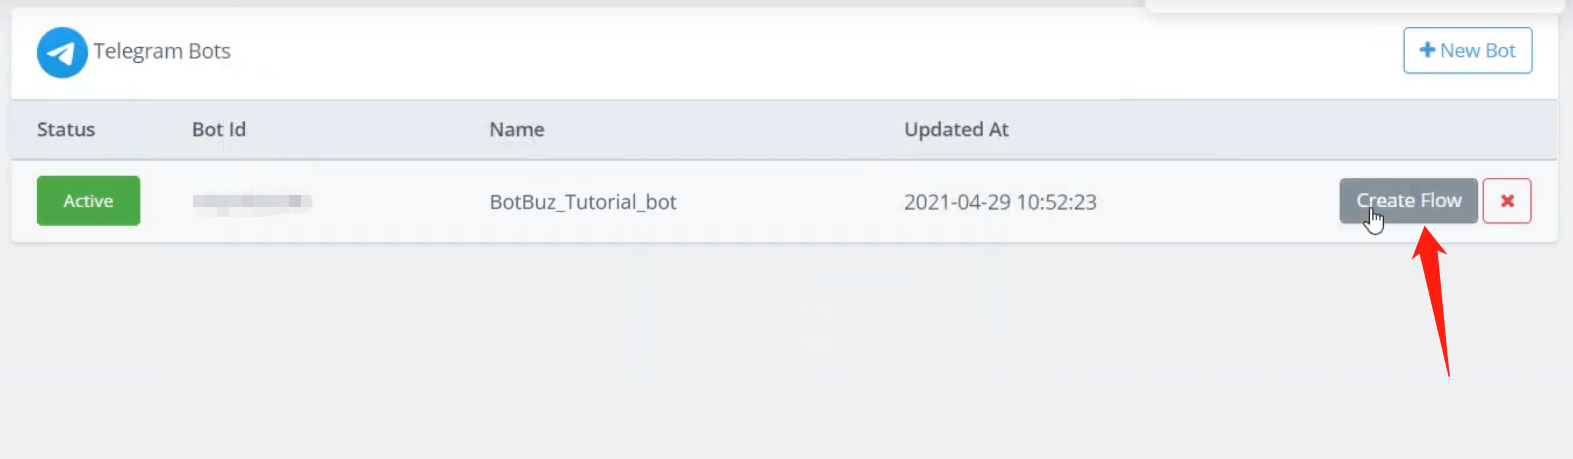
Flip the status to stop/start the automation and click the red x to remove the connection (your flow will be still in “All Bots”)
Talk to Telegram Bot
2 ways:

- Click the URL link above.
- Use the preview button in your flow.
Slack Bot
For now, Botbuz is able to send various types of messages to your Slack group or contacts mainly for notification purposes.
In Progress ...
We are working on building more functions for Slack bots. The documentation would be updated as soon as we have done that. Should you have any query, please feel free to contact us via the Botbuz support bot in the bottom right corner on Botbuz.com.au (opens new window).
WeChat Bot
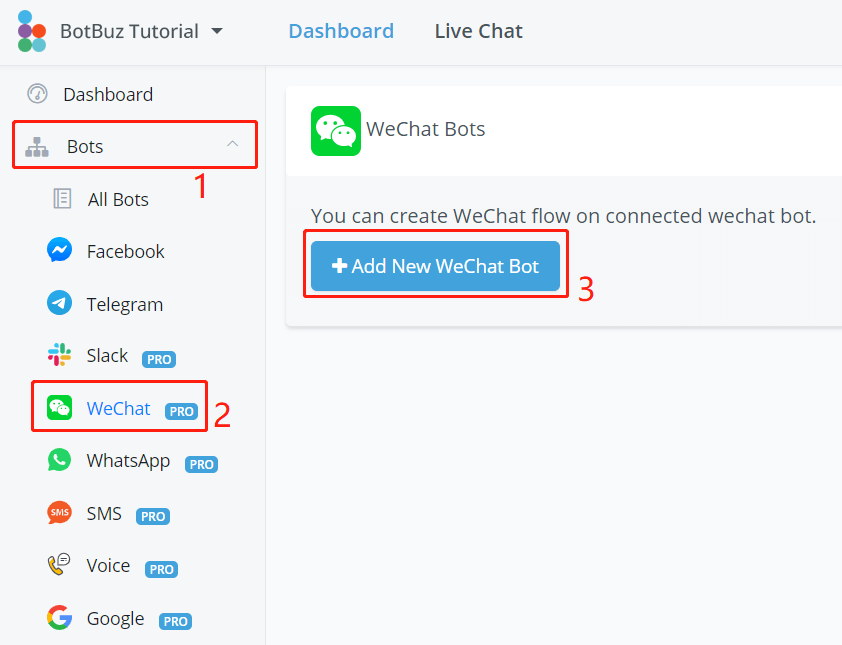
Follow steps 1, 2 and 3 in the above screenshot.
- If you already have a WeChat official account or wanted to register one, click “Sign up”
- If you don't have an official account yet, click “Sandbox Test account” to test the bot with your WeChat personal account
TIP
You can choose English on the WeChat website by clicking the globe icon on the upper right side. However, some pages do not support translation.
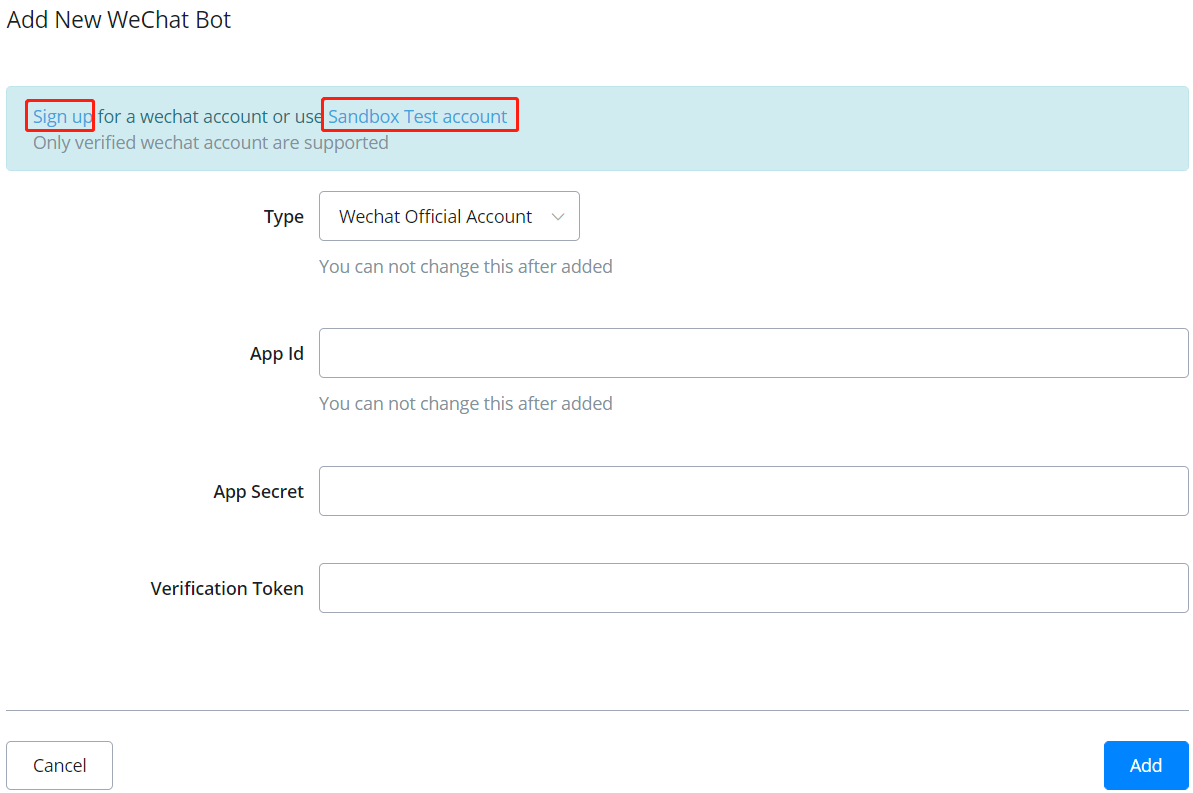
Login yourself with your WeChat account. On the top, you can see your “appID” and “appsecret” as below:
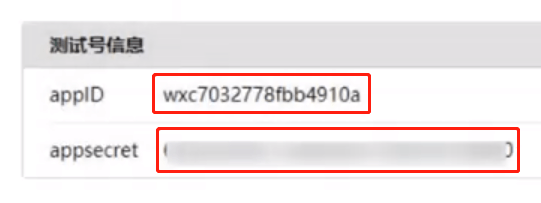
Copy them back to Botbuz. Follow the steps below:
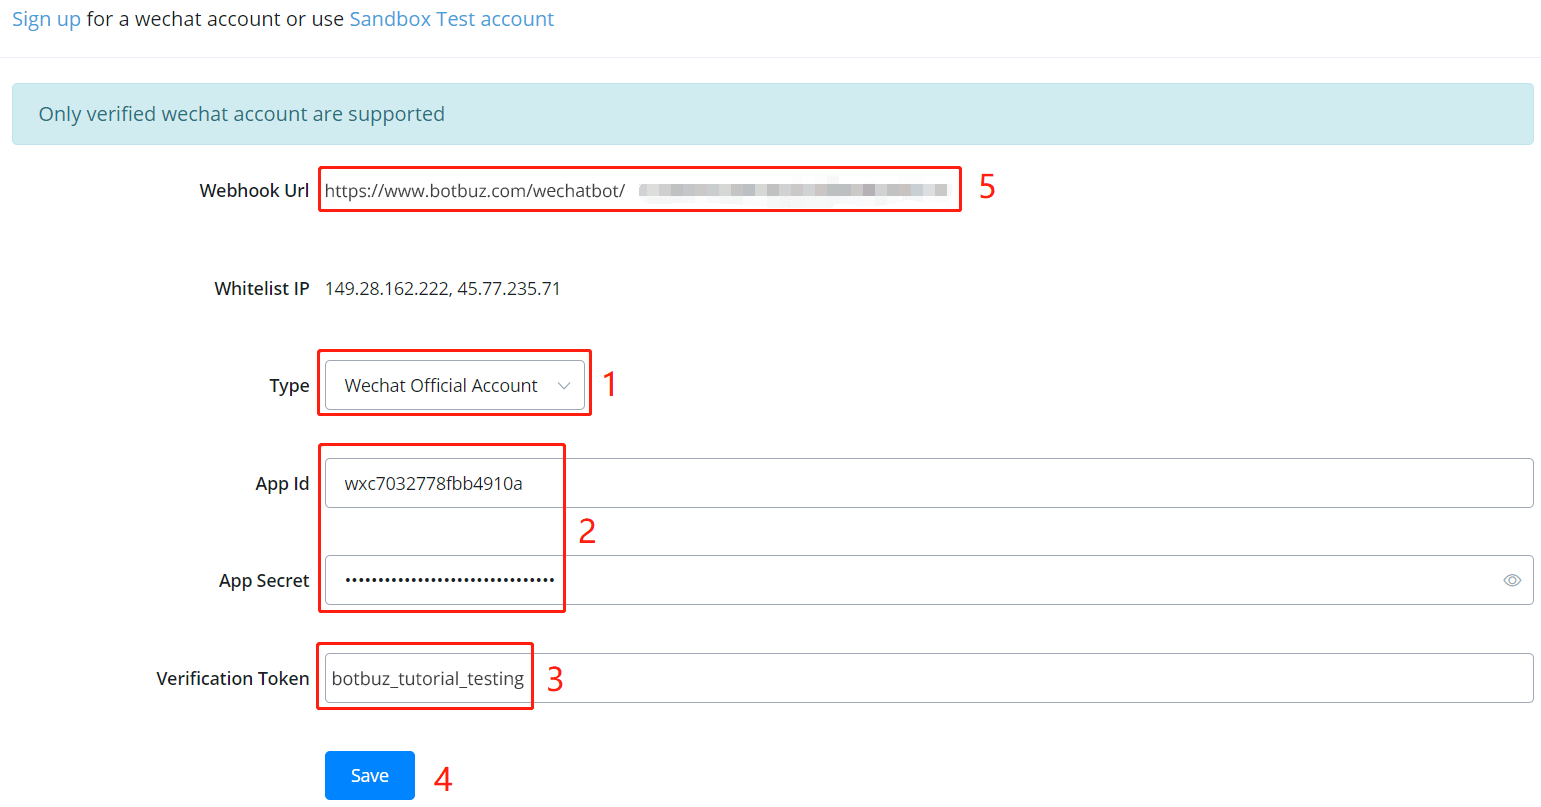
- choose a type
- paste your App ID and secret
- name a token yourself
- click “Save”
- a webhook URL will show, copy it to the WeChat's website

Paste the webhook URL (in step 5) and the token (in step 3) here then click the green “Submit” button. Finally, scroll down a bit, you can see your testing QR code:
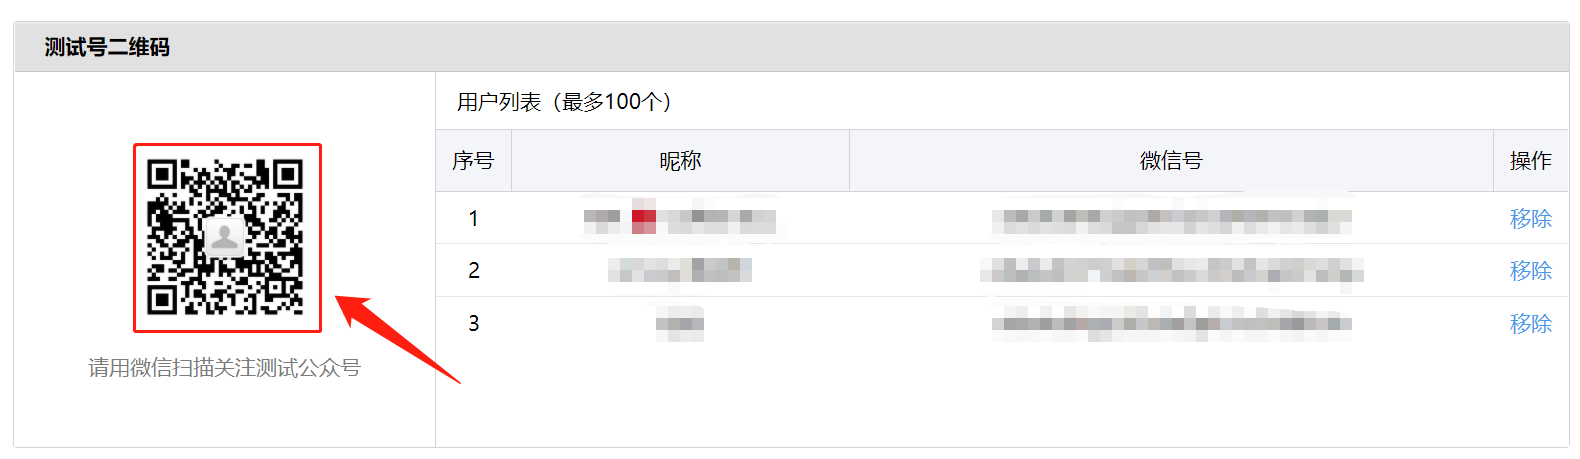
Talk to WeChat Bot
Now you can share your QR code with any WeChat user. By scanning and following your official/testing account, they are able to talk to your bot. Besides, their nickname and WeChatID will be listed here (100 users maximum).
WhatsApp, SMS & Voice Bot
Pick Providers
As follow are the providers we currently work with. Different providers support different bots. Choose your provider according to your needs. Create an account with them and pick your number.
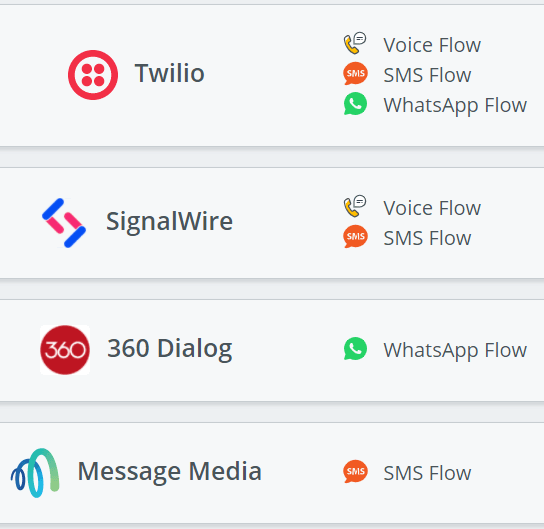

Botbuz has put links for you to jump to their official websites. You can either access them in the according channel (see screenshot above) or on the “Integration” page (see screenshot below).
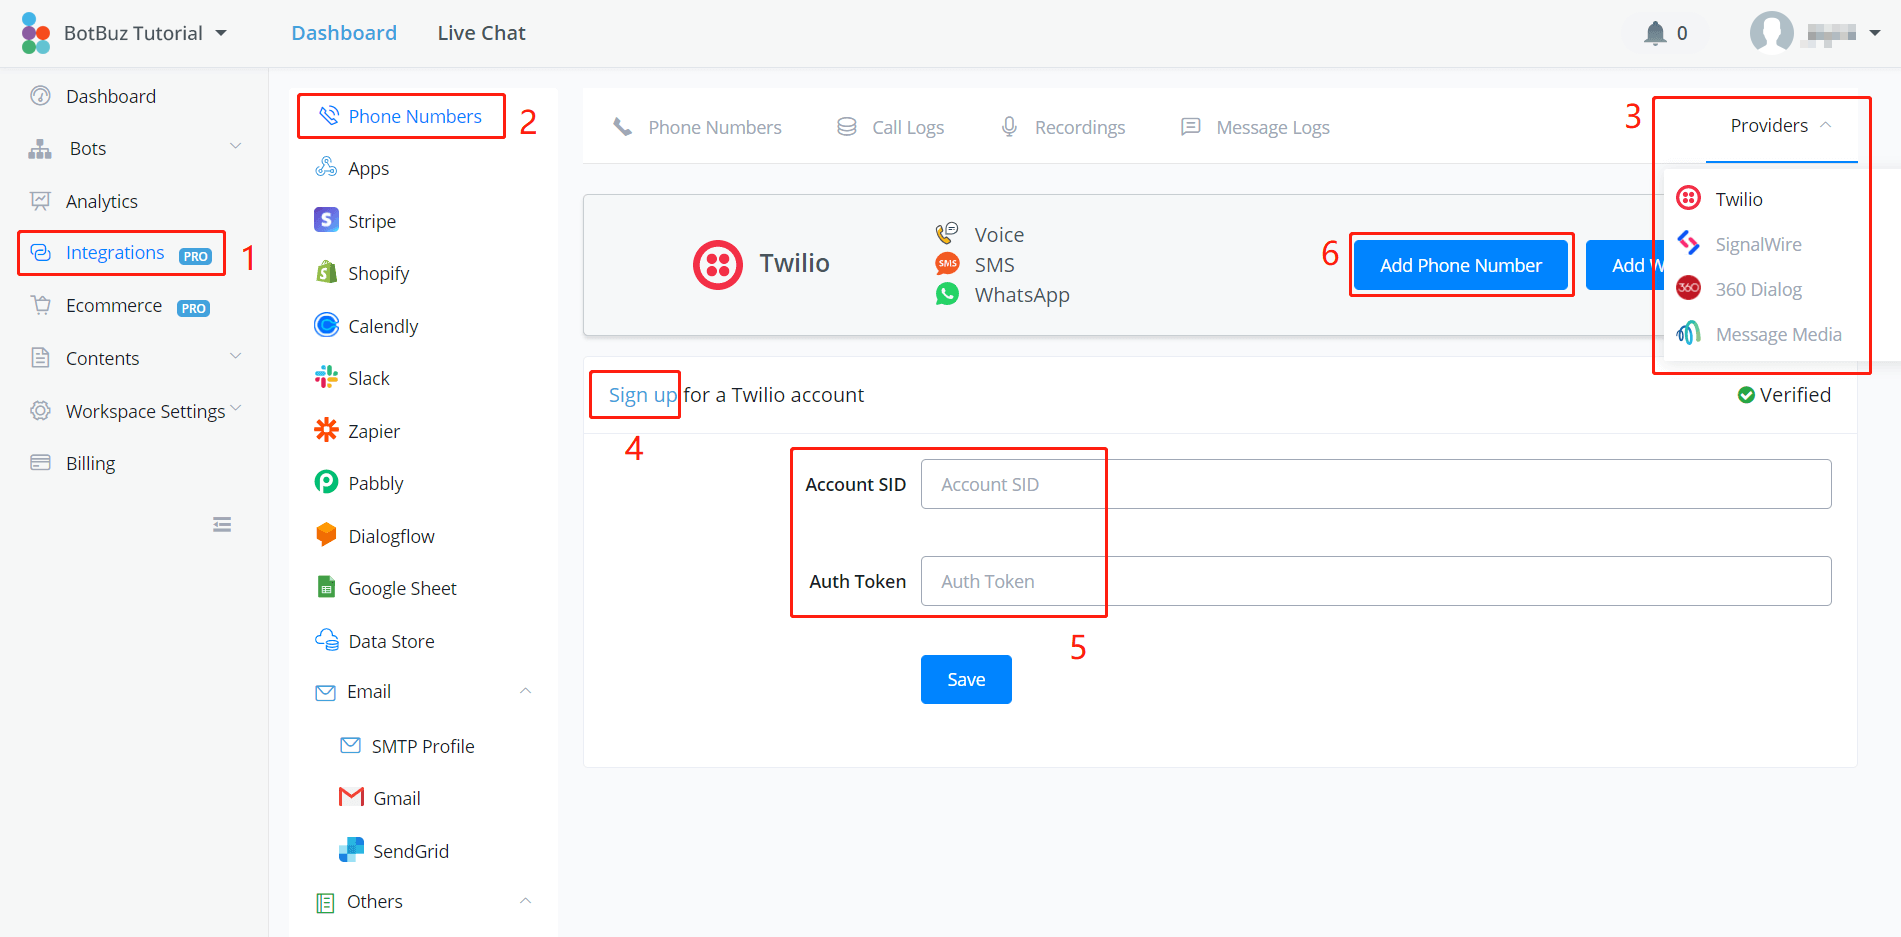
Follow the steps in the above screenshots to connect to the provider and add numbers.
Sign Up & Get Numbers
Take Twilio as an example. On their website, sign up, login in, then you will get to your dashboard:
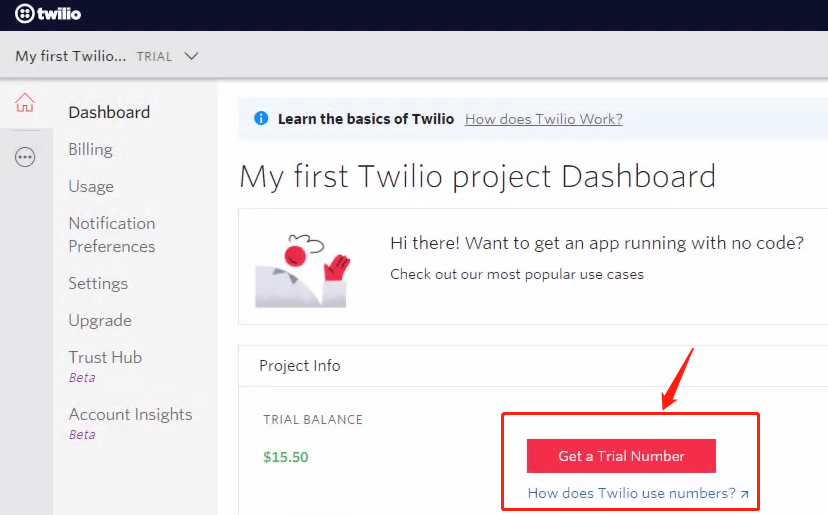
Click “Get a Trail Number”.
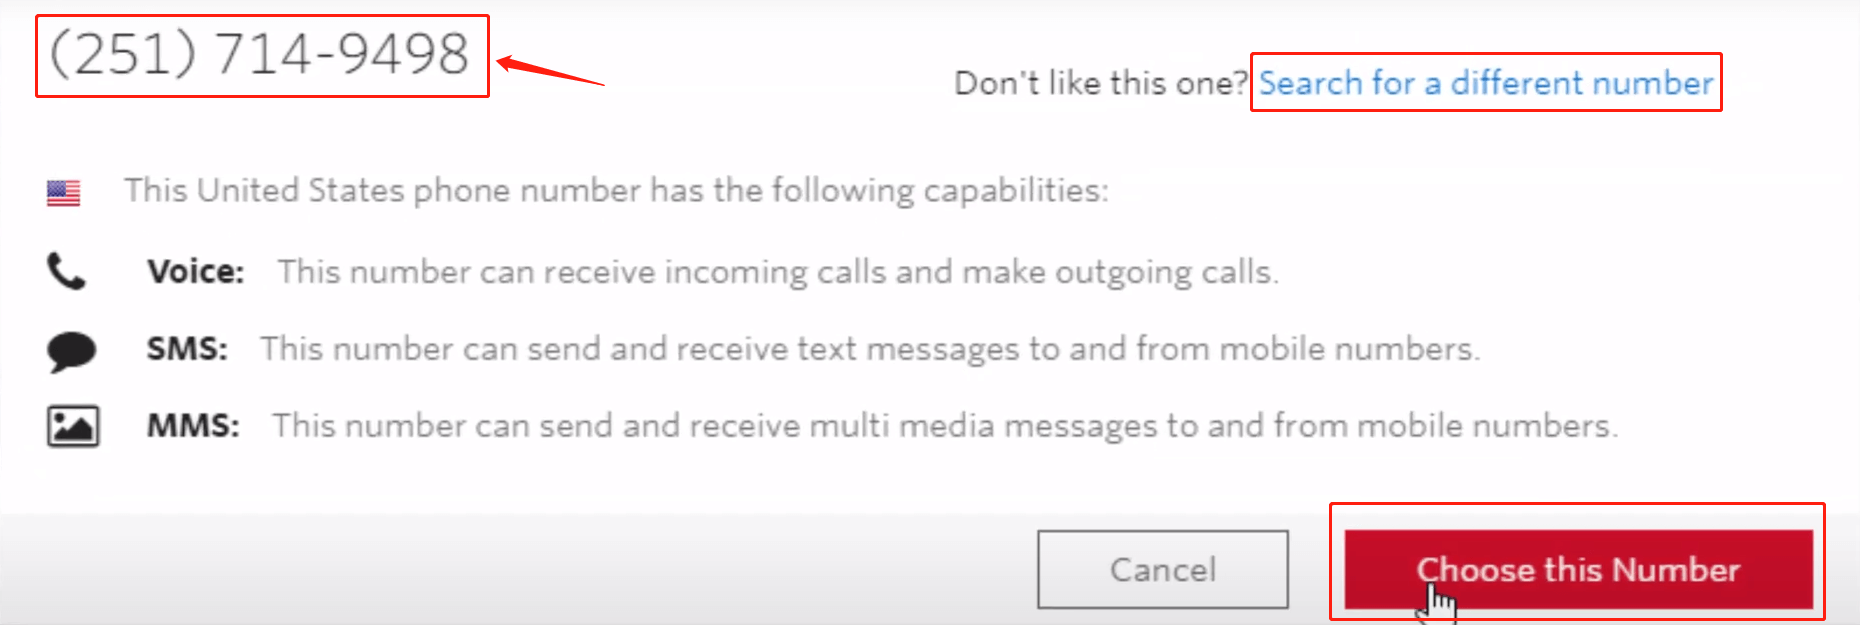
In the pop-up window, the number is shown on the upper left side, click “Choose this Number” or “Search for a different number”. Then you have your own number!
Connect to Provider
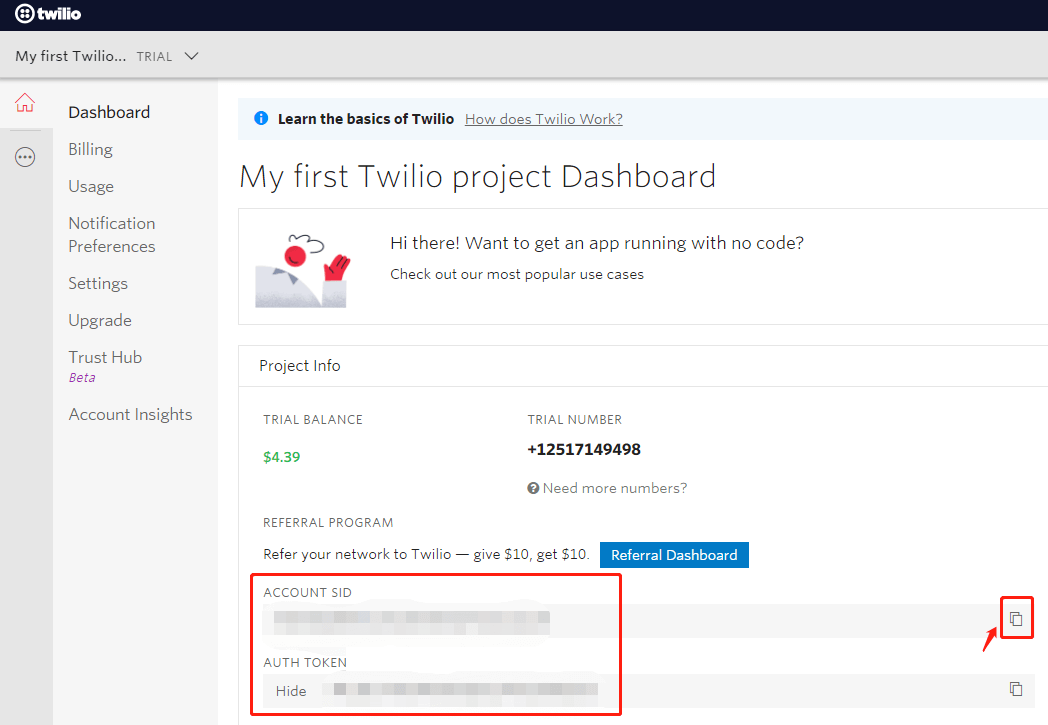
In your provider dashboard, click the little button on the right side to copy your “ACCOUNT SID” and “AUTH TOKEN” value back to Botbuz:
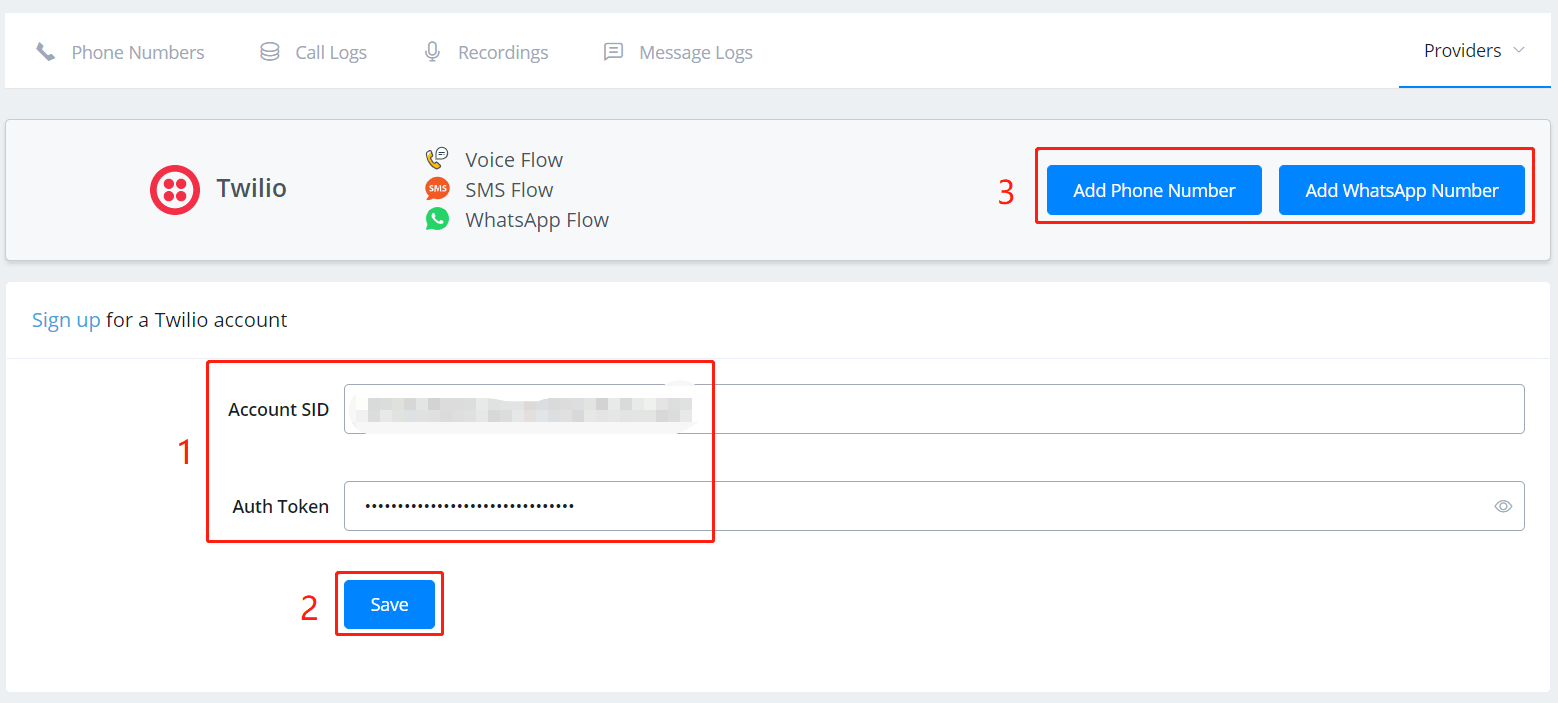
- put your copied values in corresponding fields.
- click “Save”.
- click “Add Phone Number” if you are building an SMS or Voice bot, otherwise, “Add WhatsApp Number”.
- More information click → Twilio Docs(opens new window)
- More information click → 360Dialog Docs(opens new window)
- More information click → SignalWire Docs(opens new window)
- More information click → Message Media Docs(opens new window)
Add Numbers
Click “Add Number” in area 3 in the above picture after connecting your provider with Botbuz.
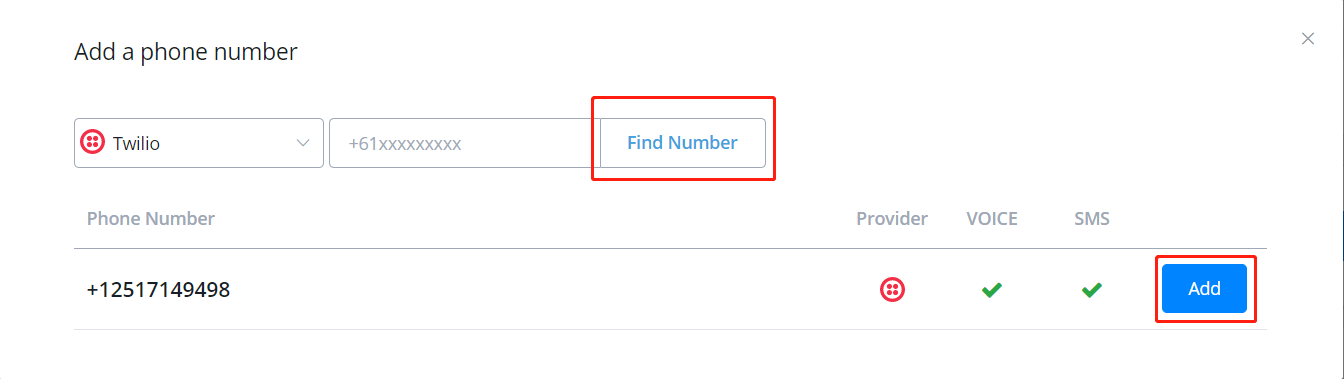
Click “Find Number”, the system will search all the numbers that are under your provider account. Click “Add” to add one of the numbers.
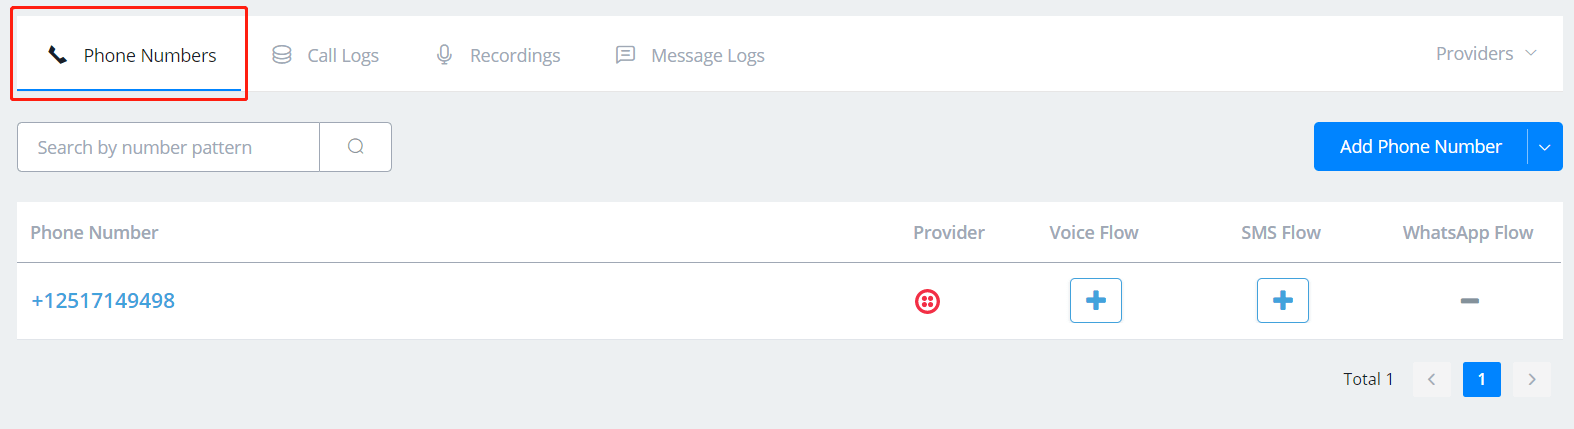
Thereafter, you are able to see all your connected numbers under the “Phone Numbers” page in “Integration”.
 Add new numbers from the drop-down list as below: (“Buy Number” is disabled at the moment)
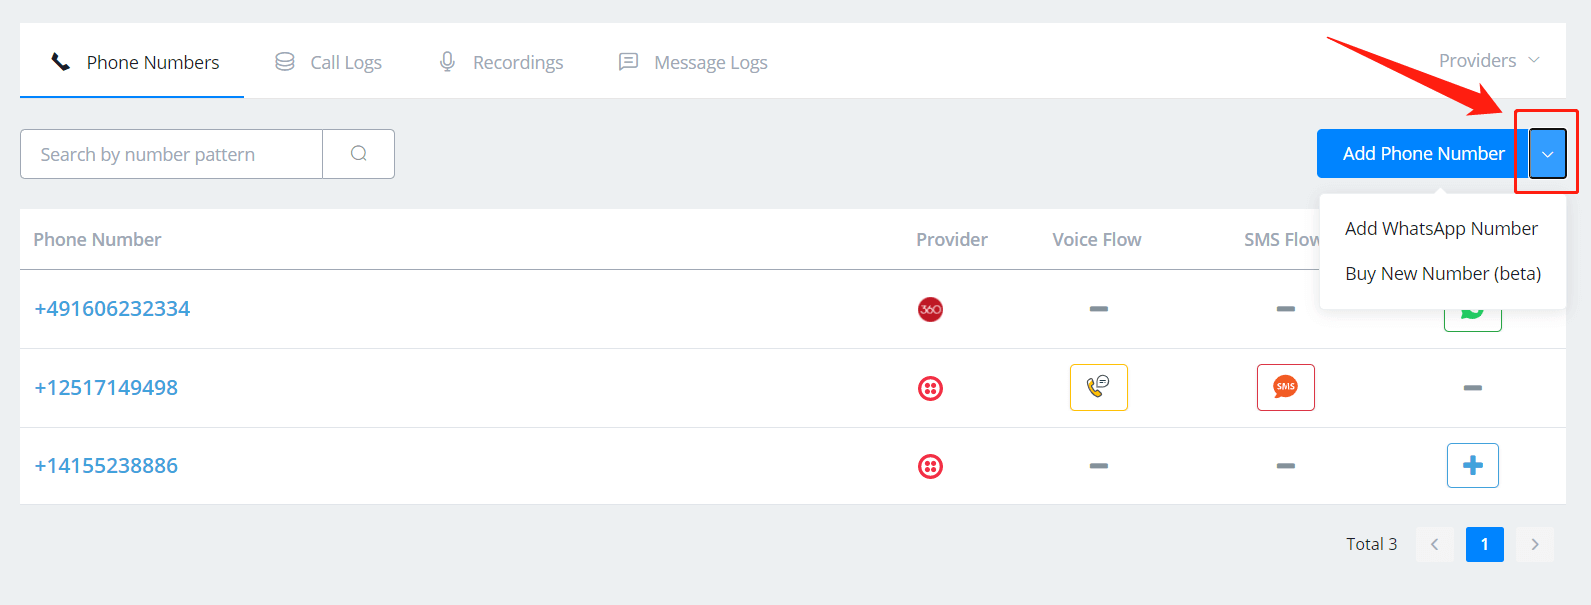
TIP
If you would like to disconnect the WhatsApp / Voice / SMS flow with your number, or create a new flow for that number, copy the number and click "Release Number". Then your flow will be disconnected but stay safe in your "All Bots". Add the number again to create a new flow with it.
After adding phone numbers:
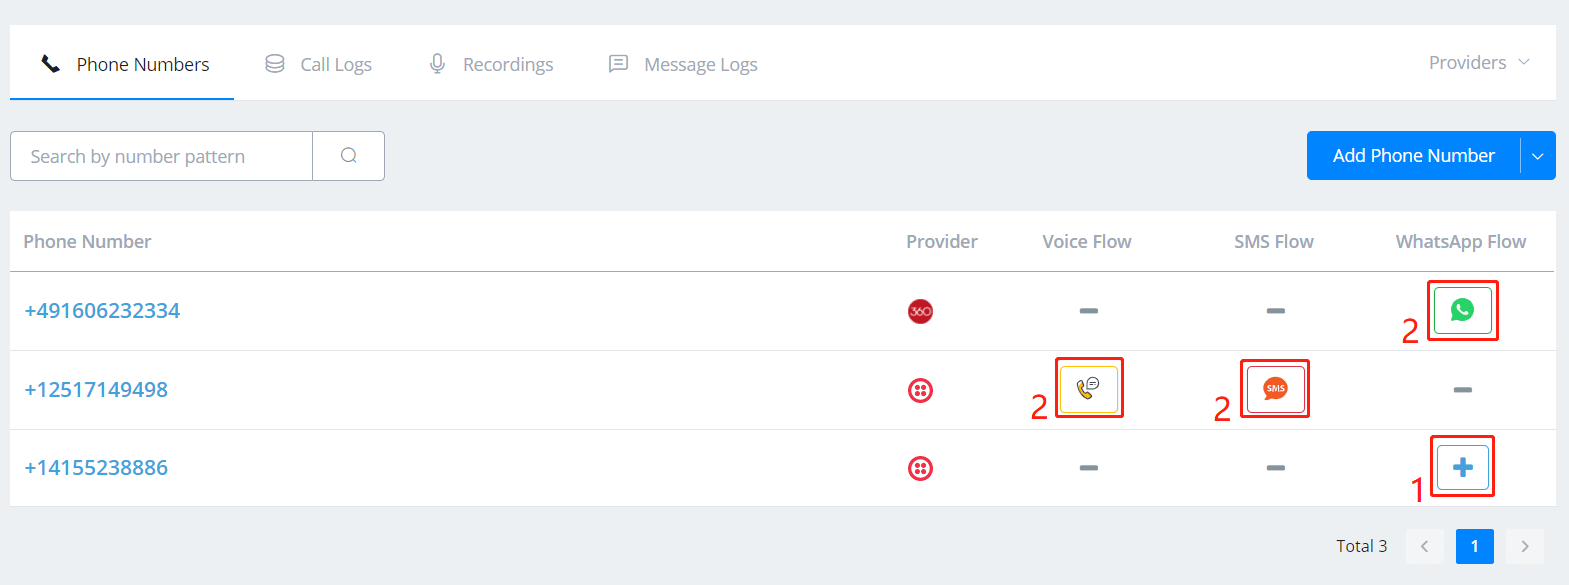
- use the plus button to create new a flow.
- button 2 is for “Open Flow” of this phone number.
Talk to WhatsApp/SMS/Voice Bot
- WhatsApp - add the phone number as a new contact and send messages to it
- Voice - call the phone number
- SMS - send SMS messages to the phone number
WhatsApp + 360Dialog Sandbox
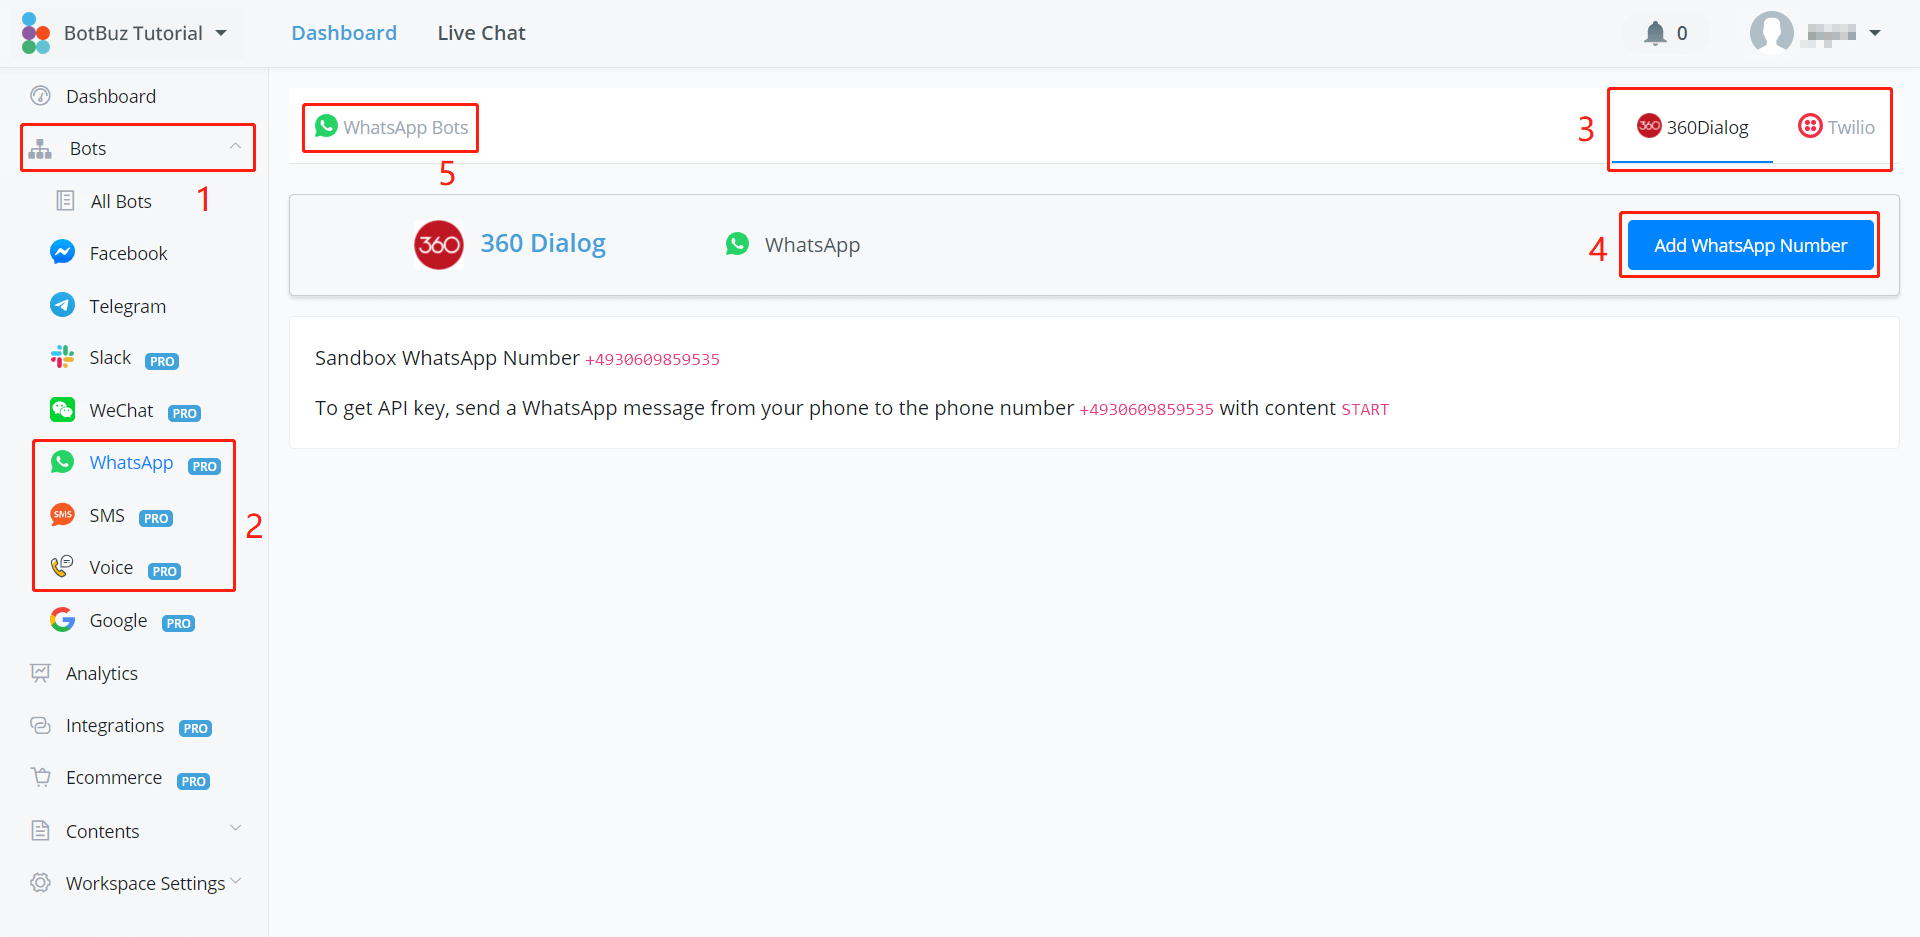
Go “Bots” → “WhatsApp” then “360Dialog” on Botbuz and in your WhatsApp App, add “+4930609859535” as a new contact and sent “START” to it.
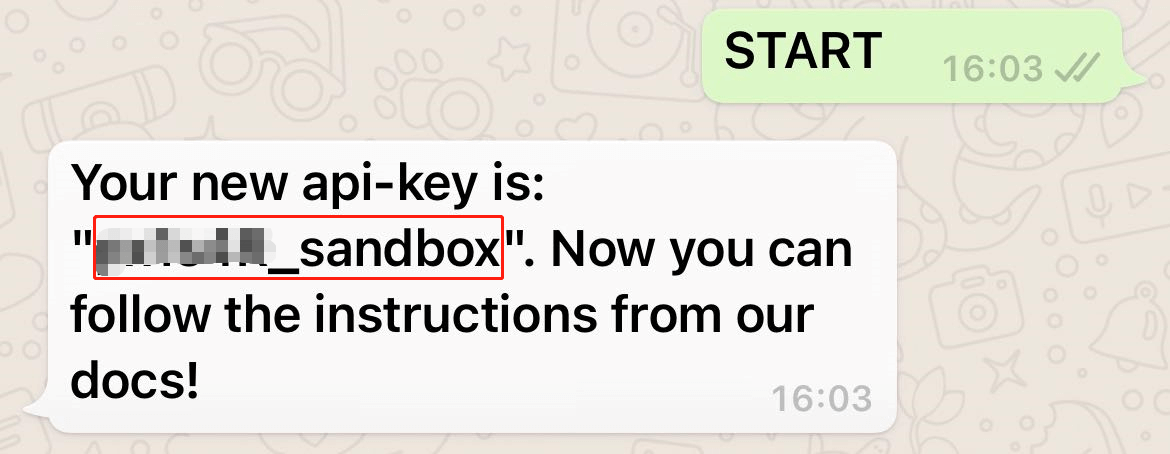
Copy the “api-key” back to Botbuz, click “Add WhatsApp Number”:
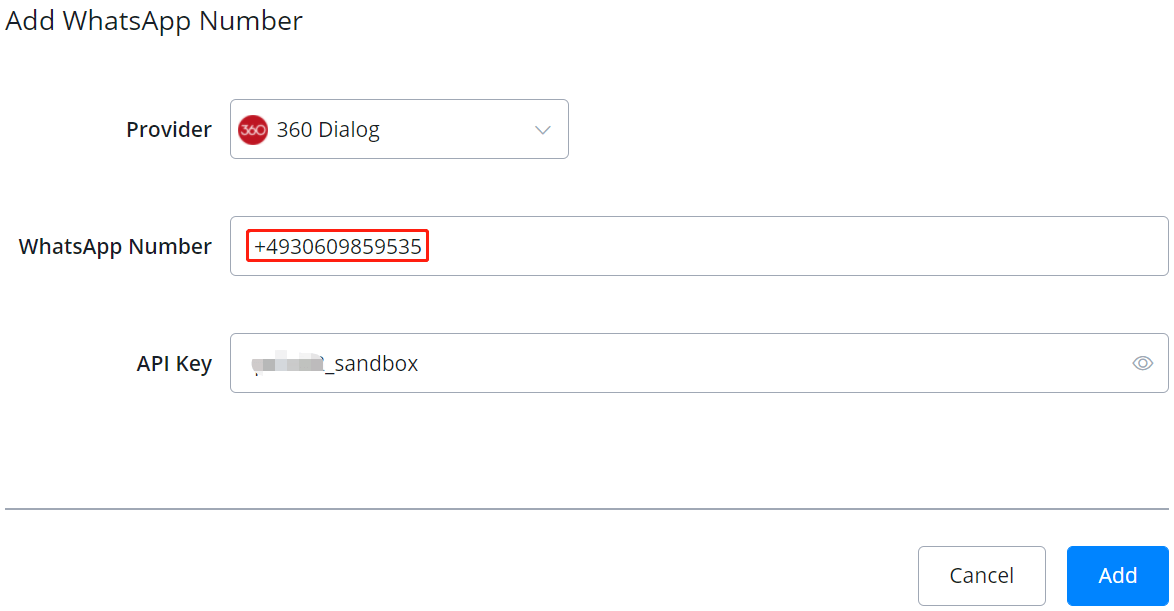
Again put the number “+4930609859535” here and paste the API key. After adding this number you can click the “Create Bot” to start building a flow.
To use 360Dialog sandbox, please note that:
- only the phone number which requests the API key can test the bot
- you can send “START” to get a new code, but make sure you update the key with your bot.
- 360Dialog doesn't allow sandbox users to access their media recourses. For example, if you use a question step to ask for a photo and store the URL in a text variable. You are unable to visit this URL to get the photo because you are using a sandbox.
To use 360Dialog with a $5/month plan
After testing the sandbox, to grab the US$5/month plan, check doc here.
Google My Business
The whole process will be:
- connect Google account
- create agent, build flow & test
- verify agent
- launch chatbot
- go live
Connect Google Account
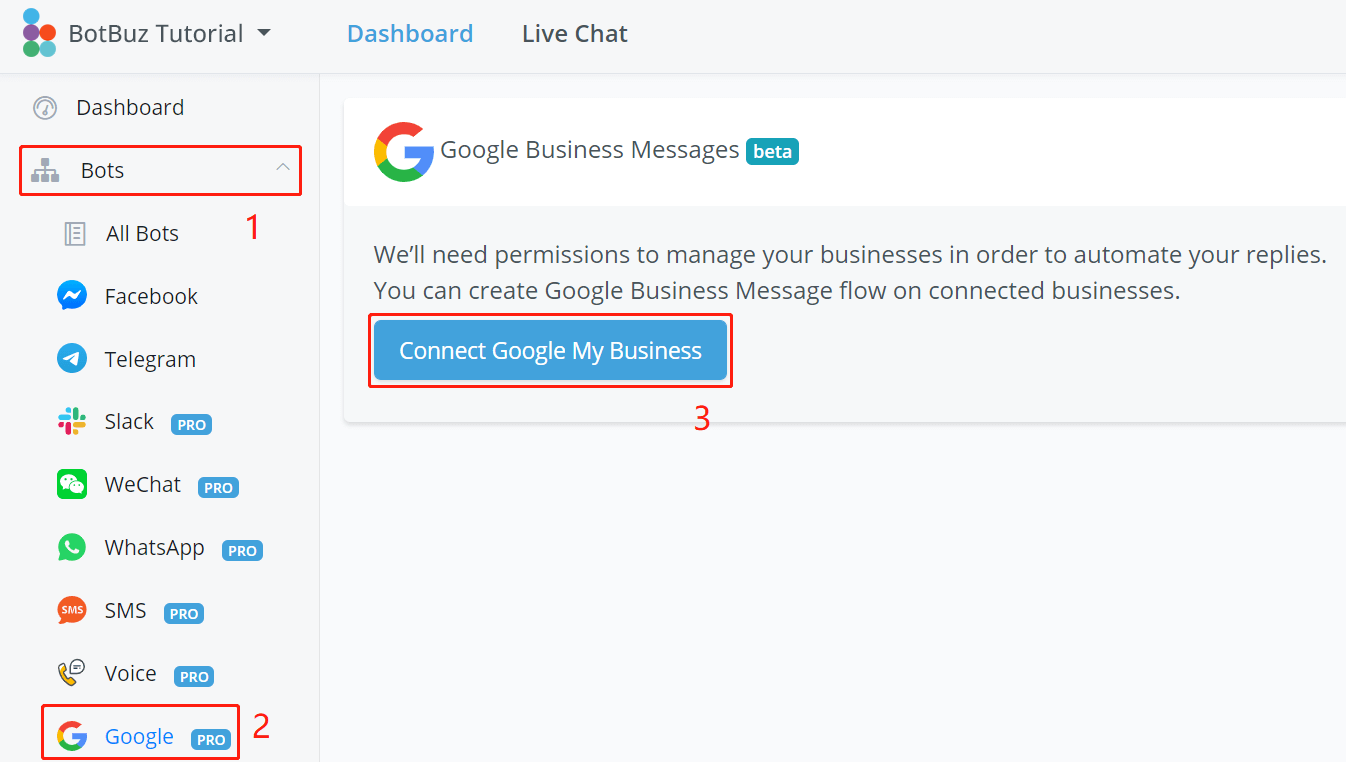
Follow steps 1, 2 and 3 to connect to your Google account.
Note
Please note that this Google account must have access to the business (either owner or manager). For agency, you will need to be invited to be the manager of your client's business.
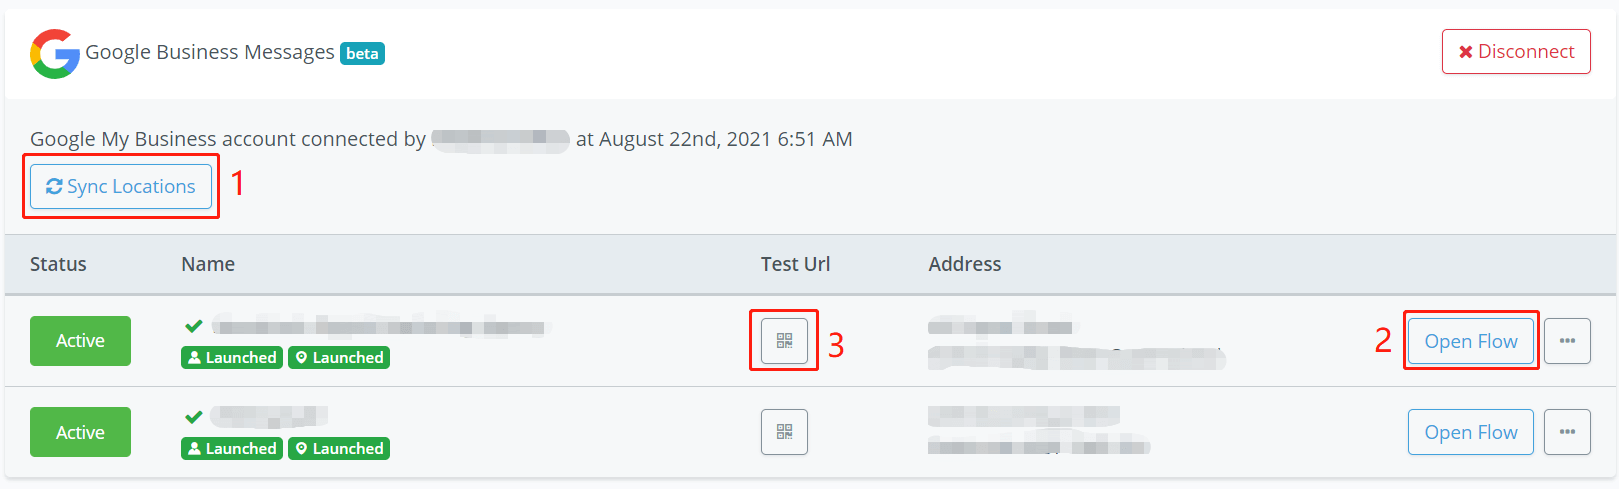
After the connection, in the above screenshot:
- click “Sync Locations” to pull all the businesses that associate with this Google account, whether they are verified or not.
- create agent then create flow
- scan the QR code or visit the URL link to test the bot in Google Map
Create Agent
Click “Create Agent”, fill in the profile information including:
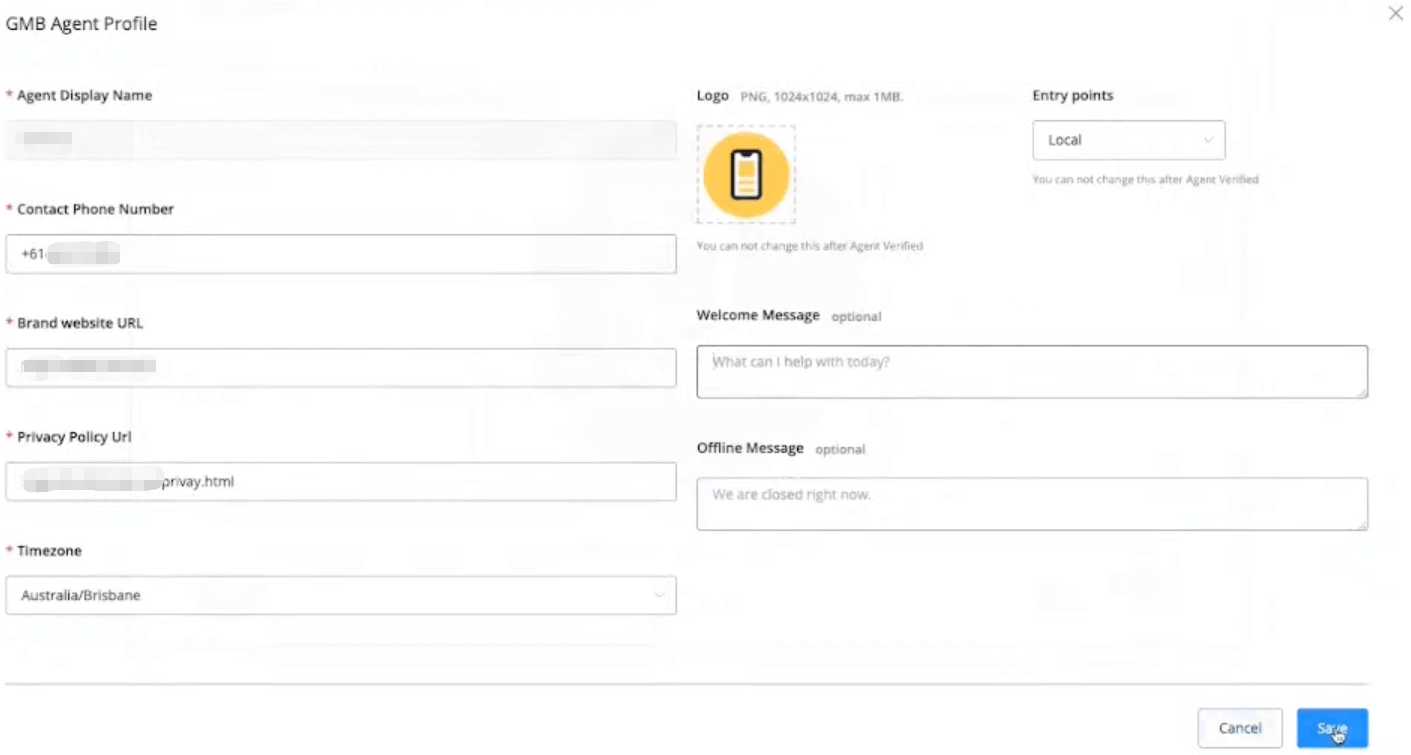
- phone number
- website address (same as your business website address)
- privacy policy URL
- timezone
- logo
- Centry points (local, non-local, both local and non-local)
- welcome message
- offline message
TIP
If you get an error saying that fails to create an agent because the location is not verified, try to click cancel and refresh the page. The "Create Flow" button will show.
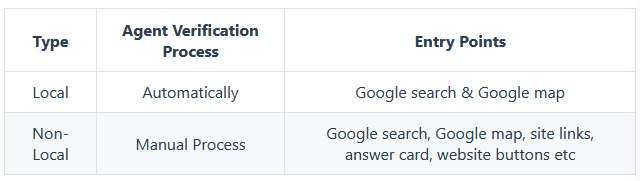
Local or Non-Local
Build Flow & Test the Bot
When your agent is created, click “Create Flow” to start building your bot. Check “Flow Builder” documentation for how-tos.
Verify Agent
IMPORTANT
Build and test everything before you request an agent verification. Because once verified, it's very difficult to change the agent information. You will need to contact Google yourself.
Before you send the request, check this:
- Did I choose what suit my business best, local or non-local?
- Am I happy with all agent information like logo, contact phone, etc?
- Do I have a contact email that shares the same domain as my website?
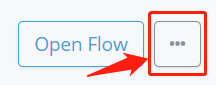
Click the button next to the “Open Flow” button, then click “Verify Agent”.
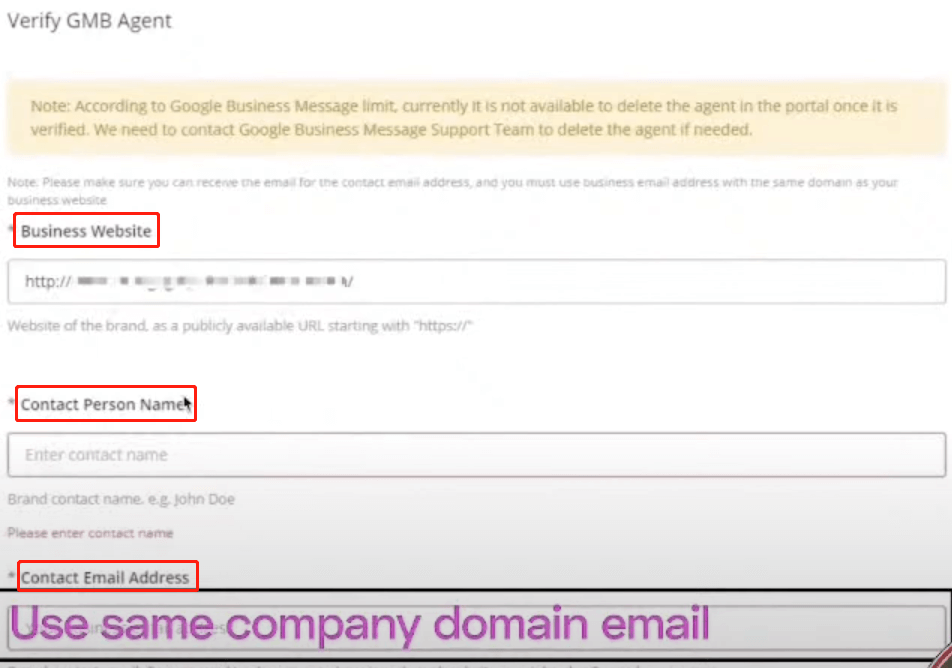
Provide a business website, contact person name and a contact email that share the same domain as the brand website.
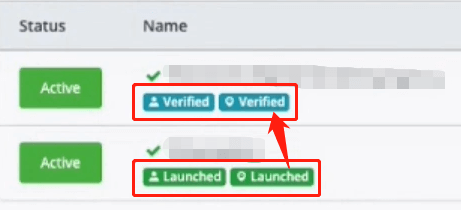
For a local business, if your business is already a verified business, your agent can be verified automatically and immediately. You will see the green “Verified” label. Thereafter, you can launch your chatbot.
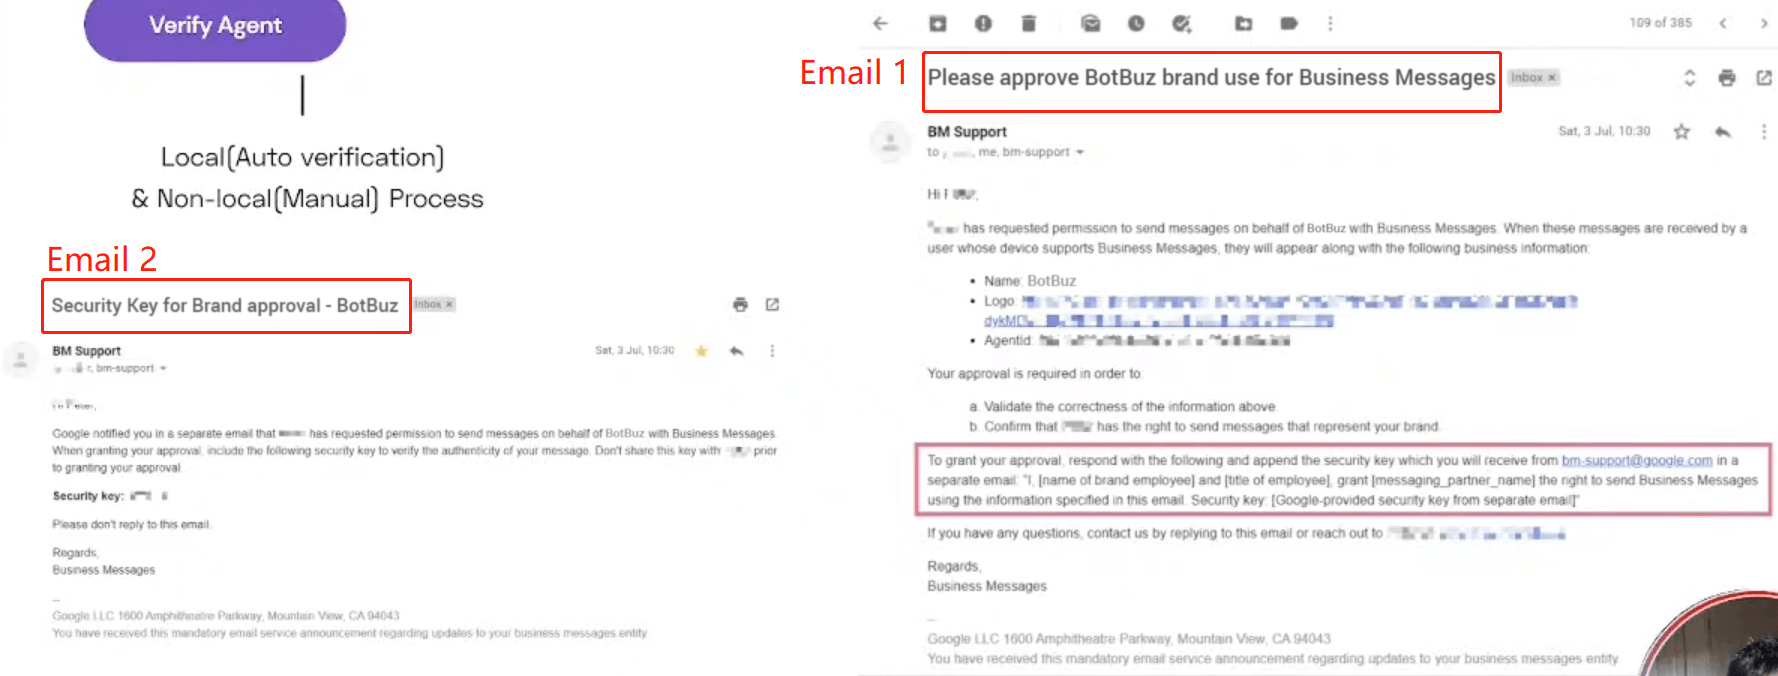
While for a non-local business, after submitting the request, you will receive 2 emails from Google. One email asks you to reply for approving Botbuz to help with the bot automation in a specified format (security key needed). Another email will give you the security key. It will take you a few days (up to 7 days) to get your agent verified.
Launch Agent
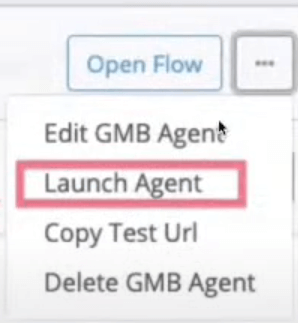
When your agent gets verified, click “Launch Agent” and a chat button will show with your business after 4-6 hours. You will see the green “Launched” label.
Unlaunch Agent
If you wanted to stop the bot automation, click the green “Active” button under status. And to stop showing the bot with your business, you need to unlaunch your agent.
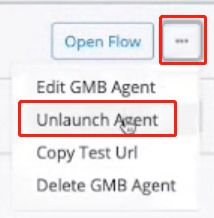
Click “Unlaunch Agent” and again, you will need to wait for 4-6 hours to see the “Chat” button disappear. By then the labels will look like this:
To launch it again, just click on “Launch Agent” again.
VK Bot
The whole process will be:
- create community, get group id and access token
- enable community messages and bot abilities
Get Group ID and Access Token
You need to have a VK personal account first, go to https://vk.com (opens new window), register and login yourself.
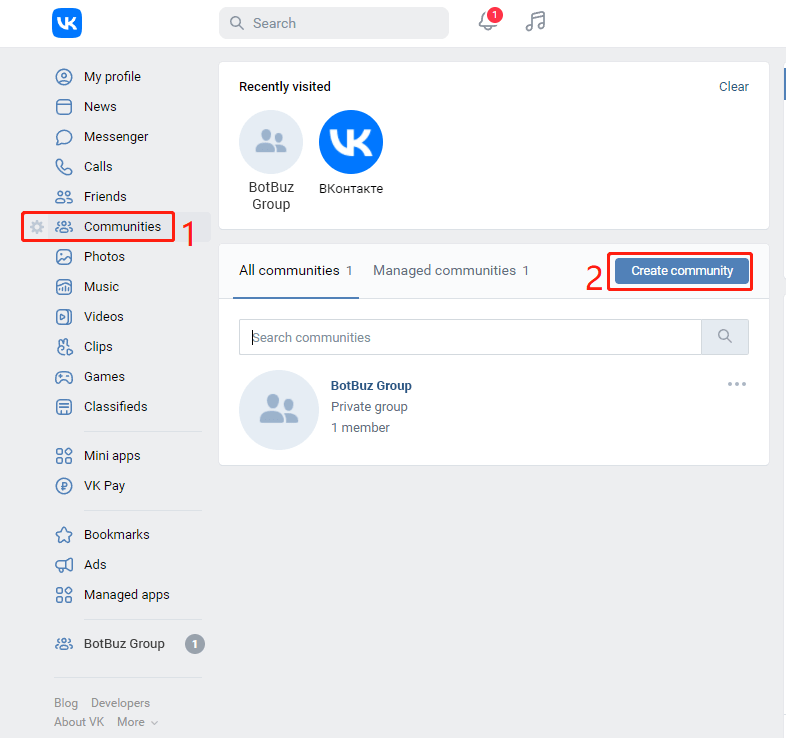
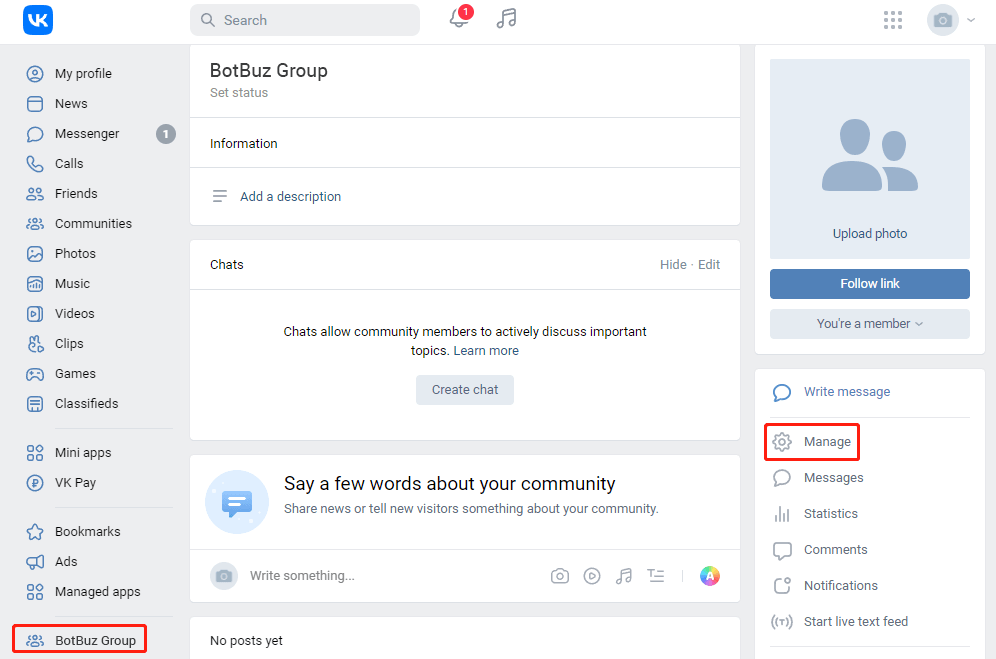
Go to “Community” from the left sidebar and “Create Community” for your chatbot.
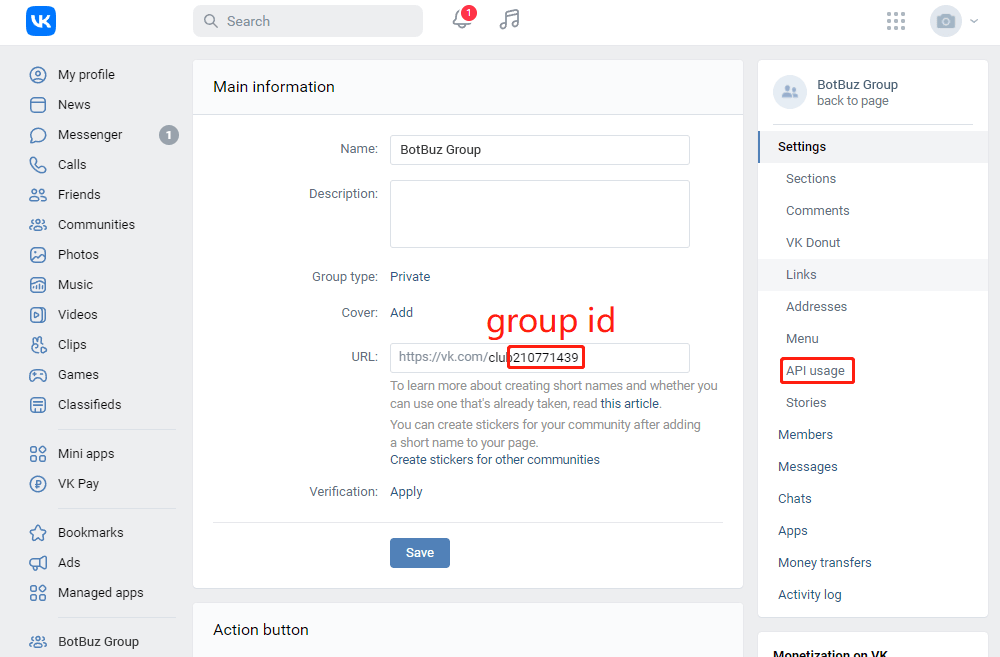
You will find your group id in the URL (see above screenshot). Click on “API usage”, let's create an access token.
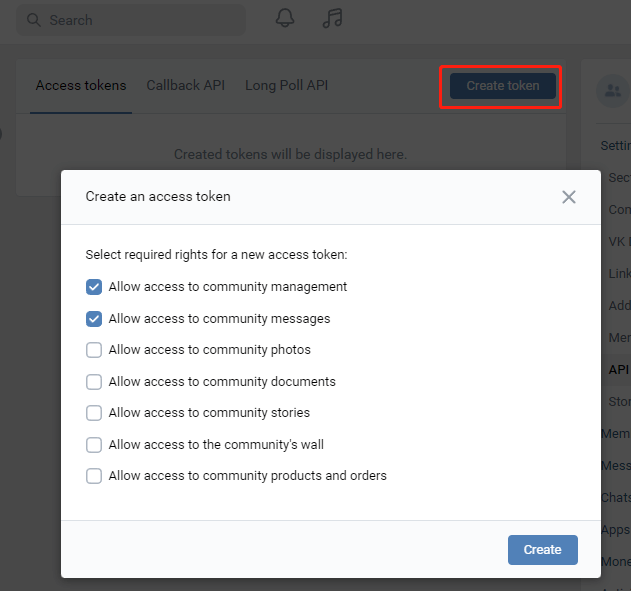
Click on “Create token”, Botbuz only need to access your community management and messages. Tick the options and hit “Create”.
TIP
You will need to download the VK application on your phone because VK will send you notifications for confirming some actions of the community.
Copy your token and group id and now let's go back to Botbuz.
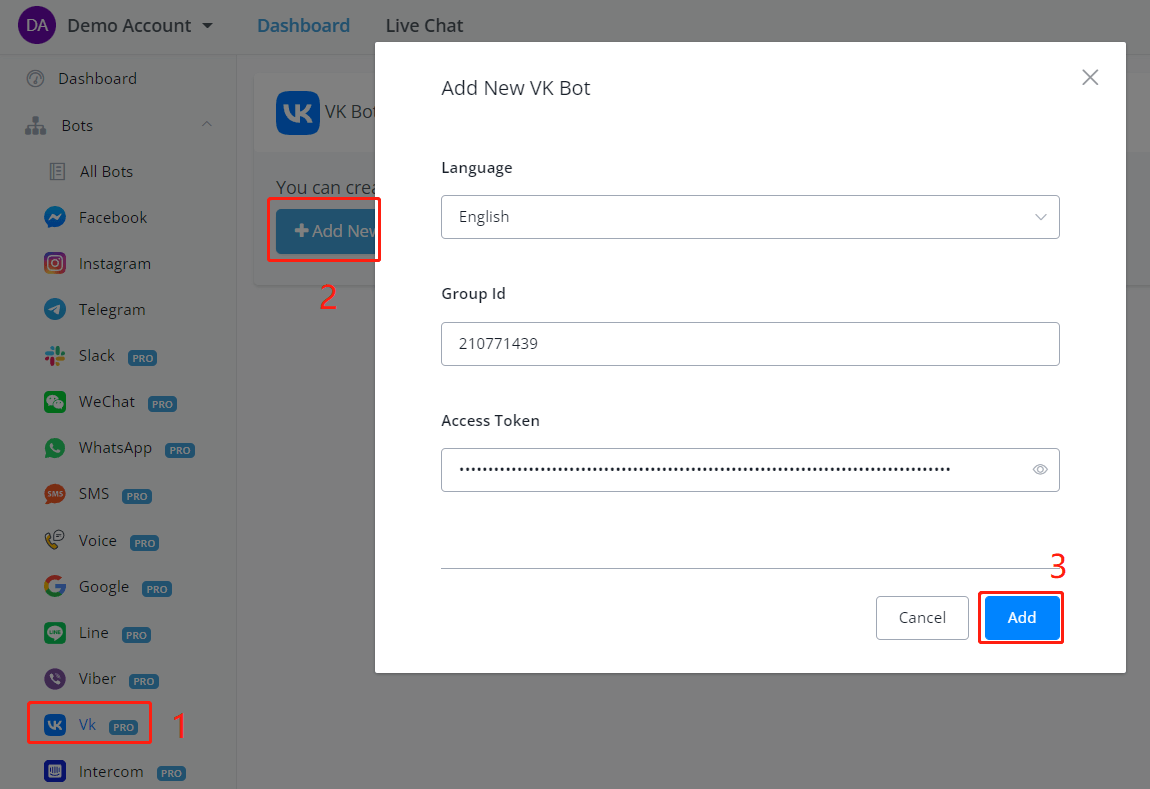
Go to VK channel, click “Add New Bot” and fill in your group id and access token, hit “Add”.
Forgot your group id? You can find the community information page here:
After the connection, your page looks like this:
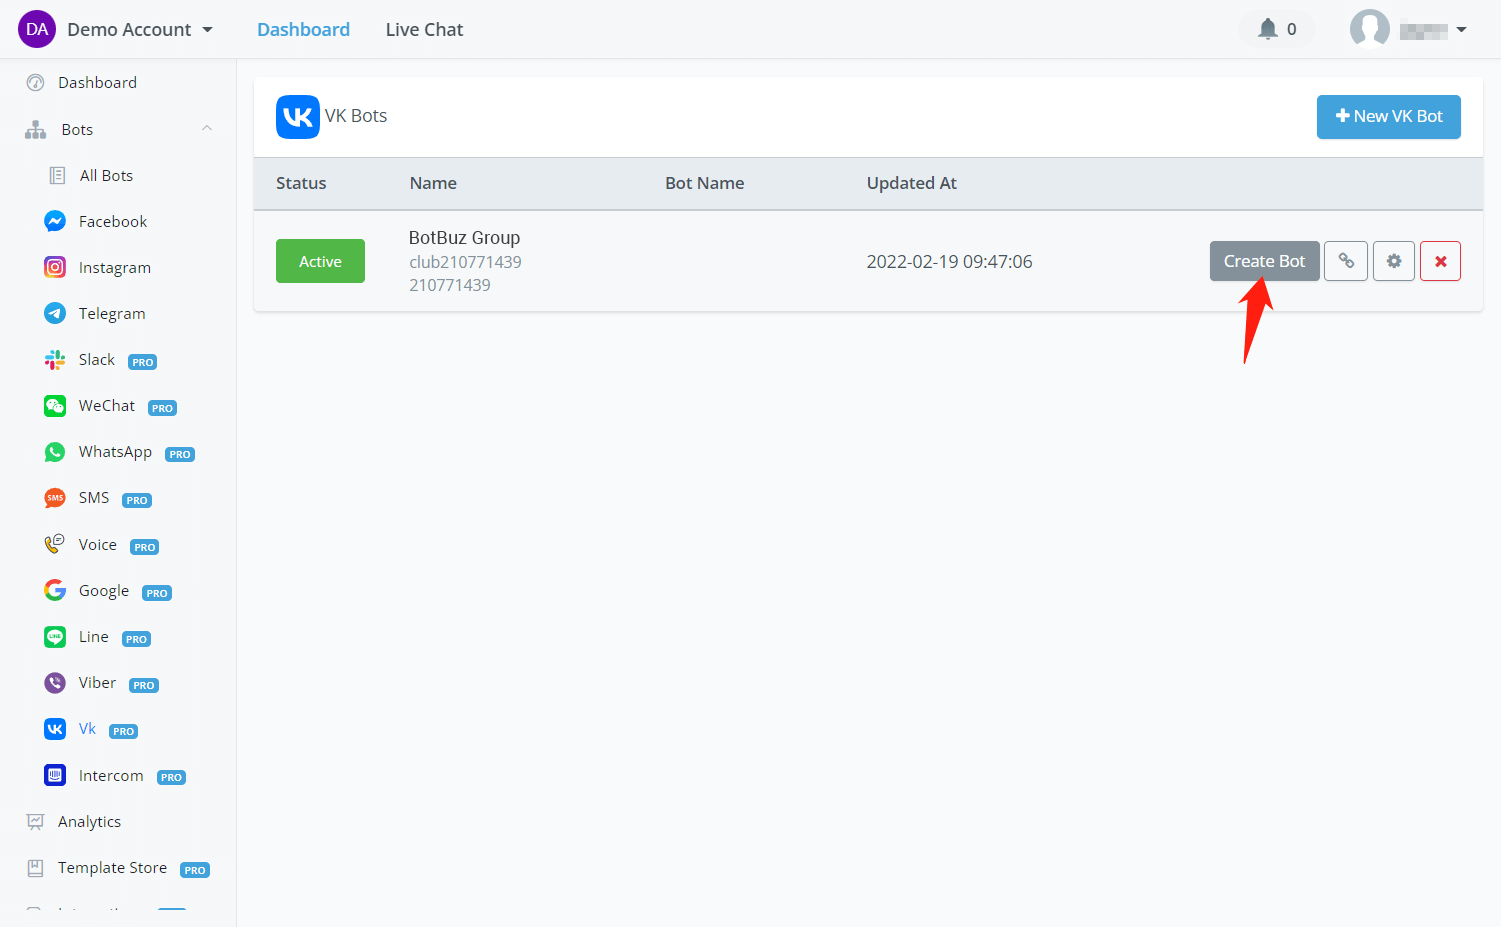
Click “Create Bot”, select a template and done.
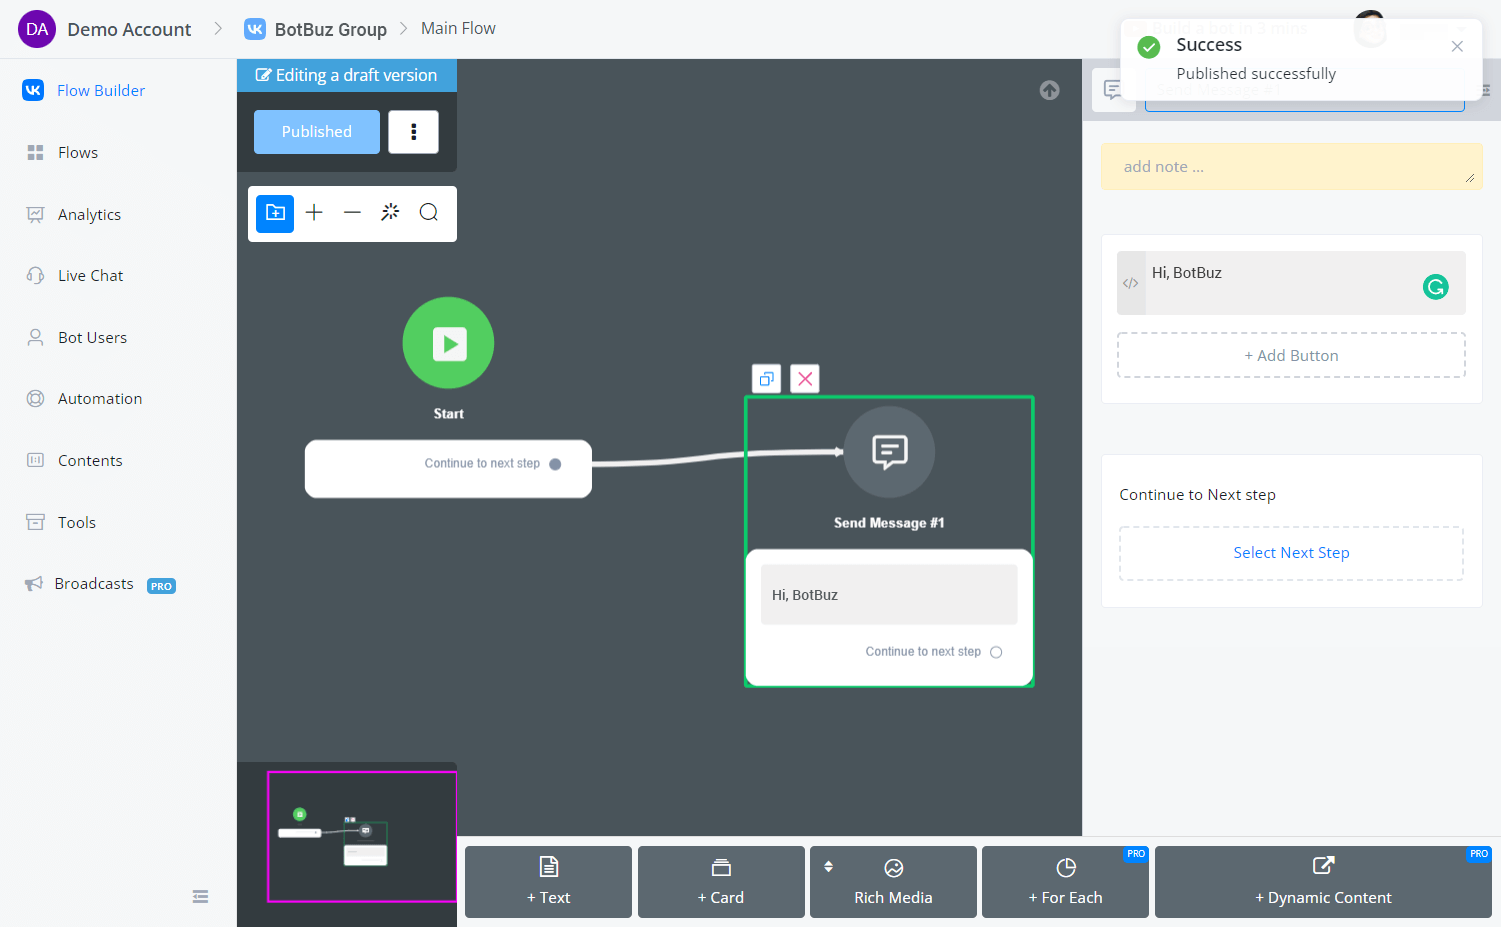
Add a simple greeting message for testing.
Enable Community Messages and Bot Abilities
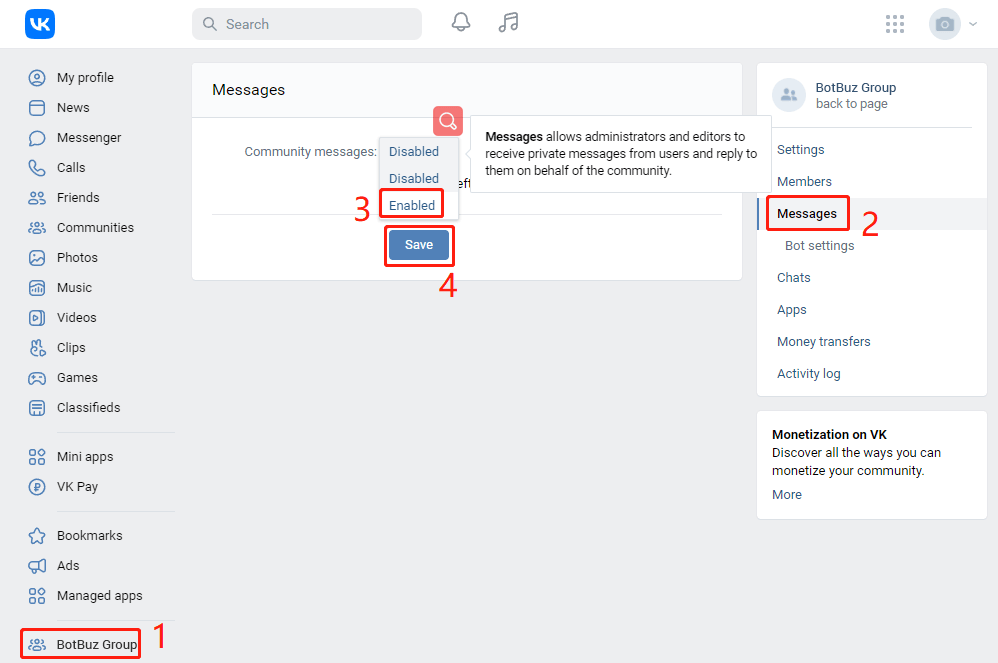
To talk to your bot, you need to enable community messages first. Follow steps 1 to 4 in the above screenshot to do so.

Then go to “Bot settings”, change the bot abilities to be “Enabled” and make sure you hit the “Save” button and see the green “Changes saved” prompted. It's important to enable bot abilities so that your bot can send buttons, questions and cards instead of just text messages and media.
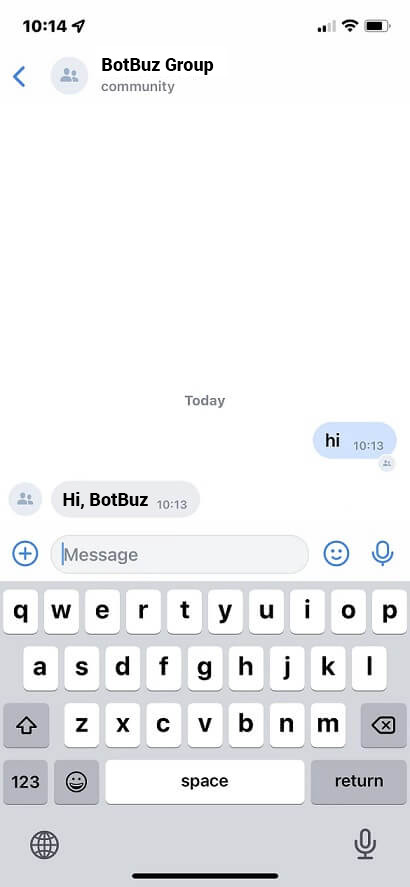
Talk to Vk Bot
Now you can open your VK application on phone, search your community name and click on it:
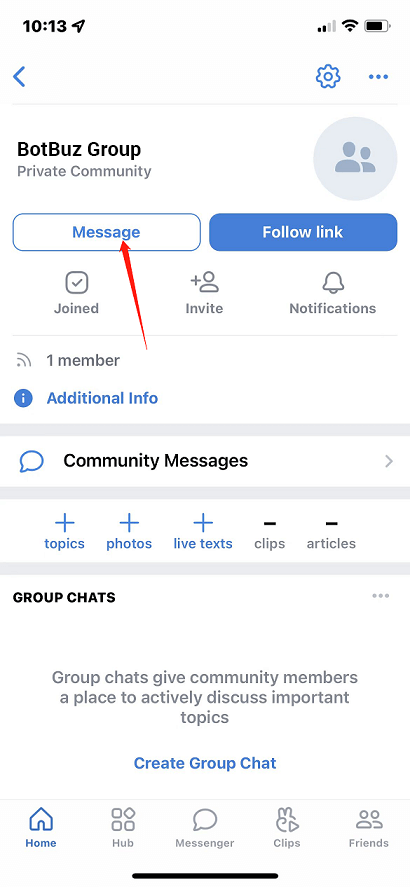
Click on “Message” to start the conversation.
VK Limitation
There are several limitations on VK channel according to their API:
- in a card, the image should have a 13/8 ratio and there should be at least one button otherwise the card won't show.
- in a question step, there are 5 quick answers at most.
- in a file question, the file uploaded by the user is sent to VK and VK return an URL pointing to the file back to Botbuz. Please note that this URL isn't a direct file link. Therefore you cannot send a file type message based on this URL. You can print the URL instead and by clicking this URL, users can access the file.
Intercom Bot
Intercom is a popular live chat platform, Botbuz integration with Intercom will help reduce 80% of the support through chatbot automation & A.I.
Key Benefits
Solve the customer's support issues in the chatbot automation and Google Artificial intelligence before they hit your support team.
No Coding Knowledge Required
You don’t need to be a developer or learn coding to use Botbuz. With our drag & drop flow builder, you can easily build out your automation logic.
11+ channels supported & increasing
Currently, Botbuz connects your intercom with your customers from Instagram, Messenger, WhatsApp, Google Business Messenger, Telegram, Viber, Line, SMS, Voice, Slack, Wechat, and more channels are added to the platform. Reach your customer through automation & live chat wherever they are.
Omnichannel flow builder
With our omnichannel flow builder, you can build your automation logic once, and apply it to all the social channels we support(Instagram, Messenger, WhatsApp, Google Business Messenger, Telegram, WeChat, Line, Viber)
Artificial Intelligence
Recognize customer intent using Google Dialogflow, and redirect them to your chatbot automation. Only transfer the unrecognized intent to your live chat support. It will save you huge time on your live chat support.
Integration with 3rd party
Botbuz has built-in integration with Stripe, Paypal, Cloudinary, Shopify, Woocommerce, Calendly, Slack, Google Sheet, Twilio, SingalWire, message Media, Gmail, Sendgrid, Mailchimp, ActiveCampaign, Zapier, Integromat & Pabbly Connect. You can easily sync the leads & sales into your own CRM or Project management tools.
Connect to Intercom
Step 1: Connect with your Intercom account
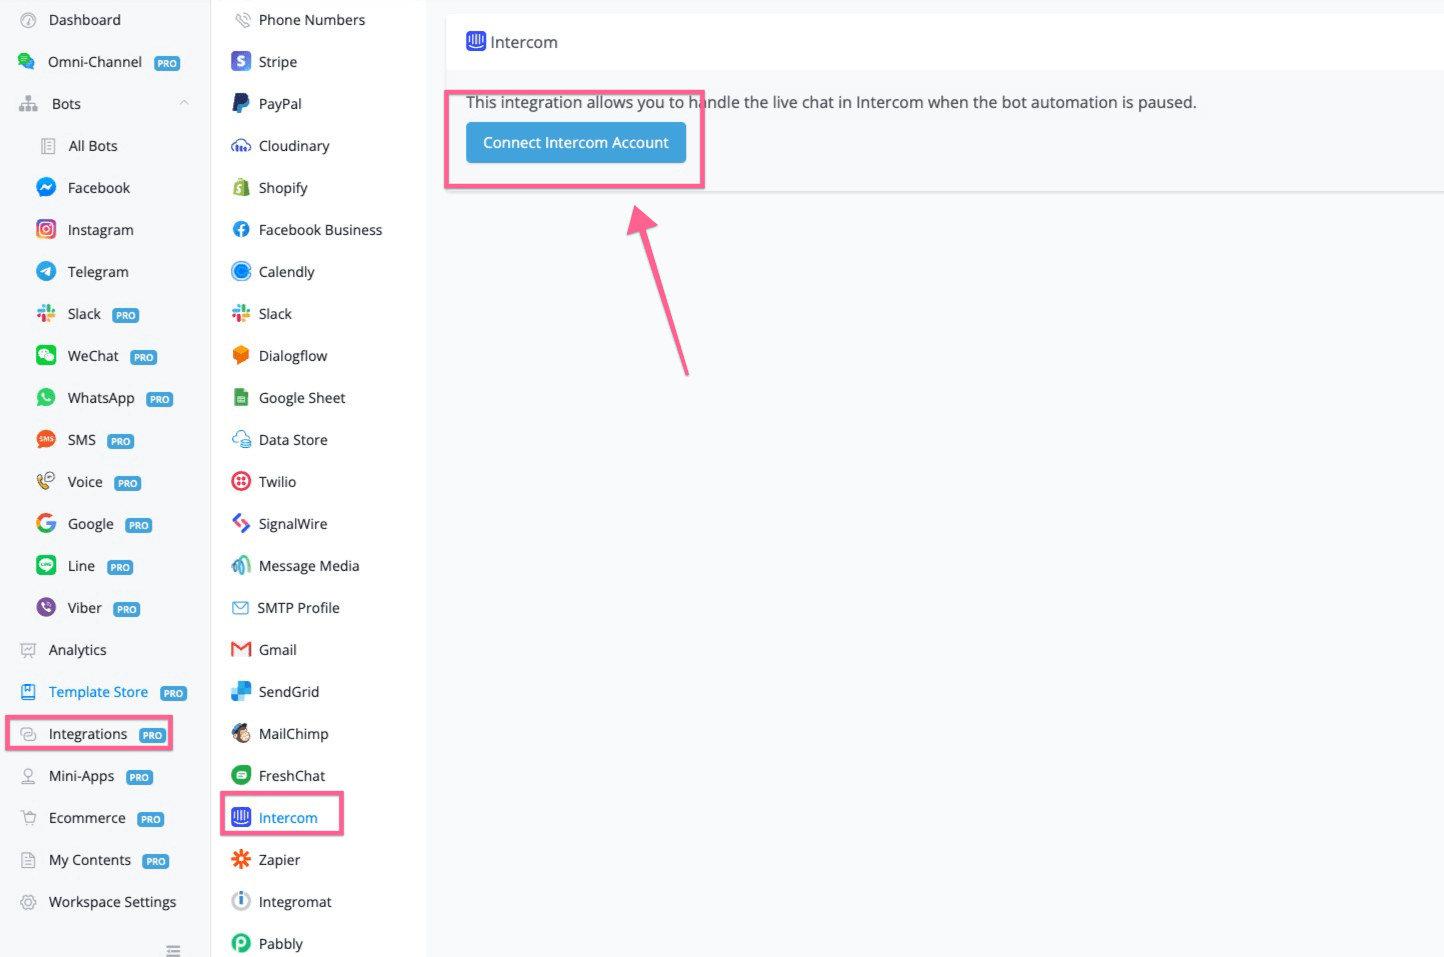
In this step, you will need to connect with your intercom account inside of Botbuz. After you log in Botbuz, you need to go to integration, and then go to Intercom, click the connect intercom account button.
Step 2: Authorize intercom account
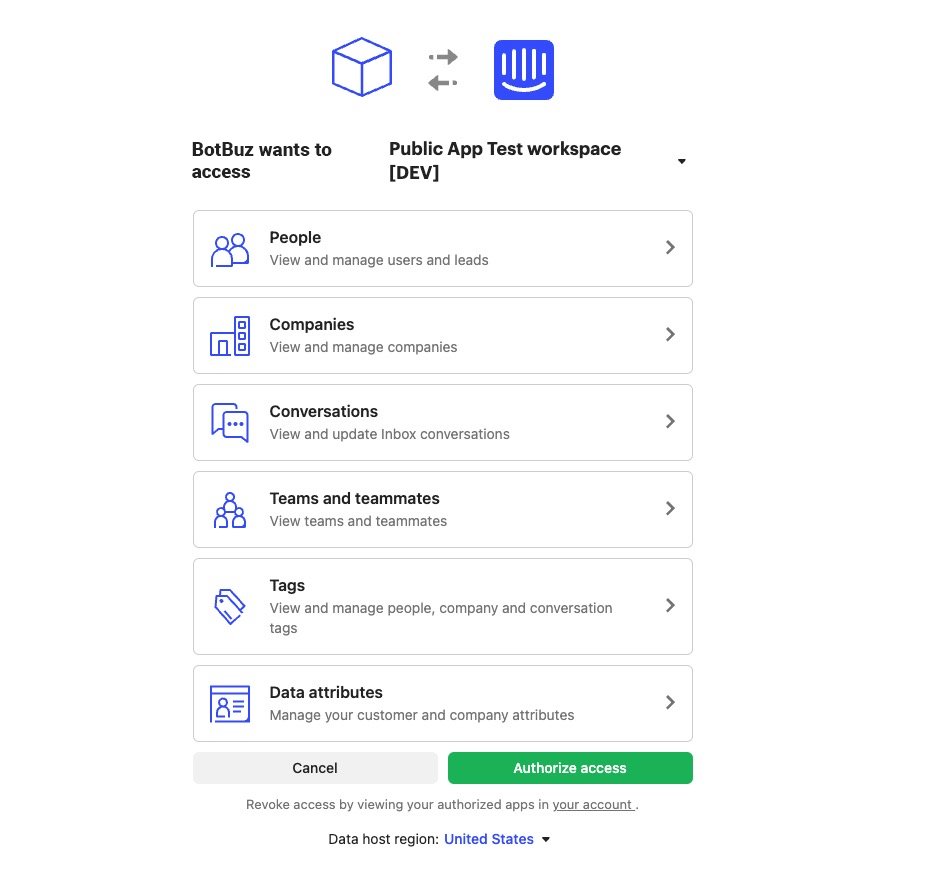
After you click connect intercom button, it will redirect you to log in to your intercom account and then you will see the screenshot above, click “Authorize access” and then you just added this app to your workspace.
After authorization, it will show up as below.
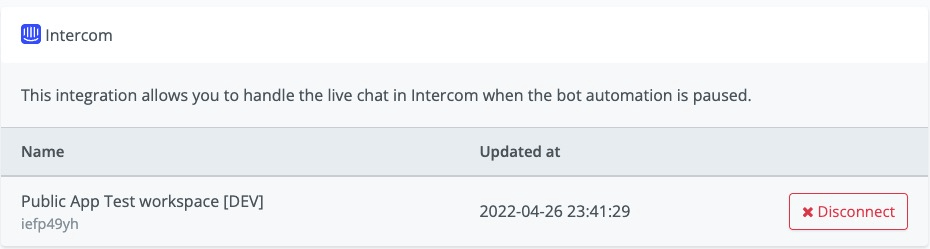
You can disconnect the app, by clicking the button to disconnect Intercom with this workspace.
Step 3: Switch livechat to intercom
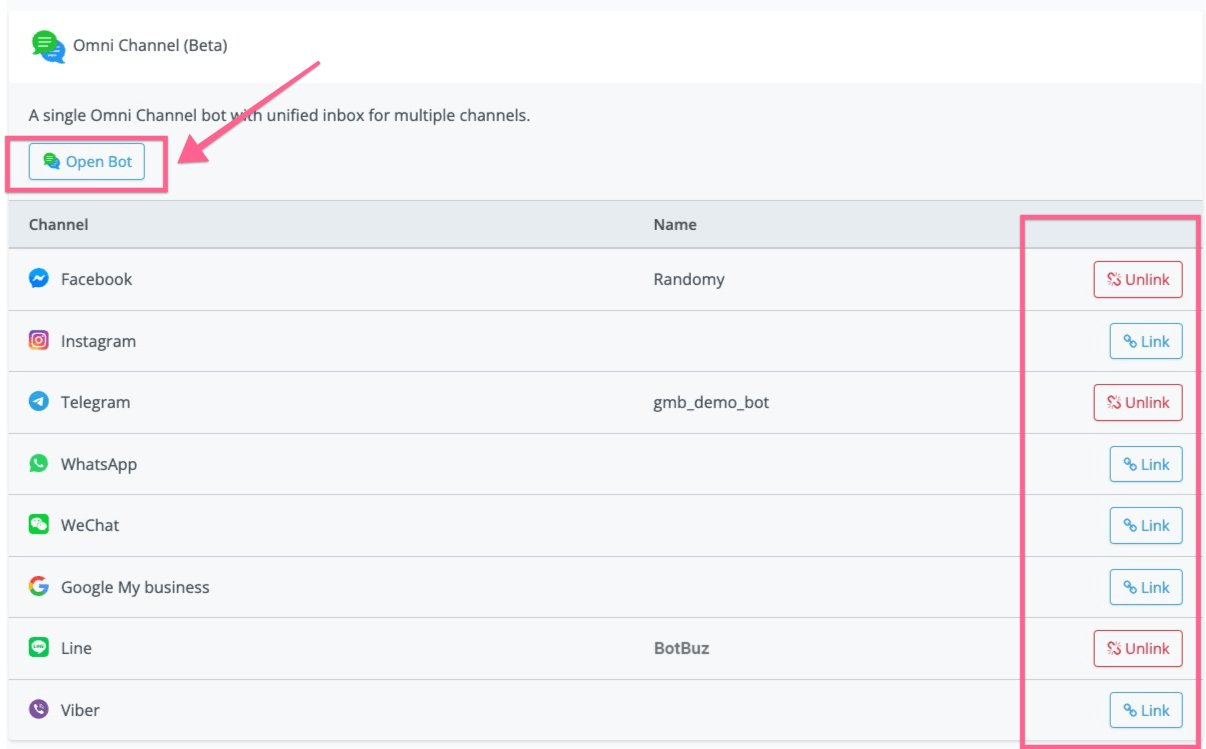
After you integrate with the intercom, you now need to create an omnichannel chatbot inside of Botbuz. You might need to link the channels we currently support(Facebook messenger, Instagram, WhatsApp, Google Business Messenger, WeChat, Line, Viber, Telegram).
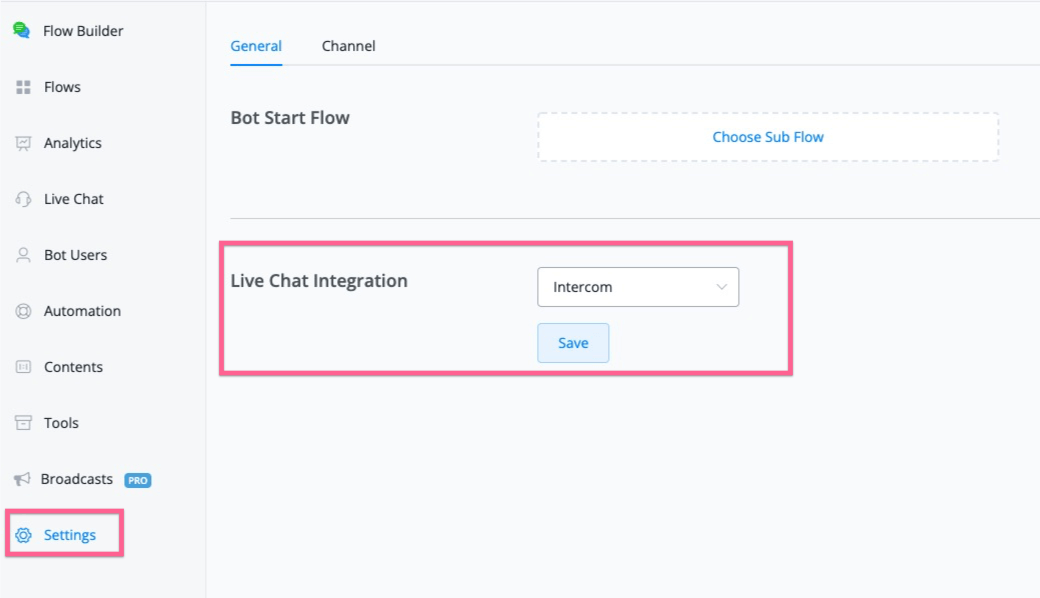
After you linked the channel, you can open the bot, then go to the settings of the omnichannel, and select intercom from the live chat integration.
Use Intercom
Step 1: Trigger “Talk to Human/Pause automation” anywhere in the flow
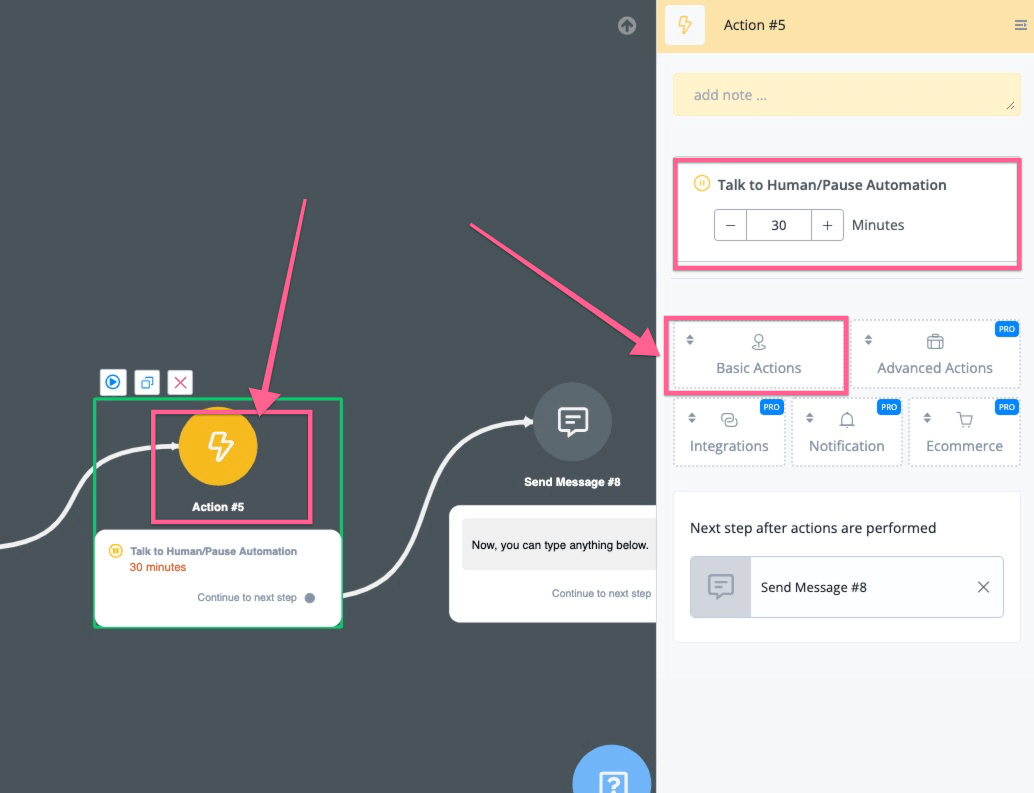
The benefits of using Botbuz with intercom is that, your business can automate at least 80% with chatbot & A.I. You can easily build your chatbot with our visual flow builder, and if at any point, your customer needs any help.
You can connect with an Action, and then go to Basic Actions, then you can find “Talk to human/Pause automation”, and then your customer from 11+ social channels can talk directly to your intercom live chat support.
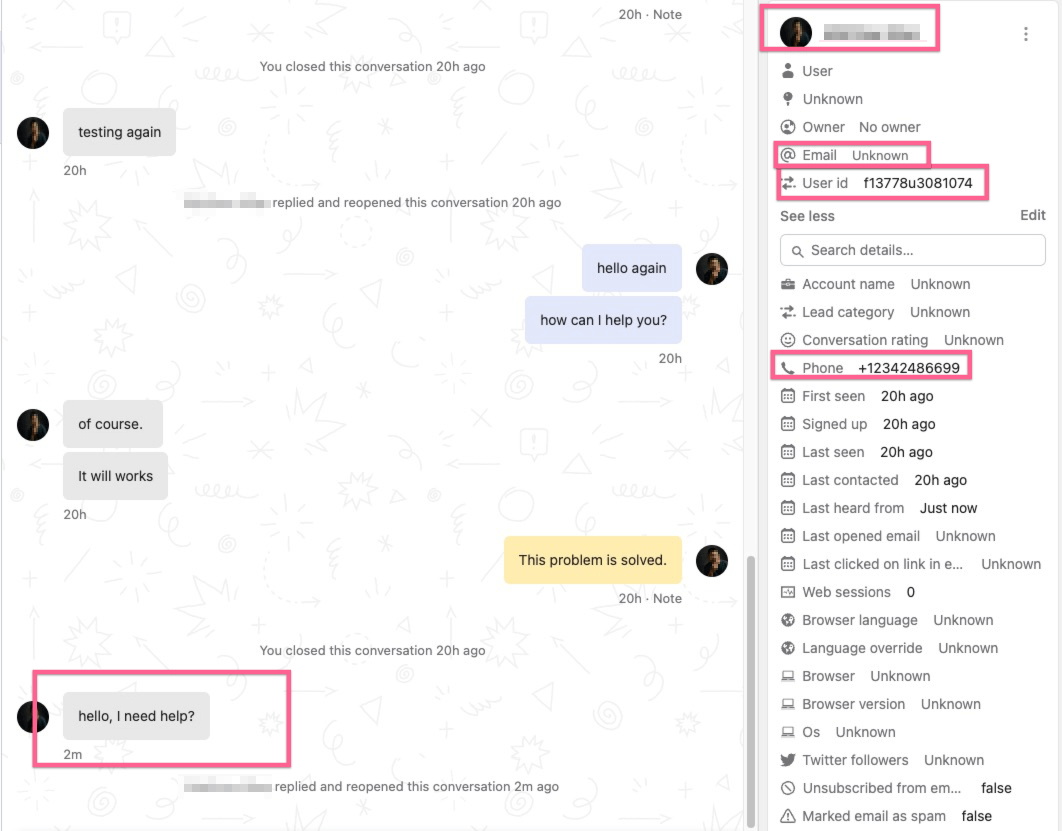
After your customer initiates a conversation, you will see the new contacts created from social channels along with their questions.
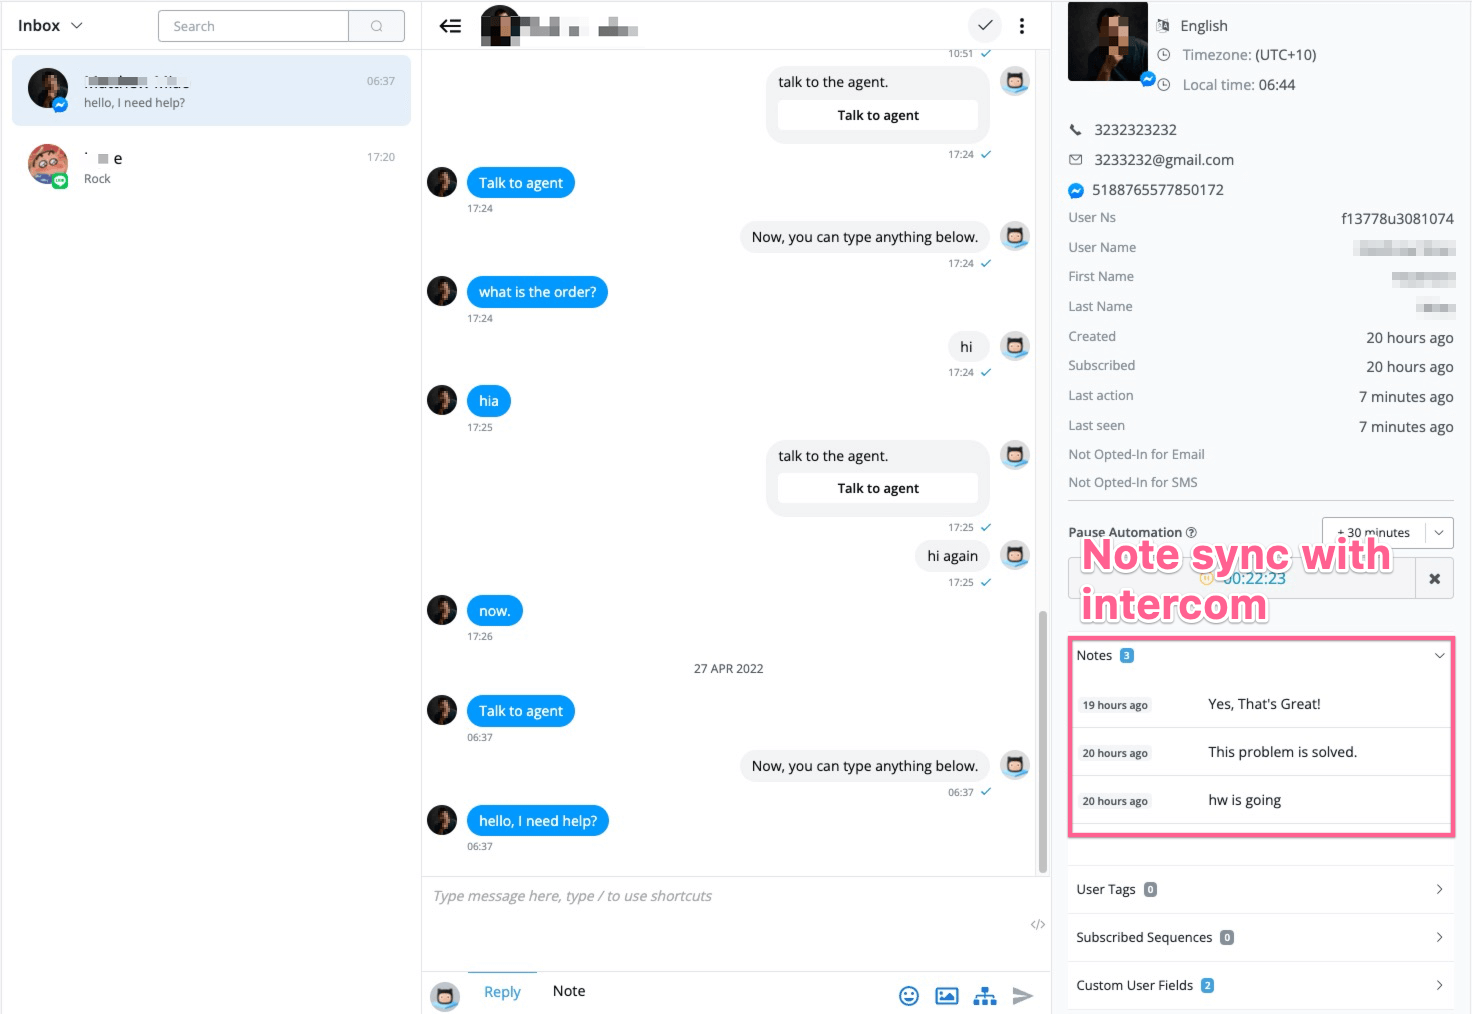
Botbuz will pull the user’s profile, email & phone to create the contact if there is any.
And now your intercom agent can talk directly back to the customer from 11+ social channels.
By default, the live chat is set at 30 mins, after the time passed, if there is no active conversation, the user will be sent back to chatbot automation.
Step 2: Sending files & Images
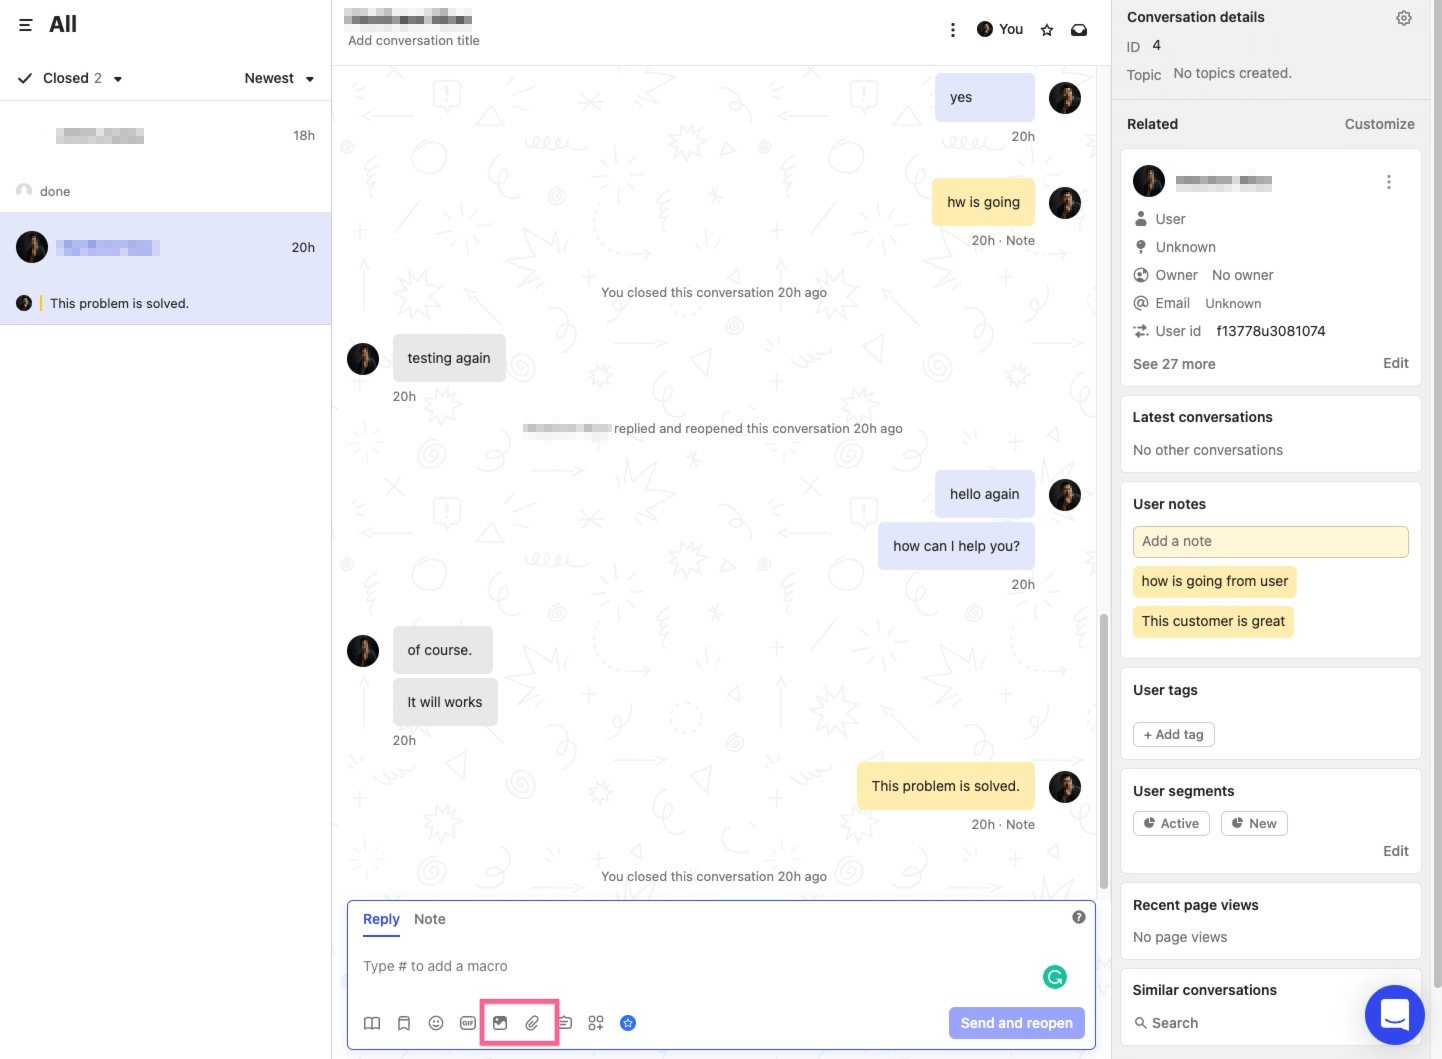
After your customer active live chat from our flow, your customers can send text, images & files to your agent.
Meanwhile, your intercom agent can also send images & files back to the user.
If the intercom agent adds any notes to the customer/conversation, the note content will also sync to Botbuz’s subscribers
Please note that you can also see all the live chat history inside of Botbuz’s live chat.
Step 3: Ending conversation
If your intercom live chat support helps the user solve the issue, and when they close the conversation, the user will be pushed back to the chatbot automation.
If intercom live chat decides to follow up on the issue, for certain channels(Messenger, WhatsApp, Instagram) if it’s within 24 hours window, we will deliver the message. If it’s out of the 24-hour window, we will reply that the user is out of the contact window.
If the user is within the contact window, any messages from the intercom agent will reset the 30 human support window & activate live chat with the user.
WhatsApp + 360Dialog ($20/month)
Botbuz partners with 360Dialog, which is an official WhatsApp API partner. We are bringing special partner prices that start with $20 per month.
You will be able to build your WhatsApp chatbot with the best pricing, and also the most supported message types. For example, template messages & product catalogue messages are both supported within Botbuz if you are using 360Dialog.
In this help document, we will show you step by step how to get your WhatsApp chatbot set up.
Checklist
In order to build your first WhatsApp chatbot, you will need the below 3 things to get started
- Verified Facebook Business Manager: You will need to have a verified business manager account, if you don’t have it, you can still test the bot with the sandbox we offer. But the features will be limited.
- A new phone number that hasn’t been used with WhatsApp: you can buy a new phone number or cancel your phone number for other BSP providers.
- Connect the number to Botbuz.
That’s all you need to have to set up your first WhatsApp chatbot with Botbuz.
Verified Facebook Business Manager
If your Facebook business manager is verified, you should be able to see the screenshot below:
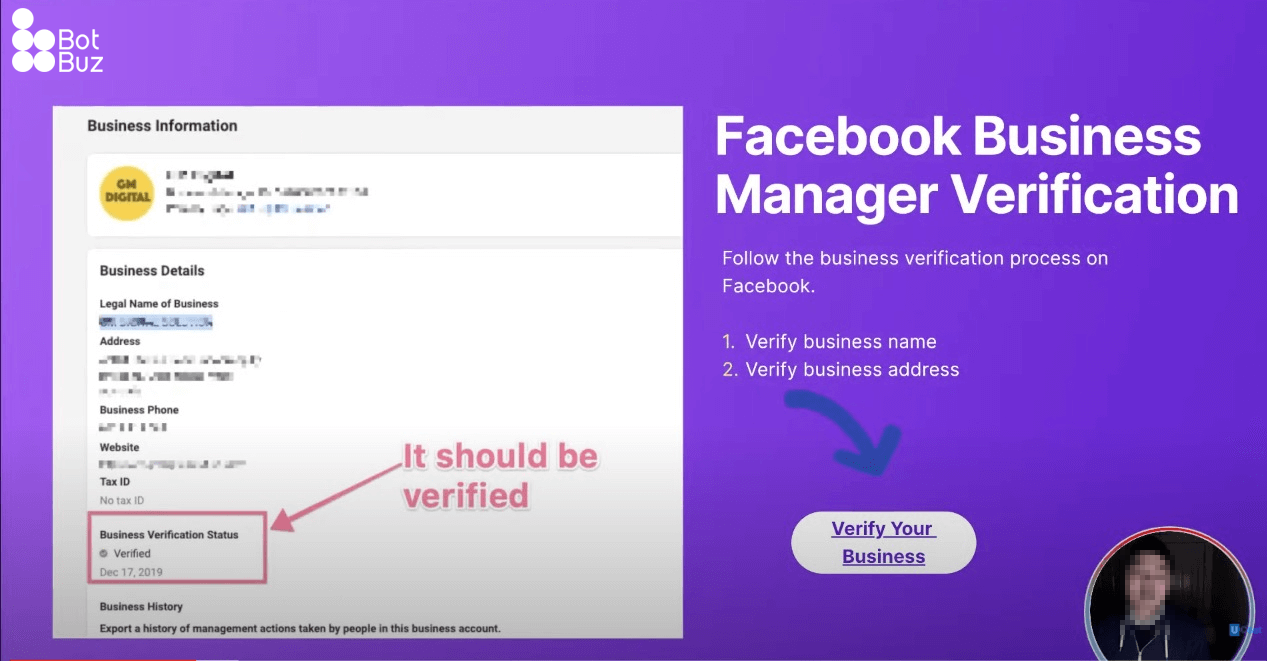
The green tick should be under your Business verification process.
If you don’t have a verified Facebook business account yet, we share some of the documents required, and how you can submit and get your business verified.
Sign up with 360Dialog
After you got a verified Facebook business manager account, now you can sign up with our partner link (opens new window).
After you subscribed, contact support at [email protected]. We will provide you sign up link to create account.
The process will be simple 3 steps, first, you need to complicate the application form as in the screenshot below:
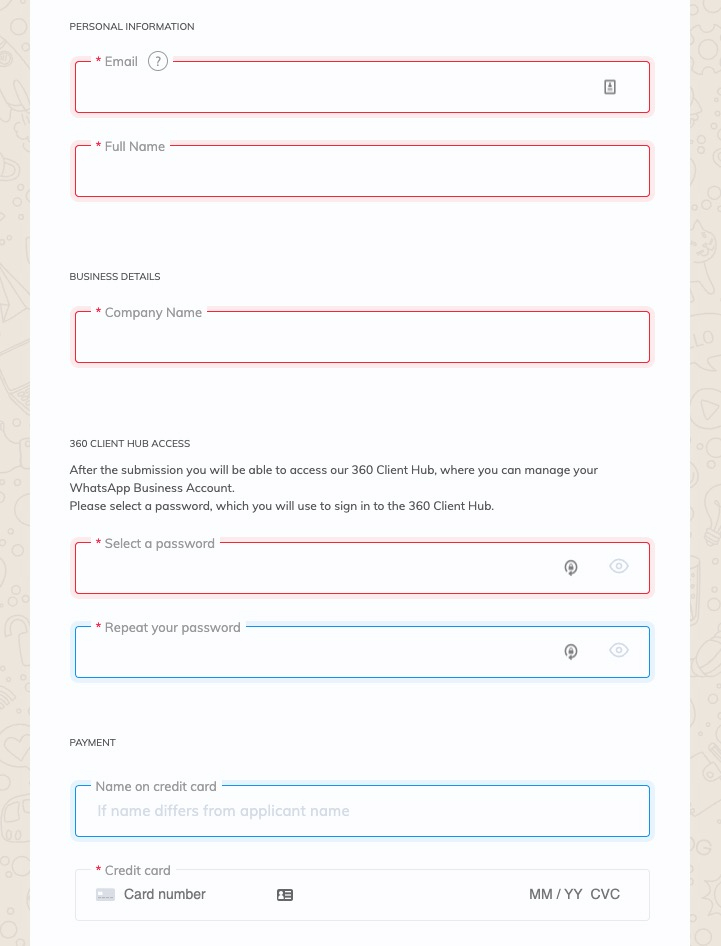
Make sure you provide your credit card details to sign up for this $5 per month offer. After you submit your application form, it will redirect you to log in to your Facebook account and authorize your account.
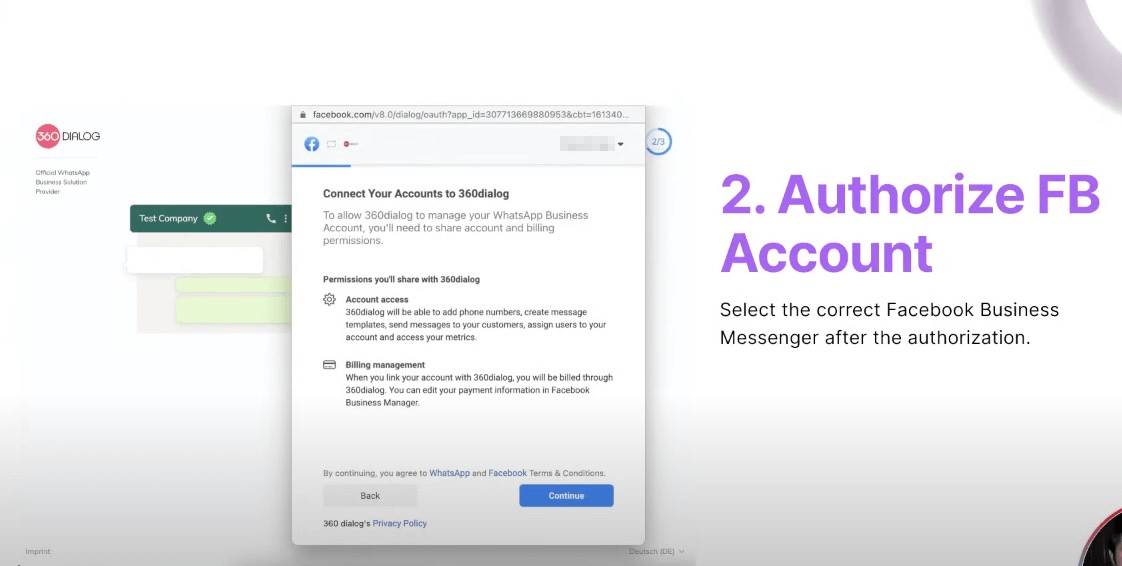
Click continue to authorize your Facebook account to 360Dialog, and then you need to fill up the display name & select the business category, and description for this WhatsApp account.
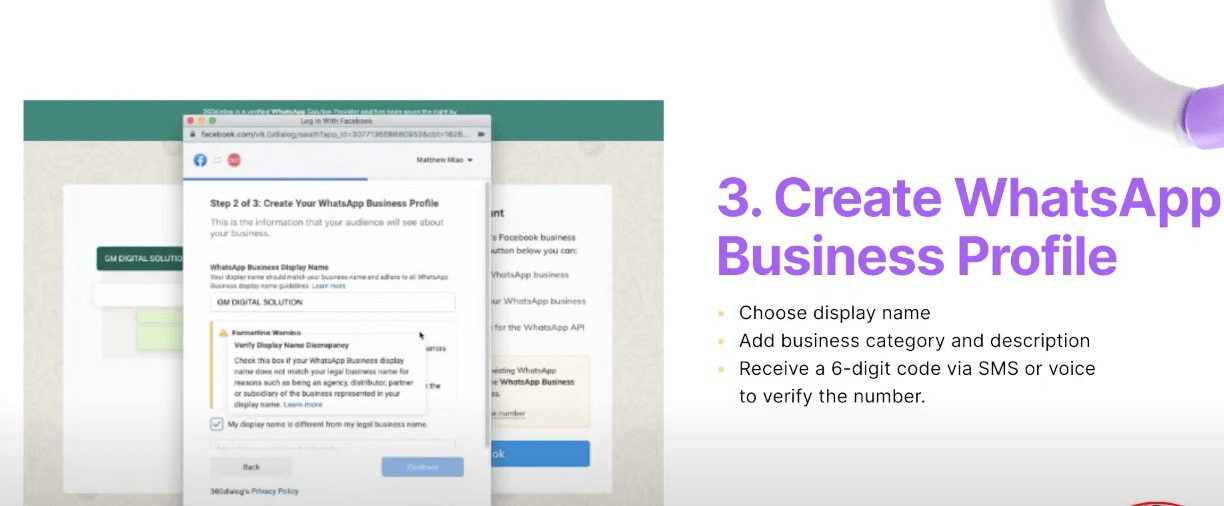
Please note WhatsApp have certain requirement about “display name”, you can find out more details here (opens new window)
You need to verify your phone number by SMS or Voice, choose the way you want to verify your phone number, and after the verification, you will be redirected to the 360Dialog dashboard.
Please note this link to sign up is for a new number ONLY, the number needs to be never used with WhatsApp or WhatsApp business.
If the number has been used with another WhatsApp business service provider, you need to fully cancel from them, and then register through our partner link.
Connect 360Dialog with Botbuz
After you log in to your 360Dialog dashboard, you can click the “Generate API key” button, and then you will get your API key and address in the pop-up window like the screenshot below:
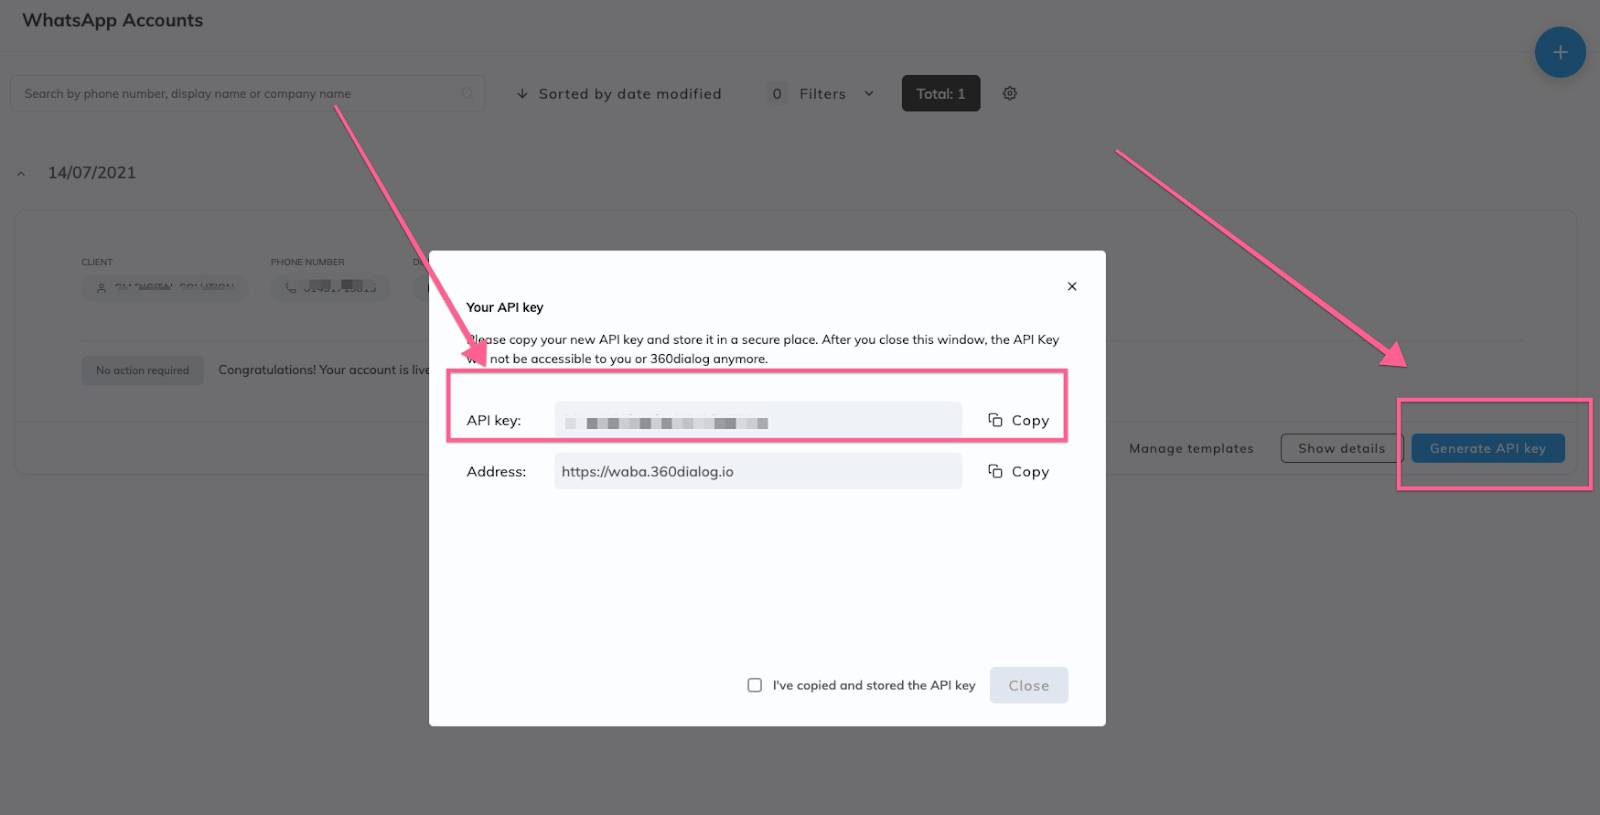
In order to connect your 360Dialog account with Botbuz, you need to copy your phone number & API key, and then go to your Botbuz dashboard, and go into the WhatsApp channel, click add new bots.
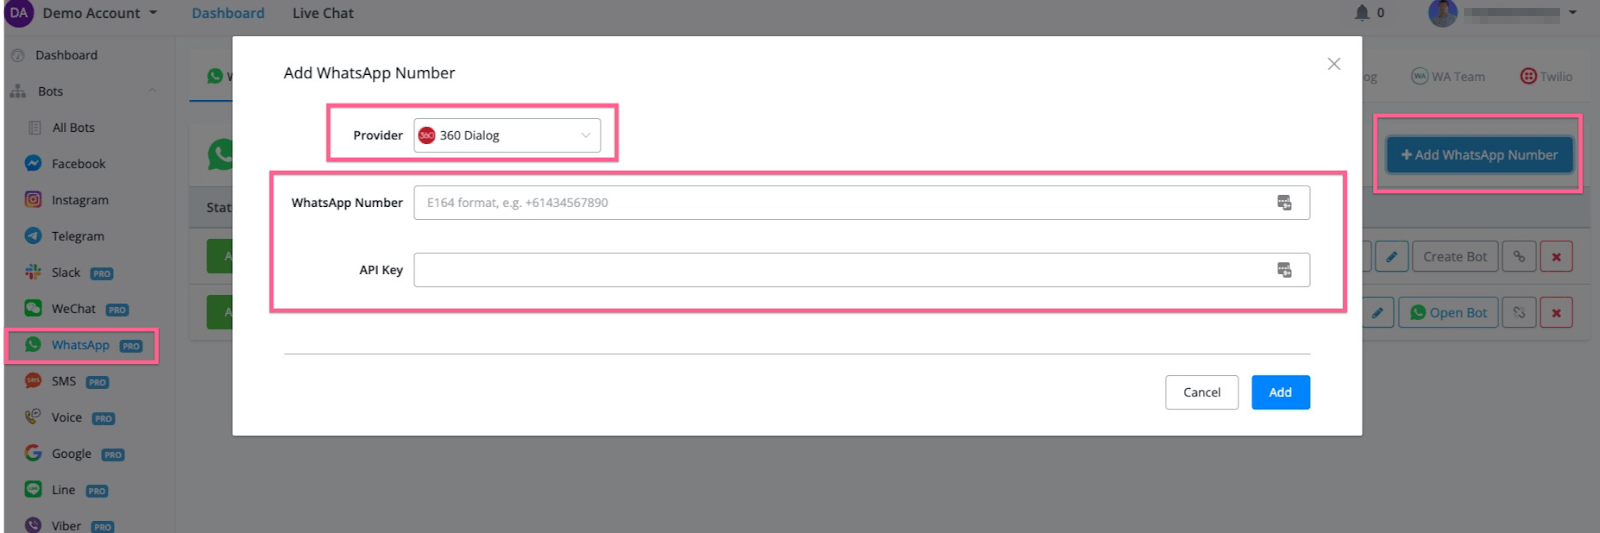
You need select 360Dialog as the provider, and then paste your API keys and phone number. It should connect.
Then you can start building your first WhatsApp chatbot with Botbuz.
WhatsApp Cloud API
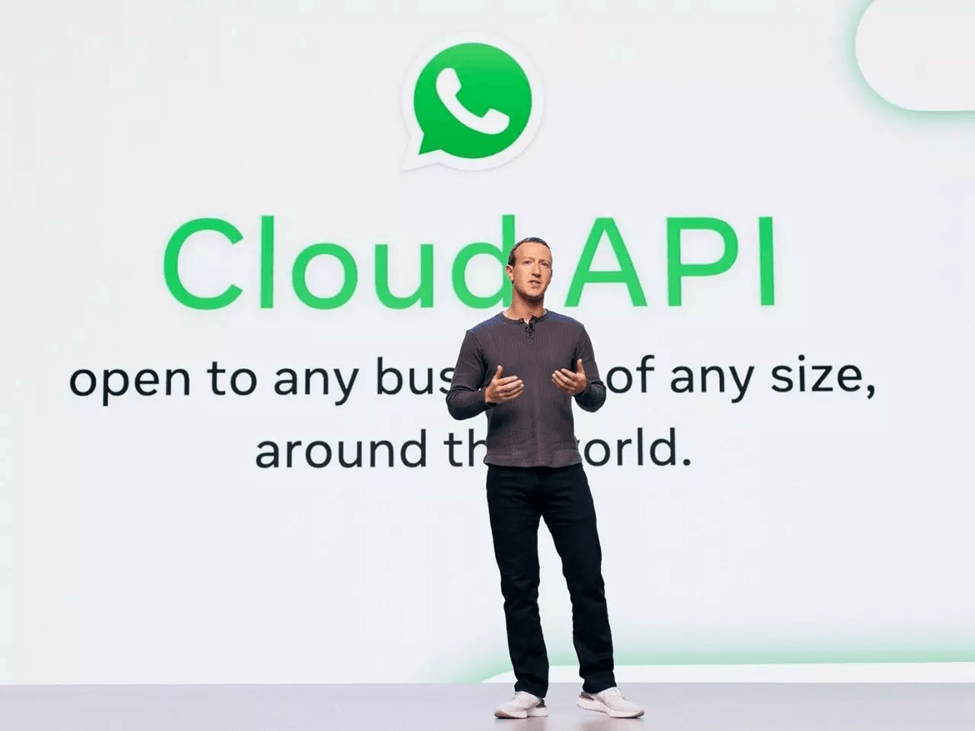
Facebook announced WhatsApp cloud API on 20th May, and it’s available to any business of any size, big and small.
This documentation will teach you how to set up WhatsApp cloud API with Botbuz. You will be able to build your WhatsApp chatbot with a free testing number offered by Facebook, and also switch to the live production when your bot is ready to go live!
Please note:
For now, due to certain limitations of WhatsApp cloud API, every business needs to create its own Facebook App in order to use WhatsApp cloud API. Once Facebook allows platforms like Botbuz to create a WhatsApp business account, we will improve the process to use WhatsApp cloud API.
Set up Facebook App
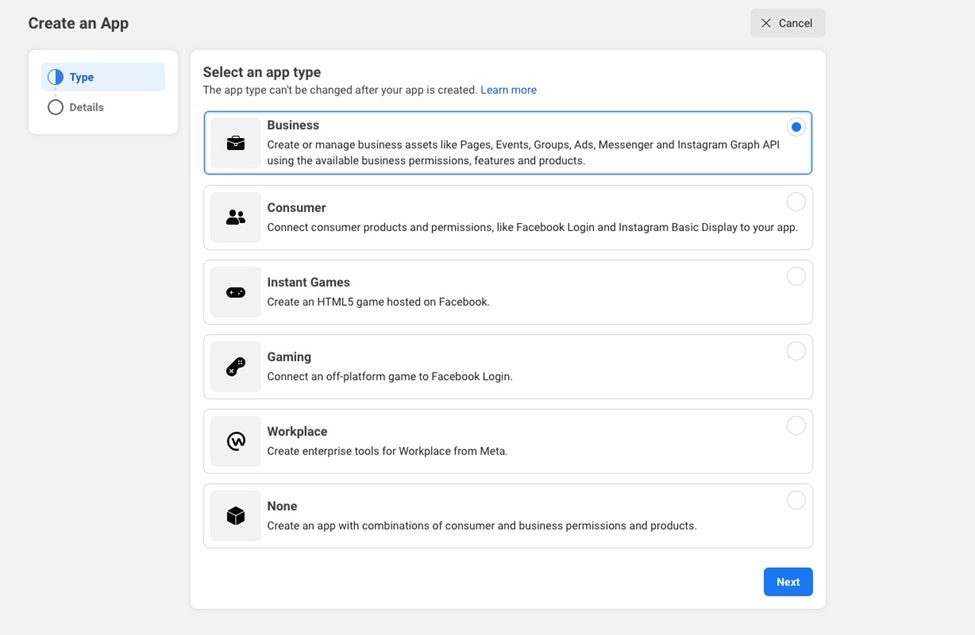
First, you need to register as a meta developer (opens new window), and then enable two-factor authentication (opens new window)for your account.
And then you can click the “create a new app” from the top right of your dashboard, and then select “Business” as the app type:
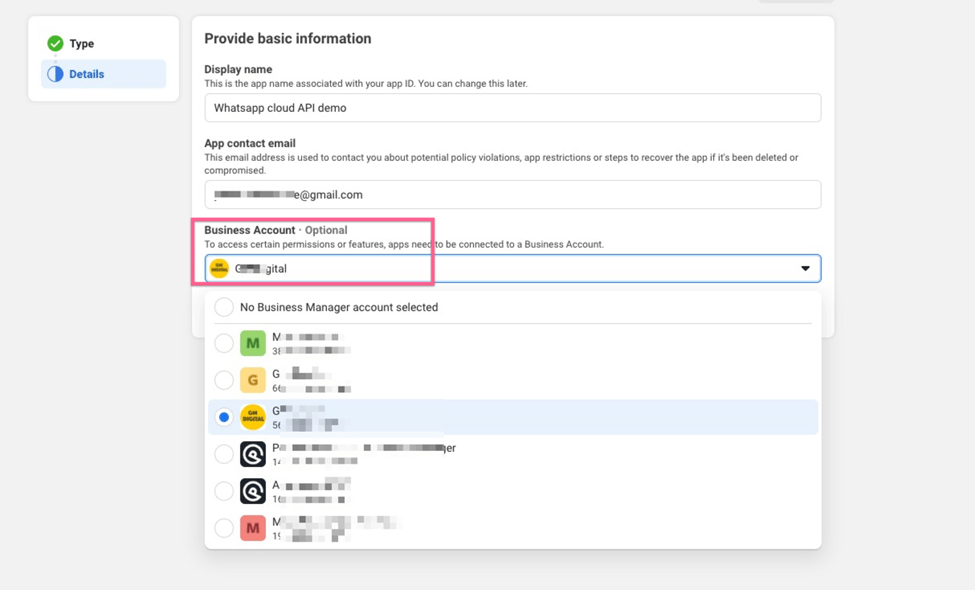
Then put the display name, and add the app contact email, if you want to connect this app to any of your business accounts, you can click the drop-down to connect them.
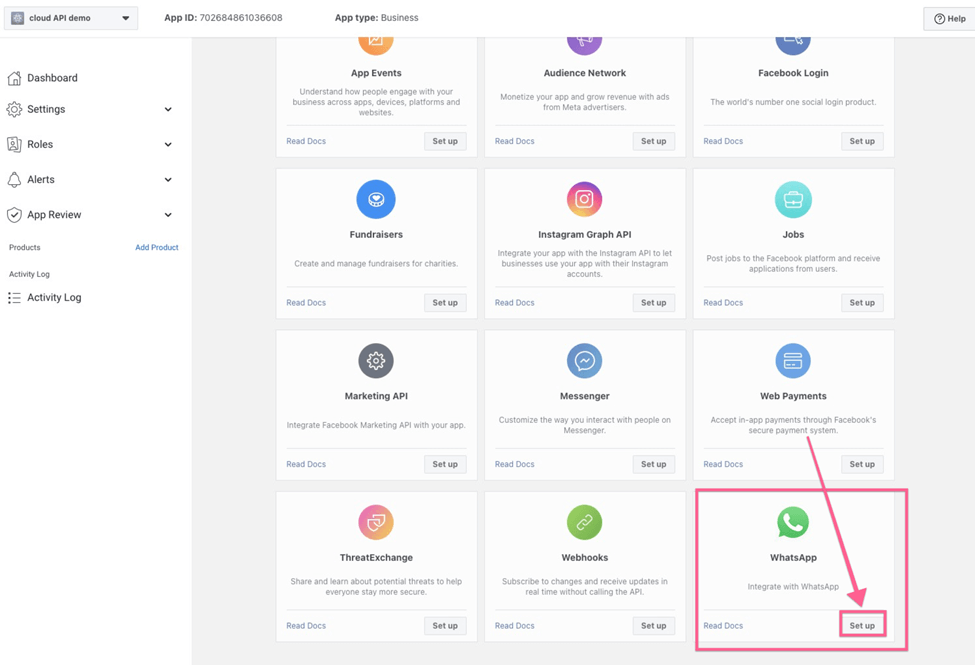
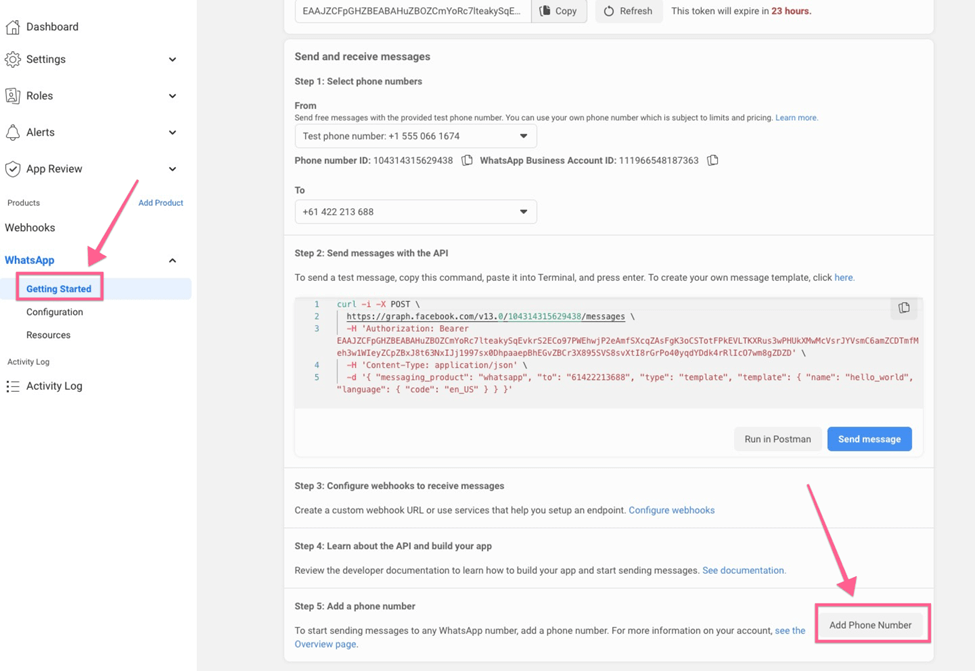
After you create your own app, and then you scroll down to WhatsApp, and then click “Set up” in the WhatsApp product.
And then you will be redirected to the screenshot below:
Now, you can click the “Get started” under WhatsApp, and then you will redirect to the screenshot below:
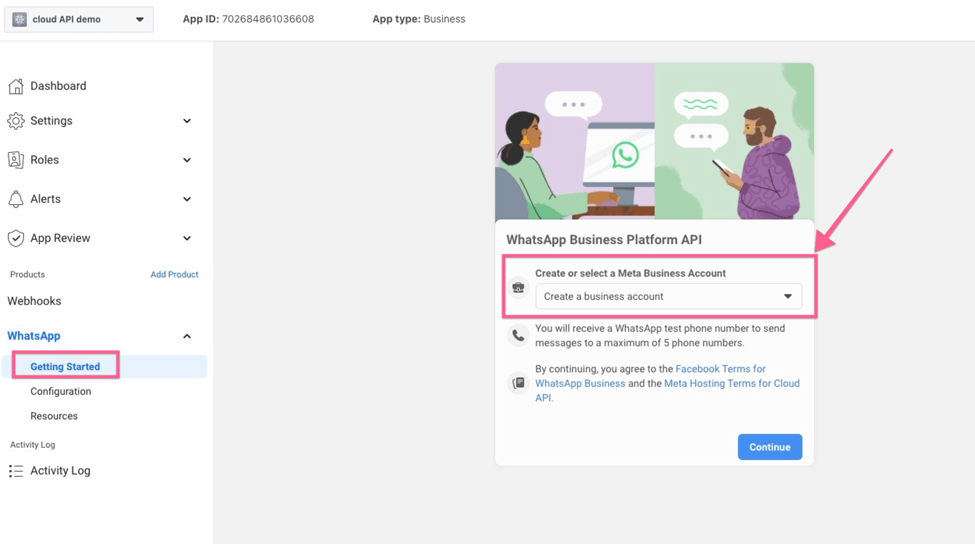
Select the business account that owns the phone number you want to use for WhatsApp automation. If you don’t have a business account, Facebook will automatically create one for you.
Then you need to click the “configuration” to set up your own webhook.
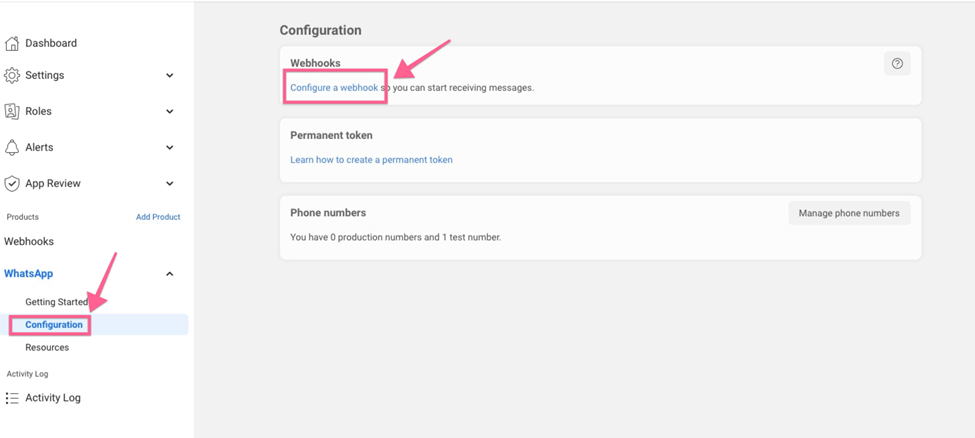
Get your Webhook from BotBuz
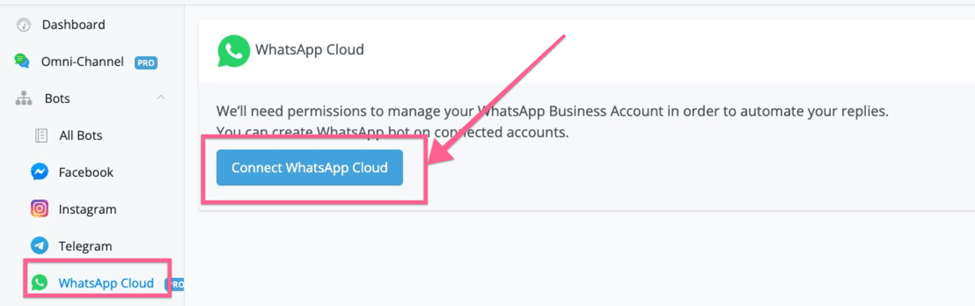
Now, you need to go back to Botbuz, and then select the WhatsApp cloud, click “Connect WhatsApp Cloud”
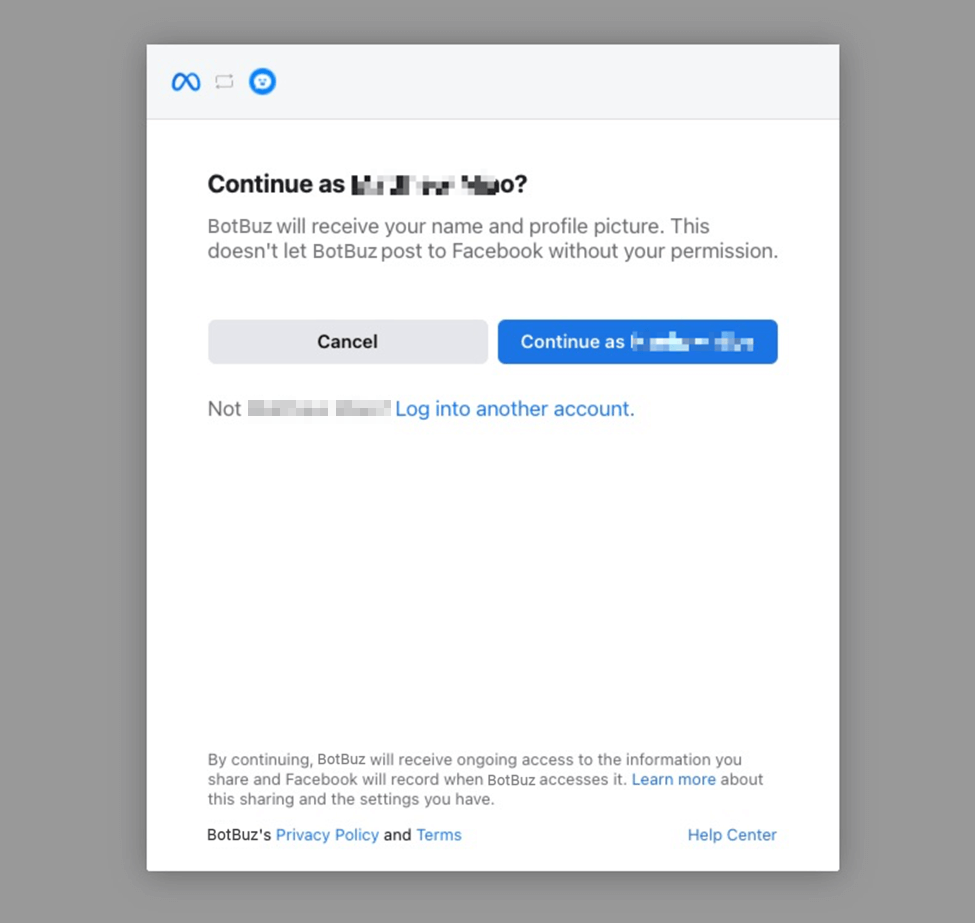
After you click the button, it will pop up the window for you to authorize your Facebook account, and then select the business account you want to connect to.
You can connect one business account under one workspace. Multiple numbers can be connected to the same business account.
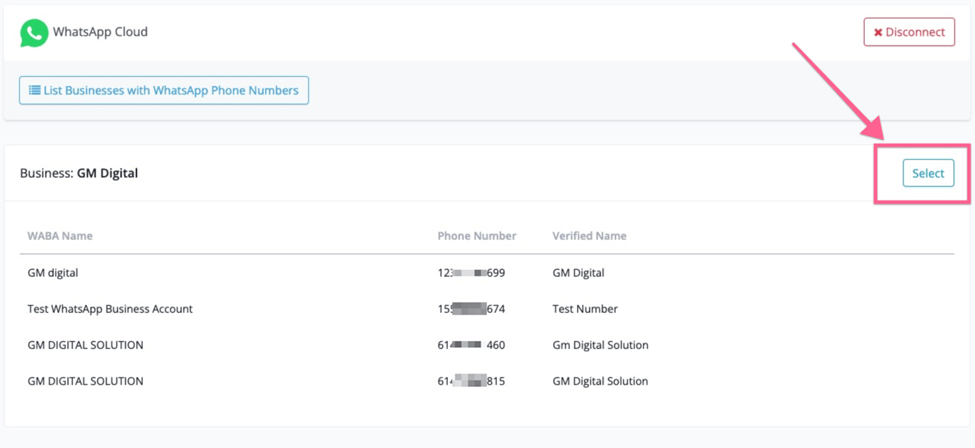
After you select your business account, you will be redirected back to Botbuz. And then after you click the “list businesses with WhatsApp phone numbers”
It will list all the WhatsApp numbers in this business account. You can click the “Select” button to the next step.
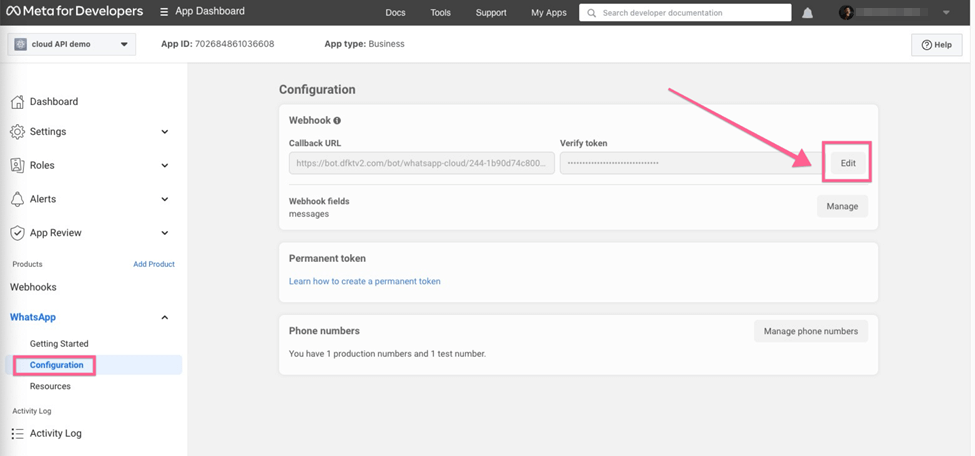
Then you will see your unique Webhook URL and token to use in the next step.
Now you can go back to the app in your Facebook developer account, and then click “Edit” in the configuration as per the screenshot below:
In the pop-up window, paste your webhook URL and token from Botbuz.
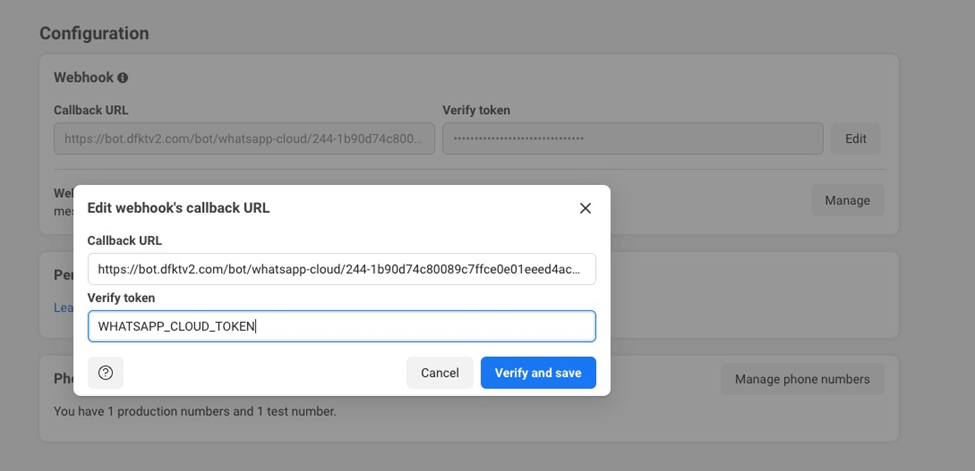
And then click “verify & save”.
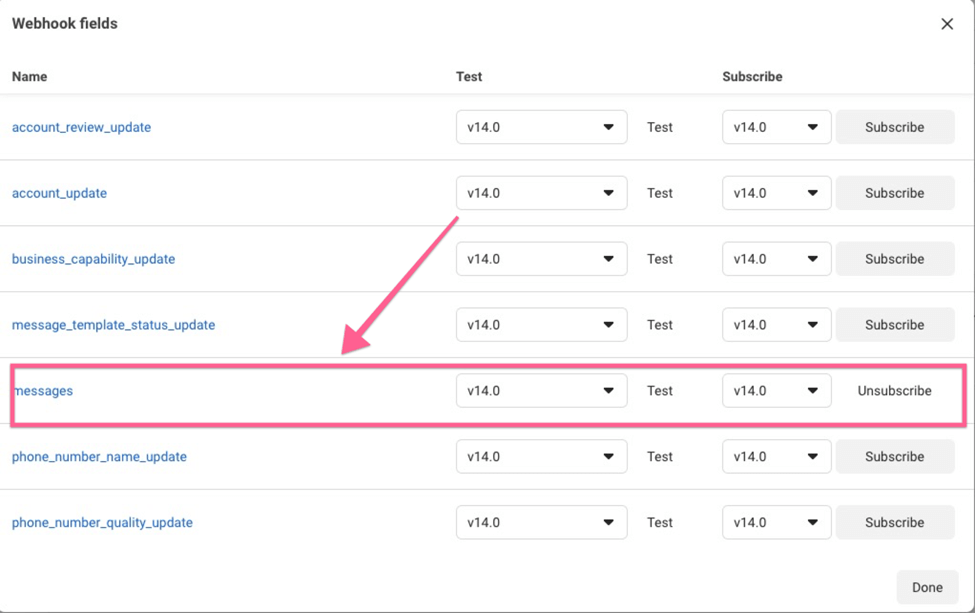
After you add the webhook URL, now you need to click the “manage” under the Webhook field.
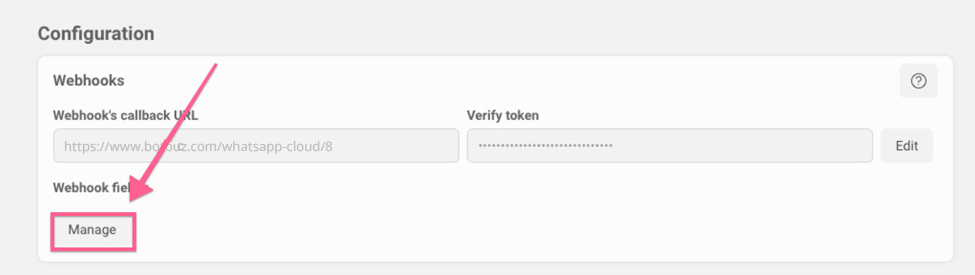
You need to subscribe to the “messages” as per the screenshot below:
Now, you can go to Botbuz, and sync numbers & pick a number to create your WhatsApp chatbot.
Please note, that every app will be offered a test number for free from Facebook. You can easily start testing with this test number.
Start with test numbers
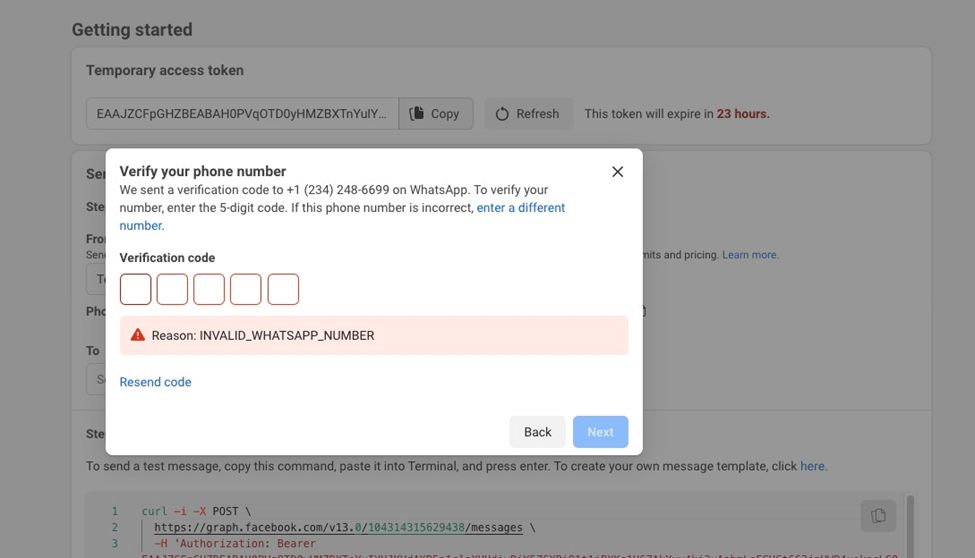
The test number allows you to have an unlimited free conversation with a set of verified phone numbers. You need first to verify your phone numbers. You can do so by clicking the “add the phone number” below:

And then you need to verify this phone number by receiving an SMS from Facebook.
After your phone number is verified, you can send a text message, and preview the chatbot you built with this test number.
Build WhatsApp bot with testing WhatsApp number
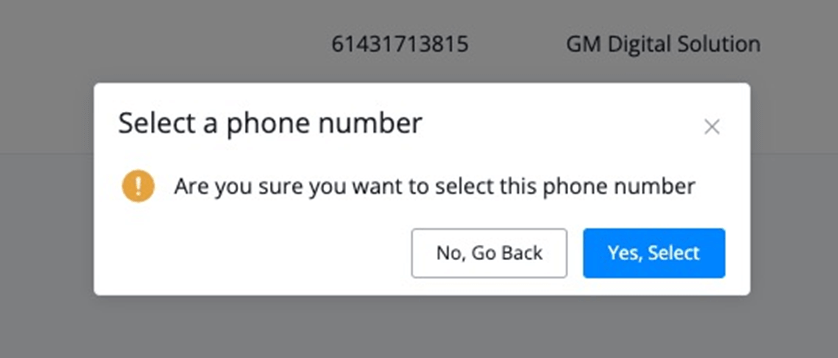
In Botbuz, if you synced numbers, you will see the screenshot below, and select the test number offered from Facebook, you can start building your first WhatsApp chatbot.
And then confirm the selection.
And then you can create the bot to test the connection.

And you can create a simple flow like the below to test the send message & also question block.
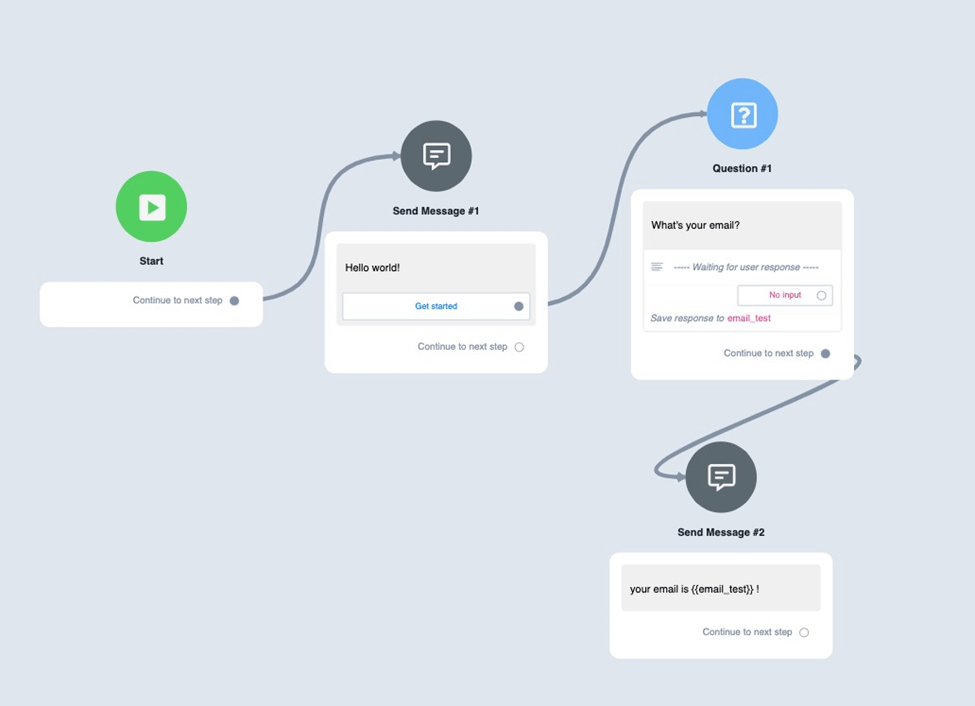
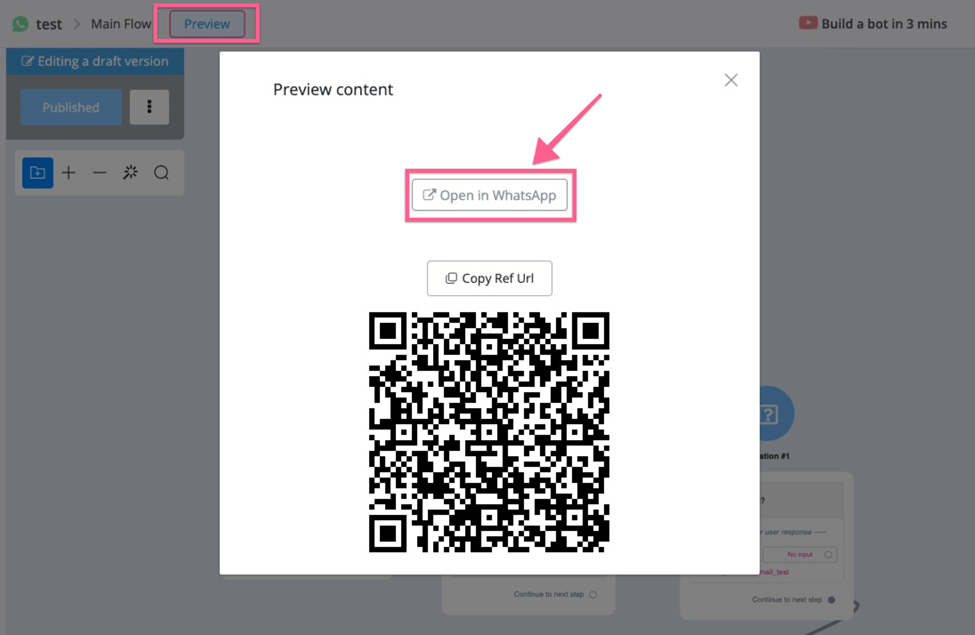
After you build this simple flow, click “Preview” and then select “Open in WhatsApp”, and test if the bot is responding or not.
And then you can follow the instructions, and you will see that WhatsApp is working properly.
You can build your automation with the test number, and after all the tests, if you are ready to push the bot to a real WhatsApp number, you can follow the instructions below.
If you don’t receive messages, it’s possible that you haven’t added your phone number to a verified phone number in the app.
For test phone numbers, you can send unlimited messages, but it’s only for verified phone numbers you added.
Supported message types
Regular massage type
Botbuz supports you to send regular text, text+buttons, files, audio, images, and also cards in this WhatsApp channel.
Template message
Template messages must be submitted for Facebook's approval before they are available to use. It is Facebook that reviews each template to avoid spam and to check that each message complies with their WhatsApp API guidelines.
When to use templates for WhatsApp messaging?
A template message needs to be sent whenever it is outside of a Customer Service Window, which means, whenever it has been more than 24 hours since the customer sent their last message to that business phone number.
You regularly use the message template to send notifications.
Templates use placeholder values that can be replaced with dynamic content inside double curly braces when the message is sent. Think of template messages as a conversation starter in a two-way conversation.
For more information about WhatsApp Template Messaging, review the Official Facebook Documentation for the WhatsApp Business API(opens new window)
Cost of Whatsapp conversations
You can find more about cost pricing information below:
https://developers.facebook.com/docs/whatsapp/pricing/conversationpricing
Charges for conversations are based on the user’s phone number. Rates for business-initiated conversations and user-initiated conversations vary by market (country or region). See Rates (opens new window)for specific pricing information.
Best practice to get your template message approved
Clarity: be specific and clear. The reviewers may not know a customer’s business and need more clarity. Avoid promotion: upselling, cold-call messaging, sending a poll to collect data, and including certain phrases that sound promotional are all considered promotional.
Spelling: check for spelling and grammatical errors and use appropriate formatting (e.g., double curly brackets for parameters).
Name: make your message template name clear. Instead of using a name like template_014, use bus_ticket_details. Remember that someone from Facebook will be reviewing your templates. Providing more clarity gives reviewers context around how the template will be used.
Create context: if you need to write a message template to re-open the 24-hour window, we would suggest starting with some mention of the previous conversation thread.
Choose an appropriate category: don’t forget to use the correct message template type. Choosing the correct one will increase the chances of getting your templates approved and will provide more information to WhatsApp during the approval process.
The categories you can choose are listed below. Header (optional): you can add a title or choose which type of media you'll use for this header. Image, PDF and Video are supported.
Different categories of the message template
Account update: Let customers know about updates or changes to their accounts. You can use this to notify the message recipient of a change to their account settings.
- Preferences are updated
- Settings have changed
- Membership has expired
- Profile has changed
Alert update: Send important updates or news to customers.
Appointment update: Send confirmations, reminders or other updates to customers about their appointments. For example:
- Appointment time changes
- Appointment location changes
- Appointment is cancelled
Auto-Reply: Send auto-replies to customers when your business isn't online or available to respond right away.
Issue resolution: Respond to questions, concerns or feedback from customers about your business. For example:
- Issue is resolved
- Issue status is updated
- Issue requires a request for additional information
- Notify the message recipient of something informational like Business hours/hours of availability
One-Time Password: Send auto-generated verification codes so customers can securely access their accounts.
Payment update: Send a message to customers about their payment. For example:
- Send an out-of-stock notification
- Notify an auction has ended
- Status of a payment transaction has changed
- Send a receipt
Personal Finance update: Send a message to customers about their personal finances. For example:
- Bill-pay reminders
- Scheduled payment reminder
- Payment receipt notification
- Funds transfer confirmation or update
- Other transactional activities in financial services
Reservation update: Send confirmations, reminders or other updates to customers about their reservations. For example:
- Location changes
- Cancellation is confirmed
- Hotel booking is cancelled
- Car rental pick-up time changes
- Room upgrade is confirmed
- Itinerary changes
Shipping update: Send shipping updates to customers about their orders. For example:
- Product is shipped
- Status changes to in-transit
- Product is delivered
- Shipment is delayed
Ticket update: Send shipping updates to customers about their orders. For example:
- Concert start time changes
- Event location changes
- Show is cancelled
- A refund opportunity is made available
Transportation update: Send shipping updates to customers about their orders. For example:
- Flight status changes
- Ride is cancelled
- Trip is started
- Ferry has arrived
If you don’t have a specific category to fit in, you can always choose auto-reply.
Building blocks of template message
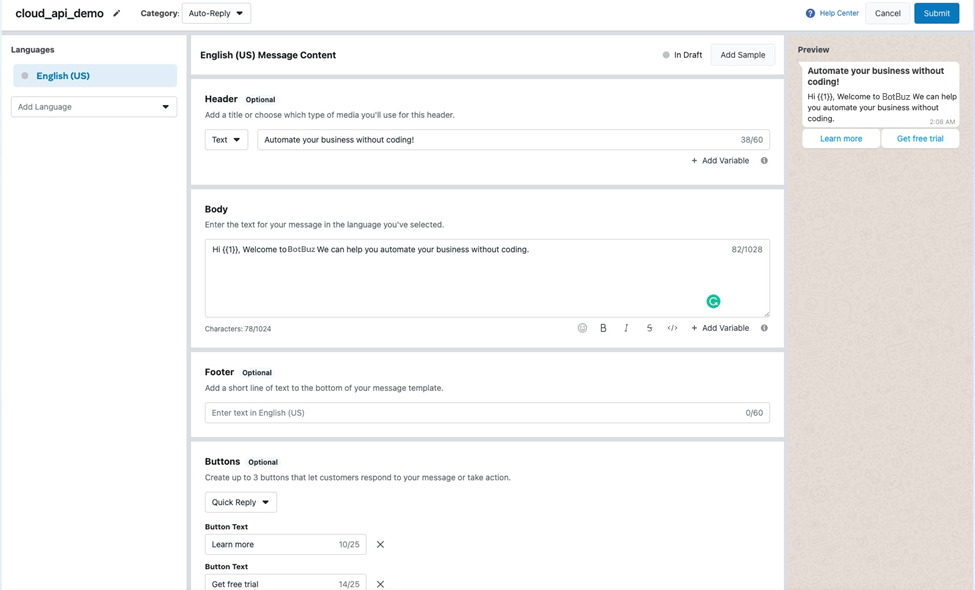
The media templates have more building blocks and features, it consists of the following building blocks:
- Header: The header is optional and serves as the title or header of your template. It supports the following: text, image, document & video
- Body: The body should contain the most important text of your template. Only text is supported
- Footer: The footer only supports text and can be used to provide less relevant information in your template message
- Button: The button adds interactivity to your templates. There are two main types.
- Quick reply button: Used for getting quick answers from your client, Max 3 Quick reply buttons per template
- Call to Action button: Max one URL and phone number per template.
Please note:
- All templates require a body, header, footer and buttons are optional.
- All media examples must be URLs that point to a valid media file.
Create template message
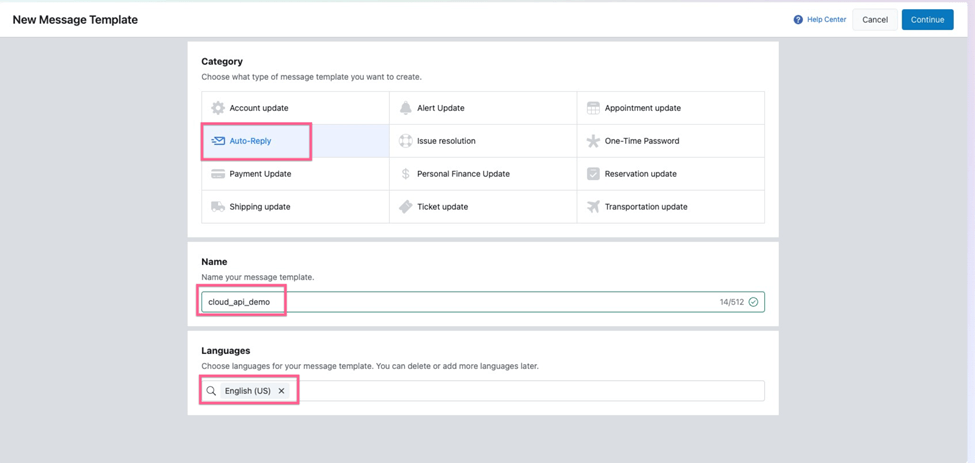
In this section, you will need to log in to your Whatsapp business manager account. Select the business manager account from the drop-down if there is any, and then select “template message”
Please note: Test WhatsApp number doesn't support creating template messages, you need to use a new real phone number to create a new template message.
And after you clicked the “Create message template” from the top right corner of the dashboard.
You need to fill up the template name and select the message category and languages.
Create standard(text only) templates:
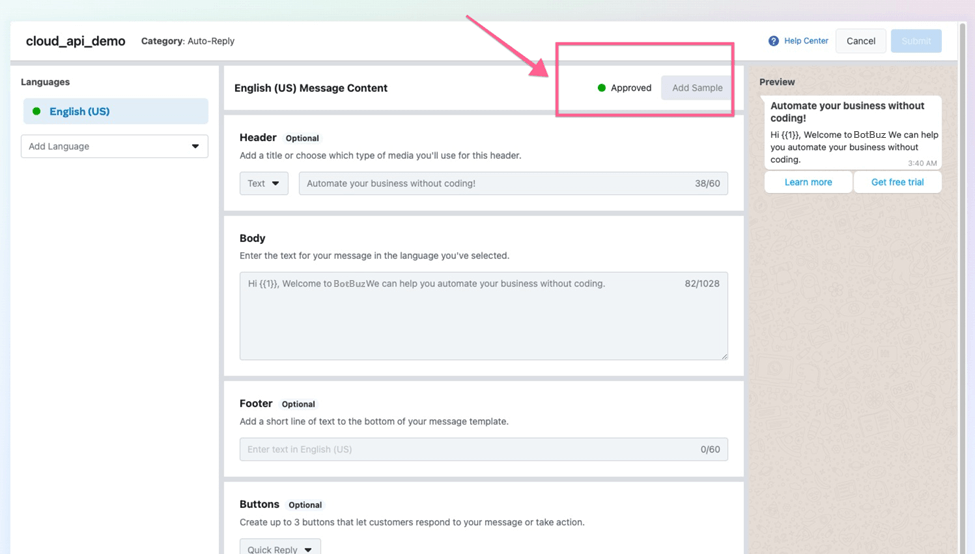
Below is the template message we created, and after you create the template, submit it to Facebook for review.
If you follow the best practice, your template will get approved very soon.
Once the template message gets approved, you will see the approved icon below.
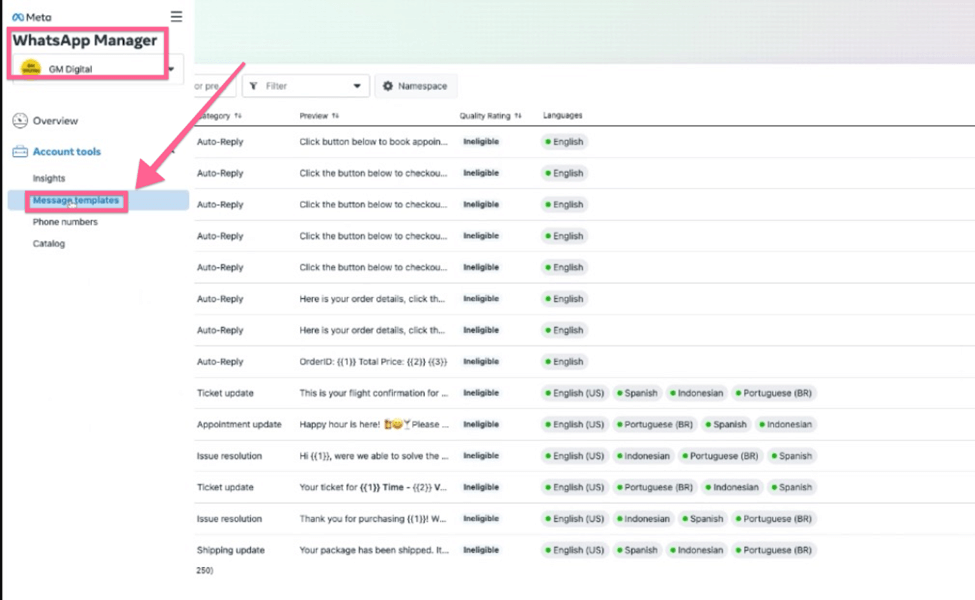
Now you can go back to Botbuz, and go to the WhatsApp channel,
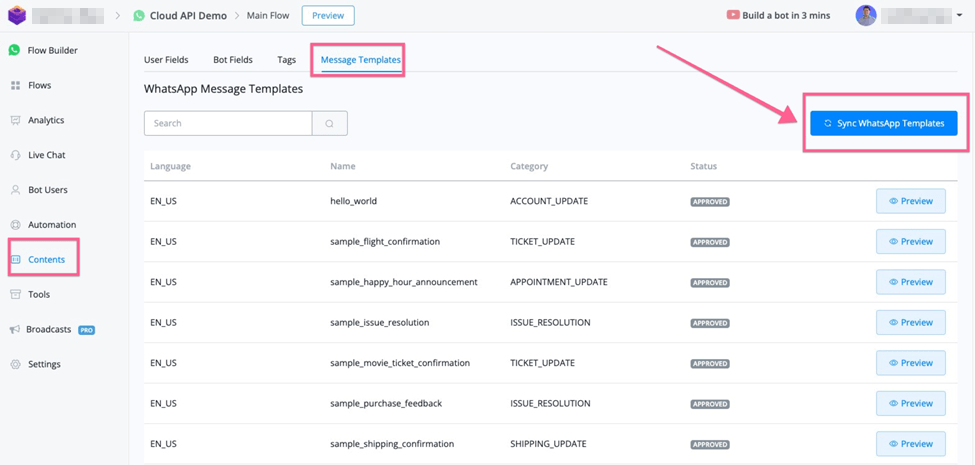
Once you go to the content, and message templates, and click “Sync WhatsApp Template”, you should be able to see that all the approved templates will be synced back to Botbuz to use.
How to use Template message
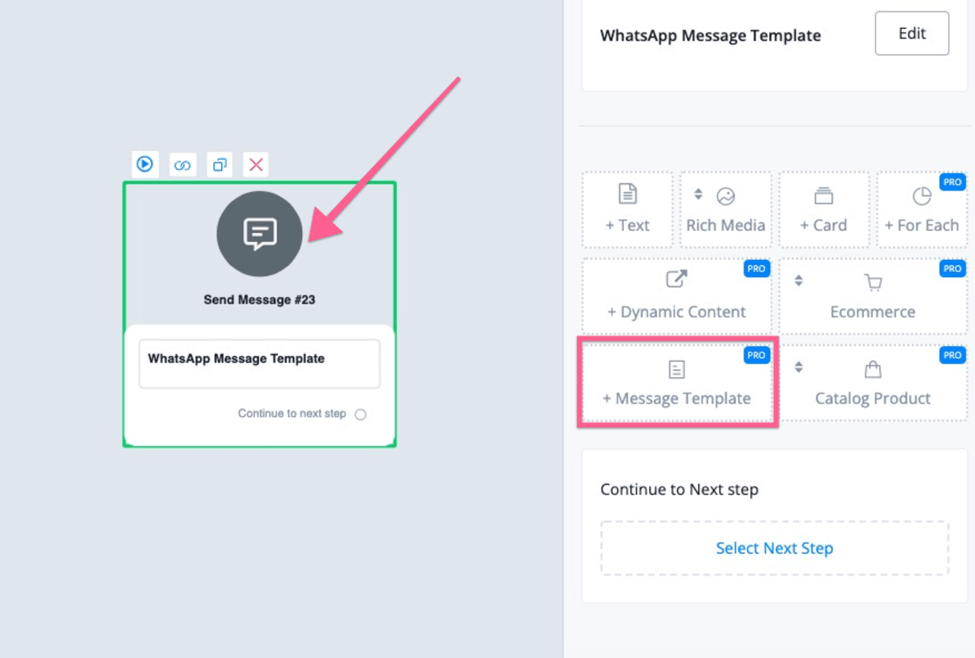
* Use in the flow builder
Template messages offer more features, like the buttons(which can link to external URLs) & phone call buttons.
You can send the template message right in the flow builder. It’s free to send if it’s within a 24-hour engagement window.
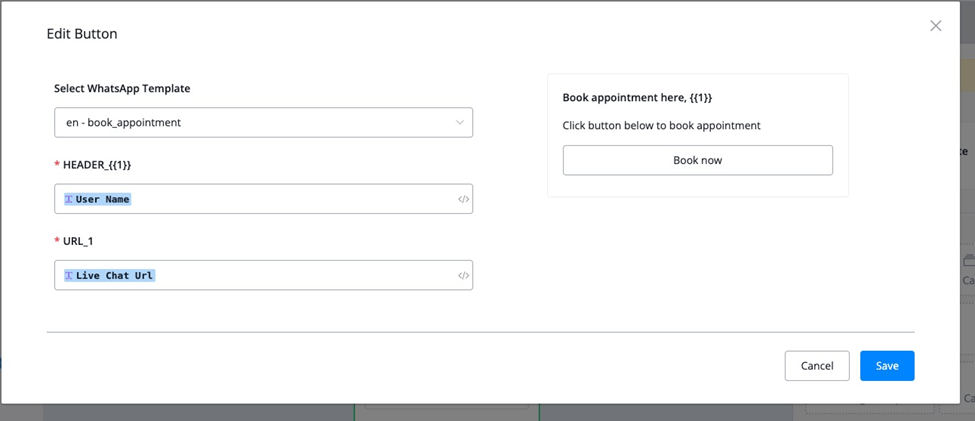
In the send message mode, select “Message template”, and if you have a variable in the template message, you can select the custom field in the Botbuz.
* Use in the broadcast
You can also use template messages in the broadcast of Botbuz.
Let’s first build out the flow you want to send the broadcast. You can use a simple conditional check to decide if you want to use a template message or not.
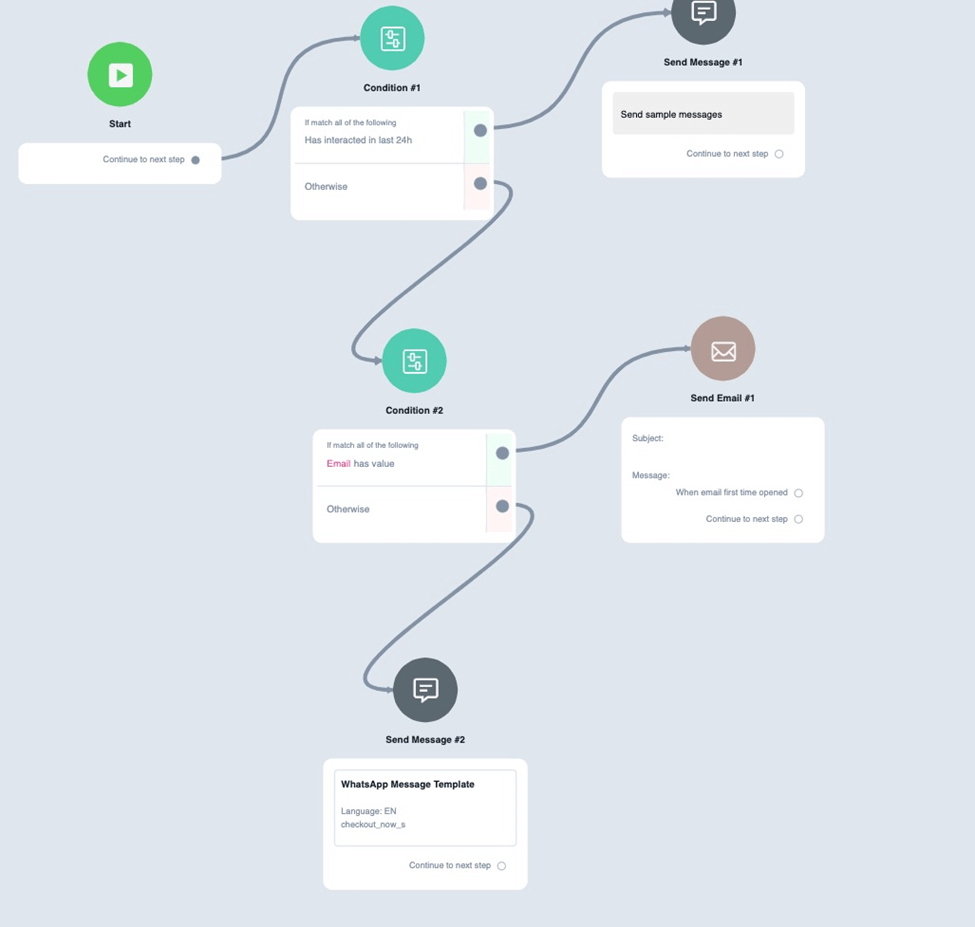
In the sample flow above, we first use conditions to check if the user is still within the 24-hour window, if they are, then you can reach out to them for free.
And then you can also select to send them an email if you have their email address.
At last, you can select to send a template to the user.
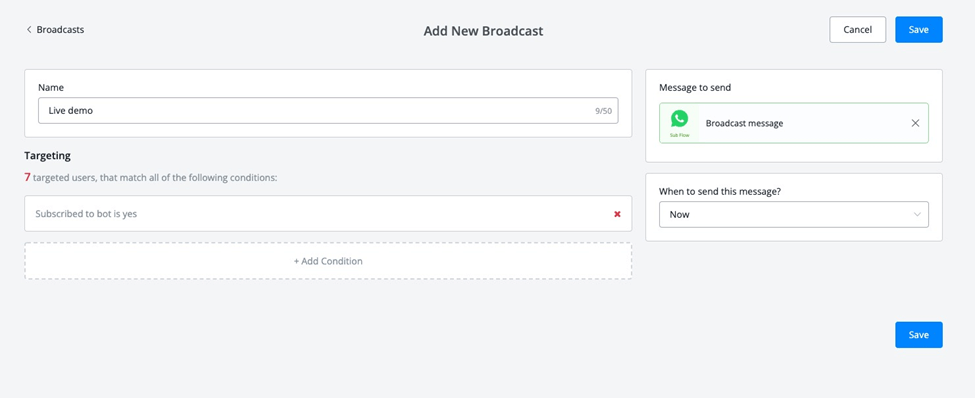
After you set up the flow to use in the broadcast, you can now go to the broadcast and select the audience you want, and then send the flow you just built.
* Use in the live Chat
In the live chat, if the user is out of the 24-hour window, you can only reach them through the template message.
If you go to the live chat window, you will see the option of “I want to send template message”
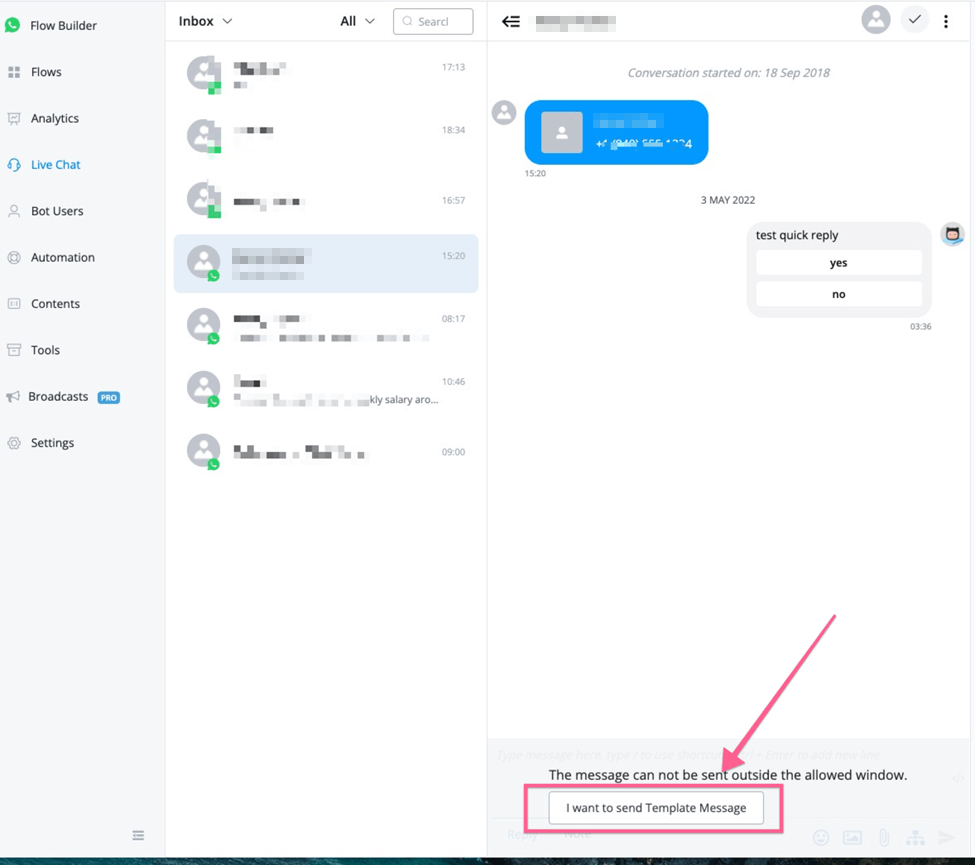
Please note that the template will be sent only if it’s the first message in the subflow.
Then you can pick up the subflow that starts with the template message.
WhatsApp Native Ecommerce - Product catalog message
You can showcase and share your products and services with your customers for them to browse items and add to a cart without leaving the chat.
Please note:
- test WhatsApp phone numbers don’t support testing product catalogue messages.
- Also, WhatsApp cloud API doesn't support product catalog features yet. You have to use BSP(like 360dialog) for now. Once WhatsApp cloud API is supported, we will make updates.
But once this message type is supported, you will be able to build the native ecommerce shopping experience with Cloud API as well.
For now, you can use our 360Dialog integration for it.
To use products and catalogs in your WhatsApp Business API account, please follow the next steps.
- Create product catalog & Upload Inventory to Facebook
First, you need to upload your inventory to Facebook. You can use the API or Facebook’s Commerce Manager to do that.
Your inventory needs to be uploaded to Facebook in a catalog format — see About Catalogs (opens new window)for more information.
If you already have a Facebook catalog set up, we suggest that you leverage that catalog for WhatsApp commerce use cases.
If you need to create a catalog, there are two possibilities:
- Create a catalog using the API(opens new window)
- Create a catalog using the Commerce Manager(opens new window)
You can upload only one catalog per WhatsApp Business Account (WABA), but the same catalog can belong to multiple phone numbers.
- Special requirement for selling in India If you are selling in India, you need to comply with Facebook requirements regarding the product catalog.
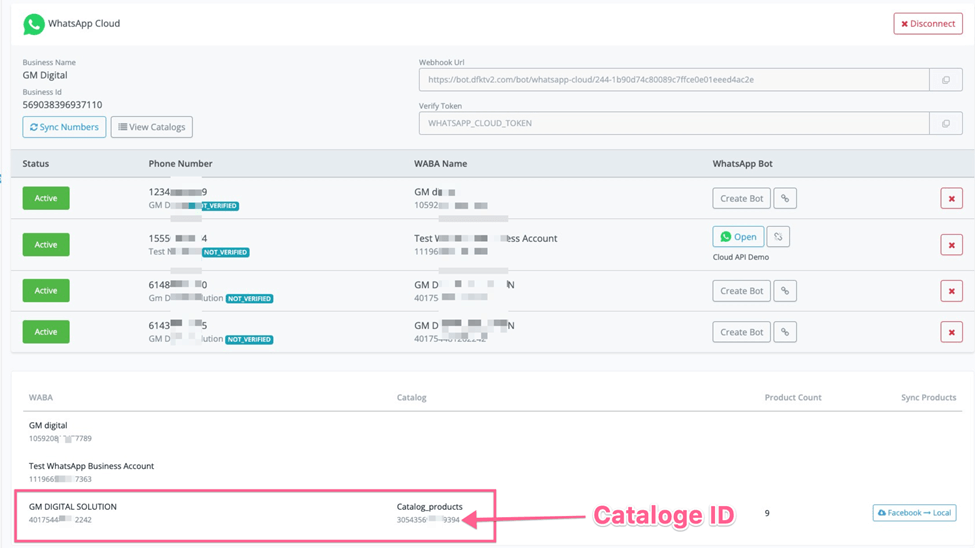
- Sync the products from Facebook to Botbuz Now back to Botbuz, go to the WhatsApp Cloud channel, you can click “View Catalog”, and then it will pull all the catalogs under your current business account.
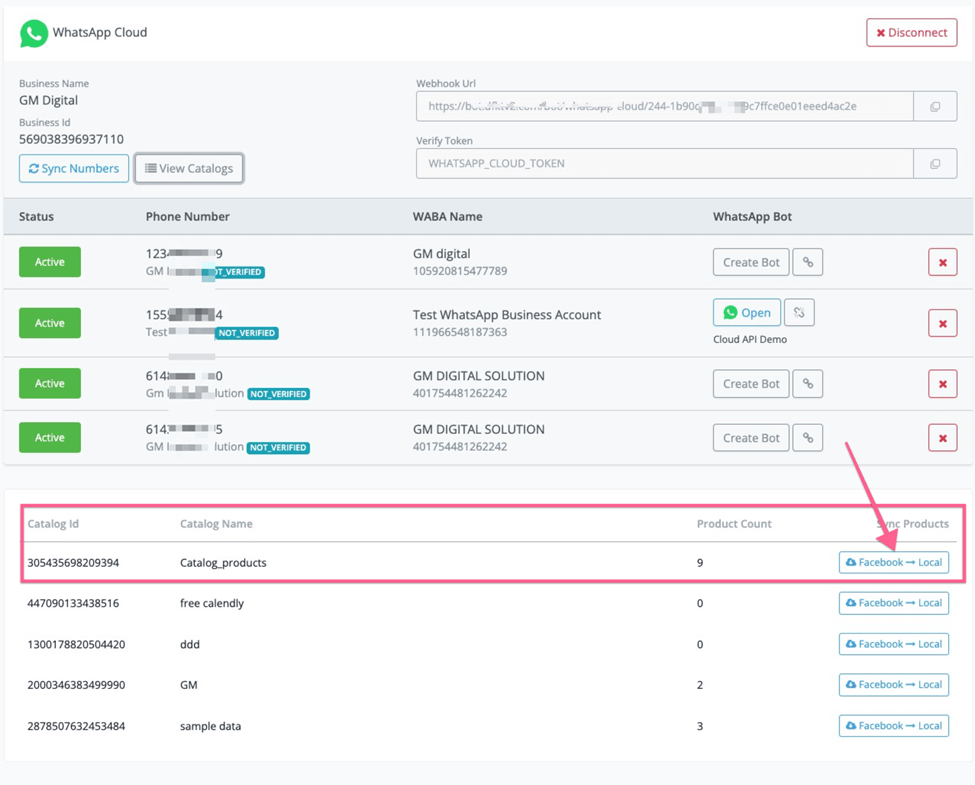
And select the “Facebook to Local” button as per the screenshot above. You should be able to sync all the products in your Facebook catalog back to our built-in eCommerce.

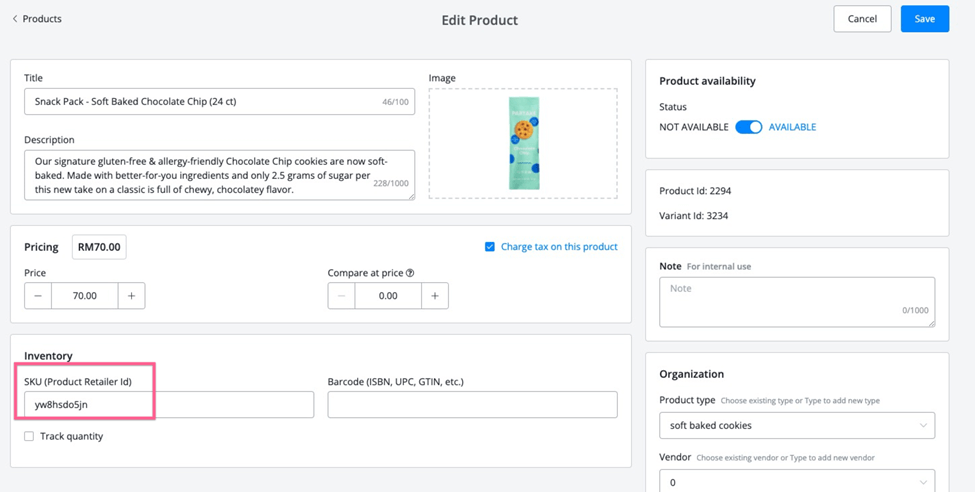
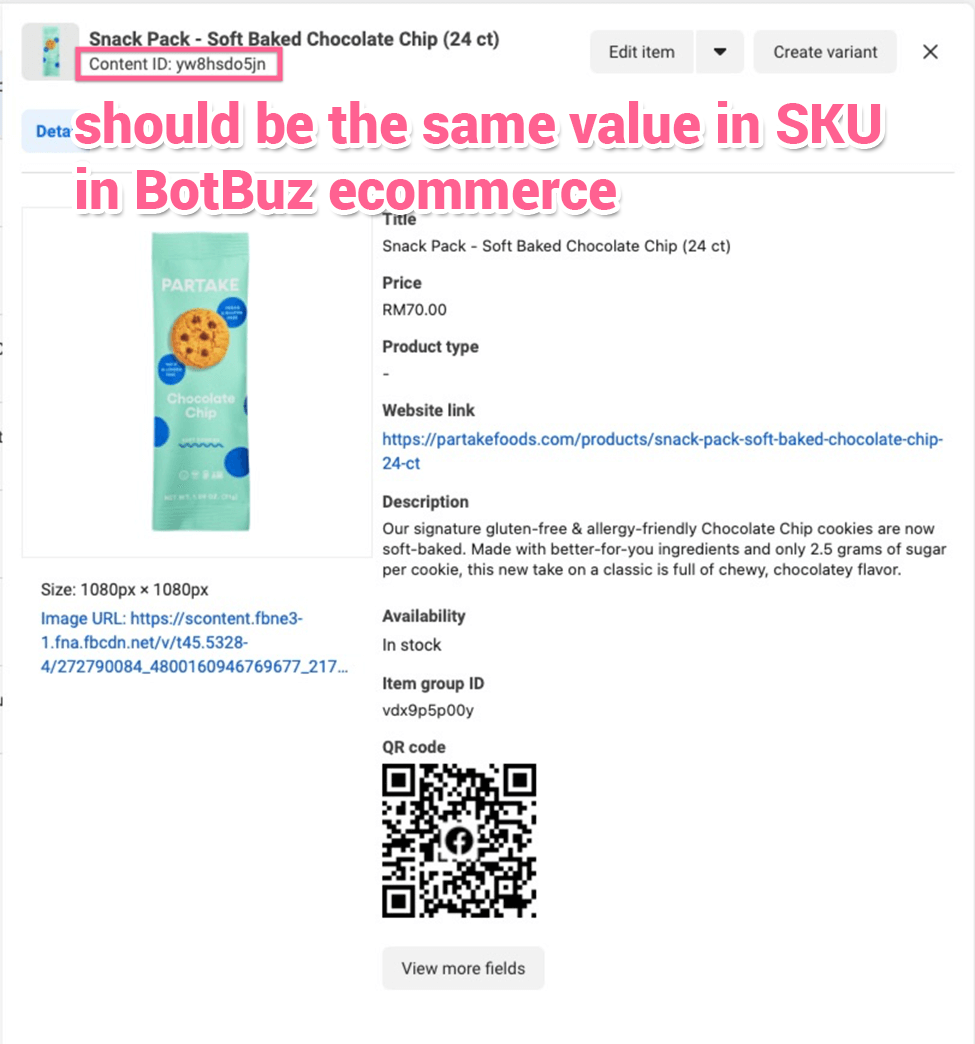
And the most important thing here is to make sure the “SKU” in Botbuz is the same as “ContentID” with your Facebook Catalog.
And here is the same value in Facebook Catalog.
* Connect Product catalog with WhatsApp number
You need to connect your WhatsApp number with a product catalog. Only after that, you can send the product catalog messages.
* Send product catalog message
Now you have to sync the product catalog into Botbuz built-in eCommerce, you can now use the send product in the send message node.
If you go to your WhatsApp Cloud API, when you click “View catalogue”, you will be able to see the catalog ID that is connected with your WABA account.
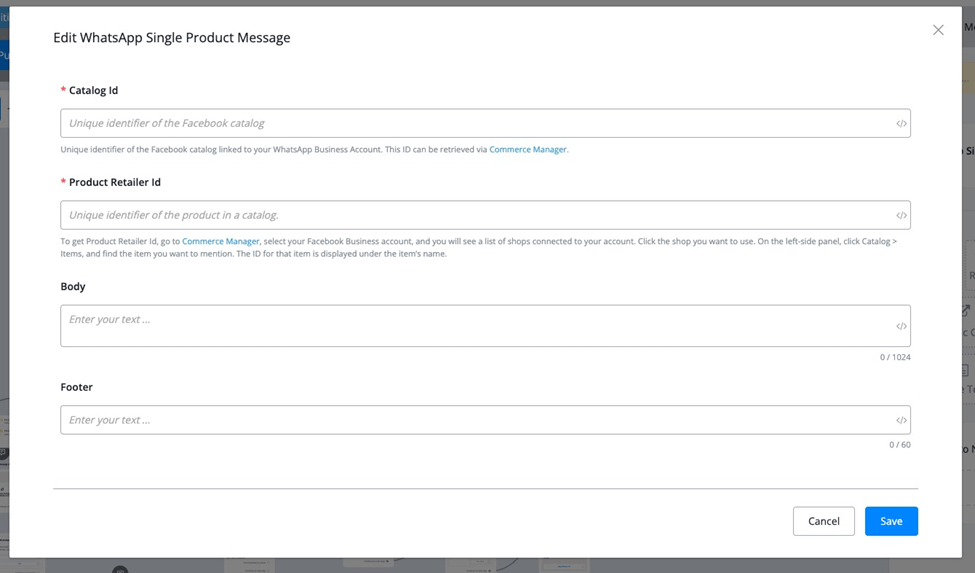
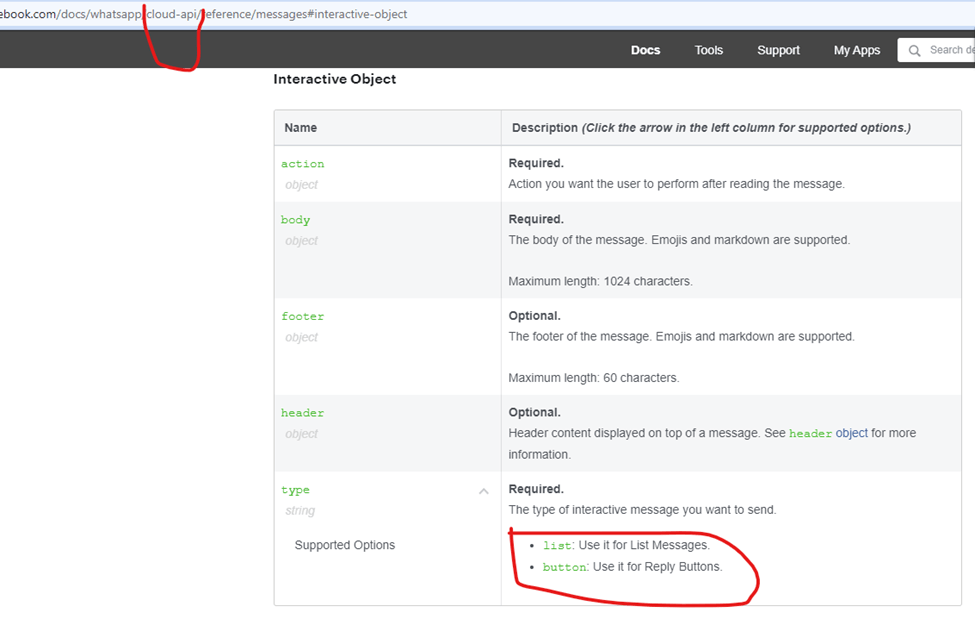
You can select to send single product message or multiple product message
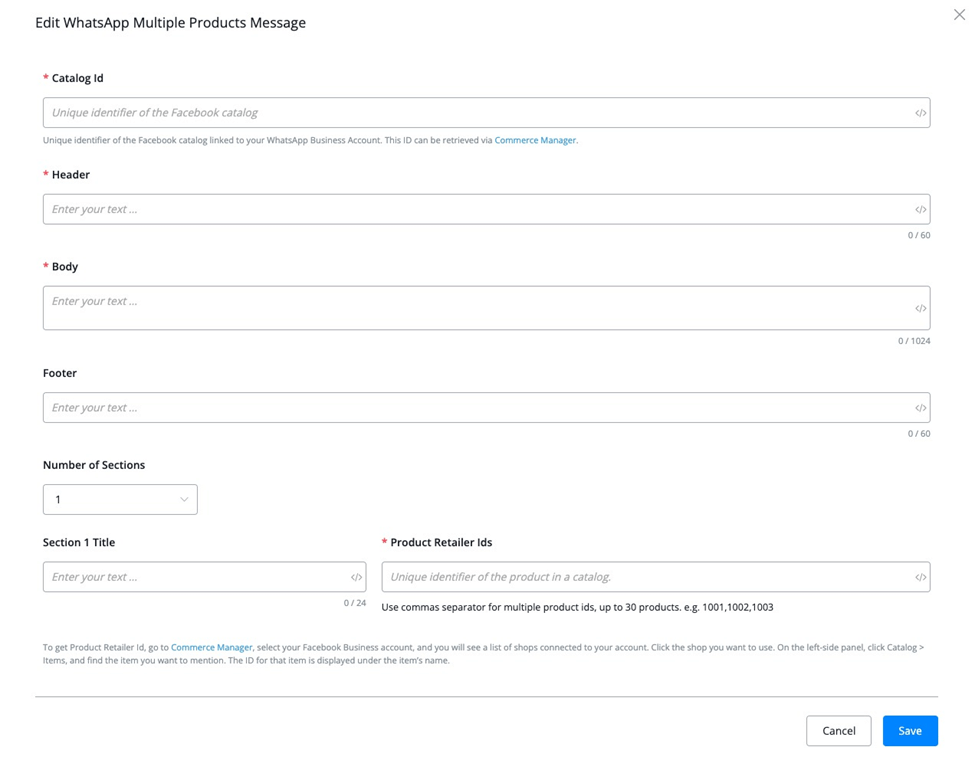
If you are sending multiple product messages, you can select how many sections you want to include, and then choose the retail ids(which are contentID in the Facebook Catalog).
If you have already synced Facebook Catalog with Botbuz ecommerce, you can use the “Get products” action to dynamically populate the retails IDs.
You can go to Actions, and then select “ecommerce”, and then “Get products”

You can use built-in filters to dynamically populate the retail IDs to use in sending product catalog messages.
You can find more details here:
* Set up product inquiry trigger
You will learn more about setting up a “WhatsApp product inquiry trigger”. This will trigger the message every time your customer sends you a message inquiry on the product detail page.
* Set up WhatsApp order created trigger
WhatsApp order received trigger will be triggered when the user sends the cart.
You can use the value inside of this trigger to generate the checkout link for the user.
* Collect the payment
In this section, you will learn how to generate the checkout links and collect the payment for the WhatsApp order.
Collect payment through RazorPay
Botbuz has very flexible checkout options, you can easily integrate with 3rd party payment gateway.
You can find these integrations from our mini app store.
Checkout with template messages
WhatsApp only supports buttons that link to external websites.
Botbuz supports you to send template messages, you need to submit the template message in 360dialog or Cloud API, and then sync the approved template message back to Botbuz.
Then you can send these template messages in our flow builder.
* Update order status
Mark order as paid - Stripe & Paypal
In the last step when the payment has been completed, you can:
- mark the order as paid.
- Send notification
- Sync the order information to Google Sheets.
P.S: If you are using Stripe & Paypal to make the payment, you will see 2 same value orders in Botbuz. This is because a custom product is created to make the payment.
Mark order as paid - RazorPay
If you are using RazorPay to make the payment, when the Razorpay has completed, you should be able to update the order status. If you are using another local payment gateway, you can do the same.
Add your own business phone number
First, You need to go to your apps in Facebook developer, and add your own phone number,
Click “Get started” and then click “Add phone number” in step 5 as per the screenshot below:
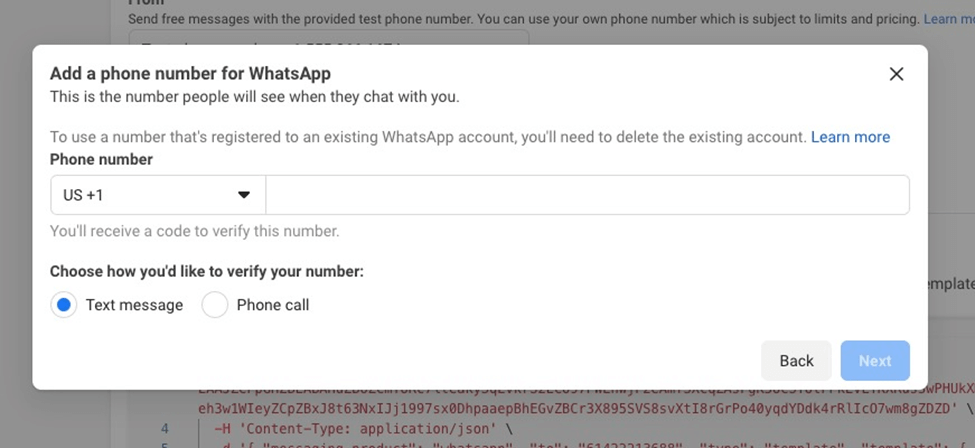
You need to provide the information to create your WhatsApp business profile
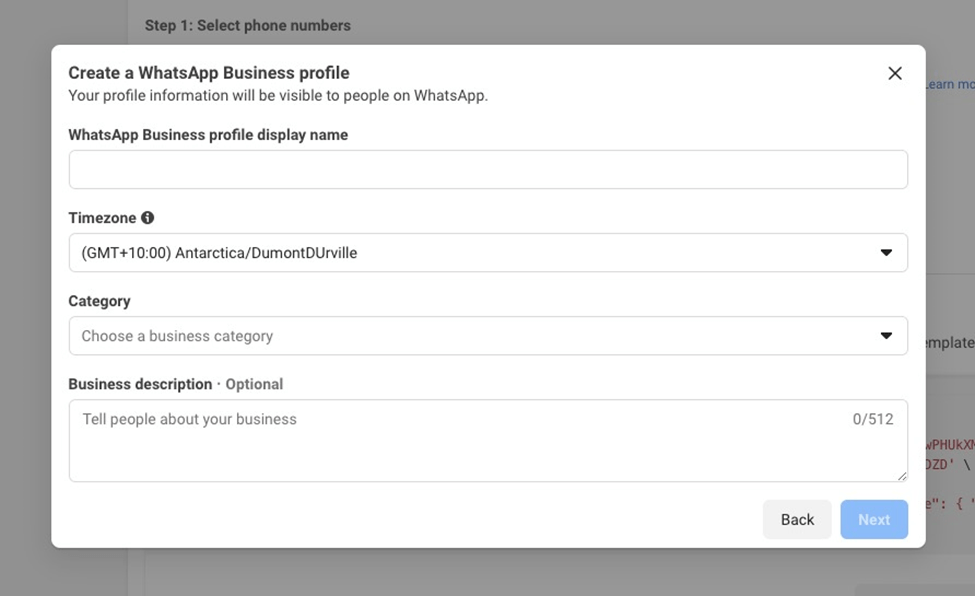
And then you can add a phone number for WhatsApp, you need to verify your phone number by receiving a text message or phone call.
After you verify your phone number, you will just need to wait for Facebook to approve this number, and then you can sync the number back to Cloud API channels.
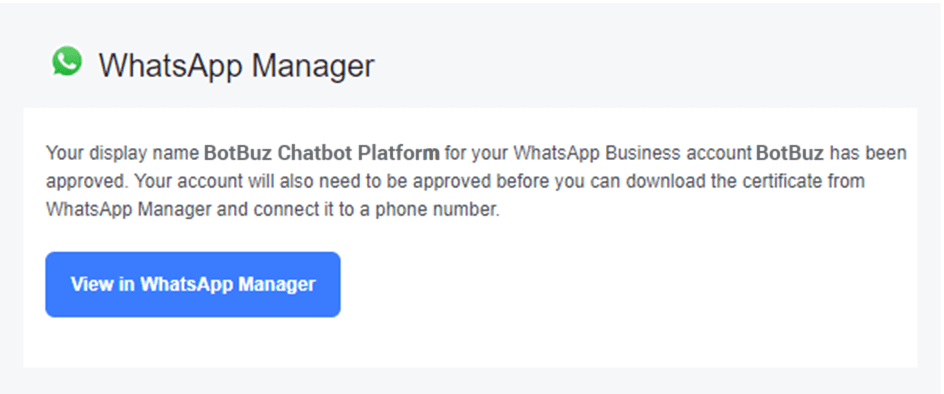
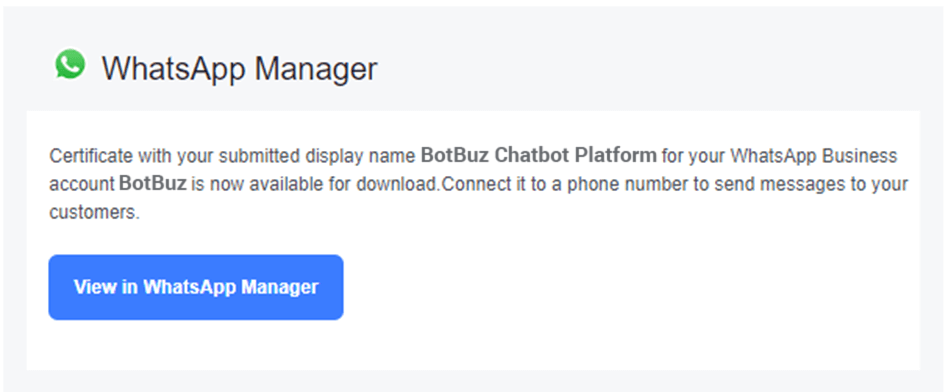
After you submit the information, you will receive certification & display name confirmation from Facebook.
As per the screenshot below:
And you will also receive emails from Facebook about the new number you just applied for.
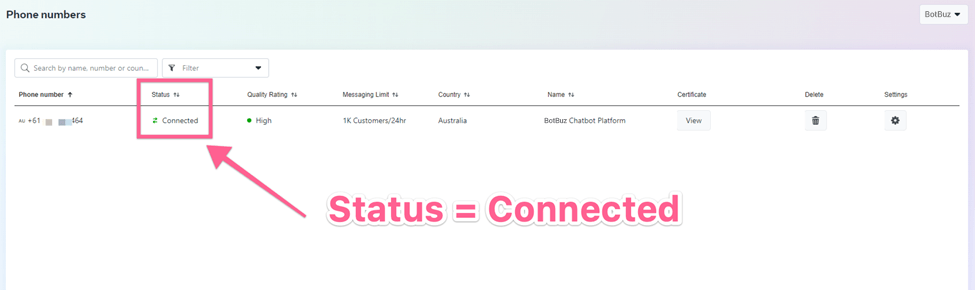
You need to closely monitor the status in your WhatsApp business manager, and make sure it’s connected, not pending.
You will be able to switch when the status is Connected, not pending.
Please note
- You can not use your existing WhatsApp number on the WhatsApp Cloud API.
You will either have to delete your existing WhatsApp account and then you can use the same number in the WhatsApp Cloud API or you need to get a totally separate number for the WhatsApp Cloud API account.
We recommend you get a new number for the WhatsApp Cloud API.
- You can still use the number for everyday purposes, such as calling and receiving messages after registering it on the WhatsApp Business Platform.
- Once you use a phone for WhatsApp Automation you can no longer use that number on the WhatsApp Business App or WhatsApp personal app.
Switch the flow from the Testing phone number to your business phone number
In this step, you will be able to switch the chatbot flow you build with the testing number to your own business number you just added.
Unlink the bo
In this step, you can first unlink the bot from your testing number.
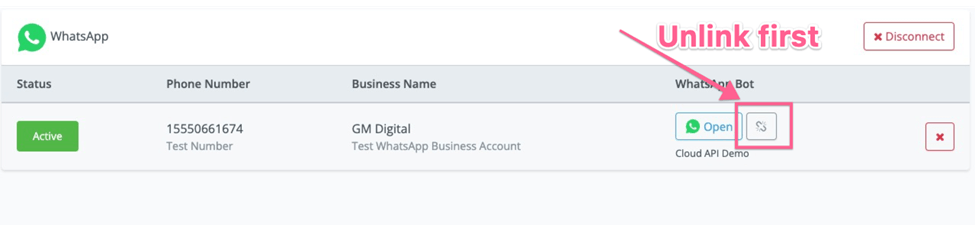
When you click the unlink icon, type “UNLINK” in the screenshot below:
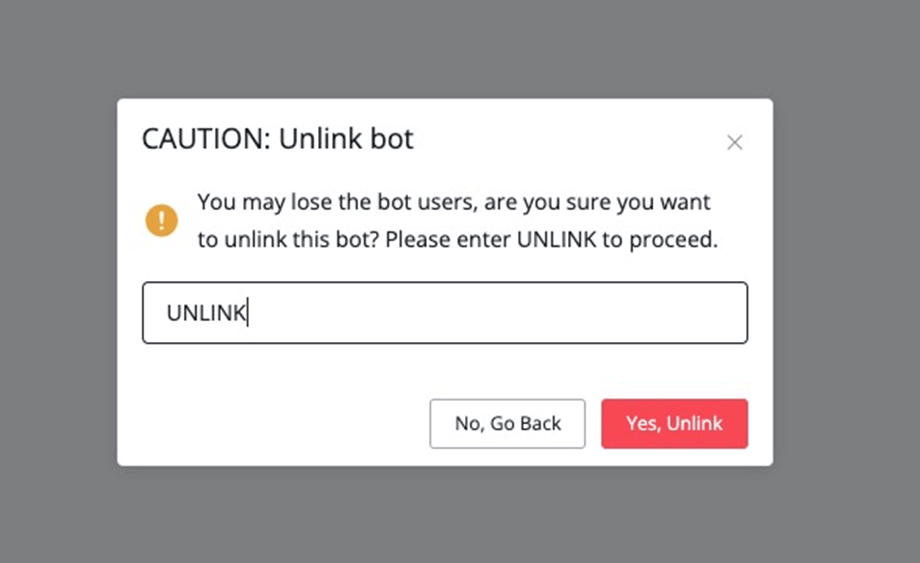
After you click the “YES, Unlink” button, you should be able to delete this testing number by clicking the “x” in the screenshot below:
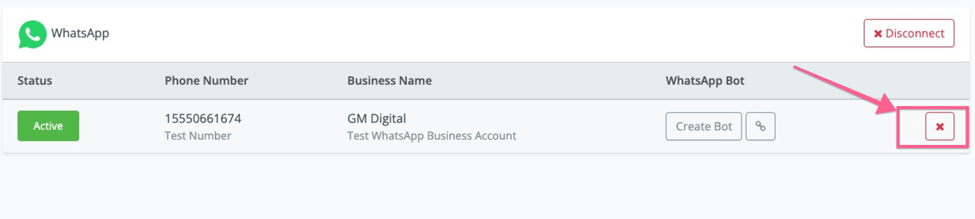
After you delete the testing phone number, don’t worry about the flow you already built, they are not deleted.
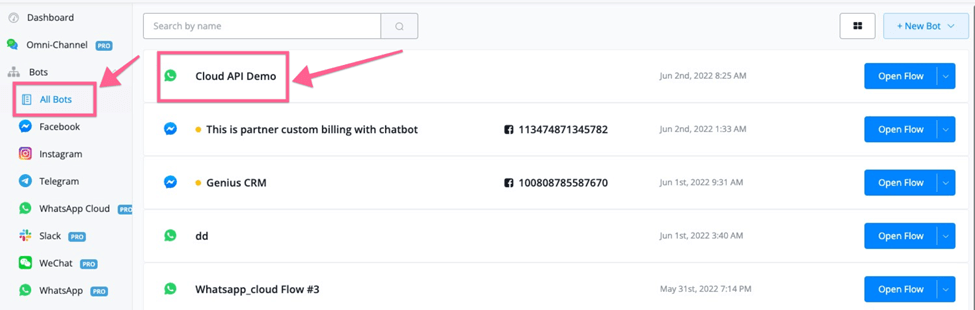
You can still find the flow if you go to “All bots”, We will link this flow back to the real business phone number you just added to your app.
Sync the real business number into the WhatsApp cloud
Now you can do the same process as previously to sync the test number into Botbuz, instead of choosing the test number, you will choose the real business phone number this time to add into Botbuz.

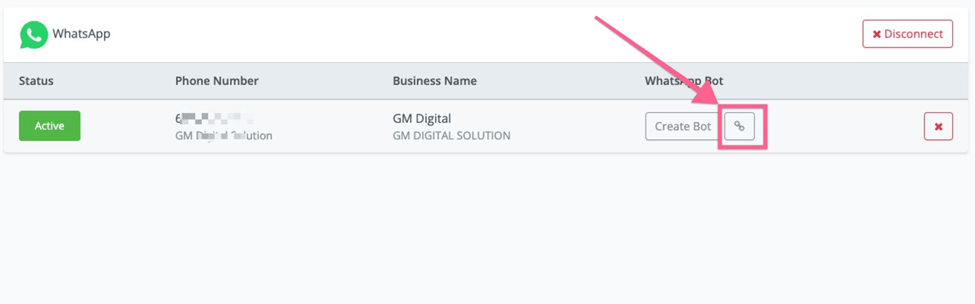
Link flow with real business number
After you select and confirm the phone number, you can click the “LINK” icon to link your previous flow back to this real business Whatsapp number.
And then select the flow you previously build with the test WhatsApp number as per the screenshot below:
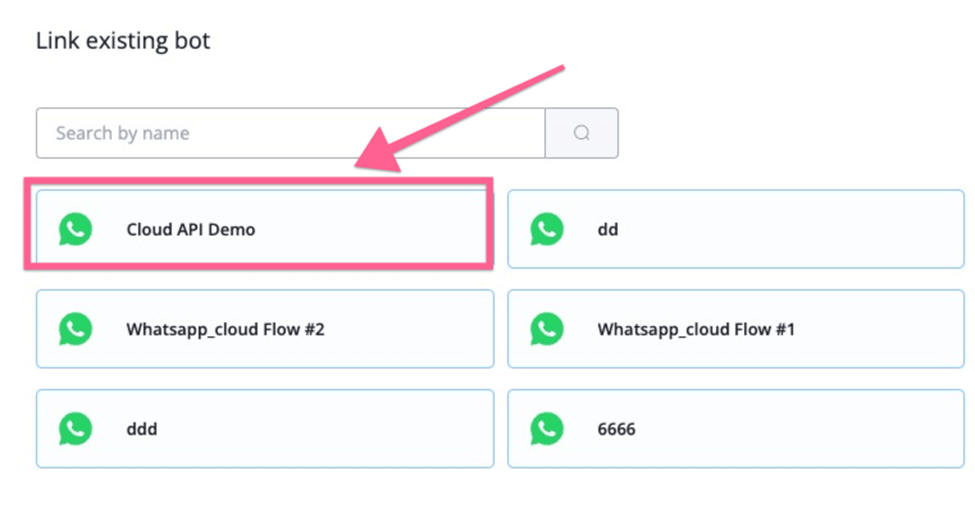
And then you can type “LINK” to link the flow with the new number.

Then you can have the existing flow connected to your real business number.

Now you have successfully switched your WhatsApp chatbot from a testing phone number to your real phone number.
Pricing
WhatsApp cloud API pricing
With the conversation-based pricing model, WhatsApp Business Platform conversations fall into 2 categories that are priced differently:
- User-initiated: A conversation that initiates in response to a user message. Whenever a business replies to a user within the 24-hour customer service window, that message will be associated with a user-initiated conversation. Businesses can send free-form messages within this 24-hour customer service window.
- Business-initiated: A conversation that initiates from a business sending a user a message outside the 24-hour customer service window. Messages that initiate a business-initiated conversation will require a message template.
All conversations are measured in fixed 24-hour sessions. A conversation starts when the first business message in a conversation is delivered, either initiated by the business or in reply to a user message and ends 24 hours later. Businesses and users can exchange any number of messages, including template messages, within a 24-hour conversation session without incurring additional charges. Each 24-hour conversation session results in a single charge.
The pricing varies based on the recipient's geographical location. If you are sending messages to users in India, your sending cost will be comparatively lower than sending messages to users in the US.
You can check the detailed pricing structure through the link below. https://developers.facebook.com/docs/whatsapp/pricing
Sessions
All conversations are measured in 24-hour increments or “sessions”, as we’ll refer to them here. A session starts whenever the first message is sent by a business, either in response to a user inquiry or if a business-initiated message template is delivered
Policy
The policy requires the use of a template message whenever sending a message to a user more than 24 hours after their last message. So, a new session begins.
If you send a free-form message outside the customer support window, you are not following the policy, so the delivery of this message will fail. However, it opens a business-initiated conversation that might be charged.
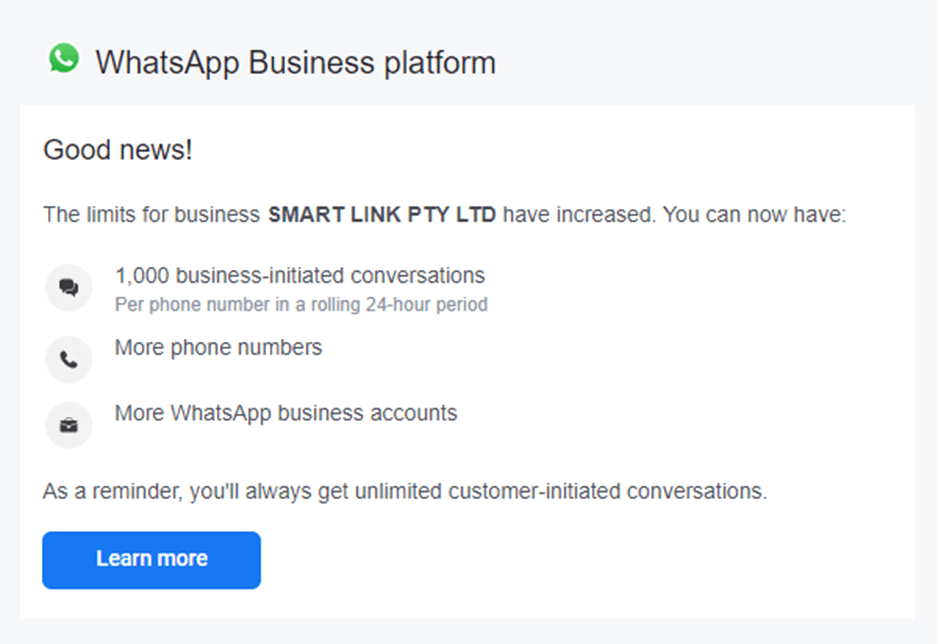
Free 1000 session messages
The first 1,000 conversations each month are free. If you want to send more than 1,000 conversations, you need to add a credit card to your account.
Also, Facebook offers a free testing phone number for every app, it’s super easy for you to build a demo WhatsApp bot with a test number, and also take advantage of the free 1000 session message to onboarding clients.
Please note that the free 1000 session message is offered at the WABA level. If you have multiple numbers under the same WABA, then all these numbers will share the limits of 1000 free session messages.
The limits will refresh on a monthly basis.
Free entry points conversations
Conversations are not charged when users message businesses using call-to-action buttons on Ads that Click on WhatsApp or a Facebook Page call-to-action buttons. Free entry point conversations can only be user-initiated. The first conversation that starts from the entry point is free of charge, and then subsequent conversations with the user are charged.
Standard pricing applies to Ads that Click on WhatsApp. The conversation that initiates from the ad is free, but not the ad itself.
Business verification limits
Unverified business limits
It’s not mandatory to complete Facebook business verification to start building your first WhatsApp chatbot.
But if your business isn’t verified, you can:
- Send template messages to up to 50 unique users in a 24-hour rolling period.
- Response to unlimited customer-initiated conversations
You will need to complete business verification if you want to initiate more than 50 business-initiate conversations in a rolling 24-hour window
Verified business limits
Once the business is verified, you can start sending messages to up to 1000 unique users in a 24-hour rolling period. The limits are automatically increased to even higher numbers as you send more quality messages. The highest allowed limit currently is 100,000 conversations to unique users in a 24-hour rolling period. You can get more details here: https://developers.facebook.com/docs/whatsapp/messaging-limits#messaging
How to get your business verified?
Business verification allows you to get increased sending limits. Without verification, you can send messages to up to 50 unique numbers per day. After verification, the limit increases to sending messages to 1000 unique numbers per day.
In order to have access to higher account tiers in the WhatsApp Business API account, you must complete Business Verification within the Business Manager. This means you will have to provide Facebook with some documents to prove the existence and legitimacy of your business.
Even though the Business Verification is required by Meta for a company to have access to higher account tiers of the WhatsApp Business API, this process is completely unrelated to WhatsApp.
For support about issues with the Business Manager (opens new window), please reach out to direct Meta support through the “?” (help) icon on the bottom left corner of the page.
Business Manager Verification Process
Access Business manager security center
To start the verification process go to the Security Center (opens new window)and click Start Verification in the Business verification section.
Select your business
If your business is already listed
Confirm your business details
Select a phone number that you have access to from the drop-down menu and click Next.
Double-check for any typos or other errors: you will not be able to edit this information upon submission.
Get a verification code
Choose to receive the verification code on your business phone number via a text message, a phone call or email. The phone number option may not be available in all countries.
Please make sure that the email registered has the same domain as the website.
Accepted example Email: [email protected] Site: www.business.com// Not accepted example Email: [email protected] or [email protected] Site: www.business.com//
Or verify your domain
If your domain is already verified, click Use Domain Verification. If not, complete the domain verification process, then return to the Security Center and select Continue.
Enter verification code (not applicable if you use domain verification)
Enter your verification code. Click Submit.
Enter your verification code. Click Submit.
If your business is not listed
If you cannot see your business in the list please select None of these matches. Then proceed with Steps 3 & 4 below.
Verify the legal business name
You may be asked in step 3 to provide official documentation of your business’s legal name. Upload an official document that matches the business’s legal name you entered in step 1, such as a business license, articles of incorporation or business tax registration.
Verify the Business Address or Phone Number
Upload a document that shows both the legal name of your business and the mailing address or phone number shown on the screen.
After you upload the documents, Meta will review them as quickly as they can. This may take several days. You can check the current status of your verification by going to your Security Center.
When your business is verified you will be notified and you will also see the verified status in your account.

Documents needed for Business Verification
Because of the differences between legal documents between countries/districts, Facebook has provided a list of the specific documents that need to be sent according to each country/district. Please see them below.
Documents that are not accepted are:
- Invoices
- Purchase Orders
- Self-filled applications for the company
- Tax returns filed by you or your company
- Website print
Brazil
- Business bank statement
- Cadastro Nacional da Pessoa Jurídica (CNPJ)
- Certificado da Condição de Microempreendedor Individual (MEI)
- Contrato Social
- Utility bill
China
- 公司註冊證書
- 商業登記摘錄
- 商業登記證
- 营业执照
- 銀行帳單
Cyprus
- Αντίγραφο κίνησης λογαριασμού / Hesap özeti
- Εγγραφή στο μητρώο Φ.Π.Α.
- Καταστατικό / Şirket ana sözleşmesi
- Μητρώο Επιχειρηματικών Οντοτήτων
- Συστατική Πράξη Εταιρείας / Şirket Kuruluş Onay Belgesi
France
- Avis de situation au repertoire Sirene
- Extrai d'immatriculation D1
- Extrait K, L, Kbis ou Lbis
- Facture d'électricité, de gaz ou d'eau
- Lettre de confirmation de numéro SIREN délivrée par l'Urssaf
- Statuts de l'enterprise
- VAT registration
India
- Business bank statement
- Business license
- Certificate of incorporation
- Goods and services tax registration certificate(GST)
- Permanent Account Number Card (PAN)
- Shop establishment certificate
- Udyog Aadar (UID)
- Utility bill
Indonesia
- Business bank statement
- Izin Usaha Mikro Kecil (IUMK)
- Nomar Induk Berusaha (NIB))
- Surat Izin Usaha Perdagangan (SIUP)
- Surat Pengukuhan Pengusaha Kena Pajak (SPPKP
- Tanda Daftar Perusahaan (TDP
- Utility bill
Ireland:
- An Oifig um Chlárú Cuideachtaí
- Business bank statement
- Business tax certificate
- Certificate of business incorporation
- Certificate of registration
- Utility bill
Italy:
- Atto Costitutivo
- Certificato di Registrazione Aziendale
- Registro Imprese dell'archivio ufficiale della CCIAA
- Statuto
- Business bank statement
- Certificate of formation
- Utility bill
- Value Added Tax Certificate (VAT)
Japan:
- 個人事業の開業, 廃業等の届出書
- 営業許可
- 定款
- 履歴事項全部証明書
- 法人番号指定通知書
- 納税証明書
- Business bank statement
- Utility bill
South Korea:
- 사업자등록증
- 요금납부 내역서
- 지방세 납세 증명서
- 지방세 납세 증명
Taiwan:
- 台中市政府函
- 有限公司设立登记表
UAE
- Certificate of formation
- رخصة تجارية
- رخصة تجارية
- شهادة تسجيل لضريبة القيمة المضافة
- فاتورة اتصالات
- فاتورة الكهرباء
- كشف حساب بنك
Ukraine
- Виписка з єдиного державного реєстру юридичних осіб , фізичних осіб-підприємців та громадьских формувань
- Виписка з єдиного державного реєстру юридичних осіб та фізичних осіб-підприємців
- Витяг з реєстру платників єдиного податку
- Свідоцтво платника єдиного податку
United Kingdom
- Business bank statement
- Certificate of Incorporation
- Certificate of public liability insurance
- Companies House document
- Company registration number (CRN)
- HM Revenue and Customs: VAT certificate
- HM Revenue and Customs: Account statement
- Utility bill
United States:
- Articles of incorporation
- Business bank statement
- Business license
- Employer identification number (EIN)
- IRS SS-4 (EIN Assignment Letter)
- IRS 147c (EIN Confirmation Letter)
- Taxpayer identification number
Other countries:
- Utility bills like a phone or electricity bill
- Bank statement
- Business licenses and permits from any level of government
- Certificate of formation or incorporation
- Business Tax or VAT registration certificate
- EIN confirmation letter from the IRS (U.S. only)
- Federal tax returns to the IRS by the company (U.S. only)
- Business bank account statements
- Business credit report from one of the reporting agencies
Checklist for Business Verification
To increase the company's chances of being verified by Meta, it is important that:
- The company's website is active and complete, containing the company's name and address
- The account email is from the same domain as the company's website provided in the documentation
- If the verification will be made through the phone number, make sure you are able to receive the call. If the phone has IVR, disable it temporarily
- The company's trade name in the documentation is the same used on the website and the Facebook page. If different, the names need to be related in some way on the website. For example, at the footer, enter “Company ABC powered by company D”
If the Start Verification button is not available
Your Business Manager may not be eligible for verification. In this case, you won’t be able to click the Start Verification button:
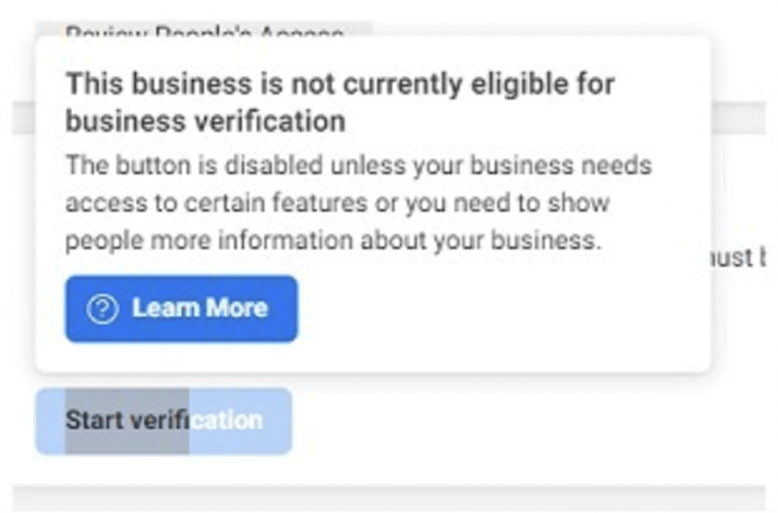
To enable the button, please:
- Fill out all of the information on the Business Info page, inside the Facebook Business Manager settings
- Create an app in your Facebook developer account.
My Business Verification request was rejected: What to do now?
If your request for business verification was rejected by the Facebook team, you should receive an email notification noting that the documents you attached didn't pass the verification process.
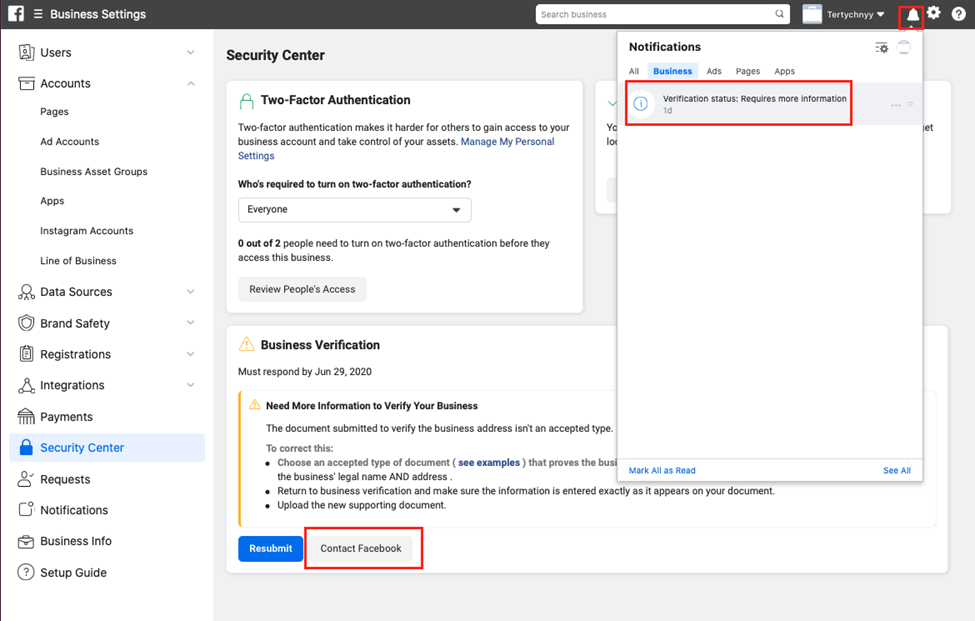
On the new page, you will see your ticket/case number.
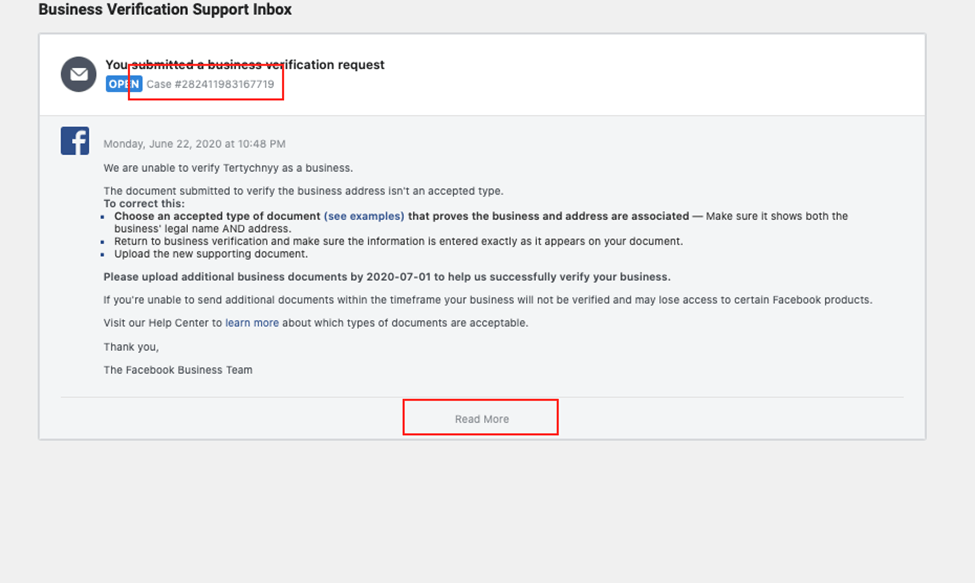
If you click on the ‘Read More’ button, you can start interacting directly with Facebook Support to find out what is missing or which documents are not correct.
Is Business Verification the same thing as the green check?
No.
Business verification is different from the verified badge, also known as a green check or Official Business Account (OBA).
Official Facebook Documentation
You can find more details from official Facebook documentation:
Display name guidelines
When you add a new phone number to your WhatsApp business account you must assign it a display name.
All display names should have a relationship with your business and should not violate WhatsApp Commerce (opens new window)and Business policies (opens new window). Having display names compliant with the WhatsApp guidelines is required to send messages using the WhatsApp Business API or to qualify for WhatsApp official business accounts.
Prior to completing registration, you may change the display name as many times as you wish. After registration, you must wait 30 days between any display name change requests.
Below are the principles for display names:
Compliance with policies
A display name should not violate WhatsApp Commerce and Business policies. An example of a store that sells wine glasses:
- Accepted: ABC Wine Glasses
- Not accepted: ABC Wine
Within your company, you may have separate WhatsApp business accounts for different divisions; only those divisions that are compliant with WhatsApp’s Commerce Policy may have a WhatsApp business account.
Accurate representation of your business
A display name should represent:
- A business or its service, product, or department
- A test account or a demo account and must maintain an association with the business (e.g., Fresh Produce Test)
A display name should not be:
- An individual's full name
- A generic term (e.g., Fashion)
- A generic geographic location (e.g., New York)
- A slogan or a long description
An organization with a government affiliation needs the WhatsApp team's approval. A display name must contain a minimum of 3 characters.
Consistency with external brandings
A display name must have consistent branding with external sources (e.g., a company's website or marketing). An example of a product line named “Fresh Produce Cold Pressed Juices”:
- Accepted: Fresh Produce Cold Pressed Juices (how it is branded on your website)
- Not accepted: Fresh Produce Juices (you changed branding by removing “Cold Pressed”)
- Not accepted: FP Cold Pressed Juices (you added an abbreviation to the company name inconsistent with external branding)
A display name must have grammatically correct capitalization, and should match the capitalization used in your external branding. Do not change the spacing and do not add any extra punctuation, emojis, or character symbols
Clear relationship with your business
A display name must have a clear relationship with your business (must be referred to on the business's website or external media references). For example:
- Accepted: Name of a charity mentioned on a non-profit organization's website
- Not accepted: Name of a charity not mentioned on any external websites
If the relationship between your company and the brand is not obvious, indicate the relationship using “by [company name].”
- Not accepted: Fruit Snacks (Fresh Produce owns the Fruit Snacks brand but their association is not mentioned on any external websites)
- Accepted: Fruit Snacks by Fresh Produce
If the display name represents a business that the company is working with (i.e., if the business is an agency, distributor, partner, or parent company), then the relationship between the business represented in the display name and end-client business must be evident and clear in both parties’ business websites. For example, if Global Voyager signs up for WhatsApp and wants to use the display name Commercial Air, they must submit links to both websites stating that Commercial Air is a subsidiary of Global Voyager.
Legal entity in footer
If the official name (legal entity) of the company in the documents that were used for Business Verification and naming on the website is different, we recommend adding a mention of a legal entity to the website, for example in the footer: “Business ABC powered by business CDE”
Working website
A display name cannot be approved without a working website. The website must be verified by your Facebook Business Manager. If your company's website has been changed, the new website must be submitted for verification.
FAQ
1. How can I reply to clients on my mobile phone? Once you connect the phone number with WhatsApp cloud API, you won’t be able to use this number in the WhatsApp business or WhatsApp personal app.
2. Can I use my current mobile WhatsApp number in the WhatsApp cloud API? You can not use your existing WhatsApp number on the WhatsApp Cloud API. You will either have to delete your existing WhatsApp account and then you can use the same number in the WhatsApp Cloud API or you need to get a totally separate number for the WhatsApp Cloud API account.
We recommend you get a new number for the WhatsApp Cloud API.
3. How can I delete a phone number from a business account? You can refer to the link below to delete the phone number from your business account. https://developers.facebook.com/docs/whatsapp/phone-numbers#delete-phone-number-from-a-business-account
4. I am using 360Dialog currently, do I need to switch to Cloud API? Here is the difference between 360Dialog & WhatsApp cloud API, here is a table for your reference:
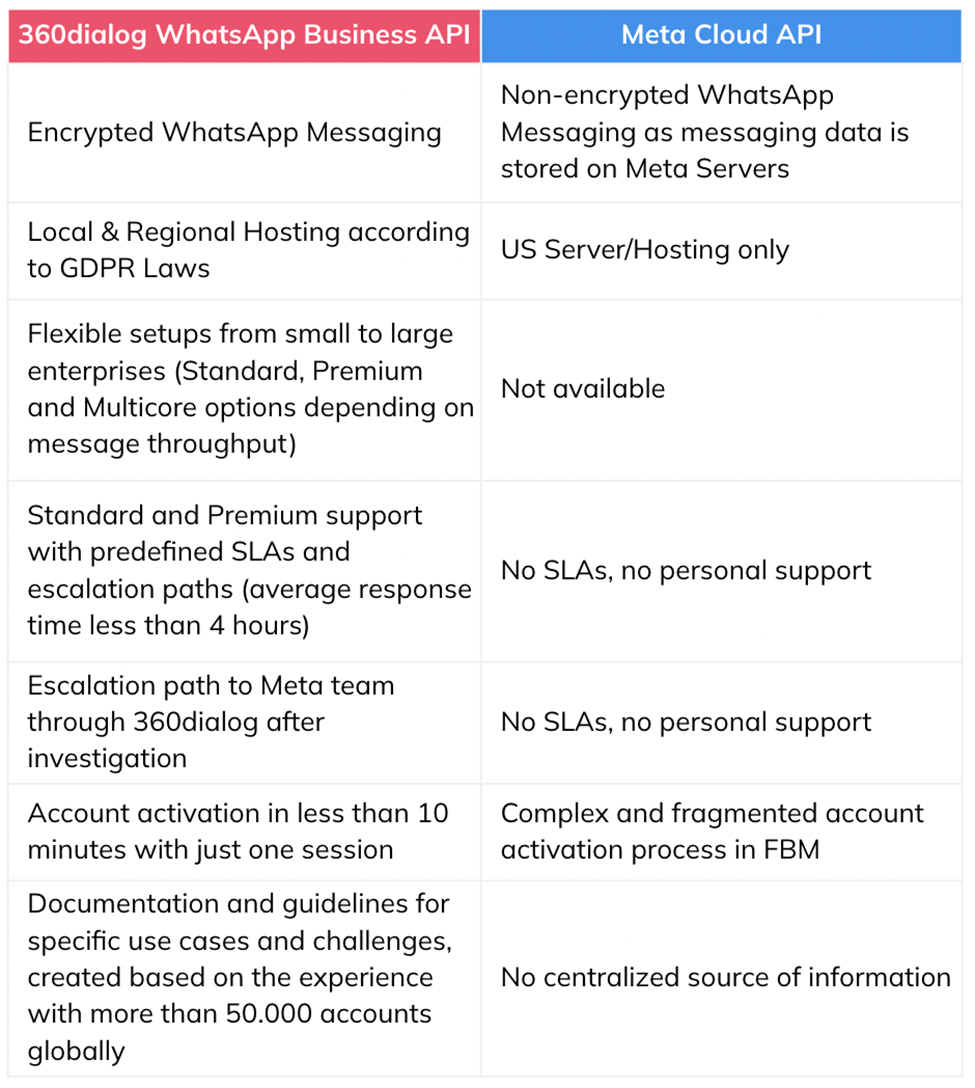
In summary, with 360dialog, the client has access to different WhatsApp offers (Cloud API, Business API, on-premise), hosting and performance upgrades (Premium Package, local hosting, multicores), and different support levels and SLAs - none of which is offered by Meta directly.
If you are using WhatsApp cloud API, it’s a little cheaper. You can get started easily with the test phone number & free 1000 session messages.
You can make your own decision based on the information above.
5. I can’t connect my business account under WhatsApp cloud API? Currently, you can only connect a business account to one of the BotBuz workspaces. If you need to switch to a different workspace, you need to disconnect and reconnect again to the new workspace.
Dashboard
Integrations
- Botbuz has integrated with various third-party applications that you are familiar with, including:
- Wonder how to utilize these applications in your flow? Check detailed guides for each integration.
Ecommerce
Built-in Ecommerce System
With the built-in Ecommerce system, you can easily manage your products and discounts with Botbuz. And your bot can then display and sell products for you automatically.
To access the Ecommerce system, click “Ecommerce” from the left sidebar on your dashboard.
Single Buy Button
You can also sell products that are pre-set in your Stripe or PayPal account with a single “Buy” button (only buy one item at a time, no add to cart).
Email Templates
Create Template
Follow steps 1 to 4 in the above screenshot.

In the above screenshot:
- you can get started with a sample template
- use the tools on the right sidebar to edit your email
- preview your email on computer or phone
- define up to 10 variables for later filling
Remember to save your template after you finish.
Use Template
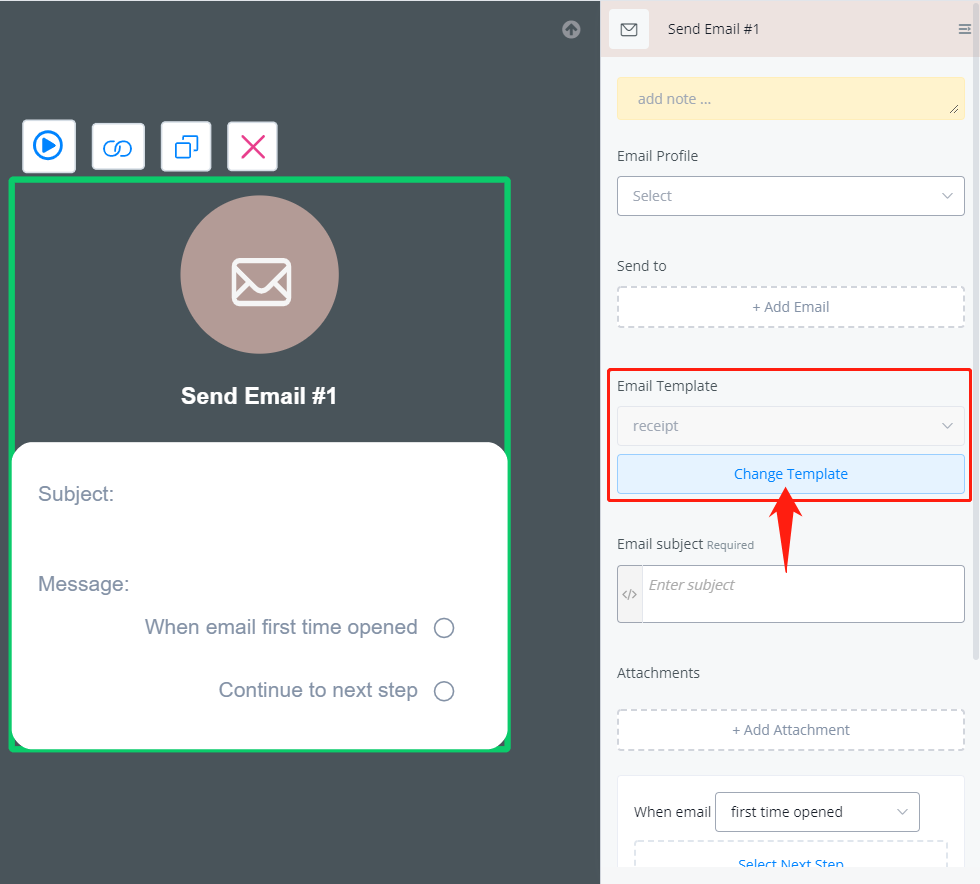
In your flow, right click to create a Send Email Step, edit it, click on “Change Template”.
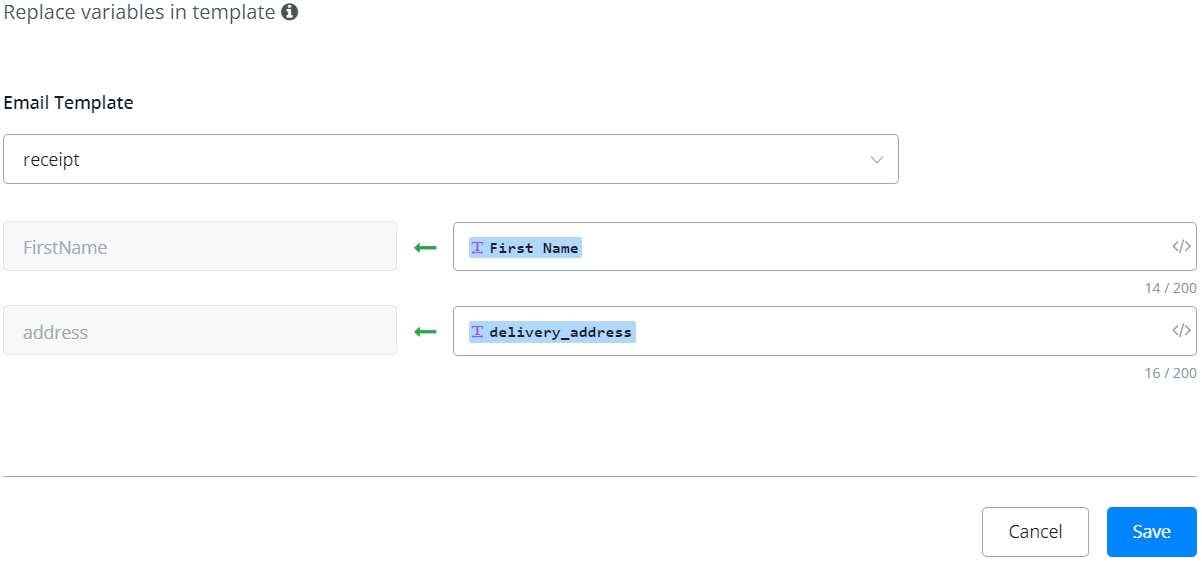
Choose a template and map values for your pre-defined variables in the template.